
Related Manuals for Infopia LipidPro


Summary of Contents for Infopia LipidPro
- Page 1 Bd. General Washis 53 1030 Brussels, BELGIUM Tel: +(32) 2. 732.59.54 Fax: +(32) 2.732.60.03 E-Mail : mail@obelis.net Lancet: SAE HAN Med Corp. Lancing Device: GMMC INFL01A User Manual IMM20-360 Rev.2011-09-02...
- Page 2 Thank you for your choosing the LipidPro lipid profile and glucose measuring system. This instruction for use includes important informa- tion you need to know about the LipidPro lipid profile and glucose measuring system. Please read it carefully. Our goal for LipidPro...
-
Page 3: Test Principle
How to use Instructions For Use LipidPro lipid profile and glucose measuring system has two kinds of test This guide includes all the information you need to use LipidPro for self-testing principle according to test items: one for blood glucose and the other for lipid use. -
Page 4: Table Of Contents
Checking the System with Control Solution -------------------------22-26 4. Testing Your Blood 0434 Instructions for lancing device ------------------------------------------27-29 Testing Your Blood---------------------------------------------------------30-32 Quick reference of test procedure--------------------------------------33-34 1. LipidPro Meter 5. Two AAA batteries Test Procedure -------------------------------------------------------------35-42 2. User manual 6. Lancing Device Glucose test strip Discard Function----------------------------------------43 7. -
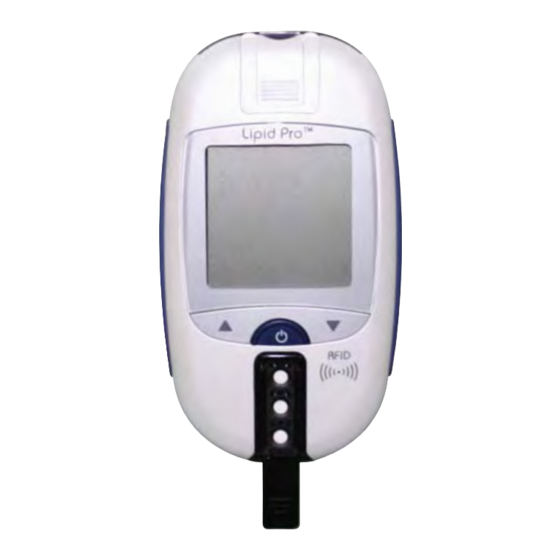
Page 5: Lipidpro Tm Testing Meter
Hour & Date of test Average Test Results(only for glucose) Control Solution Symbol Caution 1. Do not use LipidPro meter in a dry environment, especially if synthetic materials are Day & Month present. Synthetic clothes, carpets, etc., may cause damaging static discharges in a dry environment. -
Page 6: Lipidpro Tm Test Strip Information
4. Make a note of the discard date which is three months from the date you first open a new vial of strips. Do not use LipidPro™ test strip and vial after the discard date. 2. Total Cholesterol test strip 5. - Page 7 Accuracy: LipidPro Test Strip Information The accuracy results obtained with the LipidPro lipid profile and glucose 1-4. LDL-Cholesterol LIMITATIONS OF SYSTEM (for lipid profile test): measuring system were compared to glucose results obtained with the Hitachi Sample Type Regression line...
- Page 8 The performance of the glucose test strips has been evaluated in laboratory and in clinical tests (Please refer to strip instructions for use for more details). Measurement Range: The measurement range of the LipidPro Glucose Testing is 10 to 600 mg/dL (0.6-33.3mmol/L).
-
Page 9: Setting Your Meter
Test Strip as soon as a result is displayed. How to install /replace the batteries: 1. Open the battery cover on the back of the LipidPro 2. Remove old batteries from the compartment and safely discard. - Page 10 Setting Your Meter Before Testing - Coding Your Meter LipidPro has two coding systems: Lipid Profile test - Each vial of test strip has RFID-tag which enables the meter to recognize its code number automatically. By pressing Up(▲) or Down(▼) button, select testing...
-
Page 11: Before Testing Coding The Meter
• Coding for Glucose test Firmly insert the glucose test strip into the Once it recognizes the code number, the meter test port of LipidPro meter, and then the displays the code value for 2 seconds and return power will automatically turn on with the to the stand-by status. -
Page 12: Checking The System With Control Solution
RFID symbol ( ) on the meter. Note: Caution The LipidPro Control Solutions are sold separately. The radiation of RFID ( ) recognition is within 2cm. The TC(Level 1, Level 2), TG(Level 1, Level 2) and HDL (Level 1, Level 2) control The meter will revert back to stand-by status if there is no operation within 5 seconds. - Page 13 Checking the system with control solution Checking the system with control solution • Glucose test 3. Check the code number on the display of the meter with that on the strip vial. Testing procedure 1504 1. Shake the control solution before use. 4.
-
Page 14: Instructions For Lancing Device
• If this test falls out of range, try another control solution test with a new unopened vial of strips. • After following the appropriate steps and the control solution test still falls out of range, do not perform a test. Please contact the infopia customer service at +82-31-460-0300 or sales@infopia21.com. Depth Indicator/Adjustable Tip... - Page 15 HOW TO USE 6. Hold the tip firmly in one hand then pull out the Wash your hands carefully with warm water to increase the circulation of the sliding barrel with the other hand. This will cock the blood into the fingers. lancing device.
-
Page 16: Testing Your Blood
~68℉) for three days. Please follow the procedure below. To perform a blood test you need: 1. Allow blood sample to reach room temperature. • LipidPro meter 2. Anti-coagulated blood should be mixed well prior to testing. • Test strips 3. -
Page 17: Quick Reference Of Test Procedure
• If the test result is out of the test range, the Hi/Lo message will be shown on the LCD. • Safely discard used test strips, lancets and capillary rods. completely poorly • It is required to insert the blood sample on the LipidPro test strip within 3 minutes filled filled while the blood inserting icon is blinking. - Page 18 Quick reference of test procedure -Glucose test Test Procedure 1. Lipid test - Test for multi items 1) Insert the glucose test strip. Code number is automatically displayed. Compare with code number printed on test strip vial. If Press mode ( ) button after a test strip is not identical, discard the test strip and inserted and confirm if the meter recognizes the...
- Page 19 Test Procedure Test Procedure 2. Test for each single item 1) Total Cholesterol test Please apply the sample to the HDL-cholestrol test area of test strip until you hear beep sound. Then, the symbol, disappears. Press mode ( ) button after a test strip is inserted and confirm if the meter recognizes the right test strip by checking out the corresponding symbol on its display.
- Page 20 Test Procedure Test Procedure The meter displays , blinking in order, The symbol of blood is blinking. which means it is currently undergoing tests. When the test is completed (in about 2 minutes), the meter displays the test result of with the symbol.
- Page 21 Test Procedure Test Procedure 3) Triglyceride test Press mode ( ) button after a test strip is The meter displays , blinking in inserted and confirm if the meter recognizes the order, which means it is under test. right test strip by checking out the corresponding symbol on its display.
-
Page 22: Test Procedure
Test Procedure Glucose test strip Discard Function 3. Glucose test When the test strip is inserted, the meter displays the code number for 3 seconds. 1. After checking your test result, turn the meter upside down and slide the ejector button twice forward to remove the test strip from the meter. The symbol of blood is blinking. -
Page 23: Alternate Site Testing At Glucose Measuring
Alternate site testing at glucose measuring Performing a Blood Test using an Alternate site Note : This alternate site testing is applied to glucose testing only. Important : We recommend that you test on your fingertip if you are testing for hypogly- cemia (low blood glucose) or if you have a history of reoccurring hypoglyce- mia. -
Page 24: Reviewing Your Results
Reviewing Your Results Reviewing Your Results Every test result is stored with its date and time of test. Lipid Profile test results The meter stores 200 memories regardless of test items. Press Mode ( ) button. When the test results is over the capacity memory, the recent test result will replace with the oldest test result. -
Page 25: Deleting Your Results
‘Con’ on the LCD display Printing test results Press ▼ button in 3 or more seconds can be print If LipidPro™ connected interface cable to your PC(software is memory results. (If the print is set “ON”) running). ‘PC’ on the display Caution If LipidPro™... -
Page 26: Cleaning Your Meter And Maintenance
A cloth dampened with water and mild detergent can be used to wipe down the Oxidization voltage is out of range, etc. outside of the meter.Your LipidPro meter is a precision instrument. Please handle it with care. This message appears Please insert a new test strip 1) Do not disassemble or modify the meter. -
Page 27: Troubleshooting
Troubleshooting Troubleshooting Message Probable cause Action required Message Probable cause Action required The test result is lower This message appears Please wait for the meter displays the Please retest with a new test strip. than the following. when blood sample is icon blinking before applying your blood If the problem persists, please contact Glucose : less than... -
Page 28: Product Specifications
If you experience symptoms that are not consistent with your lipid and glucose results, first be sure you have followed all instructions in this Instructions Testing Types Glucose For Use, then, contact infopia Customer Service. Never ignore symptoms or make significant changes to the control program. Test range 10~600 mg/dL Product Specification 0.3 ㎕... -
Page 29: Warranty
This warranty is subject to the following exceptions and limitations: Operation humidity 10 ~ 90% 1. infopia Co., Ltd. shall not be required to replace any unit which are damaged or malfunction due to abuse, accidents, alteration, neglect, misuse, mainte- Display type nance by someone other than infopia Co., Ltd., or failure to operate in... -
Page 30: Symbol Reference
Symbol Reference Symbol Description Serial number Consult operating instructions Used By This product fulfills the requirements of Directive 98/79/EC on in vitro diagnostic medical devices Caution, consult accompanying documents For In Vitro Diagnostic Use Batch code Catalogue Number Temperature limitation Do not re-use Date of Manufacture Keep away from sunlight...
Need help?
Do you have a question about the LipidPro and is the answer not in the manual?
Questions and answers