Table of Contents
Advertisement
Quick Links
Advertisement
Table of Contents

Related Manuals for Jumbuck HS-UM006D


Summary of Contents for Jumbuck HS-UM006D
-
Page 2: For Your Safety
ASSEMBLY & OPERATION ASSEMBLY & OPERATION ASSEMBLY & OPERATION INSTRUCTIONS (HS INSTRUCTIONS (HS-UM006D UM006D) G AS Grill OUTDOOR USE ONLY FOR YOUR SAFETY FOR YOUR SAFETY FOR YOUR SAFETY If you smell gas: 1. Do not store or use gasoline or other Do not store or use gasoline or other 1. -
Page 3: Universal Lpg
Important! Please read these instructions carefully before use! Important! Please read these instructions carefully before use! Important! Please read these instructions carefully before use! UNIVERSAL LPG SAFETY INSTRUCTIONS SAFETY INSTRUCTIONS IMPORTANT: Read the assembly instruction of this booklet before removing the contents IMPORTANT: Read the assembly instruction of this booklet before removing the contents IMPORTANT: Read the assembly instruction of this booklet before removing the contents of this carton. -
Page 4: Other Consideration
DO NOT OPERATE THIS APPLIANCE BEFORE READING THE OPERATE THIS APPLIANCE BEFORE READING THE OPERATE THIS APPLIANCE BEFORE READING THE INSTRUCTION BOOKLET INSTRUCTION BOOKLET DO NOT PLACE ARTICLES ON OR AGAINST THIS APPLIANCE PLACE ARTICLES ON OR AGAINST THIS APPLIANCE PLACE ARTICLES ON OR AGAINST THIS APPLIANCE DO NOT STORE CHEMICALS OR FLAMMABLE MATERIALS OR STORE CHEMICALS OR FLAMMABLE MATERIALS OR... -
Page 5: Parts List
PARTS LIST... - Page 6 PART NUMBER PART NAME SUPPLIER CODE SUPPLIER CODE THERMOMETER UM006D01 UM006D01 TOP COVER UM006D 02 UM006D 02 GREASE TRAY UM006D 03 UM006D 03 OIL CUP UM006D 04 UM006D 04 WARMING GRID UM006D 05 UM006D 05 COOKING PLATE UM006D 06 UM006D 06 COOKING GRID UM006D 07 UM006D 07...
- Page 7 1.BBQ body …. 1pc 2. Leg-L..... 2pcs 3. Leg-R ..2pcs 4. Side panel ..2pcs 5. wheel axis..1pcs 6 . Wheel(170) ... 2 6 . Wheel(170) ... 2pcs 7. Cylinder Hook..8. Grease tray..1pc 9. Flame tamer.. 2pcs 10.
- Page 8 Bolt Nut M10 M6 x 15 mm M6 x 15 mm 12pcs 2 pcs A A A A F F F F Bolt Bolt M5 x 10mm M6 x 90 mm M6 x 90 mm 8 pcs 6pcs B B B B G G G G Spring Washer Washer...
- Page 9 Assembly Instructions Remove all contents from packaging, and make sure all parts are present before attempting to assemble! Tighten all bolt Remove all contents from packaging, and make sure all parts are present before attempting to assemble! Tighten all bolt Remove all contents from packaging, and make sure all parts are present before attempting to assemble! Tighten all bolt connections by hand first, then when the grill is fully assembled, go back and connections by hand first, then when the grill is fully assembled, go back and tighten.
- Page 10 STEP 3 (Part 6) Assemble wheels to the wheel axis to the wheel axis (Part 5) and use nut and washer to lock as shown. and use nut and washer to lock as shown. STEP 4 Assemble the body side L up (part 17) ,body side R up Assemble the body side L up (part 17) ,body side R up (part 18) and body back up (part 19) (part 19) to the BBQ Body (Part 1) as shown.
- Page 11 STEP 5 Assemble the hood (part 20) onto the body Assemble the hood (part 20) onto the body as shown, and use bolts JX2 to tighten. STEP 6 Assemble the side shelves to the body as shown. Assemble the side shelves to the body as shown.
- Page 12 STEP 7 Assemble bottom shelf(part 14) as shown Assemble bottom shelf(part 14) as shown STEP 8 Assemble cylinder hook (Part 7), use bolt to tighten. Assemble cylinder hook (Part 7), use bolt to tighten.
- Page 13 STEP9 (Part 9) Place the Flame tamers into the BBQ body as shown (cover on the burners) into the BBQ body as shown (cover on the burners). STEP 10 (Part 10) (Part 11) Place Cooking grid and Cooking plate and Cooking plate into BBQ body as shown...
- Page 14 STEP 11 Place Warming Grid (Part 15) into BBQ body as shown 15) into BBQ body as shown STEP 12 (Part 8) Slide the grease tray into BBQ body from back as shown into BBQ body from back as shown.
- Page 15 STEP 13 (Part 13) Attach Oil cup to the bracket under the Grease tray to the bracket under the Grease tray. STEP 14 Assemble the leg support(part 16) as shown. the leg support(part 16) as shown.
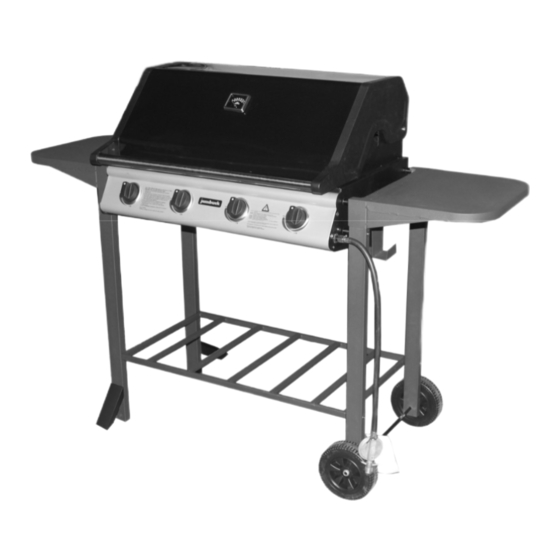
- Page 16 Fully-Assembled...
-
Page 17: Specification
Industry Street Malaga 6090 Western Australia Western Australia Phone: 61 Phone: 61-8-9248 9822 Fax: 61-8-9248 8986 MODELS: HS-UM006D UM006D 4 burner trolley barbecue FEATURES: Hooded, 2 wheels, high temp, lacquered grill body, cast iron Hooded, 2 wheels, high temp, lacquered grill body, cast iron... -
Page 18: Gas Connections
GAS CYLINDER USE GAS CYLINDER USE GAS CYLINDER USE GAS CONNECTIONS In the case of a problem arising with the hose and regulator please contact your BBQ supplier for a In the case of a problem arising with the hose and regulator please contact your BBQ supplier for a In the case of a problem arising with the hose and regulator please contact your BBQ supplier for a list of approved replacement parts .The hose and regulator list of approved replacement parts .The hose and regulator assembly parts must be an Australian... -
Page 19: Lighting Procedure
LIGHTING PROCEDURE LIGHTING PROCEDURE Lighting the barbecue is easy, but must be done with due care. Lighting the barbecue is easy, but must be done with due care. Make sure that gas is turned on at the cylinder, or that gas is available to the barbecue. turned on at the cylinder, or that gas is available to the barbecue. -
Page 20: Cooking Hints
COOKING FIRST TIME USE-CURING THE HOTPLATE CURING THE HOTPLATE During manufacturing, the cooking surfaces were coated with a non During manufacturing, the cooking surfaces were coated with a non-toxic paint. This paint will come off toxic paint. This paint will come off completely over time. - Page 21 FIGURE F1 FIGURE F1-OUTDOOR AREA-EXAMPLE 1 FIGURE F2 FIGURE F2-OUTDOOR AREA-EXAMPLE 2 Both ends open FIGURE F3 FIGURE F3-OUTDOOR AREA-EXAMPLE 3 Open sides at least 25% of 30% or more in total of the 30% or more in total of the total wall area remaining wall area is open and remaining wall area is open and...
-
Page 22: After Cooking
Open sides at least 25% of total wall area 30% or more in total of the remaining wall area is open and remaining wall area is open and unrestricted FIGURE F4 FIGURE F4-OUTDOOR AREA-EXAMPLE 5 AFTER COOKING To turn the barbecue off, it is best to turn off the cylinder first, and allow all the gas remaining in the hose to To turn the barbecue off, it is best to turn off the cylinder first, and allow all the gas remaining in the hose to To turn the barbecue off, it is best to turn off the cylinder first, and allow all the gas remaining in the hose to burn off, this will only take a couple of seconds. - Page 23 BURNER MAINTENANCE C BURNER MAINTENANCE CONT. Bend a stiff wire, (a lightweight coat hanger works well) into a small hook as shown below. Run the hook Bend a stiff wire, (a lightweight coat hanger works well) into a small hook as shown below. Run the hook Bend a stiff wire, (a lightweight coat hanger works well) into a small hook as shown below.
-
Page 24: Care And Maintenance
Leak test your grill before each use. Leak test the hose connections each time you reconnect the gas each use. Leak test the hose connections each time you reconnect the gas each use. Leak test the hose connections each time you reconnect the gas cylinder. -
Page 25: Warranty
Australian Consumer Law. ian Consumer Law. You are . Any parts other than original Jumbuck parts other than original Jumbuck parts entitled to replacement or refund for a major entitled to replacement or refund for a major... - Page 26 For New Zealand Customer Goods presented for repair may be replaced by Goods presented for repair may be replaced by Any claim under this warranty must be made Any claim under this warranty must be made refurbished goods of the same type rather than refurbished goods of the same type rather than within 12 months of the date of purchase of the within 12 months of the date of purchase of the...
-
Page 27: For Technical Assistance
For Australia customers if you experience any For Australia customers THE WARRANTY technical issues with your JUMBUCK BBQ, in the technical issues with your JUMBUCK BBQ, in the first instance review the instructions manual or first instance review the instructions manual or Removal or re-installation costs.
Need help?
Do you have a question about the HS-UM006D and is the answer not in the manual?
Questions and answers