Table of Contents
Advertisement
Advertisement
Table of Contents

Related Manuals for Jumbuck HS-UM011SB


Summary of Contents for Jumbuck HS-UM011SB
- Page 2 ASSEMBLY & OPERATION INSTRUCTIONS (HS-UM011SB) GAS Grill OUTDOOR USE ONLY FOR YOUR SAFETY FOR YOUR SAFETY If you smell gas: 1. Do not store or use gasoline or other 1. Shut off gas to the appliance. flammable vapours or liquids in the vicinity 2.
-
Page 3: Safety Instructions
SAFETY INSTRUCTIONS IMPORTANT: Read the assembly instruction of this booklet before removing the contents of this carton. IMPORTANT SAFETY INSTRUCTIONS 1. This barbecue is an outdoor appliance only. Under no circumstances should it be use indoors. 2. READ ALL OPERATING INSTRUCTION BEFORE LIGHTING. 3. - Page 4 IMPORTANT "This appliance shall only be used in an above ground open-air situation with natural ventilation, without stagnant areas, where gas leakage and products of combustion are rapidly dispersed by wind and natural convection" WARNING A strong gas smell or the hissing sound of gas indicates a serious problem with your gas grill or the LP gas tank.
- Page 5 Part list...
-
Page 6: Table Of Contents
PART NUMBER PART NAME SUPPLIER CODE THERMOGRAPH UM011SB01 LID PLATE UM011SB 02 LID SIDE PLATE R UM011SB 03 LID SIDE PLATE L UM011SB 04 LID PLATE PART UM011SB 05 LID HANDLE UM011SB 06 LID HANDLE PART UM011SB 07 WARMING GRILL UM011SB 08 COOKING PLATE UM011SB 09... - Page 7 1.Wheel...…. 4pcs 2.Cart side plate..1pc 3. Cart bottom plate..1pc 4. Magnet ..1pc 5. Cart back plate... 1pc 6 . Cart front support ... 7.Door L.....1pc 8.Door R..1pc 9.Body asm.. 1pc 10.Left panel…... 1pc 11.Left panel front…... 1pc 12.Right panel front...1pc 13.
-
Page 8: Hardware Pack
26. Body side U-plate 27. Body back U-plate…1pc 28.Oil cup…..1pc 25.Body side U-plate L…1pc R……1pc 29.Lid handle ….1pc 30.Lid handle part….2pcs 31.Lid plate part…1pc Hardware Pack Bolt: M6x15 Bolt: M4x10 41pcs 8pcs Bolt: M5x10 Washer:M4 4pcs 4pcs Nut M4 Spanner 4pcs... -
Page 9: Assembly Instructions
Assembly Instructions Remove all contents from packaging, and make sure all parts are present before attempting to assemble! Tighten all bolt connections by hand first, then when the BBQ is fully assembled, re-tighten all nuts and bolts. STEP 1 Assemble the wheel (Part 1)onto the cart side plate (Part2) as shown. - Page 10 STEP 2 Assemble cart bottom plate(part 3) as shown. STEP 3 Assemble the cart back plate(Part 5) ,Cart plate(part 22) and Magnet (part 4) as shown.
- Page 11 STEP 4 Assemble Cart plate(part 22) and Magnet (part 4) as shown. STEP 5 Assemble the cart front support (part 6 ) onto the cart as shown.
- Page 12 STEP 6 Assemble the door l ( part 7) and door r (part 8 ) onto the cart as shown; STEP 7 Assemble the clapboard ( part 23 )onto the cart as shown;...
- Page 13 STEP 8 Assemble the Body side U-plate L (part 25) and Body side U-plate R(part 26) onto the body as shown. STEP 9 Assemble the body back U-plate(part 27) onto the body as shown.
-
Page 14: Um011Sb
Step 10 Assemble the body onto the cart as shown. Step 11 Assemble the lid handle(part 28) , lid handle part(part 29) and the thermometer(part 24) as shown. Assemble the lid plate part(part 31) as shown. -
Page 15: Um011Sb
Step 12 Assemble the lid onto the body as shown. Step 13 Assemble the left panel (part 10) and left panel front (part 11) as shown. Then assemble the left panel onto the body as shown. Use bolt (AX6) to tighten. -
Page 16: Um011Sb
STEP 14 Assemble the side valve , right panel front(part 12) and knob support (part 13) as shown, use the bolt (BX2) tighten. STEP 15 Assemble the right panel front onto the right panel(part 14) as shown. Please check that the side burner and side valve are well connected. -
Page 17: Um011Sb
STEP 16 Assemble the right panel onto the body as shown. STEP 17 Place the side burner grill (part 15) onto the right panel as shown. Insert the knob into the side valve as shown. -
Page 18: Um011Sb
STEP 18 Place the heating plate(part 17) over the burners as shown STEP 19 Place the cooking grill (part 18),the cooking plate (part 19 )and the warming grill (part 20) onto the body as shown. -
Page 19: Um011Sb
Step 20 Insert the grease tray (part 21) into the body as shown. Step 21 Insert the oil cup (part 28) into the grease tray as shown. -
Page 20: Um011Sb
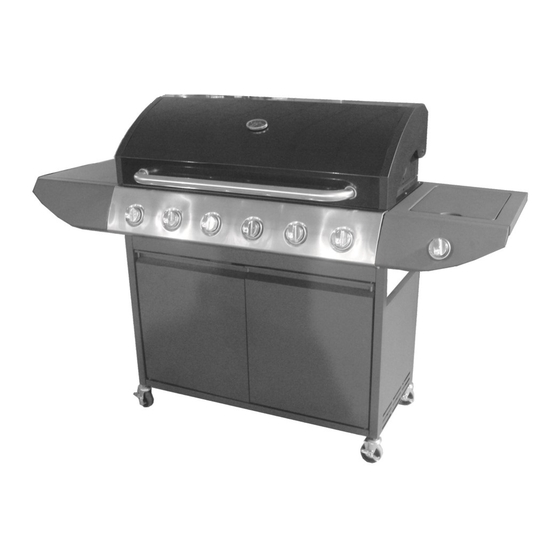
Fully-Assembled... -
Page 21: Um011Sb
2/26 Industry Street Malaga 6090 Western Australia Phone: 61-8-9248 9822 Fax: 61-8-9248 8986 MODELS: HS-UM011SB 6 burners and 1 side burner trolley barbecue FEATURES: Stainless steel burners, 2 directional wheels, 2 castors,high temp, lacquered grill body, cooking plate and Grid ,side shelves with tool hook on left, S/S tube type burner and auto ignition. -
Page 22: Gas Connections
GAS CYLINDER USE GAS CONNECTIONS In the case of a problem arising with the hose and regulator please contact your BBQ supplier for a list of approved replacement parts .The hose and regulator assembly parts must be an Australian Gas Association approved part. LEAK TESTING This should be done the first time you connect up the barbecue, and again every time you disconnect and reconnect any fitting. -
Page 23: Lighting Procedure
LIGHTING PROCEDURE Lighting the barbecue is easy, but must be done with due care. Make sure that gas is turned on at the cylinder, or that gas is available to the barbecue. Make sure the LPG cylinder is filled. Check that the end of each burner tube is properly located over each valve orifice. Make sure all gas connections are securely tightened. -
Page 24: Um011Sb
COOKING FIRST TIME USE-CURING THE HOTPLATE During manufacturing, the cooking surfaces were coated with a non-toxic paint. This paint will come off completely over time. Its purpose is purely to help protect your barbecue during transport and storage. Coat the hotplate with canola oil or something similar. Light the barbecue as above. Leave the barbecue with all burners on low for about 30 minutes. -
Page 25: Um011Sb
FIGURE F2-OUTDOOR AREA-EXAMPLE 2 Both ends open FIGURE F3-OUTDOOR AREA-EXAMPLE 3 Open sides at least 25% of total wall area 30% or more in total of the remaining wall area is open and unrestricted FIGURE F4-OUTDOOR AREA-EXAMPLE 4 Open sides at least 25% of total wall area 30% or more in total of the remaining wall area is open and... -
Page 26: Burner Maintenance
AFTER COOKING To turn the barbecue off, it is best to turn off the cylinder first, and allow all the gas remaining in the hose to burn off, this will only take a couple of seconds. Then turn off all burners. While the hotplate is still hot, take a long handled brush and a scraper and remove remaining oil and food scraps. -
Page 27: Important Information
BURNER MAINTENANCE CONT. 1. Regardless of which burner cleaning procedure you use, we recommend you also complete the following steps to help prolong burner life. 2. Use a wire brush to clean the entire outer surface of each burner until free of food residue, and dirt 3. -
Page 28: Care And Maintenance
CARE AND MAINTENANCE Apart from cleaning, your barbecue is a fairly low maintenance item. A couple of things are worth looking at though. Remember to turn off and disconnect the gas before any maintenance is carried out. 1. If your barbecue uses a flexible hose to connect to the gas, check the rubber O-ring on the regulator end of the hose assembly at least once a year. -
Page 29: Um011Sb
Australian Consumer Law. You are . Any repair does not extend the warranty entitled to replacement or refund for a major . Any parts other than original Jumbuck parts failure and to have the goods repaired or Void this warranty. -
Page 30: Um011Sb
For New Zealand Customer Goods presented for repair may be replaced by Any claim under this warranty must be made refurbished goods of the same type rather than within 12 months of the date of purchase of the being repaired. Refurbished parts may be used product. -
Page 31: Um011Sb
FOR TECHNICAL ASSISTANCE For Australia customers if you experience any THE WARRANTY technical issues with your JUMBUCK BBQ, in the Removal or re-installation costs. This warranty first instance review the instructions manual or does not cover costs for transit, nor in home contact the warranty service agent.
Need help?
Do you have a question about the HS-UM011SB and is the answer not in the manual?
Questions and answers