Advertisement
Table of Contents
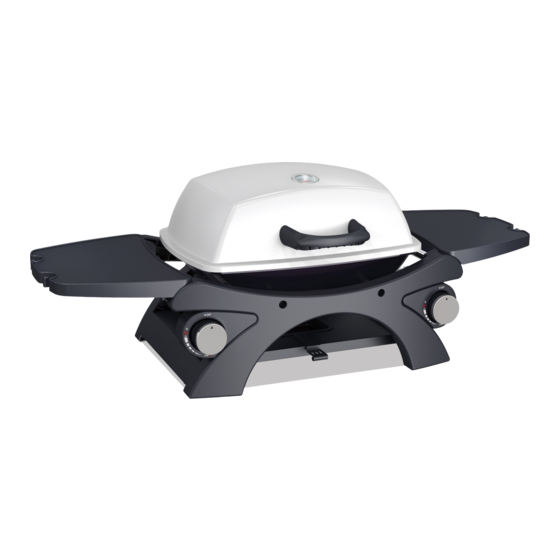
Portable 2 Burner BBQ
Cast Iron Grill & Hot Plate
•
Solid steel construction
•
Removeable side shelves included
•
Temperature gauge
•
Cooking surface 470W x 356D mm
•
Enamel coated cast iron grill and hot plate
•
Universal LPG only
•
Hose & regulator included
•
Dimensions: 1.02L x 0.46W x 0.37H m
2
Burner
Grill &
Hot Plate
Important: Please retain these instructions for future use
/
S/Steel
Dial
Burner
Ignition
Material
Advertisement
Table of Contents

Related Manuals for Jumbuck Fineline JBPB219


Summary of Contents for Jumbuck Fineline JBPB219
- Page 1 Portable 2 Burner BBQ Cast Iron Grill & Hot Plate • Solid steel construction • Removeable side shelves included • Temperature gauge • Cooking surface 470W x 356D mm • Enamel coated cast iron grill and hot plate • Universal LPG only •...
-
Page 2: For Your Safety
ASSEMBLY & OPERATION INSTRUCTIONS PORTABLE SINGLE BURNER BBQ FOR YOUR SAFETY FOR YOUR SAFETY If you smell gas: Do not store or use gasoline or other Shut off gas to the appliance. flammable vapours or liquids in the 2. Extinguish any open flame. vicinity of this or any other appliance. -
Page 3: Important Safety Instructions
SAFETY INSTRUCTIONS IMPORTANT: READ THE ASSEMBLY INSTRUCTIONS IN THIS BOOKLET BEFORE REMOVING THE CONTENTS OF THIS CARTON IMPORTANT SAFETY INSTRUCTIONS or extinguish using a fire extinguisher. This appliance must only be used in an above ground If you cannot safely reach the valve to turn off open-air situation with natural ventilation, without because the fire is at the cylinder, contact the fire stagnant areas, where gas leakage and products of... -
Page 4: Other Considerations
WARNING OTHER CONSIDERATIONS A strong gas smell or the hissing sound of gas indicates Strong winds and low temperature can affect the a serious problem with your gas BBQ or the gas cylinder. heating and performance of your gas BBQ so Failure to immediately follow the steps listed below factor in these elements when positioning your could cause serious bodily injury, death, or property... - Page 5 Always place the gas cylinder beside the BBQ when overhead cover. Within a partial enclosure that includes an over- not in use. If using the approved Jumbuck BBQ head cover and no more than two walls. trolley for this model, there is a cylinder holder at the base.
-
Page 6: Gas Cylinder Safety Information
GAS CYLINDER SAFETY INFORMATION GAS TYPE GAS HOSE REPLACEMENT Note the labeling of appropriate gases listed on your In the case of a problem arising with the gas hose, BBQ and ascertain that the gas you have is suitable for please contact your BBQ supplier for a list of your BBQ. -
Page 7: Leak Testing
LEAK TESTING Please check for gas leakage the first time you are connecting the BBQ to the gas cylinder, and also each time you are replacing the gas cylinder or disconnect- ing/reconnecting any fittings. Inspect the hose before soap each use. water To check for gas leakage, turn on the gas supply at the 1. -
Page 8: Manual Ignition
LIGHTING TURNING OFF YOUR GRILL Always visually inspect your BBQ before lighting. 1. Turn off the gas supply at the LP cylinder by turn- Replace any hoses that are frayed or cracked before ing the valve clockwise. lighting your BBQ. Look for anything that may be block- 2. - Page 9 BBQ MAINTENANCE IMPORTANT INFORMATION Apart from cleaning, your BBQ is a fairly low mainte- This product is for outdoor use only. nance appliance. Below are a couple of things worth Do not use indoors. looking at though. Remember to turn off and discon- Do not use below ground level.
-
Page 10: Burner Maintenance
BURNER MAINTENANCE Regardless of which burner cleaning procedure you use, we recommend you also complete the following You should check the burner periodically for any sort of steps to help prolong burner life. blockage. Use a wire brush to unclog the holes. 1. -
Page 11: Exploded View
EXPLODED VIEW... - Page 12 CARTON CONTENTS AND SPARE PARTS Part list Part Description Illustration Quantity Number Lid and firebox assembly Cooking hot plate Cooking grill plate Flame tamer Grease cup Side table Hardware Part Description Illustration Quantity Number M6x12 Washer Tools needed (Not supplied) Illustration Quantity...
- Page 13 ASSEMBLY INSTRUCTIONS Step 1 Secure the fire box to the leg stand using the 4 M6 x 12 screws (AA) and washers (BB). Insert a washer and screw into the 4 holes from the inside of the fire bowl, and use a phillips head screw driver to secure. Do not over-tighten as this may cause damage to the surface of the fire bowl.
- Page 14 ASSEMBLY INSTRUCTIONS Step 3 Put the cooking grill plate (C) and cooking hot plate (B) into the firebox (A) over the flame tamer (D). Step 4 Assemble the two side shelves (F) by clipping them over the side handles as shown below.
- Page 15 ASSEMBLY INSTRUCTIONS Step 5 Insert the grease cup (E) into the opening on the bottom tray of the BBQ. Line the bottom of the grease cup with fat absorber. BBQ is now ready to use.
-
Page 16: Troubleshooting
TROUBLE SHOOTING PROBLEM CAUSE CURE Loose connection or Check hose and regulator is secure and perform When lighting I smell gas faulty part the leak test. Check that the valve on the gas cylinder is turned on. Check the burner ports are free from obstruc- No gas flow tions. -
Page 17: Specification
SPECIFICATION BRAND NAMES: JUMBUCK APPLIANCE: Portable 2 Burner BBQ CERTIFICATE HOLDER: Mayo Hardware 4 Secombe Place Moorebank NSW 2170 Phone: 1300 360 211 Email: customerservice@mayohardware.com.au MODELS: JBPB219. Fineline. 0173343 FEATURES: Cast Iron Grill and Hot Plate Rotary electronic ignition Temperature gauge... -
Page 18: Warranty
WARRANTY FOR AUSTRALIAN CUSTOMERS FOR NEW ZEALAND CUSTOMERS Any claim under this warranty must be made within 12 Any claim under this warranty must be made within months of the date of purchase of the product. To make 12 months of the date of purchase of the product. To a claim under the warranty contact Mayo Hardware make a claim under the warranty contact Mayo customerservice@mayohardware.com.au, or take the... - Page 19 WARRANTY WHAT IS NOT COVERED IN THE WARRANTY FOR TECHNICAL ASSISTANCE Removal or re-installation costs. This warranty does Refer to the troubleshooting section of this operat- ing manual or contact Mayo Hardware through the not cover costs for transit, nor in home service. below details: Liability will only be accepted for loss or damage during transit if at the time the product was being...
Need help?
Do you have a question about the Fineline JBPB219 and is the answer not in the manual?
Questions and answers