Advertisement
Quick Links
Advertisement

Related Manuals for Jumbuck HS-Gens-310


Summary of Contents for Jumbuck HS-Gens-310
-
Page 2: Important Safety Instructions
Jumbuck HS-Gens-310 Charcoal BBQ Grill & Smoker IMPORTANT SAFETY INSTRUCTIONS For outdoor use only. Improper installation, adjustment, alteration, service or maintenance can cause property damage, injury or death. Read the installation instructions thoroughly before installing this equipment. ... - Page 3 Pre-caution Lighting the Charcoal BBQ always ensure hands are protected when solid fuel is to be used for this product (fire wood, charcoal etc.) putting or removing food from the BBQ place solid fuel onto the charcoal grid and always ensure BBQ is cool before touching or cleaning the internal areas light using fire starters...
- Page 4 EXPLODED VIEW PARTS CODE Parts Number Parts Name Parts Code Hood GEN-310-01 Hood Handle GEN-310-02 Temperature Gauge GEN-310-03 Air Vent GEN-310-04 Chimney GEN-310-05 Hood Hinge GEN-310-06 Cooking Grill GEN-310-07 Charcoal Grid GEN-310-08 Hood Hinge Support GEN-310-09 BBQ Body GEN-310-10 GEN-310-11...
-
Page 5: Carton Contents
CARTON CONTENTS Reference# Description Part# Illustration Quantity Hood GEN-310-01 Hood Handle GEN-310-02 Temperature GEN-310-03 Gauge Air Vent GEN-310-04 Chimney GEN-310-05 Hood Hinge GEN-310-06 Cooking Grill GEN-310-07 Charcoal Grid GEN-310-08 Hood Hinge GEN-310-09 Support BBQ Body GEN-310-10 GEN-310-11... -
Page 6: Hardware Pack Contents
HARDWARE PACK CONTENTS Reference# Description Illustration Quantity Bolt M6x 12mm Nut M6 Bolt M5x10mm Black Nut M5 Black Bolt M5x10mm White Flat Washer White Spring Washer M5 White Wing Nut M5 Wing Nut M6 Flat Washer White... - Page 7 ASSEMBLY INSTRUCTIONS ASSEMBLY TIPS Remove all contents from packaging, and make sure all the parts are present before attempting to assemble! Tighten all bolt connections by hand first. When the BBQ is fully assembled, retighten the screws, nuts and bolts by using a wrench and screw driver.
- Page 8 STEP 2 Install the Air Vent (part 4) onto the BBQ Body (part 10) as per illustration below. Step 3 Install the onto the BBQ Body (part 10) as per illustration Hood Hinge Support (part 9) below.
- Page 9 STEP 4 Install the Chimney (part 5) onto the Hood (part 1) as per illustration below. STEP 5 Install the Hood Hinge (part 6) onto the Hood (part 1) as per illustration below.
- Page 10 STEP 6 Install the Air Vent (part 4) onto the Hood (part 1) as per illustration below. Step 7 Install the Temperature Gauge (part 3) onto the Hood (part1) as per illustration below.
- Page 11 STEP 8 Install the Hood Handle (part 2) onto the Hood (part 1) as per illustration below. STEP 9 Attach the Hood (part 1) onto BBQ Body (part 10) as per illustration below.
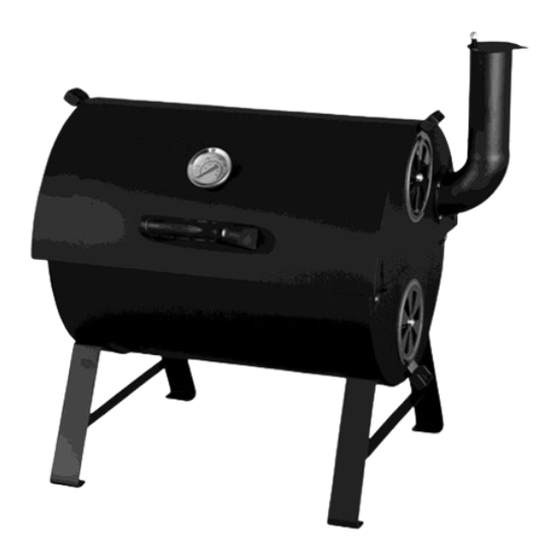
- Page 12 STEP 10 Place the Charcoal Grid (part 8) and Cooking Grill (part 7) onto the assembled BBQ as per illustration below. Fully Assembled Your BBQ is now ready for use. Please take care when lighting your BBQ. Always keep children away from this BBQ at all times.
-
Page 13: Warranty
The warranty for New Zealand is given by : the operating manual. Bunnings NZ Limited Any repair does not extend the warranty period. PO Box 14436, Any parts other than original Jumbuck parts will Panmure, Auckland, 1471 void this warranty. NEW ZEALAND (09) 978 2200 marketing@bunnings.co.nz... - Page 14 WARRANTY For New Zealand Customer For Australian Customers Any claim under this warranty must be made Any claim under this warranty must be made within 12 months of the date of purchase of the within 12 months of the date of purchase of the product.
- Page 15 Liability will only be accepted for loss or damage technical issues with your JUMBUCK BBQ, in the first instance review the instructions manual or during transit if at the time the product was being...
Need help?
Do you have a question about the HS-Gens-310 and is the answer not in the manual?
Questions and answers