Table of Contents
Advertisement
Quick Links
Advertisement
Table of Contents

Related Manuals for Strong SRT 8108


Summary of Contents for Strong SRT 8108
- Page 1 Digital Terrestrial HD Receiver SRT 8108 User manual Návod k obsluze Bedienungsanleitung Instrukcja obsługi Manuel d’Utilisateur Manuale utente Manual del usuario Felhasználói kézikönyv Ръководство на Manual do Utilizador потребителя Uživatelská příručka...
- Page 4 € 0,14/Min. deutsches Festnetz 801 702 017 € 0,42/Min. max. Mobilfunknetze support_pl@strong.tv +380(44)228 24 73 support_dk@strong.tv support_ua@strong.tv www.strong.tv Supplied by STRONG & Co, Japan Represented by STRONG Ges.m.b.H. Franz-Josefs-Kai 1 1010 Vienna Austria Email: support_at@strong.tv 15 Sep 2014 20:20...
-
Page 5: Table Of Contents
States and other countries. Manufactured under license from Dolby Laboratories. Dolby and the double-D symbol are registered trademarks of Dolby Laboratories. All other product names are trademarks or registered trademarks of their respective owners. © STRONG 2014. All rights reserved. -
Page 6: Introduction
PART 2 • English 1.0 InTRoduCTIon 1.1 Safety Instructions do noT InSTAll YouR RECEIvER: In a closed or poorly ventilated cabinet; directly on top of or under any other equipment; on a surface which might obstruct the ventilation slots. do noT EXPoSE ThE RECEIvER oR ITS ACCESSoRIES: To direct sunlight or any other equipment that generates heat;... -
Page 7: Equipment Set-Up
It is advised not to store important information on USB storage devices used with „ „ the receiver. Always make backups of data on your USB storage device before using it with this receiver. STRONG will not take responsibility for any loss of information or circumstances caused by loss of information. -
Page 8: Your Receiver
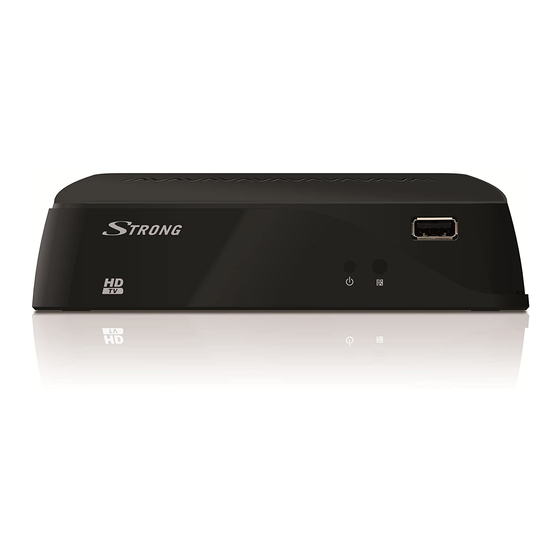
PART 2 • English 2.0 YouR RECEIvER 2.1 dEfAulT PIn: 1234 2.2 front Panel Fig. 1 1. mode indicator REd indicates that the receiver is in STANDBY mode. gREEn indicates that the receiver is in OPERATING mode. 2. IR sensor Point your remote control towards this sensor. -
Page 9: Connection
PART 2 • English 13. Info Shows the current channel information Press twice for program and technical information. 14. fAv Favourite group selection 15. Tv/RAdIo Toggles between TV or RADIO mode 16. RECAll Back to previous shown channel 17. 0~9 Channel selection or value input 18. -
Page 10: Connecting To Tv With Scart Cable
PART 2 • English 3.3 Connecting to Tv with SCART cable Fig. 4 Your receiver is also equipped with a SCART connector; alternatively, the TV set can be connected to the receiver using a good quality SCART cable. 3.4 Connecting to a digital Audio Amplifier with S / PdIf Fig. -
Page 11: Quick Guide To Using Your Receiver
5.0 QuICk guIdE To uSIng YouR RECEIvER We at STRONG understand that you can’t wait to enjoy your new high definition digital terrestrial receiver. The following quick guide will make you familiar with the basic operation of this device. We do, however, advice you to read the full manual to get the best performance from your receiver. -
Page 12: Info Banner
PART 2 • English Via the pq buttons. „ „ 6.1.1 direct access via the 0~9 buttons To gain direct access to a certain channel, simply input its number with the 0~9 buttons on the remote control. Channel numbers can be up to three digits long. Entering a number with less than three digits is possible. -
Page 13: Subtitles
PART 2 • English 6.5 Subtitles Some channels support a choice of subtitle languages. Press Sub in viewing mode to display a list of available subtitle languages. Select your subtitle of choice with pq and press ok to confirm. Press EXIT to leave without making changes.* The Sub button provides a temporary override of the subtitle setting in the main menu Language. -
Page 14: Main Menu
PART 2 • English 7.0 mAIn mEnu The main menu gives you access to settings and multimedia functions. To access the main menu, press mEnu in viewing mode. The main menu consists of the following sub menus: Program, Picture, Channel search, Time, Language System and Media. Throughout the main menu, mEnu or EXIT can be used to get back to the previous screen. -
Page 15: Lcn. (Logical Channel Numbering)
PART 2 • English 7.3 lCn. (logical Channel numbering) Some countries and broadcasters use a pre-defined channel order. If LCN (Logical Channel Numbering) is activated and an LCN signal is provided by the operator, channels will be stored in this operator defined order. -
Page 16: Time
PART 2 • English Defaults for frequency band plan, LCN and time zone are coupled to this setting. Country Region: Some countries have more than one time zone, if applicable, you can change the countries region and time zone. Antenna Power: IIf you use an (indoor) antenna, which requires a 5 V power supply, you can set this option to ‘On’. -
Page 17: Language
PART 2 • English noTE: The bluE button on the remote control serves as a shortcut to the Timer menu. 7.7 language This menu allows you to set several items for language and audio and change default settings to your personal likings. -
Page 18: Auto Standby
USB port. When new software is available for your receiver, it can be downloaded from our website www.strong.tv. Place the software file (unzipped) in the root directory of your USB storage device (HDD, memory stick etc.) and connect the device to the USB port of the receiver. -
Page 19: Media
PART 2 • English noTE: If, after a software upgrade, the receiver should behave in an unexpected way, please perform a factory reset as well. Restore Factory Default. See chapter 7.8.2. WARnIng! After an update the receiver restarts automatically. During the upgrade process NEVER disconnect the receiver from the mains or switch off the power! Doing so might damage your receiver and will void warranty! 7.9 media... -
Page 20: Troubleshooting
Formatting will permanently delete ALL data stored on the connected device. Please make a backup copy of all data you wish to keep before entering the Format menu. STRONG cannot be held responsible for loss of data from USB devices used with this receiver. -
Page 21: Technical Specifications
PART 2 • English Problem Possible cause What to do Press the Info button on After moving the receiver to Antenna signals are too weak another room/area you are no The signal strength/quality remote 2x to call up signal longer able to receive digital might be less than before, if bars and adjust antenna for reception... - Page 22 MP3 and OGG* Picture view: BMP and JPEG* *STRONG cannot guarantee the playback of all files although extensions are listed, as it depends on codec used, data bit rate and resolution (all MPEG codec formats are supported). Connectors RF IN – IEC Female RF OUT –...
Need help?
Do you have a question about the SRT 8108 and is the answer not in the manual?
Questions and answers