Table of Contents
Advertisement
Quick Links
Advertisement
Table of Contents

Related Manuals for Strong SRT 8527


Summary of Contents for Strong SRT 8527
- Page 5 PART 2 • English Licenses ANY USE OF THIS PRODUCT IN ANY MANNER OTHER THAN PERSONAL USE THAT COMPLIES WITH THE MPEG-2 STANDARD FOR ENCODING VIDEO RMATION FOR PACKAGED MEDIA IS EXPRESSLY PROHIBITED WITHOUT A LICENSE UNDER APPLICABLE PATENTS IN THE MPEG-2 PATENT PORTFOLIO, WHICH LICENSE IS AVAILABLE FROM MPEG LA, LLC, 6312 S.
-
Page 6: Table Of Contents
PART 2 • English TAbLE of ConTEnT 1.0 InTRoDuCTIon 1.1 Safety Instructions 1.2 Storage 1.3 Equipment Set-up 1.4 Accessories 1.5 Usage of external USB devices 2.0 RECEIvER 2.1 Front panel 2.2 Rear panel 2.3 Remote control 2.4 Installing the batteries 2.5 Using the remote control 3.0 ConnECTIons 3.1 Connecting the antenna... -
Page 7: Introduction
PART 2 • English 1.0 InTRoDuCTIon 1.1 safety Instructions Do noT InsTALL youR RECEIvER In a closed or poorly ventilated cabinet; directly on top of or under any other equipment; on a „ „ surface which might obstruct the ventilation slots. Do noT ExPosE ThE RECEIvER oR ITs ACCEssoRIEs To direct sunlight or any other equipment that generates heat;... -
Page 8: Accessories
PART 2 • English Make sure that all the connections, cables and outdoor components are in a good condition „ „ and all the connections are well shielded and of good quality. We recommend using high quality HDMI cables. This manual provides complete instructions for installing and using this receiver. The following symbols will serve as follows: WARnInG Indicates warning information. -
Page 9: Receiver
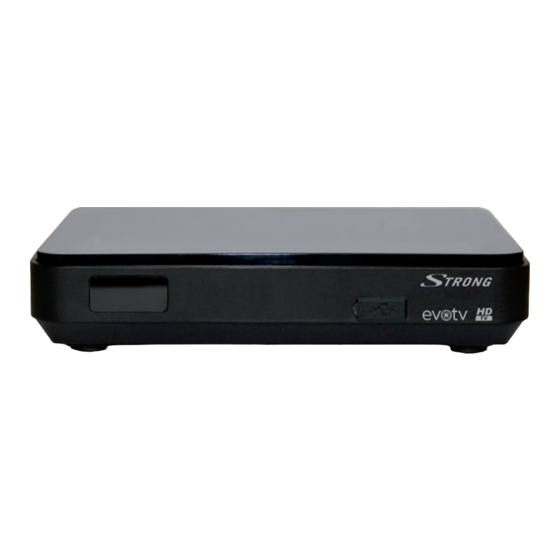
PART 2 • English 2.0 RECEIvER 2.1 front panel Fig. 1 1. slot for smart-card: The slot is located on the lower bottom side of the receiver. It is intended for service functions only and is not used during operation by the user. 2. -
Page 10: Installing The Batteries
PART 2 • English 19. GREEn/TExT In viewing mode: to open Videotext (if broadcasted). In menu and Videotext mode: depends on the menu context. 20. yELLoW/sub In viewing mode: to select a subtitle language (if subtitles are broadcasted). In menu and Videotext mode: depends on the menu context. 21. -
Page 11: Connections
PART 2 • English 3.0 ConnECTIons WARnInG Make sure that devices are disconnected from their main power supplies before connecting them to the receiver. 3.1 Connecting the antenna Fig. 6 To receive digital signals, your receiver has to be connected to a terrestrial indoor or outdoor antenna. Use the antenna cable to connect the antenna with the ANT IN connector on the back of your receiver. -
Page 12: Connecting An Infrared Extender
PART 2 • English 3.5 Connecting an infrared extender With an infrared extender, you can place the receiver out of the ordinary operating distance (e.g. in a locked cabinet) and use operate it anyway. The infrared extender is not supplied and is available at the distribution networks. -
Page 13: Quick Guide To Using Your Receiver
PART 2 • English noTE If the receiver hasn’t found any channels by the end of the channel scan, it is possible that your antenna is not installed/aligned correctly. To ensure good results and proper antenna configuration, refer to qualified professionals. 5.0 QuICk GuIDE To usInG youR RECEIvER We at STRONG understand that you can’t wait to enjoy your new high definition digital terrestrial receiver. -
Page 14: Info Banner
PART 2 • English Some channels support a choice of different audio formats and/or languages. To select another audio language, press AuDIo in viewing mode. A list with available audio languages will be displayed. Use pq to select language and confirm with ok. The audio channel as stereo, mono left and mono right can be selected with the tu buttons. -
Page 15: Electronic Tv Programme Guide (Epg)
PART 2 • English Use tu to switch between the current Now and Next event. If the complete information exceeds the displayed area use pq in order to read further. To remove the info banner, press or ExIT. noTE Event information will be displayed when available. Availability depends on the broadcast. -
Page 16: Instant Recording
PART 2 • English high resolution pictures, a reading speed of min. 10 - 15 MB/sec is required. As high data rates are not supported by all types of USB devices it is necessary to ensure that the used USB device can fulfil this requirement. Mostly such data can be found on the website or specification sheet of the USB device manufacturer. -
Page 17: Programme Organizer
PART 2 • English 6.1 Programme organizer Press MEnu and use tu to select the Program Organizer and press ok. Following submenus are displayed: Channel Manager, Channel Sort and Delete all. Use pq to select a submenu and press ok or u to access. 6.1.1 Channel Manager The channel manager allows you to move, skip, lock, delete and add channels to the favourite list. -
Page 18: Channel Search
PART 2 • English LCN your channel numbers will start with channel number 800, otherwise the LCN channels will be sorted in regional order starting with 1. None LCN channels can be found again starting with number 800. Further, the LCN method will allow you to save the strongest channels broadcasted in your area, only. -
Page 19: System Setup
PART 2 • English Use tu to choose between By Channel and By Frequency. If you set the scan mode By Scan mode: Channel, then the following is available: Use tu to choose UHF (Ultra High Frequency) or VHF (Very High Frequency). Band: Frequency channel: Select a frequency channel on which you would like to search for the channels. -
Page 20: Osd Setting
PART 2 • English aspect ratio), 4:3 Panscan (displays 16:9 broadcasts in full screen and cuts the upper and lower parts of 16:9 video on your 4:3 TV), 4:3 Letterbox (displays 16:9 widescreen broadcasts with black bars on top and under the picture on a 4:3 TV). For a modern 16:9 TV set following options can be set: 16:9 Wide Screen, 16:9 PillarBox (4:3 broadcasts will be shown with black vertical bars on the left and right side of the image) and 16:9 Pan&Scan. -
Page 21: Tools
PART 2 • English Use tu to change the settings. Following rates are available: OFF (to disable the Age: function), 04, 05, 06, 07, 08, 09, 10, 11, 12, 13, 14, 15, 16, 17 and 18. Whenever switching through channels which submit EPG based parental rate and the rate of the current broadcast is below the adjusted rate, you will have to enter your PIN code. -
Page 22: Change Password
PART 2 • English Use 0-9 to enter the end time. End Time: Use tu to select in which cycle the timer should be repeated. Once – the timer will Repeat: switch ON once, after this the timer will be removed from timer list. Daily – the timer will switch ON every day at the set time. -
Page 23: Records
PART 2 • English 6.4.5 software update via terrestrial signals Your receiver can update software via digital terrestrial broadcast as well. You can find out via your local support or dealer whether there is a new software version broadcasted in your area. When you know that there is an update available, enter the menu OAD Upgrade in the Tools menu and press ok to continue. -
Page 24: Multimedia
PART 2 • English WARnInG Within Irdeto encrypted services some events may be protected and fast forward/rewind will be limited or might not be possible. If maturity rating is activated for a specific recording, you need to enter your PIN Code MATuRITy RATInG PIn: 0000 before playback can be started. - Page 25 PART 2 • English 6.6.2 Music Your receiver supports playback of music files in the following formats: MP3 and WMA. To navigate in the list of files and folders, use the pq buttons. To start playback of a music file, press ok. During playback, it is possible to perform following actions: To pause playback.
-
Page 26: Irdeto Ca Status
PART 2 • English 6.6.5 Movie Config This menu allows you to customise the settings for the subtitle display. Use tu to change and pq to select the preferred colour, background and font colour. 6.6.6 Remove usb device This menu item only appears when a USB device is connected. Select the menu item and press ok to remove the USB device from your receiver safely. - Page 27 PART 2 • English Do not open the receiver cover. This action will damage the warranty seals and warranty repairs will be void. Problem Possible reason Remedy Check the connection of the receiver to the main power The power plug is not supply connected.
- Page 28 PART 2 • English Wrong TV input source Select the proper TV input source selected Check the cables. Check that the cables are properly connected to the outputs of the TV and the receiver. Disconnect the receiver and the TV from the No picture or sound.
-
Page 29: Technical Specification
PART 2 • English 8.0 TEChnICAL sPECIfICATIon Tuner Input connector: IEC60169-2, female, 75 Ohm nominal Input frequency range: VHF: 177.5 ~ 226.5 MHz UHF: 474 ~ 858 MHz Input signal level: -82 ~ -25 dBm Antenna power: 5V DC, max. 50 mA, short cut protected Demodulation Dvb-T/T2 Demodulation: Compliant to DVB-T (EN 300 744), DVB-T2 (EN 302 755) - Page 30 PART 2 • English Mini AV (3.5 mm) S/PDIF (coaxial) USB 2.0 HDMI General data Power supply: АС 100 – 240 V ~ 50/60 Hz Input voltage: DC 12 V, 1.0 A Power consumption: 8 W max (with USB device connected), 0.40 W (in standby mode, without USB device connected) Operating temperature range: -10 ~ +45 °C...
-
Page 31: Appendix
PART 2 • English 9.0 APPEnDIx MP2, MP4: GMC mpg, 1920x1080 MPG, MPEG MPEG-1, 2 MP3, Main Profile is not mpeg, dat @ 30p Mbit/s LPCM supported H.264: Main Profile MP2, and High Profile @ ts, trp, MPEG-2 TS MP3, 1920x1080 Level 4.0 tp, m2ts,... - Page 32 PART 2 • English Audio specifications Audio Codec file Extension bitRate/samplingRate 32 kbps ~ 448 kbps(Bit rate) MPEG-1 Layer2 32 kHz ~ 48 kHz(Sampling rate) 32 kbps ~ 320 kbps(Bit rate) MPEG-1 Layer3 32 kHz ~ 48 kHz(Sampling rate) 32 kbps ~ 192 kbps(Bit rate) OGG Vobis 8 kHz ~ 48 kHz(Sampling rate) 24 kbps ~ 384 kbps(Bit rate)
Need help?
Do you have a question about the SRT 8527 and is the answer not in the manual?
Questions and answers