Sign In
Upload
Manuals
Brands
HP Manuals
Laptop
OmniBook 6000
HP OmniBook 6000 Manuals
Manuals and User Guides for HP OmniBook 6000. We have
10
HP OmniBook 6000 manuals available for free PDF download: Evaluation Manual, Reference Manual, Service Manual, Startup Manual, Installation Manual, Information, Supplementary Manual
HP OmniBook 6000 Evaluation Manual (207 pages)
HP OmniBook 6000 - Corporate Evaluation Guide
Brand:
HP
| Category:
Laptop
| Size: 1.38 MB
Table of Contents
Table of Contents
5
Introducing the Notebook Computer
11
Taking Inventory
12
What's in the Box
12
Software Bundled on Your Computer
13
To Buy Accessories
13
To Find more Information
14
Identifying Parts of the Computer
15
Front View
15
Bottom View
16
Back View
17
Status Lights
18
Setting up Your Computer
20
Step 1 - Install the Battery
20
Step 2 - Connect Ac Power
22
Step 3 - Turn on the Computer
23
Step 4 - Set up Windows
24
Using Your Computer
25
Operating Your Computer
26
To Start and Stop the Computer
26
To Reset the Computer
27
To Use the Pointing Devices
28
To Configure the Pointing Devices
29
To Disable One Pointing Device
29
To Use the Fn Hot Keys
30
To Use the Windows and Applications Keys
31
To Use the Embedded Keypad
31
To Use the ALT GR Key
32
To Adjust the Display
32
To Adjust the Volume
33
Working in Comfort with a Notebook PC
34
Taking Care of Your Computer
36
To Protect Your Hard Disk Drive
36
To Take Care of Your Computer
36
To Safeguard Your Data
37
To Extend the Life of the Display
37
To Get the most from Your Batteries
37
To Clean Your Computer
38
Securing Your Computer
39
To Set up Password Protection
39
To Attach a Security Cable
40
To Use the Virusscan Utility
41
To Set PC Identification
41
To Lock the Hard Disk Drive
42
Traveling with Your Computer
43
Managing Power Consumption
44
How the Computer Manages Power Automatically
44
To Manage Power Manually
47
To Suspend the Computer When Closing the Display
48
Using Battery Power
49
To Check Battery Status
49
To Respond to a Low-Battery Warning
50
To Install a Secondary Battery
50
To Maximize Battery Operating Time
50
Making Connections
53
Using Plug-In Modules
54
To Install Hot-Swap Support
54
To Replace a Plug-In Module
55
To Connect the Floppy Disk Drive to the Parallel Port
57
To Insert or Remove a CD or DVD
57
To Play DVD Movies
58
Using the Modem
59
To Connect the Modem
60
To Connect to the Internet
60
To Disconnect from the Internet
61
To Dial in to a Network
61
To Change Your Modem Settings
62
To Send and Receive E-Mail
63
To Send and Receive Faxes (Windows 95)
64
To Send and Receive Faxes (Windows 98)
64
To Send and Receive Faxes (Windows 2000)
66
Connecting to a LAN
67
To Connect to a LAN
67
Connecting PC Cards
68
To Insert or Remove a PC Card
68
Connecting External Devices
70
To Identify Connectors for External Devices
70
To Use an External Monitor
71
To Connect a Printer or Other Parallel Device
72
To Connect an External Keyboard or PS/2 Mouse
72
To Connect a USB Device
73
To Connect a Serial Device
74
To Connect an Audio Device
74
To Make an Infrared Connection
75
To Connect to a Docking Product
76
Configuring and Expanding Your Computer
79
Using the BIOS Setup Utility
80
To Run the BIOS Setup Utility
80
Using Toptools
86
To Set up Toptools
86
Installing a RAM Expansion Module
87
To Install a RAM Expansion Module
87
To Remove a RAM Expansion Module
88
Replacing a Hard Disk Drive
90
To Replace the Hard Disk Drive
90
To Replace the Hard Disk Drive Holder
91
To Prepare a New Hard Disk Drive
92
Using Windows 2000
93
Installing Windows 2000
94
To Prepare for Software Installation
94
To Install Windows 2000
95
To Install Video Support
96
To Install Audio Support
96
To Install Pointing Device Support
97
To Install the Hewlett-Packard Configuration Interface (HPCI)
97
To Install the Intel® Speedstep™ Technology Applet
98
To Configure Power Management
98
Using the Docking Solutions
100
To Install Ethernet Support
101
To Install Modem Support
102
Using Windows 98
103
Installing Windows 98
104
To Prepare for Software Installation
104
To Install Windows 98
106
To Install Video Support
107
To Install Audio Support
107
To Install Pointing Device Support
107
To Install Infrared Support
108
Using the Docking Solutions
109
To Use the Docking System
109
To Install the HP Notebook Docking System Support
110
To Install Ethernet Support
112
To Install Modem Support
113
Using Windows 95
115
Installing Windows 95
116
To Prepare for Software Installation
116
To Install Windows 95 OSR 2.5
118
To Install Video Support
120
To Install Audio Support
120
To Install Pointing Device Support
121
To Install PC Card Support
121
To Install the Intel® Speedstep™ Technology Applet
122
To Install Infrared Support
122
To Install USB Support
123
To Install Accessory Module Hot Swap Support (Agate Tioman)
123
To Install Euro Key Currency Symbol Support
124
To Install the Windows 95 Y2K Update
124
To Install the 2Nd HDD Accessory Module Support
125
To Disable Automatic CD-ROM Detection
125
Using the Docking Solutions
126
To Use the Docking System
126
To Install the HP Notebook Docking System Support
127
To Configure a Docked Hardware Profile
128
To Install Ethernet Support
129
To Install Modem Support
130
Using Windows NT 4.0
131
Installing Windows NT 4.0
132
To Prepare for Software Installation
132
To Install Windows NT 4.0
133
To Install Service Pack 5
135
To Install Video Support
135
To Install Audio Support
135
To Install Pointing Device Support
136
To Install IDE Support
136
To Install the Intel® Speedstep™ Technology Applet
137
To Disable Automatic CD-ROM Detection
137
Using the Docking Solutions
138
Installing Mobile Enhancements
138
Requirements
138
To Install APM
138
To Install the Card Executive
139
To Use the Docking System
140
To Install the HP Notebook Docking System Support
140
Installing Hp/3Com 10/100 Ethernet+ 56K Global Modem Mini-PCI Card Support143 to Install Ethernet Support
143
To Install Modem Support
144
Troubleshooting Your Computer
147
Troubleshooting Techniques
148
Audio Problems
148
CD-ROM and DVD Problems
149
Display Problems
150
Docking Problems
151
Hard Disk Drive Problems
152
Heat Problems
153
Infrared Problems
153
Keyboard and Pointing Device Problems
154
Memory Problems
156
Modem Problems
156
Network Problems
159
PC Card (PCMCIA) Problems
160
Performance Problems
161
Power and Battery Problems
162
Printing Problems
164
Serial, Parallel, and USB Problems
165
Startup Problems
167
Testing the Hardware
169
To Run the Diagtools Diagnostic Test
169
Recovering and Reinstalling Software
171
To Recover the Factory Installation of Your Hard Disk
171
To Replace a Damaged Recovery CD
172
To Update the Computer BIOS
172
Support and Service
175
Getting Assistance for Your Computer
176
To Get Help from the Web
176
To Contact the HP Customer Care Center
176
To Receive Repair Service
178
To Prepare Your Computer for Shipment
178
Hewlett-Packard Limited Warranty Statement
179
Advertisement
HP OmniBook 6000 Reference Manual (152 pages)
Notebook PC
Brand:
HP
| Category:
Laptop
| Size: 0.88 MB
Table of Contents
Table of Contents
5
Introducing the Notebook Computer
9
Taking Inventory
10
What's in the Box
10
Software Bundled on Your Computer
11
To Buy Accessories
11
To Find more Information
12
Identifying Parts of the Computer
13
Front View
13
Bottom View
14
Back View
15
Status Lights
16
Setting up Your Computer
18
Step 1 - Install the Battery
18
Step 2 - Connect Ac Power
20
Step 3 - Turn on the Computer
21
Step 4 - Set up Windows
22
Using Your Computer
23
Operating Your Computer
24
To Start and Stop the Computer
24
To Reset the Computer
25
To Use the Pointing Devices
26
To Configure the Pointing Devices
27
To Disable One Pointing Device
27
To Use the Fn Hot Keys
28
To Use the Windows and Applications Keys
29
To Use the Embedded Keypad
29
To Use the ALT GR Key
30
To Adjust the Display
30
To Adjust the Volume
31
Working in Comfort with a Notebook PC
32
Taking Care of Your Computer
34
To Protect Your Hard Disk Drive
34
To Take Care of Your Computer
34
To Safeguard Your Data
35
To Extend the Life of the Display
35
To Get the most from Your Batteries
36
To Clean Your Computer
36
Securing Your Computer
37
To Set up Password Protection
37
To Attach a Security Cable
38
To Use the Virusscan Utility
39
To Set PC Identification
39
To Lock the Hard Disk Drive
40
Traveling with Your Computer
41
Managing Power Consumption
42
How the Computer Manages Power Automatically
42
To Manage Power Manually
45
To Suspend the Computer When Closing the Display
46
Using Battery Power
47
To Check Battery Status
47
To Respond to a Low-Battery Warning
48
To Install a Secondary Battery
48
To Maximize Battery Operating Time
48
Making Connections
51
Using Plug-In Modules
52
To Install Hot-Swap Support
52
To Replace a Plug-In Module
53
To Connect the Floppy Disk Drive to the Parallel Port
55
To Insert or Remove a CD or DVD
55
To Play DVD Movies
56
Using the Modem
57
To Connect the Modem
57
To Connect to the Internet
59
To Disconnect from the Internet
59
To Dial in to a Network
59
To Change Your Modem Settings
60
To Send and Receive E-Mail
61
To Send and Receive Faxes (Windows 95)
62
To Send and Receive Faxes (Windows ME or 98)
63
To Send and Receive Faxes (Windows 2000)
64
Connecting to a LAN
65
To Connect to a LAN
65
Connecting PC Cards
66
To Insert or Remove a PC Card
66
Connecting External Devices
68
To Identify Connectors for External Devices
68
To Use an External Monitor
69
To Connect a Printer or Other Parallel Device
70
To Connect an External Keyboard or PS/2 Mouse
71
To Connect a USB Device
71
To Connect a Serial Device
71
To Connect an Audio Device
72
To Make an Infrared Connection
72
To Connect to a Docking Product
74
Configuring and Expanding Your Computer
77
Using the BIOS Setup Utility
78
To Run the BIOS Setup Utility
78
Using Toptools
84
To Set up Toptools
84
Installing a RAM Expansion Module
85
To Install a RAM Expansion Module
85
To Remove a RAM Expansion Module
86
Replacing a Hard Disk Drive
88
To Replace the Hard Disk Drive
88
To Replace the Hard Disk Drive Holder
88
To Prepare a New Hard Disk Drive
89
Troubleshooting Your Computer
91
Troubleshooting Techniques
92
Audio Problems
92
CD-ROM and DVD Problems
93
Display Problems
94
Docking Problems
95
Hard Disk Drive Problems
96
Heat Problems
97
Infrared Problems
97
Keyboard and Pointing Device Problems
98
Memory Problems
100
Modem Problems
100
Network Problems
103
PC Card (PCMCIA) Problems
104
Performance Problems
105
Power and Battery Problems
106
Printing Problems
108
Serial, Parallel, and USB Problems
109
Startup Problems
111
Testing the Hardware
113
To Run the Diagtools Diagnostic Test
113
Recovering and Reinstalling Software
115
To Recover the Factory Installation of Your Hard Disk
115
To Replace a Damaged Recovery CD
116
To Update the Computer BIOS
116
Support and Service
117
Getting Assistance for Your Computer
118
To Get Help from the Web
118
To Contact the HP Customer Care Center
119
To Receive Repair Service
120
To Prepare Your Computer for Shipment
121
Hewlett-Packard Limited Warranty Statement
122
Specifications and Regulatory Information
125
Hardware Specifications
126
Modem Reference Information
129
Modem Reference (3Com)
129
Modem Reference (Ambit)
134
Safety Information
141
Power Cords
141
Ergonomics
142
Battery Safety
142
Laser Safety
143
LED Safety
143
Regulatory Information
144
U.s.a
144
Canada
145
European Union
145
Japan
146
International
146
HP OmniBook 6000 Reference Manual (150 pages)
HP OmniBook 6000: Reference Guide
Brand:
HP
| Category:
Laptop
| Size: 0.73 MB
Table of Contents
Table of Contents
5
Introducing the Notebook Computer
9
Taking Inventory
10
What's in the Box
10
Software Bundled on Your Computer
11
To Buy Accessories
11
To Find more Information
12
Identifying Parts of the Computer
13
Front View
13
Bottom View
14
Back View
15
Status Lights
16
Setting up Your Computer
18
Step 1 - Install the Battery
18
Step 2 - Connect Ac Power
20
Step 3 - Turn on the Computer
21
Step 4 - Set up Windows
22
Using Your Computer
23
Operating Your Computer
24
To Start and Stop the Computer
24
To Reset the Computer
25
To Use the Pointing Devices
26
To Configure the Pointing Devices
27
To Disable One Pointing Device
27
To Use the Fn Hot Keys
28
To Use the Windows and Applications Keys
29
To Use the Embedded Keypad
29
To Use the ALT GR Key
30
To Adjust the Display
30
To Adjust the Volume
31
Working in Comfort with a Notebook PC
32
Taking Care of Your Computer
34
To Protect Your Hard Disk Drive
34
To Take Care of Your Computer
34
To Safeguard Your Data
35
To Extend the Life of the Display
35
To Get the most from Your Batteries
35
To Clean Your Computer
36
Securing Your Computer
37
To Set up Password Protection
37
To Attach a Security Cable
38
To Use the Virusscan Utility
39
To Set PC Identification
39
To Lock the Hard Disk Drive
40
Traveling with Your Computer
41
Managing Power Consumption
42
How the Computer Manages Power Automatically
42
To Manage Power Manually
45
To Suspend the Computer When Closing the Display
46
Using Battery Power
47
To Check Battery Status
47
To Respond to a Low-Battery Warning
48
To Install a Secondary Battery
48
To Maximize Battery Operating Time
48
Making Connections
51
Using Plug-In Modules
52
To Install Hot-Swap Support
52
To Replace a Plug-In Module
53
To Connect the Floppy Disk Drive to the Parallel Port
55
To Insert or Remove a CD or DVD
55
To Play DVD Movies
56
Using the Modem
57
To Connect the Modem
58
To Connect to the Internet
58
To Disconnect from the Internet
59
To Dial in to a Network
59
To Change Your Modem Settings
60
To Send and Receive E-Mail
61
To Send and Receive Faxes (Windows 95)
62
To Send and Receive Faxes (Windows 98)
62
To Send and Receive Faxes (Windows 2000)
64
Connecting to a LAN
65
To Connect to a LAN
65
Connecting PC Cards
66
To Insert or Remove a PC Card
66
Connecting External Devices
68
To Identify Connectors for External Devices
68
To Use an External Monitor
69
To Connect a Printer or Other Parallel Device
70
To Connect an External Keyboard or PS/2 Mouse
71
To Connect a USB Device
71
To Connect a Serial Device
72
To Connect an Audio Device
72
To Make an Infrared Connection
73
To Connect to a Docking Product
74
Configuring and Expanding Your Computer
77
Using the BIOS Setup Utility
78
To Run the BIOS Setup Utility
78
Using Toptools
84
To Set up Toptools
84
Installing a RAM Expansion Module
85
To Install a RAM Expansion Module
85
To Remove a RAM Expansion Module
86
Replacing a Hard Disk Drive
88
To Replace the Hard Disk Drive
88
To Replace the Hard Disk Drive Holder
89
To Prepare a New Hard Disk Drive
90
Troubleshooting Your Computer
91
Troubleshooting Techniques
92
Audio Problems
92
CD-ROM and DVD Problems
93
Display Problems
94
Docking Problems
95
Hard Disk Drive Problems
96
Heat Problems
97
Infrared Problems
97
Keyboard and Pointing Device Problems
98
Memory Problems
100
Modem Problems
100
Network Problems
103
PC Card (PCMCIA) Problems
104
Performance Problems
105
Power and Battery Problems
106
Printing Problems
108
Serial, Parallel, and USB Problems
109
Startup Problems
111
Testing the Hardware
113
To Run the Diagtools Diagnostic Test
113
Recovering and Reinstalling Software
115
To Recover the Factory Installation of Your Hard Disk
115
To Replace a Damaged Recovery CD
116
To Update the Computer BIOS
116
Support and Service
119
Getting Assistance for Your Computer
120
To Get Help from the Web
120
To Contact the HP Customer Care Center
120
To Receive Repair Service
122
To Prepare Your Computer for Shipment
122
Hewlett-Packard Limited Warranty Statement
123
Specifications and Regulatory Information
125
Hardware Specifications
126
Modem Reference Information
129
Modem Reference (3Com)
129
Modem Reference (Ambit)
134
Safety Information
141
Power Cords
141
Ergonomics
142
Battery Safety
142
Laser Safety
143
LED Safety
143
Regulatory Information
144
U.s.a
144
Canada
145
Japan
145
International
146
Advertisement
HP OmniBook 6000 Service Manual (114 pages)
HP Omnibook 6000/6100
Brand:
HP
| Category:
Laptop
| Size: 2.88 MB
Table of Contents
Service Manual
1
Table of Contents
3
Product Information
7
Table 1-1. Omnibook 6000/6100 Models
7
Table 1-2. Product Comparisons
8
Features
9
Figure 1-1. Omnibook - Front View
9
Figure 1-2. Omnibook - Back View
10
Figure 1-3. Omnibook - Bottom View
10
Operation
11
Turning the Computer on and off
11
Table 1-3. Activating Power Modes
11
Checking the Status of the Computer
12
Table 1-4. Main Status Lights (Front of Computer)
12
Table 1-5. Keyboard Status Lights
12
Using Fn Hot Keys
13
Table 1-6. Fn Hot Keys
13
Resetting the Computer
14
Figure 1-4. Resetting the Computer
14
Specifications
15
Table 1-7. Omnibook 6000/6100 Specifications
15
Table 1-8. Omnibook 6000/6100 Accessories
18
Figure 1-5. Replaceable Module Diagram
20
Internal Design
20
Table 1-9. Functional Structure
21
Removal and Replacement
23
Table 2-1. Removal Cross-Reference
23
Disassembly Flowchart
24
Table 2-2. Required Equipment
24
Table 2-3. Recommended Screw Torques
24
Figure 2-1. Disassembly Flow
25
Removing the Battery (User-Replaceable)
26
Figure 2-2. Removing the Battery
26
Removing a Plug-In Module (User-Replaceable)
27
Figure 2-3. Removing a Module
27
Figure 2-4. Removing a Module
27
Removing an SDRAM Module (User-Replaceable)
28
Figure 2-5. Removing a SDRAM Module
28
Removing the Hard Disk Drive (User-Replaceable)
29
Figure 2-6. Removing the Hard Disk Drive
29
Figure 2-7. Removing the Hard Disk Case
30
Removing Mini-PCI Card #1 (User-Replaceable)
32
Figure 2-8. Removing the Mini-PCI Card
32
Removing the Power Button Panel (User-Replaceable)
33
Figure 2-9. Removing the Power Button Panel
33
Replacing Small Parts (User-Replaceable)
34
Table 2-4. Replacing Small Parts (User-Replaceable)
34
Removing the Display Assembly (HP Authorized Service Providers Only)
35
Figure 2-10. Removing the Display
36
Removing the Keyboard (HP Authorized Service Providers Only)
37
Figure 2-11. Removing the Keyboard
37
Figure 2-12. Unplugging the Keyboard Cables
38
Removing the Heatsink (with Fan) (HP Authorized Service Providers Only)
39
Figure 2-13. Removing the Heatsink
39
Removing the CPU Module (HP Authorized Service Providers Only)
41
Figure 2-14. Removing the CPU Module
41
Removing the Top Case (HP Authorized Service Providers Only)
43
Figure 2-15. Removing the Top Case: Omnibook 6100 Models
44
Figure 2-16. Removing the Top Case: Omnibook 6000 Models
45
Removing the Motherboard or Bottom Case (HP Authorized Service Providers Only)
46
Figure 2-17. Removing the Motherboard: Omnibook 6100 Models
47
Figure 2-18. Removing the Motherboard: Omnibook 6000 Models
48
Figure 2-19. Installing Docking Doors
49
Figure 2-20. Installing the Lower PCMCIA Door
49
Replacing the Motherboard
50
Table 2-5. Motherboard and PCA Compatibility
50
Figure 2-21. Replacing Motherboard Components: Omnibook 6100 Models
51
Figure 2-22. Replacing Motherboard Components: Omnibook 6000 Models
52
Figure 2-23. Example of Serial Number Label
54
Replacing the Bottom Case
54
Repairing the BIOS IC (HP Authorized Service Providers Only)
55
Removing Other Components (HP Authorized Service Providers Only)
56
Figure 2-24. Boot-Block Jumper
56
Table 2-6. Removing Omnibook Components
56
Troubleshooting and Diagnostics
61
Troubleshooting
62
Figure 3-1. Basic Troubleshooting Steps
62
Checking for Customer Abuse
63
Troubleshooting the Problem
63
Verifying the Repair
64
Suggestions for Troubleshooting
65
Table 3-1. Scope of Diagnostic Tools
65
Table 3-2. Troubleshooting Suggestions
66
Diagnostic Tools
77
Overview of Diagnostic Tools
77
Figure 3-2. Diagnostic Screens - Basic and Advanced
77
Figure 3-3. Serial and Parallel Loopback Connectors
79
Table 3-3. Omnibook Diagnostic Error Codes
80
Power-On Self-Test
84
Table 3-4. POST Terminal-Error Beep Codes
84
Table 3-5. POST Messages
85
Sycard Pcctest 450 Cardbus Card (Optional)
87
Table 3-6. Sycard Pcctest Commands
87
Desktop Management Interface (DMI)
88
BIOS Setup Utility
89
Table 3-7. BIOS Setup Menus and Parameters
89
Replaceable Parts
93
Figure 4-1. Exploded View
94
Table 4-1. Omnibook Replaceable Parts
95
Table 4-2. Accessory Replaceable Parts
100
Table 4-3. Part Number Reference
101
HP OmniBook 6000 Service Manual (96 pages)
Hewlett-Packard Laptop PC Service Manual
Brand:
HP
| Category:
Laptop
| Size: 1.74 MB
Table of Contents
Service Manual
1
Table of Contents
3
1 Product Information
7
Table 1-1. Omnibook 6000 Series Models
7
Table 1-2. Product Comparisons
8
Features
9
Figure 1-1. Omnibook - Front View
9
Figure 1-2. Omnibook - Lower View
10
Figure 1-3. Omnibook - Rear View
10
Operation
11
Turning the Omnibook on and off
11
Table 1-3. Activating Power Modes
11
Checking the Status of the Omnibook
12
Table 1-4. Main Status Lights (Front of Computer)
12
Table 1-5. Keyboard Status Lights
12
Using Fn Hot Keys
13
Table 1-6. Fn Hot Keys
13
Resetting the Omnibook
14
Figure 1-4. Resetting the Computer
14
Specifications
15
Table 1-7. Omnibook 6000 Series Specifications
15
Table 1-8. Omnibook 6000 Series Accessories
18
Figure 1-5. Replaceable Module Diagram
19
Internal Design
19
Table 1-9. Functional Structure
20
2 Removal and Replacement
21
Table 2-1. Removal Cross-Reference
21
Disassembly Flowchart
22
Figure 2-1. Disassembly Flow
22
Table 2-2. Required Equipment
23
Table 2-3. Recommended Screw Torques
23
Removing the Battery (User-Replaceable)
24
Figure 2-2. Removing the Battery
24
Removing a Plug-In Module (User-Replaceable)
25
Figure 2-3. Removing a Module
25
Figure 2-4. Removing a Module
25
Removing an SDRAM Module (User-Replaceable)
26
Figure 2-5. Removing a SDRAM Module
26
Table 2-4. SDRAM Module Replacement Part Numbers
26
Removing the Hard Disk Drive (User-Replaceable)
27
Figure 2-6. Removing the Hard Disk Drive
27
Table 2-5. Hard Disk Drive Replacement Part Numbers
27
Figure 2-7. Removing the Hard Disk Case
28
Removing the Mini-PCI Card (User-Replaceable)
29
Figure 2-8. Removing the Mini-PCI Card
29
Table 2-6. Mini-PCI Card Replacement Part Numbers
29
Removing the Power Button Panel (User-Replaceable)
31
Figure 2-9. Removing the Power Button Panel
31
Replacing Small Parts (User-Replaceable)
32
Table 2-7. Replacing Small Parts (User-Replaceable)
32
Removing the Display Assembly (HP Authorized Service Providers Only)
33
Figure 2-10. Removing the Display
34
Removing the Keyboard (HP Authorized Service Providers Only)
35
Figure 2-11. Removing the Keyboard
35
Figure 2-12. Unplugging the Keyboard Cables
36
Removing the Heatsink (with Fan) (HP Authorized Service Providers Only)
37
Figure 2-13. Removing the Heatsink
37
Removing the CPU Module (HP Authorized Service Providers Only)
38
Table 2-8. Cpu/Motherboard Component Compatibility
38
Figure 2-14. Removing the CPU Module
39
Removing the Top Case (HP Authorized Service Providers Only)
40
Figure 2-15. Removing the Top Case
41
Removing the Motherboard or Bottom Case (HP Authorized Service Providers Only)
42
Replacing the Motherboard
42
Figure 2-16. Removing the Motherboard
43
Replacing the Motherboard
45
Figure 2-20. Example of Serial Number Label
47
Replacing the Bottom Case
47
Repairing the BIOS IC (HP Authorized Service Providers Only)
48
Removing Other Components (HP Authorized Service Providers Only)
49
Figure 2-21. Boot-Block Jumper
49
Table 2-9. Removing Omnibook Components
49
3 Troubleshooting and Diagnostics
53
Troubleshooting
54
Figure 3-1. Basic Troubleshooting Steps
54
Troubleshooting the Problem
55
Verifying the Repair
55
Suggestions for Troubleshooting
56
Table 3-1. Scope of Diagnostic Tools
56
Table 3-2. Troubleshooting Suggestions
57
Diagnostic Tools
66
Omnibook Diagtools
66
Figure 3-2. Omnibook Diagnostic Screens - Basic and Advanced
66
Figure 3-3. Serial and Parallel Loopback Connectors
68
Table 3-3. Omnibook Diagnostic Error Codes
69
Power-On Self-Test
73
Table 3-4. POST Terminal-Error Beep Codes
73
Table 3-5. POST Messages
74
Sycard Pcctest 450 Cardbus Card (Optional)
76
Table 3-6. Sycard Pcctest Commands
76
Desktop Management Interface (DMI)
77
BIOS Setup Utility
79
Table 3-7. BIOS Setup Menus and Parameters
79
4 Replaceable Parts
83
Figure 4-1. Exploded View
84
Table 4-1. Omnibook Replaceable Parts
85
Table 4-2. Accessory Replaceable Parts
87
Table 4-3. Part Number Reference
88
HP OmniBook 6000 Installation Manual (68 pages)
HAFM server
Brand:
HP
| Category:
Laptop
| Size: 0.84 MB
Table of Contents
Table of Contents
3
About this Guide
7
Intended Audience
7
Related Documentation
7
Document Conventions
9
Symbols in Text
9
Symbols on Equipment
10
Rack Stability
11
Getting Help
11
HP Technical Support
11
HP Website
12
HP Authorized Reseller
12
1 Introduction
13
2 System Requirements
15
Requirements and Capabilities of the Omnibook PC
15
HAFM Server System Requirements
15
3 PC Setup and Configuration
17
Drive Assignments
17
CMOS Setup
17
CMOS Settings
17
Install LAN Card (Optional)
18
4 Windows 2000 Setup and Configuration
19
Power Options
19
Changing the Default Power Options
19
Power Options Properties Window
20
5 Internet Information Server Setup and Configuration
21
Installing IIS 5.0
21
Windows Components Wizard Window
22
Web Server Configuration
23
FTP Server Configuration
23
Configuring the FTP Server Home Directory for Read/Write Access
23
6 HAFM Management Applications Installation
25
Installing the HAFM Software
25
Iomega Quiksync
25
7 HAFM Server Configuration
27
Connecting the HAFM Server to a LAN
27
HAFM Server LAN Connections
28
Configure HAFM Server Network Information
29
HA-Fabric Manager Login Dialog Box
30
System Properties Dialog Box-Network Identification Tab
31
Identification Changes Dialog Box
32
Local Area Connection Status Dialog Box
33
Local Area Connection Properties Dialog Box
34
Internet Protocol (TCP/IP) Properties Dialog Box
35
Advanced TCP/IP Settings Dialog Box-IP Settings Tab
36
Advanced TCP/IP Settings Dialog Box-DNS Tab
37
Set HAFM Server Date and Time
38
HA-Fabric Manager Login Dialog Box
39
Date/Time Properties Dialog Box
40
Date/Time Properties Dialog Box-Time Zone Tab
41
Configure and Enable Call-Home Features
42
Configure the Call-Home Via Dial-Out Feature
42
Type of Connection Window
43
Phone Number to Dial Window
44
Connection Availability Window
44
Ready to Create Your Connection Window
45
Configuring Windows 2000 to Enable a Dial-Up Connection
46
Configure and Enable the Proactive Services Call-Home Via LAN Feature
47
Test Remote Notification
48
Test Remote Notification Dialog Box
48
Click Ok
49
8 HAFM Operation
51
HAFM Services Window
51
HAFM Login Window
52
HAFM Services Window
52
HA-Fabric Manager Login Dialog Box
53
Service Control Manager
54
Stopping and Starting the HAFM Server from a Local Client
54
Accessing the Service Control Manager
54
Using HAFM Server to Manage the SAN
55
Services Window
55
9 Backing up and Restoring the HAFM Server
57
Backing up Configuration Data
57
Record or Verify HAFM Server Restore Information
58
Restore the HAFM Server
59
Install or Upgrade Software
60
HP OmniBook 6000 Startup Manual (75 pages)
Notebook PC
Brand:
HP
| Category:
Laptop
| Size: 0.48 MB
Table of Contents
Table of Contents
5
Introducing the Notebook Computer
7
Taking Inventory
8
What's in the Box
8
Software Bundled on Your Computer
9
To Find more Information
10
Identifying Parts of the Computer
11
Front View
11
Bottom View
12
Back View
13
Status Lights
14
Setting up Your Computer
16
Step 1 - Install the Battery
16
Step 2 - Connect Ac Power
18
Step 3 - Turn on the Computer
19
Step 4 - Set up Windows
20
Using Your Computer
21
Operating Your Computer
22
To Start and Stop the Computer
22
To Reset the Computer
23
To Use the Pointing Devices
24
To Use the Fn Hot Keys
25
Working in Comfort with a Notebook PC
26
Traveling with Your Computer
29
Using Battery Power
30
To Check Battery Status
30
To Respond to a Low-Battery Warning
31
Making Connections
33
Using Plug-In Modules
34
To Install Hot-Swap Support
34
To Replace a Plug-In Module
35
Configuring and Expanding Your Computer
37
Using the BIOS Setup Utility
38
To Run the BIOS Setup Utility
38
Installing a RAM Expansion Module
39
To Install a RAM Expansion Module
39
Replacing a Hard Disk Drive
41
To Replace the Hard Disk Drive
41
Troubleshooting Your Computer
43
Troubleshooting Techniques
44
Display Problems
44
Hard Disk Drive Problems
45
Keyboard and Pointing Device Problems
45
Performance Problems
46
Power and Battery Problems
46
Startup Problems
47
Testing the Hardware
48
To Run the Diagtools Diagnostic Test
48
Recovering and Reinstalling Software
50
To Recover the Factory Installation of Your Hard Disk
50
Support and Service
53
Getting Assistance for Your Computer
54
To Get Help from the Web
54
To Contact the HP Customer Care Center
54
To Receive Repair Service
56
To Prepare Your Computer for Shipment
57
Hewlett-Packard Limited Warranty Statement
58
Specifications and Regulatory Information
61
Hardware Specifications
62
Safety Information
65
Power Cords
65
Ergonomics
66
Battery Safety
66
Laser Safety
67
LED Safety
67
Regulatory Information
68
U.s.a
68
Canada
69
European Union
69
Japan
70
Russia
70
International
71
HP OmniBook 6000 Startup Manual (73 pages)
HP OmniBook 6000: User Guide
Brand:
HP
| Category:
Laptop
| Size: 0.39 MB
Table of Contents
Table of Contents
5
Introducing the Notebook Computer
7
Taking Inventory
8
What's in the Box
8
Software Bundled on Your Computer
9
To Find more Information
10
Identifying Parts of the Computer
11
Front View
11
Bottom View
12
Back View
13
Status Lights
14
Setting up Your Computer
16
Step 1 - Install the Battery
16
Step 2 - Connect Ac Power
18
Step 3 - Turn on the Computer
19
Step 4 - Set up Windows
20
Using Your Computer
21
Operating Your Computer
22
To Start and Stop the Computer
22
To Reset the Computer
23
To Use the Pointing Devices
24
To Use the Fn Hot Keys
25
Working in Comfort with a Notebook PC
26
Traveling with Your Computer
29
Using Battery Power
30
To Check Battery Status
30
To Respond to a Low-Battery Warning
31
Making Connections
33
Using Plug-In Modules
34
To Install Hot-Swap Support
34
To Replace a Plug-In Module
35
Configuring and Expanding Your Computer
37
Using the BIOS Setup Utility
38
To Run the BIOS Setup Utility
38
Installing a RAM Expansion Module
39
To Install a RAM Expansion Module
39
Replacing a Hard Disk Drive
41
To Replace the Hard Disk Drive
41
Troubleshooting Your Computer
43
Troubleshooting Techniques
44
Display Problems
44
Hard Disk Drive Problems
45
Keyboard and Pointing Device Problems
45
Performance Problems
46
Power and Battery Problems
46
Startup Problems
47
Testing the Hardware
48
To Run the Diagtools Diagnostic Test
48
Recovering and Reinstalling Software
50
To Recover the Factory Installation of Your Hard Disk
50
Support and Service
53
Getting Assistance for Your Computer
54
To Get Help from the Web
54
To Contact the HP Customer Care Center
54
To Receive Repair Service
56
To Prepare Your Computer for Shipment
56
Hewlett-Packard Limited Warranty Statement
57
Specifications and Regulatory Information
59
Hardware Specifications
60
Safety Information
63
Power Cords
63
Ergonomics
64
Battery Safety
64
Laser Safety
65
LED Safety
65
Regulatory Information
66
U.s.a
66
Canada
67
Japan
67
Russia
68
International
69
HP OmniBook 6000 Information (12 pages)
up-to-date information
Brand:
HP
| Category:
Laptop
| Size: 0.02 MB
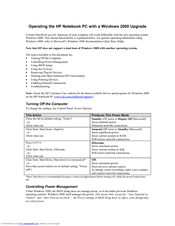
HP OmniBook 6000 Supplementary Manual (4 pages)
Operating the HP Notebook PC with a Windows 2000 Upgrade
Brand:
HP
| Category:
Laptop
| Size: 0.15 MB
Table of Contents
Turning off the Computer
1
Controlling Power Management
1
Using Bios Setup
2
Using Pointing Devices
3
Advertisement
Related Products
HP OmniBook 6000 - Notebook PC
HP OmniBook 6100 - Notebook PC
HP OmniBook 6100
HP Omnibook 6200
HP OmniBook 600
HP Omnibook 6000 series
HP OmniBook 2000
HP OmniBook 3000 - Notebook PC
HP OmniBook
HP Omnibook 7100 - notebook pc
HP Categories
Desktop
Laptop
Server
Monitor
Switch
More HP Manuals
Login
Sign In
OR
Sign in with Facebook
Sign in with Google
Upload manual
Upload from disk
Upload from URL