Table of Contents
Advertisement
Advertisement
Table of Contents

Related Manuals for Hitron CGN2


Summary of Contents for Hitron CGN2
- Page 1 USER’S GUIDE CGN2 RESIDENTIAL CABLE MODEM VERSION 2.0 - FEBRUARY 2012...
-
Page 2: About This User's Guide
HITRON CGN2 USER’S GUIDE ABOUT THIS USER’S GUIDE INTENDED AUDIENCE This manual is intended for people who want to configure the CGN2’s features via its Graphical User Interface (GUI). HOW TO USE THIS USER’S GUIDE This manual contains information on each the CGN2’s GUI screens, and describes how to use its various features. -
Page 3: Customer Support
A key stroke is denoted by square brackets and uppercase text. For example: Press [ENTER] to continue. CUSTOMER SUPPORT For technical assistance or other customer support issues, please consult your Hitron representative. Version 2.0, February 2012. Copyright 2012 Hitron Technologies Version 2.0, February 2012. -
Page 4: Table 1: Default Credentials
HITRON CGN2 USER’S GUIDE DEFAULT CREDENTIALS The CGN2’s default login credentials are as follows. For more information, see Logging into the CGN2 on page 23. Table 1: Default Credentials Username cusadmin Password password Copyright 2012 Hitron Technologies. All rights reserved. All trademarks and registered trademarks used are the properties of their respective owners. -
Page 5: Compliances
HITRON CGN2 USER’S GUIDE COMPLIANCES FCC INTERFERENCE STATEMENT This equipment has been tested and found to comply with the limits for a Class B digital device pursuant to Part 15 of the FCC Rules. These limits are designed to provide reasonable protection against radio interference in a commercial environment. - Page 6 HITRON CGN2 USER’S GUIDE FCC Radiation Exposure Statement: This equipment complies with FCC radiation exposure limits set forth for an uncontrolled environment. This equipment should be installed and operated with minimum distance 20cm between the radiator & your body. This transmitter must not be co-located or operating in conjunction with any other antenna or transmitter.
-
Page 7: Table Of Contents
1.2 Hardware Connections ..............14 1.3 LEDs ....................18 1.4 IP Address Setup ................21 1.4.1 Manual IP Address Setup ............22 1.5 Logging into the CGN2 ..............23 1.6 GUI Overview ..................24 1.7 Resetting the CGN2 ................25 Status ..................... 26 2.1 Cable Overview ................. - Page 8 HITRON CGN2 USER’S GUIDE 2.1.6 Routing Mode ................31 2.1.7 Configuration Files ..............31 2.1.8 Downstream and Upstream Transmissions ......31 2.1.9 Cable Frequencies ..............31 2.1.10 Modulation ................32 2.1.11 TDMA, FDMA and SCDMA ............ 32 2.2 The System Info Screen ..............33 2.3 The Initialization Screen ..............
- Page 9 HITRON CGN2 USER’S GUIDE 4.3.1 Adding or Editing an IP Filtering Rule ........63 4.4 The Forwarding Screen ..............65 4.4.1 Adding or Editing a Port Forwarding Rule ........ 67 4.5 The Port Triggering Screen ............... 69 4.5.1 Adding or Editing a Port Triggering Rule ........71 4.6 The DMZ Screen ................
-
Page 10: List Of Figures
HITRON CGN2 USER’S GUIDE LIST OF FIGURES Figure 1: Application Overview ................13 Figure 2: Hardware Connections ................15 Figure 3: Power Adaptor ..................18 Figure 4: LEDs ....................19 Figure 5: Login ....................23 Figure 6: GUI Overview ..................24 Figure 7: The Status > System Info Screen ............34 Figure 8: The Status >... -
Page 11: List Of Tables
HITRON CGN2 USER’S GUIDE LIST OF TABLES Table 1: Default Credentials ................4 Table 2: Hardware Connections ................16 Table 3: LEDs ....................19 Table 4: GUI Overview ..................24 Table 5: Private IP Address Ranges ..............28 Table 6: IP Address: Decimal and Binary ............28 Table 7: Subnet Mask: Decimal and Binary ............29... -
Page 12: Introduction
Internet via the cable connection. Computers with a wired connection to the CGN2 are on the Local Area Network (LAN), computers with a wireless connection to the CGN2 are on the Wireless Local Area Network (WLAN) and the CGN2 connects to the service provider over the Wide Area Network (WAN). -
Page 13: Key Features
HITRON CGN2 USER’S GUIDE Figure 1: Application Overview 1.1.1 KEY FEATURES The CGN2 provides: Internet connection to cable modem service via CABLE port (F-type RF connector) Local Area Network connection via four 10/100/1000 Mbps (megabits per second) Ethernet ports Dynamic Host Configuration Protocol (DHCP) for devices on the LAN ... -
Page 14: Hardware Connections
Settings backup and restore Secure configuration interface, accessible by Web browser HARDWARE CONNECTIONS This section describes the CGN2’s physical ports and buttons. Version 2.0, February 2012. Copyright 2012 Hitron Technologies Version 2.0, February 2012. Copyright 2012 Hitron Technologies... -
Page 15: Figure 2: Hardware Connections
HITRON CGN2 USER’S GUIDE Figure 2: Hardware Connections Version 2.0, February 2012. Copyright 2012 Hitron Technologies Version 2.0, February 2012. Copyright 2012 Hitron Technologies... -
Page 16: Table 2: Hardware Connections
HITRON CGN2 USER’S GUIDE Table 2: Hardware Connections ON/OFF Use this button to turn your CGN2 on or off. To turn the CGN2 on, press and hold the ON/OFF button for less than 1 second. To turn the CGN2 off, press and hold the ON/OFF ... - Page 17 HITRON CGN2 USER’S GUIDE Table 2: Hardware Connections The CGN2 provides one USB 2.0 host port, allowing you to plug in a USB flash disk for mounting and sharing through the LAN interfaces via the Samba protocol (network neighborhood). The CGN2 supports the following Windows file systems: FAT16 ...
-
Page 18: Leds
Use this to connect to the 12v/2A power adapter that came with your CGN2. NEVER use another power adapter with your CGN2. Doing so could harm your CGN2. Figure 3: Power Adaptor LEDS This section describes the CGN2’s LEDs (lights). -
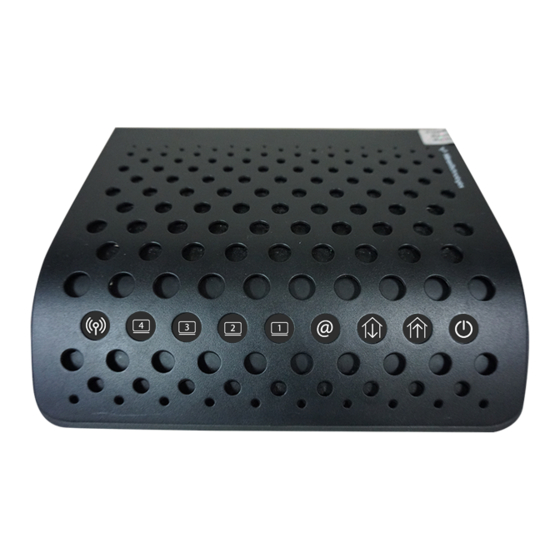
Page 19: Figure 4: Leds
HITRON CGN2 USER’S GUIDE Figure 4: LEDs Table 3: LEDs STATUS DESCRIPTION WIRELESS Off The wireless network is not enabled. Green, steady The wireless network is enabled, and no data is being transmitted or received over the wireless network. Green, blinking The wireless network is enabled, and data is being transmitted or received over the wireless network. - Page 20 Green, steady The CGN2 has successfully located and locked onto an upstream frequency on the CABLE connection. Blue The CGN2 is engaged in channel bonding on the upstream connection. There is no upstream activity on the CABLE connection. Green, blinking The CGN2 is searching for a downstream frequency on the CABLE connection.
-
Page 21: Ip Address Setup
WIRELESS LED lights up once the wireless network is ready. IP ADDRESS SETUP Before you log into the CGN2’s GUI, your computer’s IP address must be in the same subnet as the CGN2. This allows your computer to communicate with the CGN2. -
Page 22: Manual Ip Address Setup
HITRON CGN2 USER’S GUIDE 1.4.1 MANUAL IP ADDRESS SETUP By default, your CGN2’s local IP address is 192.168.0.1. If your CGN2 is using the default IP address, you should set your computer’s IP address to be between 192.168.0.2 and 192.168.0.254. -
Page 23: Logging Into The Cgn2
HITRON CGN2 USER’S GUIDE Your computer now obtains an IP address from the CGN2, or uses the IP address that you specified, and can communicate with the CGN2. LOGGING INTO THE CGN2 Take the following steps to log into the CGN2’s GUI. -
Page 24: Gui Overview
Use this section to move from one related screen to another. Navigation Bar Main Window Use this section to read information about your CGN2’s configuration, and make configuration changes. Each item in the Primary Navigation Bar has its own chapter in this User's Guide;... -
Page 25: Resetting The Cgn2
CGN2 is returned to its initial configuration state. There are two ways to reset the CGN2: Press the RESET button on the CGN2, and hold it in for ten seconds or longer. Click WAN/LAN > Backup. In the screen that displays, click the Factory Reset ... -
Page 26: Status
The Data Over Cable Service Interface Specification (DOCSIS) is a telecommunications standard that defines the provision of data services) Internet access) over a traditional cable TV (CATV) network. Your CGN2 supports DOCSIS version 3.0. Version 2.0, February 2012. Copyright 2012 Hitron Technologies... -
Page 27: Ip Addresses And Subnets
In the case of the CGN2: The public network (Wide Area Network or WAN) is the link between the cable connector and your Internet Service Provider. Your CGN2’s IP address on this network is assigned by your service provider. Version 2.0, February 2012. Copyright 2012 Hitron Technologies Version 2.0, February 2012. -
Page 28: Subnets
Local Area Network (LAN) and Wireless Local Area Network (WLAN), if enabled. You are free to assign IP addresses to computers on the LAN and WLAN manually, or to allow the CGN2 to assign them automatically via DHCP (Dynamic Host Configuration Protocol). IANA has reserved the following blocks... -
Page 29: Dhcp
By default, the CGN2 is a DHCP client on the WAN (the CATV connection). It broadcasts an IP address over the cable network, and receives one from the service provider. By default, the CGN2 is a DHCP server on the LAN; it provides IP addresses to computers on the LAN which request them. -
Page 30: Dhcp Lease
(or other device). For example, if a single computer has an Ethernet card (to connect to your CGN2 via one of the LAN ports) and also has a wireless card (to connect to your CGN2 over the wireless interface) the MAC addresses of the two cards will be different. -
Page 31: Routing Mode
2.1.6 ROUTING MODE When your CGN2 is in routing mode, it acts as a gateway for computers on the LAN to access the Internet. The service provider assigns an IP address to the CGN2 on the WAN, and all traffic for LAN computers is sent to that IP address. The CGN2 assigns private IP addresses to LAN computers (when DHCP is active), and transmits the relevant traffic to each private IP address. -
Page 32: Modulation
HITRON CGN2 USER’S GUIDE 2.1.10 MODULATION Transmissions over the cable network are based on a strong, high frequency periodic waveform known as the “carrier wave.” This carrier wave is so called because it “carries” the data signal. The data signal itself is defined by variations in the carrier wave. -
Page 33: The System Info Screen
a unique orthogonal code to each user. THE SYSTEM INFO SCREEN Use this screen to see general information about your CGN2’s hardware, its software, and its connection to the Internet. NOTE: Most of the information that displays in this screen is for troubleshooting purposes only. -
Page 34: Figure 7: The Status > System Info Screen
HITRON CGN2 USER’S GUIDE Figure 7: The Status > System Info Screen Version 2.0, February 2012. Copyright 2012 Hitron Technologies Version 2.0, February 2012. Copyright 2012 Hitron Technologies... -
Page 35: Table 8: The Status > System Info Screen
RF MAC This displays the Media Access Control (MAC) address of the CGN2’s RF module. This is the module that connects to the Internet through the CATV connection. Serial Number This displays a number that uniquely identifies the device. - Page 36 HITRON CGN2 USER’S GUIDE Table 8: The Status > System Info Screen (continued) WAN Information WAN Address This field displays the CGN2’s IP address on the WAN (Wide Area Network) interface. Subnet Mask This field displays the CGN2’s WAN subnet mask. Gateway Address This field displays the address of the device on the WAN to which the CGN2 is connected.
-
Page 37: The Initialization Screen
This screen displays the steps successfully taken to connect to the Internet over the CABLE connection. Use this screen for troubleshooting purposes to ensure that the CGN2 has successfully connected to the Internet; if an error has occurred you can identify the stage at which the failure occurred. -
Page 38: The Cm Status Screen
HITRON CGN2 USER’S GUIDE For each step: Process displays when the CGN2 is attempting to complete a connection step. Success displays when the CGN2 has completed a connection step. THE CM STATUS SCREEN Use this screen to discover information about: The nature of the upstream and downstream connection between the CGN2 and ... -
Page 39: Figure 9: The Status > Cm Status Screen
This displays the name of the configuration file that the Name CGN2 downloaded from your service provider. This file provides the CGN2 with the service parameter data that it needs to perform its functions correctly. Network Access This displays whether or not your service provider allows you to access the Internet over the CABLE connection. - Page 40 When an upstram connection cannot be made on the specified channel, the CGN2 attempts to connect on the next channel. If you want the CGN2 to attempt to connect on a different channel, enter it in the field and click Apply. NOTE: Do not change the channel unless you have a good reason to do so.
-
Page 41: The Password Screen
DHCP server. THE PASSWORD SCREEN Use this screen to change the password with which you log in to the CGN2. NOTE: If you forget your password, you will need to reset the CGN2 to its factory defaults. -
Page 42: The Capability Screen
Click this to see information about the fields in this screen. THE CAPABILITY SCREEN Use this screen to enable or disable the CGN2’s residential gateway and Universal Plug n Play (UPnP) functions. Disabling the residential gateway feature sets the unit to use bridge mode only. Use this mode when your network is already using another router. -
Page 43: Figure 11: The Status > Capability Screen
HNAP Select the checkbox to enable the CGN2’s Home Network Administration Protocol features, or deselect the checkbox to disable them. Select the checkbox to enable the CGN2’s USB media sharing capability, or deselect the checkbox to disable them. NOTE: This option is available to logged-in MSO users only. - Page 44 HITRON CGN2 USER’S GUIDE Version 2.0, February 2012. Copyright 2012 Hitron Technologies Version 2.0, February 2012. Copyright 2012 Hitron Technologies...
-
Page 45: Wan/Lan
31). The LAN is a separate network from the Wide Area Network (WAN). In the case of the CGN2, the WAN refers to all computers and other devices available on the cable connection. By default, computers on the WAN cannot identify individual computers on the LAN;... -
Page 46: Lan Ip Addresses And Subnets
Similarly, the CGN2 allows you to define a Domain Suffix to the LAN. When you enter the domain suffix into your browser, you can reach the CGN2 no matter what IP address it has on the LAN. -
Page 47: The Ip Screen
Configure the CGN2’s internal DHCP server Define how the CGN2 assigns IP addresses on the LAN See information about the network devices connected to the CGN2 on the LAN. Click WAN/LAN > IP. The following screen displays. Version 2.0, February 2012. Copyright 2012 Hitron Technologies Version 2.0, February 2012. -
Page 48: Figure 12: The Wan/Lan > Ip Screen
The following table describes the labels in this screen. Table 12: The WAN/LAN > IP Screen WAN Information WAN Address This field displays the CGN2’s IP address on the WAN (Wide Area Network) interface. Subnet Mask This field displays the CGN2’s WAN subnet mask. Gateway Address This field displays the address of the device on the WAN to which the CGN2 is connected. - Page 49 DNS servers that you want to use in these fields. Private LAN IP Setting IP Address Use this field to define the IP address of the CGN2 on the LAN. Subnet Mask Use this field to define the LAN subnet. Use dotted decimal notation (for example, 255.255.255.0).
-
Page 50: The Shared Media Screen
Use this screen to manage and share data stored on devices connected to the CGN2’s USB port. The CGN2 provides one USB 2.0 host port, allowing you to plug in a USB flash disk for mounting and sharing through the LAN interfaces via the Samba protocol (network neighborhood). -
Page 51: The Debug Screen
HITRON CGN2 USER’S GUIDE Figure 13: The WAN/LAN > Shared Media Screen The following table describes the labels in this screen. Table 13: The WAN/LAN > Shared Media Screen Group ID Specify the name of the Network Neighborhood workgroup whose users may access the shared media on the USB device. -
Page 52: The Backup Screen
THE BACKUP SCREEN Use this screen to back up your CGN2’s settings to your computer, to load settings from a backup you created earlier, to reboot your CGN2, or to return it to its factory default settings. Click WAN/LAN > Backup. The following screen displays. -
Page 53: Figure 15: The Wan/Lan > Backup Screen
The following table describes the labels in this screen. Table 15: The LAN > Backup Screen Backup/Restore Setting Backup Settings Click this to create a backup of all your CGN2’s settings Locally on your computer. Restore Settings Use these fields to return your CGN2’s settings to those Locally specified in a backup that you created earlier. -
Page 54: Firewall
FIREWALL The term “firewall” comes from a construction technique designed to prevent the spread of fire from one room to another. Similarly, your CGN2’s firewall prevents intrusion attempts and other undesirable activity originating from the WAN, keeping the computers on your LAN safe. You can also use filtering techniques to specify the computers and other devices you want to allow on the LAN, and prevent certain traffic from going from the LAN to the WAN. -
Page 55: Intrusion Detection System
Firewall > Local Logs screen. 4.1.3 PING The CGN2 allows you to use the ping utility on the LAN (in the WAN/LAN > Debug screen) and also on the WAN (in the Firewall > Firewall Options screen). For more information, see Debugging (Ping and Traceroute) on page 46. -
Page 56: Port Forwarding
You can set up a port forwarding rule for each application for which you want to open ports in the firewall. When the CGN2 receives incoming traffic from the WAN with a destination port that matches a port forwarding rule, it forwards the traffic to the LAN IP address and port number specified in the port forwarding rule. -
Page 57: The Filter Setting Screen
Deselect this to turn the firewall off. NOTE: It is strongly recommended that you enable the CGN2's firewall unless LAN protection is provided by another device or software. Intrusion Detection Select this to turn the intrusion detection system off. - Page 58 To configure MAC address filtering on the wireless network, see The Access Control Screen on page 93. You can set the CGN2 to allow only certain devices to access the CGN2 and the network, or to deny certain devices access.
-
Page 59: Figure 17: The Firewall > Filter Setting Screen
HITRON CGN2 USER’S GUIDE Figure 17: The Firewall > Filter Setting Screen Version 2.0, February 2012. Copyright 2012 Hitron Technologies Version 2.0, February 2012. Copyright 2012 Hitron Technologies... -
Page 60: Table 17: The Firewall > Filter Setting Screen
Table 17: The Firewall > Filter Setting Screen MAC Filter Options MAC Filter Options Use this field to control whether the CGN2 performs MAC filtering. Select Allow-All to turn MAC filtering off. All devices may access the CGN2 and the network. - Page 61 Manually-Added LAN Devices Device Name Enter the name to associate with a network device that you want to permit or deny access to the CGN2 and the network. NOTE: This name is arbitrary, and does not affect functionality in any way.
- Page 62 HITRON CGN2 USER’S GUIDE Table 17: The Firewall > Filter Setting Screen (continued) All IP Filtering Rules Use this to turn IP filtering on or off. Deselect the checkbox to enable IP filtering. Select the checkbox to disable IP filtering (default).
-
Page 63: Adding Or Editing An Ip Filtering Rule
HITRON CGN2 USER’S GUIDE Table 17: The Firewall > Filter Setting Screen (continued) Delete Select an IP filtering rule’s radio button ( ) and click this to remove the rule. The deleted rule’s information cannot be retrieved. Apply Click this to save your changes to the fields in the IP Filtering Options section. -
Page 64: Table 18: The Firewall > Filter Settings > Add/Edit Screen
To specify only a single port, enter its number in both fields. Protocol Use this field to specify whether the CGN2 should block communication via: Transmission Control Protocol (TCP) User Datagram Protocol (UDP) ... -
Page 65: The Forwarding Screen
HITRON CGN2 USER’S GUIDE THE FORWARDING SCREEN Use this screen to configure port forwarding between computers on the WAN and computers on the LAN. You can turn port forwarding on or off and configure new and existing port forwarding rules. - Page 66 These fields display the ports to which the rule applies: The Public field displays the incoming port range. These are the ports on which the CGN2 received traffic from the originating host on the WAN. The Private field displays the port range to which the ...
-
Page 67: Adding Or Editing A Port Forwarding Rule
HITRON CGN2 USER’S GUIDE Table 19: The Firewall > Forwarding Screen (continued) Cancel Click this to return the fields in this screen to their last- saved values without saving your changes. Help Click this to see information about the fields in this screen. -
Page 68: Table 20: The Firewall > Forwarding > Add/Edit Screen
Public Port Range Use these fields to specify the incoming port range. These are the ports on which the CGN2 received traffic from the originating host on the WAN. Enter the start port number in the first field, and the end port number in the second field. -
Page 69: The Port Triggering Screen
HITRON CGN2 USER’S GUIDE Table 20: The Firewall > Forwarding > Add/Edit Screen Apply Click this to save your changes to the fields in this screen. Cancel Click this to return the fields in this screen to their last- saved values without saving your changes. - Page 70 Target ports. The Target field displays the range of triggered ports. These ports are opened automatically when the CGN2 detects activity on the Trigger ports from computers on the LAN. Protocol This displays the protocol of the port triggering rule.
-
Page 71: Adding Or Editing A Port Triggering Rule
Trigger Port Range Use these fields to specify the trigger ports. When the CGN2 detects activity on any of these ports originating from a computer on the LAN, it automatically opens the Target ports in expectation of incoming traffic. -
Page 72: The Dmz Screen
Table 22: The Firewall > Port Triggering > Add/Edit Screen Target Port Range Use these fields to specify the target ports. The CGN2 opens these ports in expectation of incoming traffic whenever it detects activity on any of the Trigger ports. -
Page 73: Figure 23: The Firewall > Dmz Screen
LAN. Connected Computers Click this to see a list of the computers currently connected to the CGN2 on the LAN. To add a connected computer to the DMZ, click its Add button and click Apply in the screen that displays. -
Page 74: Parental Control
HITRON CGN2 USER’S GUIDE PARENTAL CONTROL This chapter describes the screens that display when you click Parent Control in the toolbar. It contains the following sections: Parental Control Overview on page The Website Blocking Screen on page The Scheduling Screen on page ... -
Page 75: The Website Blocking Screen
HITRON CGN2 USER’S GUIDE THE WEBSITE BLOCKING SCREEN Use this screen to block access from the LAN to certain websites. You can also specify trusted computers, which are not subject to the blocking filter. NOTE: To apply the blocking filter only at certain times, use the Parental Control >... -
Page 76: Table 24: The Parental Control > Web Site Blocking Screen
Click this to see a list of the computers that are currently Computers connected to the CGN2. To add a computer to the New Computer MAC Address field, select its Add checkbox and click Apply in the screen that displays. -
Page 77: The Scheduling Screen
HITRON CGN2 USER’S GUIDE Table 24: The Parental Control > Web Site Blocking Screen (continued) Clear List Click this to delete all the computers’ MAC addresses from the list. Apply Click this to save your changes to the fields in this screen. -
Page 78: Figure 25: The Parental Control > Scheduling Screen
HITRON CGN2 USER’S GUIDE Figure 25: The Parental Control > Scheduling Screen The following table describes the labels in this screen. Table 25: The Parental Control > Scheduling Screen Days of the Week Select the days of the week on which you want the website blocking filter to be in effect. -
Page 79: The Email / Syslog Alert Screen
HITRON CGN2 USER’S GUIDE Table 25: The Parental Control > Scheduling Screen (continued) Cancel Click this to return the fields in this screen to their last- saved values without saving your changes. Help Click this to see information about the fields in this screen. -
Page 80: Table 26: The Parental Control > Email / Syslog Alert Screen
HITRON CGN2 USER’S GUIDE The following table describes the labels in this screen. Table 26: The Parental Control > Email / Syslog Alert Screen Mail Server Configuration Use this section to define the location of the transmitting email server, and the email address from which admin emails appear to originate. -
Page 81: Figure 27: Add Target Email Address
HITRON CGN2 USER’S GUIDE Table 26: The Parental Control > Email / Syslog Alert Screen (continued) Recipient List (up to 4 Use this section to define up to four target email address items) to which admin emails will be sent. - Page 82 HITRON CGN2 USER’S GUIDE Table 26: The Parental Control > Email / Syslog Alert Screen (continued) Cancel Click this to return the fields in this screen to their last- saved values without saving your changes. Help Click this to see information about the fields in this screen.
-
Page 83: Wireless
6.1.1 WIRELESS NETWORKING BASICS Your CGN2’s wireless network is part of the Local Area Network (LAN), known as the Wireless LAN (WLAN). The WLAN is a network of radio links between the CGN2 and the other computers and devices that connect to it. -
Page 84: Wireless Standards
The wireless clients connect to the access point in order to receive a wireless connection to the WAN and the wired LAN. The CGN2 is the access point, and the computers you connect to the CGN2 are the wireless clients. 6.1.3... -
Page 85: Wireless Security
(signal scrambling so that only authenticated users can decode the transmitted data). The sophistication of each security method varies, as does its effectiveness. The CGN2 supports the following wireless security protocols (in order of effectiveness): WEP (the Wired Equivalency Protocol): this protocol uses a series of “keys” or ... -
Page 86: Wmm
THE SETUP SCREEN Use this screen to configure your CGN2’s basic wireless settings. You can turn the wireless module on or off, select the wireless mode and channel, run WPS and configure the wireless network’s SSID. -
Page 87: Figure 28: The Wireless > Setup Screen
HITRON CGN2 USER’S GUIDE Click Wireless > Setup. The following screen displays. Figure 28: The Wireless > Setup Screen The following table describes the labels in this screen. Table 27: The Wireless > Setup Screen Wireless Basic Settings Wireless ON/OFF Use this field to turn the wireless network on or off. - Page 88 If in doubt, use 11B/G/N (default). Channel Select the wireless channel that you want to use, or select Auto to have the CGN2 select the optimum channel to use. NOTE: Use the Auto setting unless you have a specific reason to do otherwise.
-
Page 89: Figure 29: Wps Pin
Click the PIN button to begin the PIN configuration process. In the screen that displays, enter the WPS PIN that you want to use for the CGN2, or the WPS PIN of the client device you want to add to the network. - Page 90 Hidden Use this field to make your network visible or invisible to other wireless devices. Select the checkbox if you do not want the CGN2 to broadcast the network name (SSID) to all wireless devices in the coverage area. Anyone who wants to connect to the network must know the SSID.
- Page 91 The CGN2 supports up to four WEP keys, of which you can select one as the default. You should input the same four keys, in the same order, in your network’s wireless clients.
- Page 92 Group Key Update Enter the frequency (in seconds) with which you want Interval the CGN2 to create new pre-shared keys, and issue them to the wireless client. Pre-Shared Key Enter the pre-shared key that you want to use for your wireless network.
-
Page 93: The Access Control Screen
To configure MAC address filtering on the wired LAN, see The Filter Setting Screen on page 57. You can set the CGN2 to allow only certain devices to access the CGN2 and the network wirelessly, or to deny certain devices access. -
Page 94: Table 28: The Wireless > Access Control Screen
Delete Select a permitted or denied wireless device’s radio button ( ) and click this to remove the device from the list. The device may no longer access the CGN2 and the network. Wireless Devices Auto-Learned Wireless Devices Device Name This displays the name of each network device that has connected to the CGN2 on the wireless network. -
Page 95: The Advanced Screen
Wireless Control List. Manually-Added Wireless Devices Device Name Enter the name to associate with a network device that you want to permit or deny access to the CGN2 and the network wirelessly. NOTE: This name is arbitrary, and does not affect functionality in any way. -
Page 96: Figure 31: The Wireless > Advanced Screen
HITRON CGN2 USER’S GUIDE Figure 31: The Wireless > Advanced Screen Version 2.0, February 2012. Copyright 2012 Hitron Technologies Version 2.0, February 2012. Copyright 2012 Hitron Technologies... -
Page 97: Table 29: The Wireless > Advanced Screen
BG Protection Mode Use this field to configure IEEE 802.11b/g protection. Both 802.11b and 802.11g wireless communications occur at the same radio frequencies. When the CGN2 is wirelessly connected to 802.11b clients and 802.11g clients simultaneously, the performance of the link to 802.11g clients can deteriorate due to the presence of... - Page 98 Multicast groups are often used for Internet TV and real-time streaming applications such as online gaming. IGMP snooping allows the CGN2 to “snoop” or listen in on IGMP traffic, and to determine which computers on the LAN belong to which IGMP groups. By keeping lists...
- Page 99 HITRON CGN2 USER’S GUIDE Table 29: The Wireless > Advanced Screen (continued) Operating Mode Use this field to configure how the CGN2 transmits in IEEE 802.11n mode. Mixed mode, on the other hand, allows 802.11a/b/g stations to tell when 802.11n transmissions are...
- Page 100 Select Short to use a short guard interval of 400 nanoseconds. Use this field to configure the Modulation and Coding Scheme (MCS) that the CGN2 uses for IEEE 802.11n transmissions. The 802.11n protocol specifies 77 Modulation and Coding Schemes. Each MCS refers to a combination of a modulation technique, a coding rate, a guard interval, and a certain number of spatial streams.
- Page 101 Select Enable to allow Reverse Direction Grants. Extension Channel This field displays the secondary wireless radio channel that the CGN2 uses for channel bonding (combining two channels for faster data transfer) in IEEE 802.11n transmissions. NOTE: At the time of writing, you cannot select the Extension channel.
- Page 102 However, when you enable Auto Block ACK the CGN2 sends a burst of multiple frames together, and follows it with a single, block ACK request. Select Disable to not use block ACKs.
-
Page 103: Configuring Wmm Parameters
HITRON CGN2 USER’S GUIDE 6.4.1 CONFIGURING WMM PARAMETERS To set up your CGN2’s Wifi MultiMedia (WMM) Quality of Service (QoS) settings, click the Configuration button in the Wireless > Advanced screen. The following screen displays. Figure 32: The Wireless > Advanced > WMM Configuration Screen... - Page 104 This field specifies whether Admission Control is Mandatory (ACM) for each Access Category. Select the checkbox to have the CGN2 control ACM. Version 2.0, February 2012. Copyright 2012 Hitron Technologies Version 2.0, February 2012. Copyright...
- Page 105 HITRON CGN2 USER’S GUIDE Table 30: The Wireless > Advanced > WMM Configuration Screen AckPolicy WMM defines two ACK policies: NormalAck and NoAck. NormalAck: the recipient of a transmission acknowledges each received packet. NoAck: the recipient of a transmission does not ...
- Page 106 HITRON CGN2 USER’S GUIDE Table 30: The Wireless > Advanced > WMM Configuration Screen TXOP This field defines the Transmission Opportunity (TXOP) length for each Access Category. This is the length of time during which the wireless device may to transmit over the wireless network, once it receives a transmission opportunity.
-
Page 107: Troubleshooting
Using a power adaptor other than the one that came with your CGN2 can damage the CGN2. Ensure that the power adaptor is connected to the CGN2 and the wall socket (or other power source) correctly. Ensure that the power source is functioning correctly. Replace any broken fuses or reset any tripped circuit breakers. - Page 108 I Forgot the CGN2’s Admin Username or Password The default username is cusadmin, and the default password is password. If the default username and password do not work, you need to reset the CGN2. Resetting the CGN2 on page 25. All user-configured data is lost, and the CGN2 is returned to its default settings.
- Page 109 (walls, floors, trees, etc.) and electrical interference (other radio transmitters, microwave ovens, etc) reduce your CGN2’s signal quality and coverage area. Ensure that the CGN2 and the wireless client are set to use the same wireless mode and SSID (see The Setup Screen...
-
Page 110: Index
HITRON CGN2 USER’S GUIDE INDEX cable modem Numbers CATV cipher type 802.11b/g/n clients, wireless configuration file connection process connection status, cable conventions, document customer support access control access logs access point accounts, login address, IP address, IP, local debugging default... - Page 111 HITRON CGN2 USER’S GUIDE IANA Ethernet ICMP Ethernet cables IEEE 802.11b/g/n Ethernet port IGMP snooping event logging interface, user intrusion detection IP address IP address lease IP address renewal IP address setup IP address, default factory defaults IP address, format...
- Page 112 HITRON CGN2 USER’S GUIDE PIN configuration ping port forwarding MAC address port triggering MAC address filtering port, Ethernet MAC filtering ports main window pre-authentication Media Access Control address pre-shared key MIMO private IP address modem push-button configuration modulation Multiple-In, Multiple-Out...
- Page 113 HITRON CGN2 USER’S GUIDE scheduling website blocking security website blocking, scheduled security, wireless service set Wide Area Network settings backup and restore Wifi MultiMedia shared key authentication Wifi Protected Setup SSID window, main Status Windows XP status wired security status, cable connection...
Need help?
Do you have a question about the CGN2 and is the answer not in the manual?
Questions and answers