Cornelius ABS 2.0 Operator's Manual
Hide thumbs
Also See for ABS 2.0:
- Service manual (68 pages) ,
- Installation manual (66 pages) ,
- Operator's manual (58 pages)

Related Manuals for Cornelius ABS 2.0


Summary of Contents for Cornelius ABS 2.0
- Page 1 ABS 2.0 Operator’s Manual Release Date: July 9, 2019 Publication Number: 621058590OPR Revision Date: July 9, 2019 Revision: A Visit the Cornelius web site at www.cornelius.com for all your Literature needs.
- Page 2 Commercial Warranty. Cornelius will not be responsible for any repair, replacement or other service required by or loss or damage resulting from any of the following occurrences, including but not limited to, (1) other than normal and proper use and normal...
-
Page 3: Table Of Contents
Introduction to Abs 2.0 Programming ........ - Page 4 Default Settings/Restoring Settings ......... . . 17 Display Explanation .
-
Page 5: Safety Instructions
ABS 2.0 Operator’s Manual SAFETY INSTRUCTIONS EAD AND OLLOW AFETY NSTRUCTIONS Safety Overview ALL SAFETY INSTRUCTIONS • ead and follow in this manual and any warning/caution labels on the unit (decals, labels or laminated cards). OSHA • ead and understand ALL applicable... -
Page 6: Qualified Service Personnel
ABS 2.0 Operator’s Manual UALIFIED ERVICE ERSONNEL WARNING: ALL WIRING nly trained and certified electrical, plumbing and refrigeration technicians are to service this unit. AND PLUMBING MUST CONFORM TO NATIONAL AND LOCAL CODES. FAILURE TO COMPLY COULD RESULT IN SERIOUS INJURY, DEATH OR EQUIPMENT DAMAGE. IF THE SUPPLY CORD IS DAMAGED, IT MUST BE REPLACED BY THE MANUFACTURER, ITS SERVICE AGENT OR SIMILARLY QUALIFIED PERSONS IN ORDER TO AVOID A HAZARD. -
Page 7: Sound Level
ABS 2.0 Operator’s Manual OUND EVEL CAUTION: -weighted sound pressure level has been determined to be below 70d OCATION CAUTION ppliance is not suitable for installation in an area where a water jet could be used. CAUTION he appliance must be placed in a horizontal position. -
Page 8: Introduction
When a beverage is ordered from the P.O.S. register, the ABS 2.0 automatically drops a cup, fills it with ice and dispenses the correct amount and type of any syrup-based beverage. The finished drink is then moved by the conveyor to the pick-up sta- tion and the drink description is displayed on the touchscreen. -
Page 9: Features
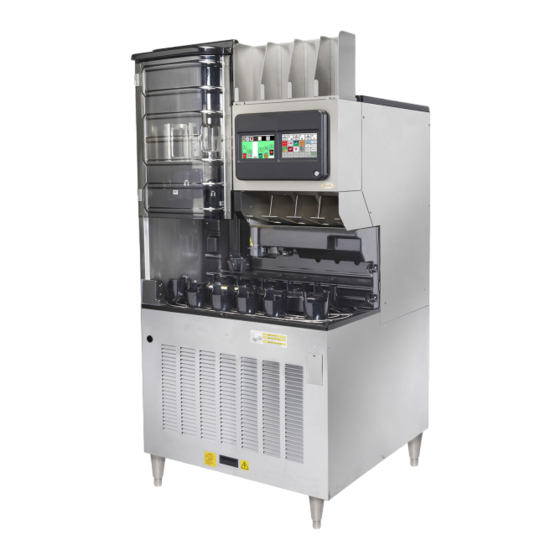
ABS 2.0 Operator’s Manual EATURES Table 2. Product features Mounting type (leg/caster) 4 legs mounted Two 177.8 mm [7 inch] touch screen dis- UI interface type and size play Number of Brands Cup storage 6 cup dispenser Lid Storage 8 lid compartment... -
Page 10: Unit Drawing
ABS 2.0 Operator’s Manual UNIT DRAWING Figure 1. Dimension Units in [mm]. Publication Number: 621058590OPR - 6 - © 2019, Cornelius Inc. -
Page 11: Normal Operations
ABS 2.0 Operator’s Manual NORMAL OPERATIONS & U OCATION OWER SAGE Location Of Unit Locate the dispenser so that the following requirements are satisfied: 1. Unit is not to be installed in an area where a water jet (power washer) is used. -
Page 12: Preparing Unit For Use
Turn ON the rocker switch on the unit to power it up. REPARING Ice Filling ABS 2.0 comes with 2 types of ice maker adapters. The list of ice makers compatible with ice maker adapter PN 629097799 (Manitowoc/Scotsman) are below in Table 5 on page 8. -
Page 13: Cup Loading/ Cup Change / Turret Setup Instructions
ABS 2.0 Operator’s Manual OADING HANGE URRET ETUP NSTRUCTIONS Table 7. Step Action Figure Select menu as shown in Figure 3. or select cup refill Figure 3. If in menu page select Cup Refill icon as shown in Figure 4. - Page 14 ABS 2.0 Operator’s Manual Table 7. (Continued) After selecting the cup size the screen with instruction message will pop up as shown in Figure 6. Open the turret door. Figure 6. A. Fill Cup’s in the cup holder. Spin Turret by hand for all other size.
-
Page 15: Operational Modes
NITIALIZING AND Turn ON the ABS 2.0 unit at the ABS 2.0 ON/OFF switch located on the left top corner of the stand. During the power-up sequence the Self Test and Initializing messages will be displayed as each test is being made. -
Page 16: Manual Mode Operation
In the MANUAL mode, POS data is updated and ALARM messages are displayed. In MANUAL mode the highlight flashes to alert operator that the ABS 2.0 unit is in the MANUAL mode. While in the MANUAL mode, POS drink orders continue to be received and placed in the order buffer. -
Page 17: Automatic Mode Operation
UTOMATIC PERATION In automatic mode the beverage dispense automatically from the input of POS system. By default ABS 2.0 Sys- tem is setup to Automatic operation mode. If alarm conditions are present (but previously acknowledged) the ABS 2.0 status will indicate Warning. -
Page 18: Signal To Manager's Computer
EVERAGE ISPENSED The P.O.S sends the drink portion of the order to the ABS 2.0 where the information is interpreted and the drink is dispensed. If the drink requires a top-off, the initial portion will be dispensed. After a delay, the balance of the drink will be dispensed. -
Page 19: Explanation Of Conveyor Positions
ABS 2.0 Operator’s Manual XPLANATION ONVEYOR OSITIONS Cup Extraction Position Ice Fill Position Beverage Fill Position ABS ON/ OFF Switch “A” Last Position Conveyor Position Figure 14. AUTOMATIC RINK RDER NTRY Manual order entry can be made without entering the drink at the POS. This is normally done to correct an error in entry, to pour a replacement drink or to accommodate a customer special request. -
Page 20: Press Cup Size
Figure 15. RESS Operation of the ABS 2.0 is restricted to employees and service personal that have been trained and certified in the proper operation, service and maintenance of the equipment. While in automatic mode, to dispense a drink semi-automatically, press the desired cup size button. -
Page 21: To Service
ESTORING ETTINGS The ABS 2.0 system is factory set to satisfy the majority of all installations. Do not make any adjustments until you are sure the factory settings will not satisfy the store requirements. Touch Panel Layout & Explanation Cup Size... -
Page 22: Display Explanation
6. Alarm, cleaning due or past due. 7. Order - Current example. -L (Large), Regular (Ice type) -Order (ABS 2.0 = Semi Auto or Order Number) 8. Finished Drinks 1-6, left to right, Coke is Position one. 9. Flush - CW has flushed the Nozzle. -
Page 23: Entering The Manager Menu Screen
ABS 2.0 Operator’s Manual NTERING THE ANAGER CREEN Table 9. Step Action Figure Select the Menu as shown in Figure 19. Figure 19. Select the Manager Icon as shown Figure 20. Figure 20. Close the Clear the Enter 1234, then green arrow as shown... - Page 24 ABS 2.0 Operator’s Manual Table 9. (Continued) Step Action Figure From system Option select Cleaning & Sanitazi Setup button as shown in Figure 23. Figure 23. Select the cleaning options using scroll up/down button and set the next cleaning date & time for alarm as shown in Figure 24.
-
Page 25: Cleaning / Maintenance Procedures
ABS 2.0 Operator’s Manual CLEANING / MAINTENANCE PROCEDURES WARNING: isconnect power to the unit before cleaning / maintenance. ollow all lock out/tag out procedures established by the user. erify all power is off to the unit before performing any work Failure to comply could result in serious injury, death or damage to the equipment. -
Page 26: Staging Cleaning
ABS 2.0 Operator’s Manual TAGING LEANING Dis-assemble Staging Table 10. SL.NO Action Figure Remove cover by loosening the 3 thumb screws and lifting it upwards. As shown in Figure 27. Figure 27. Remove the conveyor by lifting it upwards. NOTE: : Avoid carrying conveyor by cup holder. -
Page 27: Clean Drip -Tray Area
ABS 2.0 Operator’s Manual LEAN Clean Drip-Tray Area Table 11. SL.NO Action Figure Make sure water deflector is properly installed; this will help prevent motor failures. (Order replacement if the deflector is missing). Figure 30. Drain line Pour warm water down the drip-tray drain. Flush the drip-tray using carbonated water. -
Page 28: Back Room Cleaning
ABS 2.0 Operator’s Manual Table 11.(Continued) Wipe down drip-tray and splash panel with a clean cloth to remove any soapy residue. Figure 33. Spray McD sanitizer all around drip-tray and splash panel. Let air dry for 5 minutes. Figure 34. -
Page 29: Dis-Assemble Nozzle
ABS 2.0 Operator’s Manual ASSEMBLE OZZLE Dis-assemble Nozzle Table 13. Step Action Figure Remove the outer nozzle housing by rotating it in the clockwise direction. as shown in Figure Figure 36. Remove the diffuser by pulling it vertically downward. as shown in Figure 37. -
Page 30: Clean Nozzle
ABS 2.0 Operator’s Manual LEAN OZZLE Nozzle cleaning Table 14. Step Action Figure Remove the gasket from the diffuser. Figure 38. Prepare bucket of McD APC solution. Figure 39. Place outer nozzle housing, diffuser, and gasket in the soap solution. Let soak for a few minutes. -
Page 31: Sanitize Nozzle
ABS 2.0 Operator’s Manual ANITIZE OZZLE Sanitize Nozzle Table 15. Step Action Figure Spray sanitizer on the nozzle, diffuser, and gasket Figure 42. Wipe the nozzle and diffuser with a soft cloth Figure 43. Let air dry for 5 minutes Figure 44. -
Page 32: Clean Conveyor & Grill
ABS 2.0 Operator’s Manual & G LEAN ONVEYOR RILL Table 16. Clean Conveyor & Grill Step Action Figure Wash the conveyor and grille in lukewarm soapy water. Rinse with plain water. NOTE: DO NOT place in dishwasher. Figure 45. ETURN... -
Page 33: Reassemble Staging
ABS 2.0 Operator’s Manual EASSEMBLE TAGING Table 18. Reassemble Staging Step Action Figure Reinstall the grill. Align to the notches in the drip-tray. NOTE: Cup positioning bracket must be on back side as shown in Figure 47. Figure 47. Reinstall the conveyor. Align the drive shaft to motor coupler on the left side as shown in Figure 48. -
Page 34: Reassemble Nozzle
Figure 52. INAL TATUS Table 20. Step Action Figure Great job cleaning your ABS 2.0! This will keep your ABS 2.0 running great! Daily cleaning complete. Figure 53. Publication Number: 621058590OPR - 30 - © 2019, Cornelius Inc. -
Page 35: Weekly Cleaning
ABS 2.0 Operator’s Manual EEKLY LEANING EQUIRED OOLS • McD APC. • Clean Cloth. • McD Stainless Steel Cleaner. Figure 54. ISASSEMBLE TORAGE Table 21. Disassemble Lid Storage Step Action Figure Empty all lids from the lid dispenser. Figure 55. -
Page 36: Clean Lid Storage
ABS 2.0 Operator’s Manual LEAN TORAGE Table 22. Clean Lid Storage Step Action Figure Wipe dirt and dust from all internal surfaces of lid storage with McD APC solution and wipe dry with a soft, sanitized cloth. Figure 57. Apply McD Stainless Steel Cleaner dressing to all exterior stainless steel surfaces and wipe dry with a paper towel. -
Page 37: Reassemble Lid Storage
ABS 2.0 Operator’s Manual EASSEMBLE TORAGE Table 23. Reassemble Lid Storage Step Action Figure Return lid separator to original position and refill with lids. Figure 61. LEAN RIPPER Table 24. Reassemble Lid Storage Step Action Figure Wipe dirt and dust from the inside faces of the gripper pads with McD APC solution and wipe dry with a soft, sanitized cloth. -
Page 38: Cleaning Of Exterior Surfaces
ABS 2.0 Operator’s Manual LEANING OF XTERIOR URFACES Table 25. Cleaning of Exterior Surfaces Step Action Figure Wipe dirt and dust from all exterior surfaces with McD APC solution and wipe dry with a soft, sani- tized cloth. Wipe the Turret Door, Touch Screen, Back splash, Side Wall, Exterior Panels. -
Page 39: Final Status
Clean and wipe lower exterior panels below drip-tray. Figure 67. INAL TATUS Table 26. Step Action Figure Great job cleaning your ABS 2.0 This will keep your ABS 2.0 running great! Weekly cleaning complete Figure 68. © 2019, Cornelius Inc. - 35 - Publication Number: 621058590OPR... -
Page 40: Monthly Cleaning And Sanitation (Manual Process)
ABS 2.0 Operator’s Manual ONTHLY LEANING AND ANITATION MANUAL PROCESS OOLS EQUIRED • Santizing solution - 1 Packet Kay-5 or Stera Sheen. • Soap solution - mild detergent. • Clean Buckets (3 if possible). • Clean Cloth. • McD Stainless Steel Cleaner. - Page 41 ABS 2.0 Operator’s Manual Table 27. Hopper Cleaning (Continued) Step Action Figure Gather cleaning buckets and fill accordingly: A. Cleaning – McD APC mix with warm water. B. Rinse Water – clean potable water. C. Sanitizing – McD Sanitizer mix with luke- warm water.
- Page 42 ABS 2.0 Operator’s Manual Table 27. Hopper Cleaning (Continued) Step Action Figure Re-assemble the agitator into the hopper and tighten the agitator retainer. Figure 75. Using a mechanical spray bottle filled with sanitizing solution, spray the entire interior of the ice bin, ice-chute and ice agitator assembly.
-
Page 43: Ice Chute Cleaning
ABS 2.0 Operator’s Manual HUTE LEANING Table 28. Ice Chute Cleaning Step Action Figure Hold ice chute cover and push up until you hear a click and side latches are disengaged. Figure 77. Lift off the ice chute cover and set it aside. -
Page 44: Product Line Cleaning
ABS 2.0 Operator’s Manual Table 28. Ice Chute Cleaning Step Action Figure Carefully insert ice chute cover and slide down to fully engage. Make sure cover side latches mate flush with ice chute base before sliding down. Figure 81. RODUCT LEANING Table 29. - Page 45 ABS 2.0 Operator’s Manual Table 29. Product Line Cleaning (Continued) Step Action Figure Attach fittings to each BIB disconnect. If the fittings are not available, the fittings from empty BIB bags can be cut from the bags and used. These fittings open the disconnects so the sanitizing solution can be drawn through the disconnect.
-
Page 46: Nozzle Cleaning
ABS 2.0 Operator’s Manual OZZLE LEANING Table 30. Nozzle Cleaning Step Action Figure Remove the outer nozzle housing by rotating it in the clockwise direction. Figure 89. Remove the diffuser by pulling it vertically downward. Figure 90. Remove the gasket from the diffuser. - Page 47 ABS 2.0 Operator’s Manual Table 30. Nozzle Cleaning (Continued) Step Action Figure Rinse the nozzle components in lukewarm, clean water to remove soapy residue. Figure 94. Spray sanitizer on the nozzle, diffuser, and gasket Figure 95. Wipe the nozzle and diffuser with a soft cloth Figure 96.
- Page 48 4 at one time. Continue until brands are flowing freely. Figure 102. Great job cleaning your ABS 2.0! This will keep your ABS 2.0 running great! Monthly clean procedure successfully finished. Figure 103.
-
Page 49: Monthly Cleaning And Sanitation (With Cleaning Wand)
ABS 2.0 Operator’s Manual ONTHLY LEANING AND ANITATION WITH CLEANING WAND Using a long handled nylon bristle brush, clean the interior of the cold plate with warm, soapy solution. The cold plate is to be cleaned by reaching through the ice opening into the hopper bottom with the long handle brush. - Page 50 ABS 2.0 Operator’s Manual Table 31. Hopper Cleaning (Continued) Step Action Figure Remove remaining ice in the hopper. Press and hold *ICE DUMP* button on the screen until fully empty. Collect ice in separate tray or chute and avoid dumping in ABS drip-tray.
- Page 51 ABS 2.0 Operator’s Manual Table 31. Hopper Cleaning (Continued) Step Action Figure When ready press *START CIP PUMP* button, open spray valve with a 90° turn and begin spraying all around hopper and hard to reach corners. Spray until bucket is empty. Avoid spraying directly into bottom of ice maker.
- Page 52 ABS 2.0 Operator’s Manual Table 31. Hopper Cleaning (Continued) Step Action Figure When finished press *STOP CIP PUMP* button and close valve with a 90° clockwise turn. To avoid excessive wear to CIP pump, turn off immediately after bucket is empty Figure 116.
- Page 53 ABS 2.0 Operator’s Manual Table 31. Hopper Cleaning (Continued) Step Action Figure Drain both CIP hoses and return back to unit. Figure 120. Make sure manual fill door is closed. Figure 121. Turn on the ice maker by either locating the power button behind the ice maker’s front panel...
-
Page 54: Final Status
ABS 2.0 Operator’s Manual INAL TATUS Table 32. Step Action Figure Great job cleaning your ABS 2.0! This will keep your ABS 2.0 running great! Monthly cleaning complete. Figure 123. UARTERLY LEANING NLY FOR CHILLER NITS OOLS EQUIRED • Phillips Head Screw Driver... - Page 55 ABS 2.0 Operator’s Manual Table 33. Condenser Filter Cleaning (Continued) Step Action Figure Slide the pre-cool condenser filter up to remove it from the ABS. The filter is located on the front of the chassis. Figure 126. Using a warm solution of McD APSC solution and a clean towel, clean the filter.
-
Page 56: Final Status
Phillips head screwdriver. Figure 130. INAL TATUS Table 34. Step Action Figure Great job cleaning your ABS 2.0! This will keep your ABS 2.0 running great! Quarterly cleaning complete. Figure 131. Publication Number: 621058590OPR - 52 - © 2019, Cornelius Inc. -
Page 57: Plumbing Diagram (Air/Co 2)
ABS 2.0 Operator’s Manual PLUMBING DIAGRAM (AIR/CO AIR/CO2 PICKER POSITIONS FILTER & REGULATOR UNIT EXHAUST PRESSURE EXHAUST 560000391 MIDDLE: EXHAUST PRESSURE PRESSURE .358 Mpa (52PSI) DOWN: PRESSURE EXHAUST PRESSURE OPEN: 1A EXHAUST 1B PRESSURE CLOSE: 1A PRESSURE 1B EXHAUST Ø0.419mm (Ø... -
Page 58: Troubleshooting
ABS 2.0 Operator’s Manual TROUBLESHOOTING ECHANICAL SSUES Table 35 Message Explanation Correction Remove all cups from the conveyor Cup(s) is jammed in the conveyor at cup holders at the Extract Position the cup extraction position and the before pressing the ENTER button. -
Page 59: Beverage / Ice Related Issues
ABS 2.0 Operator’s Manual EVERAGE CE RELATED SSUES Table 36. Message Explanation Correction A. Ice Chute not installed correctly. Reinstall Ice Chute. B. Bad solenoid valve. Call for service. NO ICE DISPENSE C. Plugged orifice. Call for service. D. No / Low CO Call for service. -
Page 60: Pos Related Issues
SSUES Table 37. Message Explanation • Verify that the ABS 2.0 unit is enabled in the POS Drink. Dispenser setup. • Verify that POS cable is connected to COM2 on the CCU. • Verify that the POS cable is connected to the ABS 2.0 unit. - Page 61 ABS 2.0 Operator’s Manual © 2019, Cornelius Inc. - 57 - Publication Number: 621058590OPR...
- Page 62 ABS 2.0 Operator’s Manual Publication Number: 621058590OPR - 58 - © 2019, Cornelius Inc.
- Page 64 Cornelius Inc. www.cornelius.com...