Garmin G500 Pilot's Manual
Hide thumbs
Also See for G500:
- Pilot's manual (358 pages) ,
- Instructions manual (334 pages) ,
- Reference manual (104 pages)
Table of Contents
Advertisement
Quick Links
Advertisement
Table of Contents

Related Manuals for Garmin G500


Summary of Contents for Garmin G500
- Page 1 G500/G600 Pilot’s Guide...
- Page 2 ® ® ® SVT™, G500, and G600 are trademarks of Garmin Ltd. or its subsidiaries. These trademarks may not be used without the express permission of Garmin. NavData is a registered trademark of Jeppesen, Inc.; ChartView™ is a trademark of Jeppesen, Inc.;...
- Page 3 (iv) damage caused by service performed by anyone who is not an authorized service provider of Garmin; or (v) damage to a product that has been modified or altered without the written permission of Garmin. In addition, Garmin reserves the right to refuse warranty claims against products or services that are obtained and/or used in contravention of the laws of any country.
- Page 4 GDU 620 PFD or other pressure altimeters in aircraft. WARNING: Do not use outdated database information. Databases used in the G500/G600 systems must be updated regularly in order to ensure that the information remains current. Pilots using an outdated database do so entirely at their own risk.
- Page 5 WARNING: To reduce the risk of unsafe operation, carefully review and understand all aspects of the G500/G600 Pilot’s Guide. Thoroughly practice basic operation prior to actual use. During flight operations, carefully compare indications from the GDU 620 to all available navigation sources, including the information from other NAVAIDs, visual sightings, charts, etc.
- Page 6 Terrain-SVT is intended only to enhance situational awareness. WARNING: Because of anomalies in the earth’s magnetic field, operating the G500/G600 within the following areas could result in loss of reliable attitude and heading indications. North of 72° North latitude and south of 70°...
- Page 7 System and is solely responsible for its accuracy and maintenance. The GPS system is subject to changes which could affect the accuracy and performance of all GPS equipment. Portions of the Garmin GDU 620 utilize GPS as a precision electronic NAVigation AID (NAVAID). Therefore, as with all NAVAIDs, information presented by the GDU 620 can be misused or misinterpreted and, therefore, become unsafe.
- Page 8 (AMMD). SafeTaxi, FliteCharts, and Chartview are intended to improve pilot situational awareness during ground operations should only be used by the flight crew to orient themselves on the airport surface. Garmin G500/G600 Pilot’s Guide 190-00601-02 Rev. J...
- Page 9 10/2012 Update reflects software v6.11 upgrade. 08/2011 Update reflects software v6.00 uprade. 11/2010 Update reflects software v4.00 and v5.00 upgrades. 04/2009 Update reflects software v3.0 upgrade. 07/2008 Update includes various content edits. 06/2008 Product release. 190-00601-02 Rev. J Garmin G500/G600 Pilot’s Guide...
- Page 10 Added “Independent Radar - GWX 70 Only” section. 4.8.1.2 Added note regarding weather source selection when multiple weather 4.9.3 sources are present. Updated screen image in figure 5-29, “LRU Status Window.” 5.3.4 viii Garmin G500/G600 Pilot’s Guide 190-00601-02 Rev. J...
- Page 11 Updated ownship symbols in table 7-7, “Ownship Symbols.” Added User Waypoint and Airspace Altitude Label symbols to table 7-8, “Miscellaneous Symbols.” Added aviation database description. A.1.1 Added aviation database to list of available databases. A.1.2 190-00601-02 Rev. J Garmin G500/G600 Pilot’s Guide...
- Page 12 ALLEGED INACCURACIES IN THE INFORMATION. SOME JURISDICTIONS DO NOT ALLOW THE LIMITATION OR EXCLUSION OF IMPLIED WARRANTIES OR LIABILITY FOR INCIDENTAL OR CONSEQUENTIAL DAMAGES SO THE ABOVE LIMITATIONS OR EXCLUSIONS MAY NOT APPLY TO YOU. Garmin G500/G600 Pilot’s Guide 190-00601-02 Rev. J...
-
Page 13: Table Of Contents
1.1.1.3 Attitude Heading Reference System ........1-5 1.1.1.4 GMU 44 ................1-9 1.1.1.5 GTP 59 ................. 1-9 1.1.1.6 Garmin Navigator Interface ............ 1-9 1.1.2 Optional Line Replaceable Units........... 1-10 1.1.2.1 GDL 88 ................1-10 1.1.2.2 GTX 345 ................1-10 1.1.2.3 Weather Radar .............. - Page 14 Selecting Page Options ............3-4 3.1.4 Changing the Navigation Map Range ........3-4 3.1.5 Decluttering Map Pages ............3-4 3.1.6 Panning ................3-6 3.1.7 Selecting Items on the Map ........... 3-7 3.1.8 Measuring Distances ............. 3-7 Garmin G500/G600 Pilot’s Guide 190-00601-02 Rev. J...
- Page 15 Restore Defaults ..............3-51 3.2.6.6 Full Screen ................3-52 3.2.7 Position Reporting (Optional) ..........3-53 3.2.7.1 Status ................. 3-53 3.2.7.2 Report Type ................. 3-53 3.2.8 Iridium Phone Operation (Optional) ........3-56 3.2.8.1 Status ................. 3-56 xiii 190-00601-02 Rev. J Garmin G500/G600 Pilot’s Guide...
- Page 16 4.3.5 TAWS Alerts ................ 4-16 4.3.5.1 TAWS-B Alerting Colors and Symbology ....... 4-17 4.3.5.2 Excessive Descent Rate Alert ..........4-19 4.3.5.3 Forward Looking Terrain Avoidance ........4-20 4.3.5.4 Premature Descent Alerting ..........4-21 Garmin G500/G600 Pilot’s Guide 190-00601-02 Rev. J...
- Page 17 Customizing the XM WX Satellite Weather Map ......4-53 4.7.3 XM WX Weather Symbols and Product Age ......4-55 4.7.4 XM Weather Legends ............4-58 4.7.5 XM NEXRAD ............... 4-59 4.7.5.1 Reflectivity ................4-61 190-00601-02 Rev. J Garmin G500/G600 Pilot’s Guide...
- Page 18 4.7.24 XM Icing ................4-87 4.7.25 XM Turbulence ..............4-88 4.8 Weather Radar..................4-89 4.8.1 Garmin Weather Radar Description ........4-89 4.8.1.1 Synchronized Radar - GWX 68 Only ........4-89 4.8.1.2 Independent Radar - GWX 70 Only ........4-90 4.8.1.3 Principles of Pulsed Airborne Weather Radar ......
- Page 19 SIGMETs and AIRMETs ............4-128 4.9.11 AIREP/PIREP ..............4-130 4.9.12 METARs ................4-132 4.9.13 Winds Aloft ............... 4-135 4.9.14 GFDS TFRs ................. 4-137 4.10 FIS-B Weather (Optional) ..............4-138 4.10.1 NEXRAD Abnormalities ............4-139 xvii 190-00601-02 Rev. J Garmin G500/G600 Pilot’s Guide...
- Page 20 5.2 SafeTaxi ..................... 5-18 5.2.1 Using SafeTaxi ..............5-19 5.2.1.1 Decluttering ................ 5-19 5.2.1.2 Hot Spot Information ............5-19 5.2.2 SafeTaxi Cycle Number and Revision ........5-21 5.3 Sirius XM Satellite Radio Entertainment ..........5-22 xviii Garmin G500/G600 Pilot’s Guide 190-00601-02 Rev. J...
- Page 21 Field of View ............... 5-45 5.5.3.9 Unusual Attitudes ..............5-47 Annunciations and Alerts ..............6-1 6.1 Alerts ....................6-1 6.2 System Status ..................6-16 Symbols ....................7-1 7.1 Map Page Symbols ................7-1 7.2 SafeTaxi Symbols ................... 7-2 190-00601-02 Rev. J Garmin G500/G600 Pilot’s Guide...
- Page 22 7.6 Ownship Symbols .................. 7-6 7.7 Miscellaneous Symbols ................7-7 Glossary ....................8-1 Appendix A ....................A-1 A.1 SD Card Use and Databases ..............A-1 A.1.1 Aviation Databases ...............A-3 A.1.2 Garmin Databases ..............A-5 Index ......................B-1 Garmin G500/G600 Pilot’s Guide 190-00601-02 Rev. J...
-
Page 23: System Overview
Cover SYSTEM OVERVIEW System Description This section provides an overview of the G500/G600 Avionics Display System. The G500/G600 system is an integrated display system that presents primary flight instrumentation, navigation, and a moving map to the pilot through large- format displays. - Page 24 • GDL 69/69A Satellite Data Link Receiver • GDL 88 / GTX 345 ADS-B Transceiver • GSR 56 Satellite Data Link Receiver • NavCom - Garmin GTR/GNC or SL30 COM/NAV radios, or selected third-party radios • Autopilot/Flight Director • ADF •...
-
Page 25: Standard System Line Replaceable Units
This design greatly eases troubleshooting and maintenance of the G500/G600 system. A failure or problem can be isolated to a particular LRU, which can be replaced quickly and easily. Each LRU has a particular function, or set of functions, that contributes to the system’... -
Page 26: Gdu 620
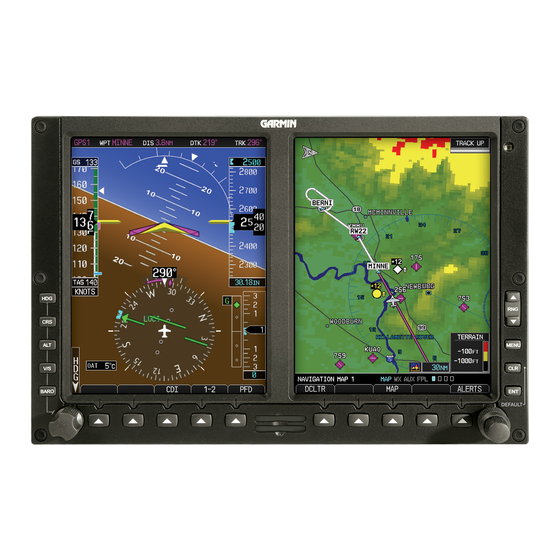
The PFD shows primary flight information, in place of traditional Pitot-static and gyroscopic systems and also provides an Horizontal Situation Indicator (HSI) for navigation. Figure 1-2 GDU 620 PFD and MFD Figure 1-3 GDU 620 PFD and MFD with PFD on Right Garmin G500/G600 Pilot’s Guide 190-00601-02 Rev. J... -
Page 27: Air Data Computer
Outside Air Temperature (OAT) sensor. The ADC provides pressure altitude, airspeed, vertical speed, and OAT information to the G500/G600 system. The ADC communicates with the GDU 620 and AHRS using an ARINC 429 digital interface. Figure 1-4 Air Data Computer 1.1.1.3... - Page 28 Refer to section 6 for specific AHRS alert information. Any failure of the internal AHRS inertial sensors results in loss of attitude and heading information. This is indicated by red “X” flags over the corresponding flight instruments. Garmin G500/G600 Pilot’s Guide 190-00601-02 Rev. J...
- Page 29 Failure of the air data input has no effect on the AHRS output while AHRS is receiving valid GPS information. Invalid or unavailable airspeed data, in addition to complete GPS failure, results in loss of all attitude and heading information. 190-00601-02 Rev. J Garmin G500/G600 Pilot’s Guide...
- Page 30 Heading reliable Current heading value turns white. Table 1-3 AHRS Signals and Indications Current Heading Unreliable Heading Recovery in Progress Align Heading Align Heading Figure 1-9 AHRS Heading Indications Garmin G500/G600 Pilot’s Guide 190-00601-02 Rev. J...
-
Page 31: Gmu 44
ADC. Figure 1-11 GTP 59 Temperature Probe 1.1.1.6 Garmin Navigator Interface The G500/G600 system requires connection to at least one external Garmin WAAS GPS navigator, such as the 400W/500W series, GTN 600/700 series, or GNS 480. 190-00601-02 Rev. J... -
Page 32: Optional Line Replaceable Units
Cover 1.1.2 Optional Line Replaceable Units A variety of LRUs are available to expand and enhance the G500/G600 system. 1.1.2.1 GDL 88 The GDL 88 is a remotely mounted ADS-B transceiver. There are four models of the GDL 88. Models with a single bottom mounted UAT antenna meet TSO C154c Class A1S and are available with or without an internal GPS/SBAS receiver. -
Page 33: Gsr 56
A subscription to the Sirius XM Satellite Radio service is required to enable the GDL 69/69A capability. Subscription information is available at: http://www.garmin.com/xm/. Figure 1-13 GDL 69/69A XM Satellite Radio Data Link Receiver 1.1.2.7... -
Page 34: Gtx 330/330D/335
A, C, and S functions. The transponder provides traffic information to the display through an ARINC 429 digital interface. In the following figure, the GTX 330/330D Mode S Transponder is shown as typical. Figure 1-15 GTX 330/330D Mode S Transponder 1-12 Garmin G500/G600 Pilot’s Guide 190-00601-02 Rev. J... -
Page 35: System Power Up
NOTE: Refer to section 6 for system-specific annunciations and alerts. The G500/G600 System is integrated with the aircraft electrical system and receives power directly from electrical busses. The GDU 620 and supporting sub-systems include both power-on and continuous built-in test features that exercise the processor, memory, external inputs, and outputs to ensure safe operation. - Page 36 Databases are displayed in white if they are determined to be current. Databases are displayed in yellow if they have expired, are not yet effective, or if the current date/time is not yet available from the GPS. Figure 1-16 System Startup Pages 1-14 Garmin G500/G600 Pilot’s Guide 190-00601-02 Rev. J...
-
Page 37: International Geomagnetic Reference Field
To update at another time, turn the Large knob to highlight “Cancel” and then press ENT. Figure 1-17 GRS MV DB Update 2. After the update is complete, press the ENT key to continue normal operation. 1-15 190-00601-02 Rev. J Garmin G500/G600 Pilot’s Guide... -
Page 38: System Operation
1. Press the desired PFD mode selection key (HDG, CRS, ALT, V/S, or BARO). A window will be displayed near the upper left corner of the HSI showing the current value for that mode. 2. Turn the PFD knob to select the desired value. 1-16 Garmin G500/G600 Pilot’s Guide 190-00601-02 Rev. J... -
Page 39: Pfd Bezel Keys
Altitude Select window. Set the Altitude Bug by turning the PFD knob after pressing the ALT key. Altitude Select Window Altitude Bug Current Altitude Barometric Setting Figure 1-19 Pressing PFD Knob Sets Altitude Select to Current Altitude 1-17 190-00601-02 Rev. J Garmin G500/G600 Pilot’s Guide... - Page 40 Vertical Speed Indicator will turn red. Vertical Speed Maximum Vertical Speed Bug Current Vertical Speed Vertical Speed Indicator Vertical Speed Minimum Vertical Speed Bug Setting Figure 1-21 Vertical Speed Warning Indication 1-18 Garmin G500/G600 Pilot’s Guide 190-00601-02 Rev. J...
-
Page 41: Mfd Knobs
Enter (ENT) Validates or confirms a menu selection or data entry. Clear (CLR) Erases information, cancels entries, or removes page menus. Pressing and holding the CLR key displays the Navigation Map 1 page. 1-19 190-00601-02 Rev. J Garmin G500/G600 Pilot’s Guide... -
Page 42: Using The Soft Key Controls
3. Press the ENT key to select the desired option. 4. Press the CLR key or MFD knob to remove the menu and cancel the operation. 1-20 Garmin G500/G600 Pilot’s Guide 190-00601-02 Rev. J... -
Page 43: System Settings
Figure 1-23 Page Menu Examples 1.4.4 System Settings G500/G600 system settings are managed from the Aux Mode System Setup Page. For details on changing settings, refer to section 3, “Aux Mode Pages.” 1. From the first AUX page, press the small MFD knob and turn the large MFD knob to highlight the desired value. - Page 44 Distance (information True Airspeed window) Wind speed Flight plan distances vector Map ranges Map range DIS field (Navigation (Traffic Status Box) Page, All distances on MFD Terrain All speeds on MFD Proximity Page) 1-22 Garmin G500/G600 Pilot’s Guide 190-00601-02 Rev. J...
-
Page 45: Display Backlighting
Display backlighting adjustment can be manually controlled using the rotorcraft’ s existing instrument panel dimmer bus or performing the following procedures. 1-23 190-00601-02 Rev. J Garmin G500/G600 Pilot’s Guide... - Page 46 Auto or Manual Figure 1-25 Display Brightness Adjustment 3. Turn the large MFD knob to highlight the MODE field. Turn the small MFD knob to select “AUTO” or “MANUAL” and then press ENT. 1-24 Garmin G500/G600 Pilot’s Guide 190-00601-02 Rev. J...
-
Page 47: Primary Flight Display
CDI is correct and is the primary means of navigation. This is because the GDU 620 applies magnetic variation corrections for the current aircraft location, but some navigators apply magnetic variation correction for the waypoint location. 190-00601-02 Rev. J Garmin G500/G600 Pilot’s Guide... -
Page 48: Pfd Soft Keys
The soft keys are located along the bottom of the displays below the soft key labels. The soft key labels shown depend on the soft key level or page being displayed. The soft keys can be used to select the appropriate soft key function. Garmin G500/G600 Pilot’s Guide 190-00601-02 Rev. J... - Page 49 The 1-2 soft key toggles between the available receivers for selected navigation source (i.e. GPS1 and GPS2 or VOR/LOC1 and VOR/LOC2). This soft key will only be present if the system is configured for a second GPS or VOR/LOC. 190-00601-02 Rev. J Garmin G500/G600 Pilot’s Guide...
- Page 50 Not all installations will have the DME HOLD soft key. SYN VIS The SYN VIS soft key is available if Synthetic Vision Technology is installed. It enables Synthetic Vision and displays the associated soft keys. Garmin G500/G600 Pilot’s Guide 190-00601-02 Rev. J...
-
Page 51: Airspeed Indicator
The Airspeed Indicator provides Indicated Airspeed, True Airspeed, and Ground Speed. The Airspeed Trend Indicator shows what the airspeed will be in six seconds, if the current acceleration is maintained. The actual airspeed is displayed inside the black pointer. 190-00601-02 Rev. J Garmin G500/G600 Pilot’s Guide... - Page 52 Reference Marker Normal Operating Range (Green) Flaps Operating Range (White) True Airspeed Airspeed Units Figure 2-7 Airspeed Tape Overspeed Range (Barber Pole) Overspeed Indication for Current Airspeed Caution Operating Range Figure 2-8 Overspeed Indication Garmin G500/G600 Pilot’s Guide 190-00601-02 Rev. J...
-
Page 53: Markings
NOTE : The actual colors and patterns of the airspeed tape may vary by installation. See your AFM/POH for more details. Figure 2-9 Typical Airspeed Tape Markings White Triangle Figure 2-10 Additional Reference Markings 190-00601-02 Rev. J Garmin G500/G600 Pilot’s Guide... -
Page 54: Reference Speeds
Reference Marker Reference Marker Figure 2-11 Reference Speeds The labels for the reference markers may vary as configured during installation. Reference Marker Reference Marker Reference Marker Reference Marker Figure 2-12 Alternate Reference Speeds Garmin G500/G600 Pilot’s Guide 190-00601-02 Rev. J... -
Page 55: Attitude Indicator
Slip/skid is indicated by the location of the bar relative to the pointer. One bar displacement (as shown below) is equal to one ball displacement on a traditional Slip/Skid Indicator. 190-00601-02 Rev. J Garmin G500/G600 Pilot’s Guide... - Page 56 Roll Pointer pointing towards the sky. Roll Scale Zero Pointer Roll Pointer Roll Scale Figure 2-16 Attitude Indicator with Sky Pointer Configuration in Left Turn 2-10 Garmin G500/G600 Pilot’s Guide 190-00601-02 Rev. J...
-
Page 57: Extreme Attitude
• Traffic and Terrain Annunciations • GPSS Annunciation • Vertical Course Deviation • Knob Mode Annunciation Indicator Glideslope • Marker Beacon Annunciation Annunciation • NAV Status • Wind Field Figure 2-17 Extreme Pitch Indication 2-11 190-00601-02 Rev. J Garmin G500/G600 Pilot’s Guide... - Page 58 Cover Figure 2-18 Extreme Pitch Indication - Figure 2-19 Extreme Pitch Indication - Nose Down Nose Up Figure 2-20 Extreme Roll Indication with Display Declutter 2-12 Garmin G500/G600 Pilot’s Guide 190-00601-02 Rev. J...
-
Page 59: Altimeter
3. Press the center of the PFD knob to set the selected altitude to the current altitude. Selected Altitude in the Selected Altitude Altitude Alerter window Altitude Trend Current Indicator Altitude Barometric Setting Figure 2-21 Altimeter 2-13 190-00601-02 Rev. J Garmin G500/G600 Pilot’s Guide... -
Page 60: Altitude Alerting
NOTE : The aural tone when approaching the selected altitude may be configured at installation for either 200 feet or 1,000 feet. The tone when deviating from the selected altitude always occurs at 200 feet. 2-14 Garmin G500/G600 Pilot’s Guide 190-00601-02 Rev. J... -
Page 61: Changing Barometric Setting
(as read from the altimeter) to differ from the GPS-MSL altitude. This variation results in the aircraft’ s true altitude differing from the baro-corrected altitude. 2-15 190-00601-02 Rev. J Garmin G500/G600 Pilot’s Guide... -
Page 62: Minimum Descent Altitude/Decision Height Alerting
50 feet above the set altitude minimum value. Yellow When Cyan Within 2500 ft White Within 100 ft Altitude Reached Barometric Minimums Barometric Minimums Figure 2-24 Barometric MDA/DH - Alerting Visual Annunciations 2-16 Garmin G500/G600 Pilot’s Guide 190-00601-02 Rev. J... - Page 63 5 - Additional Features - Charts Menu Selections. NOTE : If you highlight the minimums Altitude field and press the CLR key, it will turn the minimums alerting functionality off. 2-17 190-00601-02 Rev. J Garmin G500/G600 Pilot’s Guide...
-
Page 64: Vertical Speed Indicator
1. Press the V/S key to activate Vertical Speed mode. 2. Turn the PFD knob to change the Vertical Speed Bug. 3. Press the center of the PFD knob to set the Vertical Speed value to the current vertical speed. 2-18 Garmin G500/G600 Pilot’s Guide 190-00601-02 Rev. J... -
Page 65: Horizontal Situational Indicator
Current Track Indicator Aircraft Symbol Turn Rate/Heading Trend Vector Course Deviation Indicator Current Heading (CDI) Lubber Line Rotating Compass Card OBS Mode Active MSG (Message) on Navigator Figure 2-27 Horizontal Situation Indicator (HSI) 2-19 190-00601-02 Rev. J Garmin G500/G600 Pilot’s Guide... -
Page 66: Setting The Heading Bug
1. Press the HDG key to activate HDG mode. 2. Turn the PFD knob to change the Heading Bug. 1. Press the PFD knob in HDG mode to set the Heading Bug to the current heading. 2-20 Garmin G500/G600 Pilot’s Guide 190-00601-02 Rev. J... -
Page 67: Turn Rate Indicator
Arrowhead shown for Standard Turn Rate a Turn Rate > 4 degrees per second Heading Bug Lubber Line Half Standard Turn Rate Current Track Indicator Figure 2-29 Turn Rate Indicator and Trend Vector 2-21 190-00601-02 Rev. J Garmin G500/G600 Pilot’s Guide... -
Page 68: Course Deviation Indicator
CDI has the same angular limits as a mechanical CDI. If the CDI exceeds the maximum deviation on the scale (two dots) while coupled to GPS, the crosstrack error (XTK) is displayed below the white aircraft symbol. 2-22 Garmin G500/G600 Pilot’s Guide 190-00601-02 Rev. J... - Page 69 3. Verify the navigation source by the indication on the HSI and in the upper left corner of the PFD. NOTE: The selected navigator is the active navigator for all PFD and MFD operations, except for the supplemental bearing pointers. 2-23 190-00601-02 Rev. J Garmin G500/G600 Pilot’s Guide...
-
Page 70: Changing Cdi Course
90° of the selected inbound course. This prevents the glideslope from being displayed during localizer backcourse approaches. Vertical Deviation Source Vertical Deviation Indicator Figure 2-33 Vertical Deviation Indicator (ILS Source) 2-24 Garmin G500/G600 Pilot’s Guide 190-00601-02 Rev. J... -
Page 71: Auto-Slewing
SDF approach is active in the GPS navigator and the appropriate frequency is in the active window in the navigator. The G500/G600 will Auto-Slew the HSI course pointer for an ILS, LOC, LOC BC, LDA, or SDF approach when the steps below are completed in the following order: 1. - Page 72 1-2 soft key twice: NAV1>NAV2>NAV1 NOTE: For LOC BC approaches, the course pointer will slew 180 degrees from the inbound course. Example of activating Auto-Slewing in the G500/G600: Course Pointer slewed to 313° for the ILS Figure 2-35 Auto-Slewing HSI with ILS Loaded...
- Page 73 (or 180° from the final approach course for LOC BC approaches). Course Pointer slewed to 313° for the Backcourse to Runway 13 Figure 2-36 Auto-Slewing HSI with Localizer Backcourse Loaded (Shown with Corresponding Approach Plate) 2-27 190-00601-02 Rev. J Garmin G500/G600 Pilot’s Guide...
-
Page 74: Supplemental Flight Data
Bearing 2 Pointer GPS Level Current Navigation Source of Service Bearing 1 Pointer Bearing 1 Source Bearing 2 Source Bearing 1 Bearing 2 Pointer Icon Pointer Icon Figure 2-37 HSI with Bearing Information 2-28 Garmin G500/G600 Pilot’s Guide 190-00601-02 Rev. J... -
Page 75: Temperature Display
• Difference from International Standard Atmosphere (ISA) – This is the difference between SAT and standard (ISA) temperature at the current altitude. This provides an indication of how much warmer/colder the temperature is from a “standard” atmosphere. 2-29 190-00601-02 Rev. J Garmin G500/G600 Pilot’s Guide... -
Page 76: Wind Vectors
PFD. The distance to the station and the Nav source used are shown. DME Information DME Hold Annunciation Selected DME Set Hold for Selected DME Figure 2-42 DME Indication NOTE: The capability of providing DME information requires installation of the GAD 43e. 2-30 Garmin G500/G600 Pilot’s Guide 190-00601-02 Rev. J... -
Page 77: Marker Beacon Annunciations
A miscompare condition is triggered if the difference between the data reported by GDU 1 and GDU 2 exceeds the threshold described in the following table for at least one second. 2-31 190-00601-02 Rev. J Garmin G500/G600 Pilot’s Guide... - Page 78 An “ATTITUDE MISCOMP” annunciation is displayed over the pitch ladder if a miscompare condition exists for both pitch and roll. Pitch and Roll Miscompare Airspeed Altitude Miscompare Miscompare Pitch Miscompare Roll Miscompare Figure 2-44 Miscompare Annunciations 2-32 Garmin G500/G600 Pilot’s Guide 190-00601-02 Rev. J...
-
Page 79: Radar Altimeter
Radar Altimeter altitude value. The self-test is a wiring test to indicate communication between the GDU and the Radar Altimeter. The self-test will be cancelled after 15 seconds, the Test key is pressed again, or you leave the System Setup page. 2-33 190-00601-02 Rev. J Garmin G500/G600 Pilot’s Guide... - Page 80 • The alert upon descending through the selected altitude is the aural “minimums, minimums” callout. • The altitude required to arm the alerting is 150 feet above the selected altitude. 2-34 Garmin G500/G600 Pilot’s Guide 190-00601-02 Rev. J...
-
Page 81: 2.10 Fast/Slow Indication
The PFD display units may be set to standard or metric units by the installer. The MFD display units may still be selected by the user in the System Setup page of Aux mode. 2-35 190-00601-02 Rev. J Garmin G500/G600 Pilot’s Guide... - Page 82 Cover This page intentionally left blank 2-36 Garmin G500/G600 Pilot’s Guide 190-00601-02 Rev. J...
-
Page 83: Multi-Function Display
GPS navigator. The leg of the active flight plan currently being flown is shown as a magenta line on the navigation map. The other legs are shown in white. 190-00601-02 Rev. J Garmin G500/G600 Pilot’s Guide... -
Page 84: Navigation Map
For details about the symbols used on the MFD, refer to section 7. NOTE: Page Group and Page are shown at the bottom of the MFD. Page Page Group Turn Small MFD knob Turn Large MFD knob Figure 3-2 Page Group and Page Locator Garmin G500/G600 Pilot’s Guide 190-00601-02 Rev. J... -
Page 85: Default Navigation Map Page
The pilot should check the dedicated page for the feature that the icon represents to determine why the data is not available for display (e.g., fail, standby). 190-00601-02 Rev. J Garmin G500/G600 Pilot’s Guide... -
Page 86: Selecting
The Map Declutter feature allows the pilot to progressively step through four levels of decluttering to remove map information. The declutter level is displayed in the DCLTR soft key. Figure 3-5 Map Declutter Soft Key Garmin G500/G600 Pilot’s Guide 190-00601-02 Rev. J... - Page 87 • • Class C Airspace • • Water Detail • • • • Class D Airspace • • Active FPL Legs • • • • Table 3-1 Features Shown at Each Decluttering Level 190-00601-02 Rev. J Garmin G500/G600 Pilot’s Guide...
-
Page 88: Panning
2. Turn the large MFD knob to move the cursor horizontally. Turn the small MFD knob to move the cursor vertically. 3. Press the small MFD knob again to cancel panning. The display will return to the previous map view. Garmin G500/G600 Pilot’s Guide 190-00601-02 Rev. J... -
Page 89: Selecting Items On The Map
Figure 3-9 Measure Distance Starting Reference Point 4. Turn the large or small MFD knobs to move the cursor to a reference point. The distance and bearing is displayed at the top of the display. 190-00601-02 Rev. J Garmin G500/G600 Pilot’s Guide... -
Page 90: Customizing Navigation Map
1. While viewing one of the Navigation Map pages of the Map page group, press the MENU key to display the Navigation Map Page Menu . Figure 3-11 Navigation Map Page Menu Garmin G500/G600 Pilot’s Guide 190-00601-02 Rev. J... - Page 91 XM Ltng Off/Range Class B/ Off/Range Vector TMA * Length Stormscope Wind On/Off Off/Range Class C/ Off/Range Viewing Vector TCA * Range Stormscope Enhanced On/Off Strike/Cell Class D * Off/Range Strike/Cell Range Mode Ring 190-00601-02 Rev. J Garmin G500/G600 Pilot’s Guide...
-
Page 92: Map Feature Options
MENU key. With “Map Setup” highlighted, press ENT. With the Map Group active, turn the large MFD knob to highlight the desired option. 2. Turn the small MFD knob to change the highlighted value. 3-10 Garmin G500/G600 Pilot’s Guide 190-00601-02 Rev. J... - Page 93 The Land Data option selects whether detailed land features, such as rivers, roads, cities, are displayed. Topo features, traffic, terrain, and obstacles will still be displayed, even with Land Data turned off. 3-11 190-00601-02 Rev. J Garmin G500/G600 Pilot’s Guide...
- Page 94 1/2 the distance of the primary ring to allow the pilot to accurately judge the distance to objects depicted on the map. Range Ring Radius Enhanced Range Ring Range Ring with Compass Rose Figure 3-16 Navigation Map Range Ring 3-12 Garmin G500/G600 Pilot’s Guide 190-00601-02 Rev. J...
- Page 95 Minimum/Maximum Range of Topography Displayed on the Map Sky Indication Range of Topography Current Aircraft Altitude Displayed on the Map Current Ground Level Indication Figure 3-18 Navigation Map Topo Scale 3-13 190-00601-02 Rev. J Garmin G500/G600 Pilot’s Guide...
- Page 96 Map ranges above this value will not show the Obstacle Data. Obstacles Between 100 and 1000 feet of Aircraft Obstacles Within 100 feet or Above Aircraft Figure 3-20 Navigation Map Obstacle Data 3-14 Garmin G500/G600 Pilot’s Guide 190-00601-02 Rev. J...
- Page 97 MFD Navigation Map Page lateral image. Two dashed lines forming a V-shape in front of the aircraft symbol on the MFD, represent the forward viewing area shown on the PFD. 3-15 190-00601-02 Rev. J Garmin G500/G600 Pilot’s Guide...
- Page 98 150 feet per minute. Selected Altitude Range Arc Figure 3-23 Selected Altitude Range Arc 3-16 Garmin G500/G600 Pilot’s Guide 190-00601-02 Rev. J...
-
Page 99: Weather Feature Options (Optional)
ENT to allow editing of the selected group. The groups shown depend on the features available for equipment installed in your aircraft. Figure 3-25 Navigation Map Page Menu Weather Group Selection 4. Press the small MFD knob to return to the Navigation Map Page. 3-17 190-00601-02 Rev. J Garmin G500/G600 Pilot’s Guide... - Page 100 When Off is selected, Lightning weather will not be shown. Where 100 NM is selected, Lightning symbols will be shown at map ranges of 100 NM and lower. 3-18 Garmin G500/G600 Pilot’s Guide 190-00601-02 Rev. J...
- Page 101 NOTE: StormScope data is displayed on the Map Page only if aircraft heading is available. NOTE: The G500/G600 will display StormScope data with or without a heading source. If no heading source is available, the display will indicate this by placing “HDG N/A” in the upper right portion of the display. If no heading is available, the pilot must clear the strikes after each heading change.
-
Page 102: Traffic Feature Options (Optional)
Navigation Map page or turn the large MFD knob to the next option. When the Traffic overlay is active on a Map page, a Traffic icon will be displayed on the Map page where it is selected. 3-20 Garmin G500/G600 Pilot’s Guide 190-00601-02 Rev. J... -
Page 103: Aviation Feature Options
10 NM. Runway Extensions will be shown at and below the selected map range. When Off is selected, Runway Extensions will not be shown. 3-21 190-00601-02 Rev. J Garmin G500/G600 Pilot’s Guide... - Page 104 When Off is selected, the information will not be shown. Where 100 NM is selected, Class D airspace information will be shown at map ranges of 100 NM and lower. 3-22 Garmin G500/G600 Pilot’s Guide 190-00601-02 Rev. J...
- Page 105 The Airways option allows you to select the airways that are shown on the Navigation Map. All, Low only, and Hi only Airways may be selected. When Off is selected, airways will not be shown. 3-23 190-00601-02 Rev. J Garmin G500/G600 Pilot’s Guide...
- Page 106 Smart Airspace The Smart Airspaces selection filters airspaces to show the ones appropriate for your altitude. Garmin’ s Smart Airspace™ feature aids visual clarity on-screen by de-emphasizing airspace that’ s well above or below the aircraft’ s current altitude. The vertical separation is 1,000 feet at sea level and the vertical separation will gradually increase to 2,000 feet until the aircraft reaches 10,000 feet.
- Page 107 When Off is selected, the information will not be shown. Where 15 NM is selected, the VRPs will be shown for map ranges at and below 15 NM. 3-25 190-00601-02 Rev. J Garmin G500/G600 Pilot’s Guide...
-
Page 108: Split Screen (Optional)
3. To select the other external video source, press the MENU key. 4. Turn the large or small MFD knobs to highlight the Video selection and then press ENT Selected Video Source Figure 3-35 Aux Mode System Setup Page Menu 3-26 Garmin G500/G600 Pilot’s Guide 190-00601-02 Rev. J... -
Page 109: Aux Mode Pages
The Aux mode provides pages for System Setup, XM Information (if installed), and system Status. 3.2.1 System Settings G500/G600 system settings are managed from the Aux Mode System Setup Page. The following settings can be changed: • Display Brightness (Mode and Level) • Airspeeds (Glide-REF, V... -
Page 110: Display Brightness
Figure 3-38 Aux Mode Display Brightness Level Selection 3. If the Level was changed, Manual will be selected. Press the cursor to save the settings. If you press ENT the Mode setting will be highlighted. 3-28 Garmin G500/G600 Pilot’s Guide 190-00601-02 Rev. J... -
Page 111: Airspeed Reference Marks
NOTE: When power is cycled, the Airspeed Reference values are reset. During preflight, the Airspeed Reference values should be checked and set appropriately for the current aircraft configuration and performance. Figure 3-40 Airspeed References shown on PFD when activated 3-29 190-00601-02 Rev. J Garmin G500/G600 Pilot’s Guide... -
Page 112: Pfd Options - Wind Vector
1. While viewing the System Setup page of the AUX page group, press the small MFD knob to activate the cursor. Turn the large MFD knob to highlight the desired Nav Status value. 2. Turn the small MFD knob to select the style and press ENT 3-30 Garmin G500/G600 Pilot’s Guide 190-00601-02 Rev. J... -
Page 113: Temperature Reference
• Difference from International Standard Atmosphere (ISA) – This is the difference between SAT and standard (ISA) temperature at the current altitude. This provides an indication of how much warmer/colder the temperature is from a “standard” atmosphere. 3-31 190-00601-02 Rev. J Garmin G500/G600 Pilot’s Guide... -
Page 114: Synchronization
“Chart Streaming” in the “Synchronization” box in both units. NOTE: Chart Streaming appears only when the Databases option is turned on. Figure 3-44 Dual Unit Synchronization 2. Turn the small MFD knob to select “ON” or “OFF.” 3. Press ENT. 3-32 Garmin G500/G600 Pilot’s Guide 190-00601-02 Rev. J... - Page 115 GDU 620. In a dual GDU 620 system, the CDI keys in the navigator are disabled. 3-33 190-00601-02 Rev. J Garmin G500/G600 Pilot’s Guide...
-
Page 116: Date And Time
ENT. When Local 12 or 24 hour mode is selected, the Time Offset value will then be highlighted. 3. Turn the small MFD knob to select the desired offset and then press ENT. 3-34 Garmin G500/G600 Pilot’s Guide 190-00601-02 Rev. J... -
Page 117: Mfd Display Units
2. Turn the small MFD knob to select Imperial, Metric, or Nautical and then press ENT. The Altitude and Vertical Speed units selection will now be highlighted. 3. Turn the small MFD knob to select Feet or Meters and then press ENT. 3-35 190-00601-02 Rev. J Garmin G500/G600 Pilot’s Guide... -
Page 118: System Display Units
The Barometric Pressure Setting value will now be highlighted. When True is selected, a "T" will appear to the right of the heading value on the PFD. Figure 3-50 Barometric Setting System Display Units 3-36 Garmin G500/G600 Pilot’s Guide 190-00601-02 Rev. J... -
Page 119: Data Link
3. Turn the large MFD knob to highlight the WX/TFR Source field. 4. Turn the small MFD knob to select XM, GFDS, or FIS-B, and then press ENT. 5. Press the small MFD knob to exit adjustments. 3-37 190-00601-02 Rev. J Garmin G500/G600 Pilot’s Guide... -
Page 120: Sirius Xm Information (Optional)
The Aux mode XM Information page displays information about the Sirius XM Satellite radios, service, and products when the GDL 69/69A is installed and the Sirius XM Satellite Radio service is activated. Figure 3-53 XM Information 3-38 Garmin G500/G600 Pilot’s Guide 190-00601-02 Rev. J... -
Page 121: Sirius Xm Entertainment Radio (Optional)
1. Turn the large MFD knob to the AUX page group. 2. Turn the small MFD knob to the XM Radio page. Figure 3-54 XM Entertainment Radio A description of Sirius XM Satellite Radio audio entertainment is provided in section 5. 3-39 190-00601-02 Rev. J Garmin G500/G600 Pilot’s Guide... -
Page 122: System Status
LRUs by red “X’ s .” Failed LRUs should be noted and a service center or Garmin-authorized dealer informed. Database SYNC allows a database to be synchronized with more than two LRUs (G500/G600 and GTNs) at once. Figure 3-55 LRU and Database Information 3-40 Garmin G500/G600 Pilot’s Guide... -
Page 123: Database Sync Operation
System Status function on the DB SYNC page. The G500/G600 will display the source of the received databases. If a database transfer is pending, completed, or not authorized, the status will also be indicated. - Page 124 1. With the G500/G600 turned off, insert the database card. 2. Turn the G500/G600 on. The Database SYNC will occur automatically in the background. During the Database SYNC process, normal operation of the G500/G600 is not affected.
- Page 125 Cover Figure 3-57 Database Transfer Complete Figure 3-58 Database Transfer Not Authorized and DB Sync Conflict 3-43 190-00601-02 Rev. J Garmin G500/G600 Pilot’s Guide...
- Page 126 Cover 4. Once all of the database transfers have completed, if the G500/G600 determines that at least one of the newly transferred databases is effective and the aircraft is on the ground and stopped prior to a flight, a pop-up and confirmation will be presented to restart the unit. No pop-up will appear if the aircraft is moving or has been in the air since the unit was turned 5.
-
Page 127: Resolving Database Conflicts
3.2.4.2 Resolving Database Conflicts If the G500/G600 determines that there are multiple LRUs with the newest cycle of a database, but they have different regions or types of that database (i.e., Fixed-wing vs. Rotorcraft navigation database, different regions of the navigation database, or different obstacle database types) then a database conflict will occur. -
Page 128: Chart Streaming
Chart Streaming While the chart database is synchronizing in the background, the GDU will stream individual charts to other compatible displays. This enables all Garmin displays to use the latest chart database information even though the database is currently installed only on a single unit. Chart Streaming will not begin until after the chart database has begun synchronizing. -
Page 129: Ads-B/Fis-B Status (Optional)
ADS-B/FIS-B Status (Optional) When an optional ADS-B/FIS-B receiver is installed, the ADS-B/FIS-B Status page will show the status of satellite communications, FIS-B weather products, and the traffic applications. Figure 3-63 ADS-B/FIS-B Status Page 3-47 190-00601-02 Rev. J Garmin G500/G600 Pilot’s Guide... -
Page 130: External Video (Optional)
1. Press the Video 1 soft key to select Video 1 source for viewing and setup. 2. Press the Video 2 soft key to select Video 2 source for viewing and setup. 3-48 Garmin G500/G600 Pilot’s Guide 190-00601-02 Rev. J... -
Page 131: Zoom
3. The Current value for Brightness will be selected. Use the following directions for each value. Figure 3-65 External Video Setup 4. After selecting the desired settings, press the small MFD knob or the Setup soft key to exit editing. 3-49 190-00601-02 Rev. J Garmin G500/G600 Pilot’s Guide... - Page 132 Figure 3-67 External Video Contrast Adjustment 3. After selecting the desired setting, turn the large MFD knob to highlight the next value or press the small MFD knob to exit editing. 3-50 Garmin G500/G600 Pilot’s Guide 190-00601-02 Rev. J...
-
Page 133: Restore Defaults
Saturation values to their original settings. 1. While viewing the External Video page, press the MENU key. Figure 3-69 Restore Video Defaults Menu Selection 2. "Restore Defaults" will be highlighted. Press the ENT key. 3-51 190-00601-02 Rev. J Garmin G500/G600 Pilot’s Guide... -
Page 134: Full Screen
2. Press the small MFD knob to activate the selection window. 3. Turn the large MFD key to move the selection window. 4. Press the small MFD knob to accept the selected display area shown in the window. 3-52 Garmin G500/G600 Pilot’s Guide 190-00601-02 Rev. J... -
Page 135: Position Reporting (Optional)
When the Standard reporting type is used, the Position Reporting Period may be set to Off or Automatic. The Automatic Position Reporting Period can be set to intervals of 2 to 60 minutes. 3-53 190-00601-02 Rev. J Garmin G500/G600 Pilot’s Guide... - Page 136 7. With the Standard Reporting Type, the reporting period may be manually overridden by pressing the SEND soft key to send data. SEND Soft Key Label SEND Soft Key Figure 3-74 Press SEND to Override the Reporting Period 3-54 Garmin G500/G600 Pilot’s Guide 190-00601-02 Rev. J...
- Page 137 Cover Automatic Flight Following (AFF) The G500/G600 system, when combined with a GSR 56 Iridium datalink, can send position reports that contain data as required by the U.S. Government Automated Flight Following system. The GSR 56 account will allow configuration to forward data to the Automated Flight Following system.
-
Page 138: Iridium Phone Operation (Optional)
3.2.8 Iridium Phone Operation (Optional) Optional satellite telephone operation is available through the Iridium ® satellite system that is interfaced through the Garmin GSR 56. 3.2.8.1 Status The Status section shows the Call Time, Phone Status, and Call Suppression selected. The Call Time value shows the length of the call time for the current call using the Iridium phone. - Page 139 3. Turn the small MFD knob to highlight the desired selection. Figure 3-77 Select Call Suppression 4. Press the ENT key. Press the small MFD knob again to cancel the selection cursor. 3-57 190-00601-02 Rev. J Garmin G500/G600 Pilot’s Guide...
-
Page 140: Managing The Phone Book
4. Turn the small MFD knob to select the first character of the name and then turn the large MFD knob to select the next character. When the name is complete, press the ENT key. Phone Book Entry Name Catalog Figure 3-79 Phone Book Name Entry 3-58 Garmin G500/G600 Pilot’s Guide 190-00601-02 Rev. J... - Page 141 Press the Keys key at the bottom of the display. Press To Use Keys For Number Entry Figure 3-81 Phone Book Number Entry Using Hot Keys 2. Press the key for the group of desired numbers. 3-59 190-00601-02 Rev. J Garmin G500/G600 Pilot’s Guide...
- Page 142 Selected Phone Book Catalog Entry Figure 3-85 Selected Phone Book Catalog Entry 3. Press the ENT key. Press the small MFD knob again to cancel the selection cursor. 3-60 Garmin G500/G600 Pilot’s Guide 190-00601-02 Rev. J...
-
Page 143: Phone Volume
2. Turn the small MFD knob to set the desired volume level. 3. Press the ENT key. Press the small MFD knob again to cancel the selection cursor. 3-61 190-00601-02 Rev. J Garmin G500/G600 Pilot’s Guide... -
Page 144: Making A Phone Call
1. While viewing the Iridium Phone page, enter a phone number, or select one from the Phone Book catalog. 2. Press the DIAL key. 3. After completing the call, press the HANG UP key. 3-62 Garmin G500/G600 Pilot’s Guide 190-00601-02 Rev. J... -
Page 145: Answering A Phone Call
Press the HANG UP soft key to end the call. Press the VOL - or VOL + keys to adjust the call volume. Figure 3-89 Connected Call Pop-Up 3-63 190-00601-02 Rev. J Garmin G500/G600 Pilot’s Guide... -
Page 146: Flight Plan
DTK, Distance, and ETA Digital Chart from the Previous Leg Available for Waypoint Graphic METARs Current Leg Flight Plan Legs Baro Minimums Window Active Leg Window Figure 3-90 Flight Page 1 (Active Flight Plan) 3-64 Garmin G500/G600 Pilot’s Guide 190-00601-02 Rev. J... -
Page 147: Active Flight Plan Detail
Figure 3-91 Active Flight Plan Page Menu Option Selection 3. Turn the large MFD knob to highlight the field you wish to change. Figure 3-92 Active Flight Plan Page Menu Change Fields Option Selection 3-65 190-00601-02 Rev. J Garmin G500/G600 Pilot’s Guide... -
Page 148: Setting The Altitude Minimums Alerter
3. Turn the large MFD knob to highlight the Altitude Minimums value. Turn the large and small MFD knobs to change the Altitude Minimums value. Figure 3-95 Minimums Altitude Selection 4. Press ENT to activate the selected value. 3-66 Garmin G500/G600 Pilot’s Guide 190-00601-02 Rev. J... -
Page 149: Waypoint Information Page
Info Soft Key Rwy/Freq Soft Key Airport Directory Soft Key Figure 3-96 Flight Plan Waypoint Info/Map Page NOTE: Waypoint information is shown on the second page of the Flight Plan page group. 3-67 190-00601-02 Rev. J Garmin G500/G600 Pilot’s Guide... -
Page 150: Selecting A Waypoint
2. Press the ENT key to select the waypoint. 1. While viewing the Waypoint Information Info/Map page of the FPL page group, press the small MFD knob. 2. Turn the small MFD knob counterclockwise. Figure 3-98 Waypoint Category Selection 3-68 Garmin G500/G600 Pilot’s Guide 190-00601-02 Rev. J... - Page 151 MFD knobs to move the cursor to select the identifier for the waypoint. Selected Waypoint Selection Cursor Figure 3-99 Waypoint Selection - Nav Map Page 2. Press the ENT key to select the waypoint. 3-69 190-00601-02 Rev. J Garmin G500/G600 Pilot’s Guide...
-
Page 152: Waypoint/Runway/Frequency Information Detail
In the Frequency window, a scroll bar is shown on the right side of the window when more frequencies are available. Facility Information Window Runway Information Window Airport Frequency Window Figure 3-100 Flight Plan Waypoint Info Detail 3-70 Garmin G500/G600 Pilot’s Guide 190-00601-02 Rev. J... - Page 153 3. Use the large MFD knob to highlight the field you wish to change and use the small MFD knob to change the value. 4. Press the ENT key to save the selected value or press the small MFD knob to cancel editing. 3-71 190-00601-02 Rev. J Garmin G500/G600 Pilot’s Guide...
- Page 154 RWY/FREQ soft key to view information about the waypoint and then press the small MFD knob to activate the cursor. 2. Turn the small MFD knob to scroll through the available frequencies. 3. Press the small MFD knob to exit. 3-72 Garmin G500/G600 Pilot’s Guide 190-00601-02 Rev. J...
-
Page 155: Airport Directory
3. Use the small or large MFD knob to scroll through the information. 4. Press the small MFD knob to deactivate the cursor. Press the APT DIR soft key again to return to the Waypoint Information page. 3-73 190-00601-02 Rev. J Garmin G500/G600 Pilot’s Guide... -
Page 156: Waypoint Weather Information (Optional)
3. Press the small MFD knob to return to the main Flight Plan page. 3.3.3 Charts Page (Optional) When the Chart function is available, charts will be shown on the third page of the Flight Plan page group. For more information, refer to section 5.1. 3-74 Garmin G500/G600 Pilot’s Guide 190-00601-02 Rev. J... -
Page 157: Hazard Avoidance
Cover HAZARD AVOIDANCE The G500/G600 hazard avoidance features are designed to provide advisory information of potential hazards to flight safety associated with weather, terrain, and air traffic. This section is divided into the following groups: Terrain Avoidance • Terrain Proximity •... -
Page 158: Terrain Configurations
• TAWS-B - A system developed to meet the terrain alerting and ground proximity requirements for Class B TAWS systems as defined in TSO-C151c. Garmin’ s G500/G600 Terrain Awareness and Warning System (TAWS-B) is an optional feature and is intended to provide the flight crew with both aural and visual alerts to aid in preventing inadvertent Controlled Flight Into Terrain (CFIT). -
Page 159: Terrain System Self-Test
* SVT Terrain/Obstacle shading is only available when SVT is enabled and displayed. ** If the Garmin GPS/TAWS is not available, the G500/G600 Terrain-SVT will generate PFD annunciator text and aural callouts. An advisory message will indicate when reversion to Terrain-SVT alerting has occurred. -
Page 160: Terrain Proximity
Cover Terrain Proximity Garmin Terrain is a non-TSO-C151c terrain awareness system provided as a standard feature of GDU 620 to increase situational awareness and help reduce controlled flight into terrain (CFIT). Terrain may be displayed on the Map page group Navigation Map and Terrain pages. -
Page 161: Displaying Terrain Proximity
Range Rings Ownship Symbol at Present Position Terrain and Obstacle Altitude Legend Page Name Press View to See the 360 and ARC Selections Figure 4-1 Terrain Page with Aviation Data Displayed and 360° View 190-00601-02 Rev. J Garmin G500/G600 Pilot’s Guide... -
Page 162: Terrain Proximity Page Display On A Navigation Map Page
1. Press the VIEW soft key to show the 360 and ARC soft keys. 2. Press the 360 or Arc soft key. Press MENU and with the View Arc or View 360° selection highlighted press ENT. Garmin G500/G600 Pilot’s Guide 190-00601-02 Rev. J... -
Page 163: Terrain Proximity Page Aviation Data
1. While viewing the Terrain page of the MAP page group, press MENU for Map selections to hide or show aviation data overlay on the Terrain page. Figure 4-6 Show/Hide Aviation Data on the Terrain Page 2. Press ENT to save the highlighted value. 190-00601-02 Rev. J Garmin G500/G600 Pilot’s Guide... - Page 164 Cover Figure 4-7 Terrain Page with Aviation Data Displayed and 120° Arc View Figure 4-8 Navigation Map Page with Terrain Data Displayed Garmin G500/G600 Pilot’s Guide 190-00601-02 Rev. J...
-
Page 165: Terrain Proximity Symbols
Unlighted Obstacle altitude (Red) 1000 ft Terrain between 100 ft and 1000 ft below the aircraft altitude (Yellow) Terrain more than 1000 ft below the aircraft altitude (Black) Figure 4-10 Terrain Altitude Colors 190-00601-02 Rev. J Garmin G500/G600 Pilot’s Guide... - Page 166 Obstacle is between 100 ft and 1,000 ft below current aircraft Yellow altitude Obstacle is between 1,000 ft and 2,000 ft below current aircraft White altitude Table 4-4 Obstacle Altitude Color Descriptions 4-10 Garmin G500/G600 Pilot’s Guide 190-00601-02 Rev. J...
-
Page 167: Terrain Awareness And Warning System (Optional)
Terrain information is based on terrain elevation information in a database that may contain inaccuracies. Individual obstructions may be shown if available in the database. The data undergoes verification by Garmin to confirm accuracy of the content, per TSO-C151c. 4-11 190-00601-02 Rev. -
Page 168: Taws Self-Test
Cover 4.3.3 TAWS Self-Test During G500/G600 power-up, the terrain/obstacle database versions are displayed along with a disclaimer to the pilot. At the same time, TAWS self-test begins. One of the following aural messages is generated: • “TAWS System Test OK”... -
Page 169: Taws Page
Black Terrain (No Danger Terrain and - Terrain More than 1000 Obstacle Altitude ft Below the Aircraft Legend Altitude) Page Name 120° 360° Range Ring Selection Selection Figure 4-11 360˚ View on the TAWS Page 4-13 190-00601-02 Rev. J Garmin G500/G600 Pilot’s Guide... - Page 170 Figure 4-13 Show/Hide Aviation Data Manually Testing the TAWS System 1. Select the TAWS page. 2. Press the MENU key and then turn the large or small MFD knob to highlight “Test TAWS.” 4-14 Garmin G500/G600 Pilot’s Guide 190-00601-02 Rev. J...
- Page 171 • “TAWS System Test OK” • “TAWS System Failure” TAWS TEST is annunciated in yellow on the TAWS page and in white on the PFD. Figure 4-15 TAWS Test Display and PFD Annunciation 4-15 190-00601-02 Rev. J Garmin G500/G600 Pilot’s Guide...
-
Page 172: Taws Alerts
• Press the CLR key (returns to the currently viewed page) • Press the ENT key (accesses the TAWS Page) If the pilot takes no action, the pop-up will be removed when the alert is no longer active. 4-16 Garmin G500/G600 Pilot’s Guide 190-00601-02 Rev. J... -
Page 173: Taws-B Alerting Colors And Symbology
Alert Level Annunciator Text Threat Area Example Visual Annunciation Indication Symbol Warning White text on red background Caution Black text on yellow background Table 4-5 TAWS Alert Colors and Symbology 4-17 190-00601-02 Rev. J Garmin G500/G600 Pilot’s Guide... - Page 174 “Don’t Sink”* Caution (NCR-C) “Too Low, Terrain” * Alerts with multiple messages are configurable at installation and are installation-dependent. Alerts for the default configuration are indicated with asterisks. Table 4-6 TAWS-B Alerts Summary 4-18 Garmin G500/G600 Pilot’s Guide 190-00601-02 Rev. J...
-
Page 175: Excessive Descent Rate Alert
The parameters for the alert as defined by TSO-C151c are shown below. Figure 4-18 Excessive Descent Rate Alert Criteria 4-19 190-00601-02 Rev. J Garmin G500/G600 Pilot’s Guide... -
Page 176: Forward Looking Terrain Avoidance
During final approach, FLTA alerts are automatically inhibited when the aircraft is below 200 feet AGL while within 0.5 NM of the approach runway or below 125 feet AGL while within 1.0 NM of the runway threshold. 4-20 Garmin G500/G600 Pilot’s Guide 190-00601-02 Rev. J... -
Page 177: Premature Descent Alerting
TAWS and the system should be enabled when appropriate. When TAWS is inhibited, the alert annunciation “TAWS INHB” is shown on the PFD and MFD (Figure 4-16). 4-21 190-00601-02 Rev. J Garmin G500/G600 Pilot’s Guide... -
Page 178: Inhibiting/Enabling Taws Alerting
500 feet of terrain, the aural message “Five-hundred” is generated. There are no display annunciations or pop-up alerts that accompany the aural message. NOTE: The five-hundred aural callout provided by TAWS-B is not in relation to the optional radar altimeter, if installed. 4-22 Garmin G500/G600 Pilot’s Guide 190-00601-02 Rev. J... -
Page 179: Negative Climb Rate After Take-Off Alert
“DON’T SINK” “DON’T SINK” Altitude Loss (Feet) 1000 “DON’T SINK” “DON’T SINK” 1000 1500 2000 2500 3000 3500 4000 Sink Rate (Feet Per Minute) Figure 4-21 Negative Climb Rate (NCR) Alert Criteria 4-23 190-00601-02 Rev. J Garmin G500/G600 Pilot’s Guide... -
Page 180: Taws Not Available Alert
TAWS System Test Pass None “TAWS System Test OK” TAWS N/A TAWS Not Available TAWS Alerting is Disabled None TAWS System Test Fail “TAWS System Failure” Table 4-8 TAWS-B System Test Status Annunciations 4-24 Garmin G500/G600 Pilot’s Guide 190-00601-02 Rev. J... -
Page 181: External Taws
• TAWS annunciations can only be received from the #1 GPS unit. • If the Garmin GPS/TAWS is not available and Terrain-SVT is enabled, the G500/G600 Terrain-SVT will generate PFD text alerts and aural callouts. An advisory message will indicate when reversion to Terrain-SVT alerting has occurred. -
Page 182: Terrain-Svt
Table 4-9 G500/G600 TAWS Annunciations Terrain-SVT Garmin Terrain-SVT refers to a subset of Class B TAWS that meets the terrain alerting requirements outlined in Section 7.b of AC 23-26. Terrain-SVT is a subset of Class B TAWS that provides a Class B TAWS FLTA functionality with visual alerting and aural alerting. -
Page 183: Terrain-Svt Page 120° Arc Or 360° Rings
1. Press VIEW and then the 360 or Arc soft key. 2. Press MENU and the with the "View Arc" or "View 360°" selection highlighted press ENT. Figure 4-24 Terrain-SVT Page Menu Viewing Selections 4-27 190-00601-02 Rev. J Garmin G500/G600 Pilot’s Guide... -
Page 184: Terrain-Svt Page Aviation Data
1. Press the MENU key. 2. Use the large or small MFD knob to highlight “Inhibit Terrain” or “Enable Terrain” (choice dependent on current state) and press the ENT key. 4-28 Garmin G500/G600 Pilot’s Guide 190-00601-02 Rev. J... -
Page 185: Synthetic Vision Alerts And Annunciations
MFD. To acknowledge the pop-up alert: Press the CLR key (returns to the currently viewed page) Press the ENT key (accesses the Terrain-SVT Page) Figure 4-27 Terrain-SVT Advisory Pop-Up on the MFD 4-29 190-00601-02 Rev. J Garmin G500/G600 Pilot’s Guide... - Page 186 “Warning, Terrain, Terrain” (RTC-W, ITI-W) FLTA Terrain Warning “Warning, Wire, Wire” (RLC-W, ILI-W) FLTA Obstacle Caution “Caution, Obstacle, Obstacle” (ROC-C, IOI-C) FLTA Obstacle Warning “Warning, Obstacle, Obstacle” (ROC-W, IOI-W) Table 4-11 Terrain-SVT Alerts Summary 4-30 Garmin G500/G600 Pilot’s Guide 190-00601-02 Rev. J...
-
Page 187: Traffic Systems
Coverage is limited to specific areas as shown in the Airmen’ s Information Manual (AIM). TAS data comes from a TAS unit such as a Garmin GTS 800 or 820, Skywatch 497, KTA 810, or other unit. Coverage follows the aircraft. -
Page 188: Displaying And Operating Traffic (Tas/Tcas Systems)
Operating Mode. 2. To switch to Standby Mode from the Traffic Page, select the STANDBY soft key. NOTE: Not all TAS systems can be controlled from the G500/G600. The Operate/Standby soft keys may not be displayed. An alert will be generated when Standby is selected and the aircraft is in the air. -
Page 189: Range Ring
-9,900 to 2,700 Normal -2,700 to 2,700 Above -2,700 to 9,900 Unrestricted All Traffic Shown (-9,900 to 9,900) Table 4-12 Displayed Traffic Range NOTE: Traffic Advisories (TAs) are always displayed, regardless of altitude mode. 4-33 190-00601-02 Rev. J Garmin G500/G600 Pilot’s Guide... -
Page 190: Tas/Tcas Symbology
A Traffic Advisory that is beyond the selected display range is indicated by a half TA symbol at the edge of the screen at the relative bearing of the intruder. 4-34 Garmin G500/G600 Pilot’s Guide 190-00601-02 Rev. J... -
Page 191: Traffic System Status
Data is not being received from the TAS unit. Data is being received from the TAS unit, but the unit is DATA FAILED self-reporting a failure. FAILED Incorrect data format received from the TAS unit. Table 4-15 TAS Failure Annunciations 4-35 190-00601-02 Rev. J Garmin G500/G600 Pilot’s Guide... - Page 192 **Shown centered on the bottom of Traffic Map Page. Table 4-16 TAS Traffic Status Annunciations For TAS traffic, TEST MODE can be initiated from the Page Menu (press the MENU key) when the traffic device is in Standby mode. 4-36 Garmin G500/G600 Pilot’s Guide 190-00601-02 Rev. J...
-
Page 193: Traffic Pop-Up
NOTE: The traffic pop-up will not appear when your aircraft is on the ground. Press ENT to go directly to the Traffic page. Press CLR to return to the previously viewed page. Traffic Pop-Up Figure 4-29 Traffic Pop-Up 4-37 190-00601-02 Rev. J Garmin G500/G600 Pilot’s Guide... -
Page 194: Tis Traffic (Optional)
Page. When the aircraft is on the ground, TIS automatically enters Standby Mode. Once the aircraft is airborne, TIS switches from Standby to Operating Mode and the GDU 620 begins to display traffic information. 4-38 Garmin G500/G600 Pilot’s Guide 190-00601-02 Rev. J... - Page 195 Other Traffic, Aircraft is 3000 feet above, climbing and moving in the direction of the line Figure 4-30 Traffic Map Page - TIS 4-39 190-00601-02 Rev. J Garmin G500/G600 Pilot’s Guide...
-
Page 196: Tis Symbology
(for speeds greater than 500 fpm in either direction) to the right of the target symbol. Traffic symbols for aircraft without altitude reporting capability appear without altitude separation or climb/descent information. 4-40 Garmin G500/G600 Pilot’s Guide 190-00601-02 Rev. J... -
Page 197: Tis Limitations
Cover 4.6.2.3 TIS Limitations NOTE: This section on TIS Limitations is not comprehensive. Garmin recommends the user review the TIS Limitations section of the Aeronautical Information Manual, Section 1-3-5. TIS is NOT intended to be used as a collision avoidance system and does not relieve the pilot of responsibility to “see and avoid”... - Page 198 Cover Garmin is not responsible for Mode S geographical coverage. Operation of the ground stations is the responsibility of the FAA. Refer to the Aeronautical Information Manual for a Terminal Mode S Radar Site Map covering the U.S. NOTE: TIS will be unavailable at low altitudes in many areas of the U.S., particularly in mountainous regions.
-
Page 199: Tis Alerts
3,000 feet upward at 55 miles. Terrain and obstacles around the radar site can further decrease radar coverage in all directions. • Traffic does not have an operating transponder. 4-43 190-00601-02 Rev. J Garmin G500/G600 Pilot’s Guide... -
Page 200: Tis System Status
The transponder has failed UNAVAILABLE TIS is unavailable or out of range * Contact a service center or Garmin dealer for corrective action. Table 4-18 TIS Failure Annunciations The traffic mode is annunciated in the upper left corner of the Traffic Map Page. - Page 201 NOTE: An alert will be generated when Standby is selected and the aircraft is in the air. The annunciations indicate the status of traffic information appear in a banner at the lower left corner of maps on which traffic can be displayed. 4-45 190-00601-02 Rev. J Garmin G500/G600 Pilot’s Guide...
- Page 202 The traffic service is unavailable or out of range. * Shown as symbol on Traffic Map Page. ** Shown centered on the bottom of Traffic Map Page. Table 4-20 TIS Traffic Status Annunciations 4-46 Garmin G500/G600 Pilot’s Guide 190-00601-02 Rev. J...
-
Page 203: Ads-B Traffic (Optional)
3. After selecting a target, you can press the small MFD knob to leave the target selected, and return the small MFD to page selection mode. 4. Use the DESELECT soft key to turn off selected traffic. 4-47 190-00601-02 Rev. J Garmin G500/G600 Pilot’s Guide... - Page 204 Symbol Description Basic Non-Directional Traffic Basic Directional Traffic Basic Off-scale Selected Traffic Proximate Non-Directional Traffic Proximate Directional Traffic Proximate Off-scale Selected Traffic Non-Directional Alerted Traffic 4-48 Garmin G500/G600 Pilot’s Guide 190-00601-02 Rev. J...
-
Page 205: Status
If a TCAS system is integrated with the ADS-B system then this shows the current status of the TCAS system. When the ADS-B system is integrated with a TCAS system, the controls are provided on the installed navigator. 4-49 190-00601-02 Rev. J Garmin G500/G600 Pilot’s Guide... -
Page 206: Motion Vector
Figure 4-33 Absolute Motion (White Vectors) NOTE: Relative Motion vectors are unavailable when the aircraft is on the ground. The duration will be annunciated as UNAVAIL after “RELATIVE MOTION -” at the bottom of the screen. 4-50 Garmin G500/G600 Pilot’s Guide 190-00601-02 Rev. J... - Page 207 Press the smart key to select the altitude filter value. Altitude Mode Displayed Traffic Range (ft) Below -9,900 to 2,700 Normal -2,700 to 2,700 Above -2,700 to 9,900 Unrestricted All Traffic Shown (-9,900 to 9,900) Table 4-22 Displayed Traffic Range 4-51 190-00601-02 Rev. J Garmin G500/G600 Pilot’s Guide...
-
Page 208: Xm Wx Satellite Weather (Optional)
XM WX Satellite Radio services. If more than half of the expiration time has elapsed from the time the data is received, the color of the product age displayed changes to yellow. 4-52 Garmin G500/G600 Pilot’s Guide 190-00601-02 Rev. J... -
Page 209: Customizing The Xm Wx Satellite Weather Map
4. Press ENT to save a selection. 5. Turn the large MFD knob to the next desired option press the small MFD knob to cancel and return to the XM WX Satellite Weather Data Link Map Page. 4-53 190-00601-02 Rev. J Garmin G500/G600 Pilot’s Guide... - Page 210 Off, 10 NM to 500 NM Turbulence Data Viewing Range Off, 10 NM to 500 NM Cyclone Data Viewing Range Off, 10 NM to 500 NM Table 4-23 Weather Page Menu Setup Options 4-54 Garmin G500/G600 Pilot’s Guide 190-00601-02 Rev. J...
-
Page 211: Xm Wx Weather Symbols And Product Age
Due to time delays inherent in gathering and processing weather data for data link transmission, the weather information shown by the data link weather product may be significantly older than the indicated weather product age. 4-55 190-00601-02 Rev. J Garmin G500/G600 Pilot’s Guide... - Page 212 The valid time indication for XM Freezing Level, Winds Aloft and Canada Winds Aloft is not displayed. Instead, the generation time for these is displayed. 4-56 Garmin G500/G600 Pilot’s Guide 190-00601-02 Rev. J...
- Page 213 Cover Symbol Description Flood Severe Thunderstorm Tornado Sunny Part Sun Cloudy Rainy T-Storm Snow Windy Foggy Haze High/Low Temp Table 4-25 Weather Symbols 4-57 190-00601-02 Rev. J Garmin G500/G600 Pilot’s Guide...
-
Page 214: Xm Weather Legends
XM Weather Map Menu or pressing the LEGEND soft key on the Weather Map Page. The legend displayed will match the selected weather products. Turn the large or small MFD knobs to scroll through the legend, if necessary. 4-58 Garmin G500/G600 Pilot’s Guide 190-00601-02 Rev. J... -
Page 215: Xm Nexrad
Never use NEXRAD data or any radar data to penetrate hazardous weather. Instead, use it in an early-warning capacity of pre-departure and en route evaluation. 4-59 190-00601-02 Rev. J Garmin G500/G600 Pilot’s Guide... - Page 216 All weather product legends can be viewed on the Weather Data Link Page. For the NEXRAD legend, select the LEGEND soft key when NEXRAD is selected for display. Figure 4-39 NEXRAD Weather Legend 4-60 Garmin G500/G600 Pilot’s Guide 190-00601-02 Rev. J...
-
Page 217: Reflectivity
• When zoomed in to a range of 30 NM, each square block on the display represents an area of four square kilometers. The intensity level reflected by each square represents the highest level of NEXRAD data sampled within the area. 4-61 190-00601-02 Rev. J Garmin G500/G600 Pilot’s Guide... -
Page 218: Xm Weather Page Map Orientation
4. Press ENT to accept the displayed value. The next option will be highlighted. 5. Press the small MFD knob to cancel selection or to end editing and return to the Navigation Map page or turn the large MFD knob to the next option. 4-62 Garmin G500/G600 Pilot’s Guide 190-00601-02 Rev. J... -
Page 219: Nexrad Data Viewing Range
The next option will be highlighted. 3. Press the small MFD knob to cancel selection or to end editing and return to the Navigation Map page or turn the large MFD knob to the next option. 4-63 190-00601-02 Rev. J Garmin G500/G600 Pilot’s Guide... -
Page 220: Nexrad Source
1. While viewing Weather Setup 1/2 menu, turn the large MFD knob to highlight the NEXRAD Legend value. 2. Turn the small MFD knob to highlight US or Canada. Press ENT to accept the displayed value. 4-64 Garmin G500/G600 Pilot’s Guide 190-00601-02 Rev. J... -
Page 221: Xm Echo Tops
The display of radar coverage is always active when either NEXRAD or ECHO TOPS is selected. Areas where NEXRAD radar coverage and Echo Tops information is not currently available or is not being collected are indicated in grayish-purple. 4-65 190-00601-02 Rev. J Garmin G500/G600 Pilot’s Guide... - Page 222 The next option will be highlighted. 3. Press the small MFD knob to cancel selection or to end editing and return to the previously viewed page, or turn the large MFD knob to the next option. 4-66 Garmin G500/G600 Pilot’s Guide 190-00601-02 Rev. J...
-
Page 223: Xm Cloud Tops
Tops is selected for display. Since Cloud Tops and Echo Tops use the same color scaling to represent altitude, display of these weather products is mutually exclusive. When Cloud Tops is activated, Echo Tops or NEXRAD data is not shown. 4-67 190-00601-02 Rev. J Garmin G500/G600 Pilot’s Guide... -
Page 224: Cloud Top (Cloud Top And Echo Top Mutually Exclusive)
The next option will be highlighted. 3. Press the small MFD knob to cancel selection or to end editing and return to the previously viewed page or turn the large MFD knob to the next option. 4-68 Garmin G500/G600 Pilot’s Guide 190-00601-02 Rev. J... -
Page 225: Xm Wx Satellite Lightning
The next option will be highlighted. 3. Press the small MFD knob to cancel selection or to end editing and return to the Navigation Map page or turn the large MFD knob to the next option. 4-69 190-00601-02 Rev. J Garmin G500/G600 Pilot’s Guide... -
Page 226: Xm Sigmets And Airmets
12 minutes. Figure 4-46 XM Weather - AIRMETs (Graphic) When enabled, the following AIRMETs are available for display: • Icing • Turbulence • IFR conditions • Mountain obscuration • Surface winds 4-70 Garmin G500/G600 Pilot’s Guide 190-00601-02 Rev. J... - Page 227 Sigmet/Airmet line. Press ENT. 2. The Sigmet/Airmet information will be shown. Press the small MFD knob to return to the previously viewed page. Figure 4-47 XM Weather - AIRMETs (Text) 4-71 190-00601-02 Rev. J Garmin G500/G600 Pilot’s Guide...
-
Page 228: Xm Pireps
The next option will be highlighted. 3. Press the small MFD knob to cancel selection or to end editing and return to the Navigation Map page or turn the large MFD knob to the next option. 4-72 Garmin G500/G600 Pilot’s Guide 190-00601-02 Rev. J... -
Page 229: Xm Metars
MFD Wx Data Link Map page (1, 2, or 3). When Off is selected, METARs will not be shown. Where a value (such as 150 NM) is selected, METAR data will be shown at map ranges of the selected value (150 NM) and lower. 4-73 190-00601-02 Rev. J Garmin G500/G600 Pilot’s Guide... - Page 230 Figure 4-50 XM Weather - Textual METARs 3. Use the small MFD knob or the large MFD knob to scroll through the available information. 4. Press the small MFD knob to return to the previously viewed page. 4-74 Garmin G500/G600 Pilot’s Guide 190-00601-02 Rev. J...
-
Page 231: Xm Winds Aloft
3,000 foot increments. In the figure below where 9,000 feet is selected, Winds Aloft data will be shown at 9,000 feet. Figure 4-51 XM Weather - Winds Aloft Figure 4-52 XM Weather - Winds Aloft Legend 4-75 190-00601-02 Rev. J Garmin G500/G600 Pilot’s Guide... - Page 232 The next option will be highlighted. 3. Press the small MFD knob to cancel selection or to end editing and return to the previously viewed page or turn the large MFD knob to the next option. 4-76 Garmin G500/G600 Pilot’s Guide 190-00601-02 Rev. J...
-
Page 233: Xm Surface Analysis And City Forecast
A Warm Front is where warm air replaces cold air. An orange line with orange half moons that point in the direction of the warm air flow. Figure 4-55 XM Weather - Warm Front 4-77 190-00601-02 Rev. J Garmin G500/G600 Pilot’s Guide... - Page 234 Data Link Map page (1, 2, or 3). Forecasts are available for intervals of current, 12, 24, 36, and 48 hours. The interval is selected by pressing the FCST TIME soft key on the Wx Data Link Map page. 4-78 Garmin G500/G600 Pilot’s Guide 190-00601-02 Rev. J...
-
Page 235: Xm County Warnings
The next option will be highlighted. 3. Press the small MFD knob to cancel selection or to end editing and return to the previously viewed page or turn the large MFD knob to the next option. 4-79 190-00601-02 Rev. J Garmin G500/G600 Pilot’s Guide... -
Page 236: Xm Tfrs
The next option will be highlighted. 3. Press the small MFD knob to cancel selection or to end editing and return to the previously viewed page or turn the large MFD knob to the next option. 4-80 Garmin G500/G600 Pilot’s Guide 190-00601-02 Rev. J... - Page 237 TFR symbol (yellow circle). Press ENT. 2. The TFR details will be shown. 3. Press the small MFD knob or ENT to return to the Weather page. Figure 4-60 XM Weather - Textual TFRs and Legend 4-81 190-00601-02 Rev. J Garmin G500/G600 Pilot’s Guide...
-
Page 238: Xm Cell Movement
The next option will be highlighted. 3. Press the small MFD knob to cancel selection or to end editing and return to the previously viewed page or turn the large MFD knob to the next option. 4-82 Garmin G500/G600 Pilot’s Guide 190-00601-02 Rev. J... -
Page 239: Xm Aireps
3. Press the small MFD knob to cancel selection or to end editing and return to the previously viewed page or turn the large MFD knob to the next option. Figure 4-62 XM Weather - AIREPs 4-83 190-00601-02 Rev. J Garmin G500/G600 Pilot’s Guide... - Page 240 AIREP. 2. Press ENT to view text information. Press ENT again to return to the previous page. Figure 4-63 XM Weather - AIREP Text Detail 4-84 Garmin G500/G600 Pilot’s Guide 190-00601-02 Rev. J...
-
Page 241: Xm Cyclone
3. Press the small MFD knob to cancel selection or to end editing and return to the previously viewed page or turn the large MFD knob to the next option. Projected Path With Date And Time Current Position Of Cyclone Figure 4-64 XM Weather - Cyclone 4-85 190-00601-02 Rev. J Garmin G500/G600 Pilot’s Guide... -
Page 242: Xm Freezing Level
The next option will be highlighted. 3. Press the small MFD knob to cancel selection or to end editing and return to the previously viewed page or turn the large MFD knob to the next option. 4-86 Garmin G500/G600 Pilot’s Guide 190-00601-02 Rev. J... -
Page 243: Xm Icing
4. Press the WX Alt Dn or WX Alt Up keys to increase or decrease the reporting altitude of icing in 3,000 foot increments. The selected altitude is shown in a window above the altitude keys. 4-87 190-00601-02 Rev. J Garmin G500/G600 Pilot’s Guide... -
Page 244: Xm Turbulence
4. Press the WX Alt Dn or WX Alt Up keys to increase or decrease the reporting altitude of icing in 3,000 foot increments. The selected altitude is shown in a window above the altitude keys. 4-88 Garmin G500/G600 Pilot’s Guide 190-00601-02 Rev. J... -
Page 245: Weather Radar
Cover Weather Radar The G500/G600 can display weather radar from a Garmin GWX system or from selected 3rd-party radars. Only one weather radar system may be interfaced to the system. For detailed information on the operation of 3rd-party radars, refer to their specific documentation. -
Page 246: Independent Radar - Gwx 70 Only
• Bearing For example, the operating mode may be switched to Weather on one display, while Ground Mapping mode is enabled on another. Figure 4-67 Weather Radar Display Figure 4-68 Ground Mapping Display 4-90 Garmin G500/G600 Pilot’s Guide 190-00601-02 Rev. J... - Page 247 If the GWX 70 is turned off on the GDU, but another display is still actively scanning, the “RADAR ACTIVE” advisory appears. Figure 4-70 Radar Active Advisory Refer to the GWX 70 documentation for additional information. 4-91 190-00601-02 Rev. J Garmin G500/G600 Pilot’s Guide...
-
Page 248: Principles Of Pulsed Airborne Weather Radar
The same antenna is used for both transmitting and receiving. The returned signal is then processed and displayed on the G500/G600 MFD. Radar detection is a two-way process that requires 12.36 micro-seconds for the transmitted microwave pulses to travel out and back for each nautical mile of target range. -
Page 249: Antenna Beam Illumination
150 NM or more. 320 nm Figure 4-72 Radar Beam in Relation to the Curvature of the Earth 4-93 190-00601-02 Rev. J Garmin G500/G600 Pilot’s Guide... -
Page 250: Radar Signal Attenuation
Attenuation can also be due to poor maintenance or degradation of the radome. Even the smallest amount of wear and tear, pitting, and pinholes on the radome surface can cause damage and system inefficiency. 4-94 Garmin G500/G600 Pilot’s Guide 190-00601-02 Rev. J... -
Page 251: Radar Signal Reflectivity
A cloud that contains only small raindrops, such as fog or drizzle, will not reflect enough radar energy to produce a measurable target return. Figure 4-73 Precipitation Type and Reflectivity 4-95 190-00601-02 Rev. J Garmin G500/G600 Pilot’s Guide... -
Page 252: Ground Returns
A large incident angle gives the radar system a smaller detectable range and lower display intensity due to minimized reflection of the radar energy. 4-96 Garmin G500/G600 Pilot’s Guide 190-00601-02 Rev. J... -
Page 253: Operating Distance
With a scanning or rotating beam, the averaged power density at the Maximum Permissible Exposure Level (MPEL) boundary is significantly reduced. 4.8.3.2 Maximum Permissible Exposure Level (Other Radars) For more information about MPEL, refer to the appropriate documentation. 4-97 190-00601-02 Rev. J Garmin G500/G600 Pilot’s Guide... -
Page 254: Basic Antenna Tilt Setup
4º can help separate ground returns from weather returns in relatively flat terrain. This will place the bottom of the radar beam level with the ground. Return the antenna tilt to the previous setting after a few sweeps. 4-98 Garmin G500/G600 Pilot’s Guide 190-00601-02 Rev. J... -
Page 255: Weather Mapping And Interpretation
Weather Mapping and Interpretation 4.8.5.1 Weather display Interpretation When evaluating various target returns on the weather radar display, the colors denote approximate rainfall intensity and rates as shown in the table below. 4-99 190-00601-02 Rev. J Garmin G500/G600 Pilot’s Guide... -
Page 256: Thunderstorms
“hooks,” “fingers,” or “scalloped” edges. These irregularities may be present in green areas with no yellow, red, or magenta areas and should be treated as highly dangerous areas. Avoid these areas as if they were red or magenta areas. 4-100 Garmin G500/G600 Pilot’s Guide 190-00601-02 Rev. J... - Page 257 In areas of multiple heavy cells, use the Vertical Scan feature along with antenna tilt management to examine the areas. Remember to avoid shadowed areas behind targets. Figure 4-79 The “Blind Alley” Horizontal Scan 4-101 190-00601-02 Rev. J Garmin G500/G600 Pilot’s Guide...
-
Page 258: Tornadoes
U-shaped cloud edges 3 to 7 miles across can also indicate hail. These target returns appear quite suddenly along any edge of the cell outline. They also change in intensity and shape in a matter of seconds, making vigilant monitoring essential. 4-102 Garmin G500/G600 Pilot’s Guide 190-00601-02 Rev. J... -
Page 259: Radar Operation In Weather Mode
When the weather radar system is in the Weather or Ground Map mode, the system automatically switches to Standby mode on landing. Antenna Operating Stabilization Mode Weather Alert (GWX Only) Control Precipitation Window Scale Figure 4-80 Horizontal Scan Display 4-103 190-00601-02 Rev. J Garmin G500/G600 Pilot’s Guide... -
Page 260: Displaying Weather On The Weather Radar Page
1. If the aircraft is airborne, select the WEATHER soft key. A warm-up period is initiated (countdown is displayed on the screen - GWX radars only). After the warm-up is complete, the radar begins transmitting. 2. Press the RNG keys to select the desired range. 4-104 Garmin G500/G600 Pilot’s Guide 190-00601-02 Rev. J... -
Page 261: Vertically Scanning A Storm Cell
NOTE: Vertical scanning of a storm cell should be done with the aircraft wings level to avoid constant adjustment of the Bearing Line. 4-105 190-00601-02 Rev. J Garmin G500/G600 Pilot’s Guide... -
Page 262: Adjusting The Antenna Tilt Angle
4-106 Garmin G500/G600 Pilot’s Guide 190-00601-02 Rev. J... -
Page 263: Adjusting Gain
Remember to return the gain setting to: “Calibrated” for viewing the actual intensity of precipitation. NOTE: Gain can be adjusted in Weather mode on the GWX radars only. 4-107 190-00601-02 Rev. J Garmin G500/G600 Pilot’s Guide... - Page 264 Restore Calibrated Gain 1. While viewing the Weather Radar page of the Wx page group, press the MENU key. 2. Turn the large MFD knob to highlight “Restore Calibrated Gain” and press ENT. 4-108 Garmin G500/G600 Pilot’s Guide 190-00601-02 Rev. J...
-
Page 265: Sector Scan - Gwx Radars Only
Bearing Line will become the center point of the Sector Scan. 4. Turn the large MFD knob to place the cursor in the SECTOR SCAN field. Figure 4-88 Sector Scan - Full 4-109 190-00601-02 Rev. J Garmin G500/G600 Pilot’s Guide... -
Page 266: Antenna Stabilization
1. While viewing the Weather Radar page of the Wx page group, press the CONTROL soft key. 2. To activate or deactivate the WATCH™ feature, press the WATCH soft key. 4-110 Garmin G500/G600 Pilot’s Guide 190-00601-02 Rev. J... -
Page 267: Weather Alert - Gwx Radars Only
1. While viewing the Weather Radar page of the Wx page group, press the MENU key. 2. To activate or deactivate Weather Alerts, turn the large or small MFD knob to highlight either “Enable Weather Alert” or “Inhibit Weather Alert.” 4-111 190-00601-02 Rev. J Garmin G500/G600 Pilot’s Guide... -
Page 268: Altitude Compensated Tilt - Gwx 70 Only
This optional feature requires a separate enablement. See your dealer for details. 4-112 Garmin G500/G600 Pilot’s Guide 190-00601-02 Rev. J... -
Page 269: Ground Mapping And Interpretation
Turn the large MFD knob to highlight “YES” and then press ENT. Figure 4-94 Ground Radar Operation Caution 3. Press the BACK soft key. 4. Press the MFD knob to activate the cursor. 4-113 190-00601-02 Rev. J Garmin G500/G600 Pilot’s Guide... -
Page 270: Gfds Weather (Optional)
GFDS Weather (Optional) GFDS Weather is an optional feature available with the Iridium satellite system that is interfaced through the optional Garmin GSR 56. The primary maps for viewing Garmin Flight Data System (GFDS) Weather data are the Weather Data Link Pages in the Map Page Group. These are the only GDU 620 map displays capable of all available GFDS weather products. -
Page 271: Gfds Registration
Registering with GFDS It is necessary to register the GDU with GFDS to utilize the weather products. 1. Call Garmin Customer Service to create a GFDS account. Provide the GDU System ID and airframe info (model, tail number, etc). 2. Customer Service will issue an access code to enter on the GFDS Registration page. -
Page 272: Deactivating Unit Registration With Gfds
Weather Setup choice covers selections for adjusting the viewing ranges of the weather products. NOTE: If multiple weather sources are installed, then the weather source must first be selected on the AUX System Setup page. Refer to section 3.2.1.10. 4-116 Garmin G500/G600 Pilot’s Guide 190-00601-02 Rev. J... - Page 273 4. Press ENT to save a selection. 5. Turn the large MFD knob to the next desired option or press the small MFD knob to cancel and return to the GFDS Weather Data Link Map Page. 4-117 190-00601-02 Rev. J Garmin G500/G600 Pilot’s Guide...
-
Page 274: Gfds Data Request
2. Turn the large MFD knob to highlight “GFDS Data Request.” Press ENT Figure 4-99 Select GFDS Data Request 3. Turn the small MFD knob to select values and the large MFD knob to move to the next position. 4-118 Garmin G500/G600 Pilot’s Guide 190-00601-02 Rev. J... -
Page 275: Gfds Data Request Coverage
4. The Present Position box will be checked and weather information will be requested around your present position. 5. To deselect Present Position reporting, turn the large MFD knob to highlight “Present Position.” Press ENT 4-119 190-00601-02 Rev. J Garmin G500/G600 Pilot’s Guide... - Page 276 3. The Flight Plan box will be checked and weather information will be requested along your flight plan forward of your present position for the range selected. 4. To deselect Flight Plan reporting, turn the large MFD knob to highlight “Flight Plan.” Press ENT 4-120 Garmin G500/G600 Pilot’s Guide 190-00601-02 Rev. J...
- Page 277 When finished selecting the waypoint name, press ENT Figure 4-102 Waypoint GFDS Data Request 3. The Waypoint box will be checked and weather information will be requested around the selected waypoint for the range selected (next operation). 4-121 190-00601-02 Rev. J Garmin G500/G600 Pilot’s Guide...
-
Page 278: Gfds Data Request Auto Request
Turn the small MFD knob to select “Off” or an Update Rate. When finished selecting the Update Rate, press ENT . The Update Rate will default to “OFF” at each power cycle. Figure 4-104 GFDS Data Request Auto Update Rate 4-122 Garmin G500/G600 Pilot’s Guide 190-00601-02 Rev. J... -
Page 279: Gfds Data Request Manual Request
3. Press ENT to accept the displayed value. The next option will be highlighted. 4. Press the small MFD knob to cancel selection or to end editing and return to the WX page or turn the large MFD knob to the next option. 4-123 190-00601-02 Rev. J Garmin G500/G600 Pilot’s Guide... -
Page 280: Precipitation Data Viewing Range
3. Press ENT to accept the displayed value. The next option will be highlighted. 4. Press the small MFD knob to cancel selection or to end editing and return to the WX page or turn the large MFD knob to the next option. 4-124 Garmin G500/G600 Pilot’s Guide 190-00601-02 Rev. J... -
Page 281: Precip Legend
The next option will be highlighted. 4. Press the small MFD knob to cancel selection or to end editing and return to the WX page or turn the large MFD knob to the next option. 4-125 190-00601-02 Rev. J Garmin G500/G600 Pilot’s Guide... -
Page 282: Gfds Infrared Satellite Data Viewing Range
The next option will be highlighted. 4. Press the small MFD knob to cancel selection or to end editing and return to the WX page or turn the large MFD knob to the next option. 4-126 Garmin G500/G600 Pilot’s Guide 190-00601-02 Rev. J... -
Page 283: Data Link Lightning Data Viewing Range
The next option will be highlighted. 4. Press the small MFD knob to cancel selection or to end editing and return to the WX page or turn the large MFD knob to the next option. 4-127 190-00601-02 Rev. J Garmin G500/G600 Pilot’s Guide... -
Page 284: Sigmets And Airmets
1. While viewing a Map or Weather page, Use the small and large MFD knobs to move the cursor to highlight a SIGMET/AIRMET line. Press ENT. 2. The Waypoint Information page for that line will now be shown. Press the WX soft key to view weather information. 4-128 Garmin G500/G600 Pilot’s Guide 190-00601-02 Rev. J... -
Page 285: Turbulence
MFD Wx Data Link Map page (1, 2, or 3). When Off is selected, SIGMET/AIRMET will not be shown. Where a value (such as 250 NM) is selected, SIGMET/AIRMET data will be shown at map ranges of the selected value (250 NM) and lower. 4-129 190-00601-02 Rev. J Garmin G500/G600 Pilot’s Guide... -
Page 286: Airep/Pirep
PIREPs are issued as either Routine (UA) or Urgent (UUA). Product Age Cursor Location Selected PIREP PIREP Detail Figure 4-112 GFDS Weather Page - AIREPs/PIREPs 4-130 Garmin G500/G600 Pilot’s Guide 190-00601-02 Rev. J... - Page 287 2. The Waypoint Information page for that airport will now be shown. Press the WX soft key to view weather information for the waypoint. Figure 4-113 GFDS Weather - AIREPs/PIREPs Detail and Legend 4-131 190-00601-02 Rev. J Garmin G500/G600 Pilot’s Guide...
-
Page 288: Metars
METARs are shown as colored flags at airports that provide them. Cursor Location IFR METAR VFR METAR Selected METAR (LIFR) Figure 4-114 GFDS Weather - Graphic METARs 4-132 Garmin G500/G600 Pilot’s Guide 190-00601-02 Rev. J... - Page 289 2. The Waypoint Information page for that airport will now be shown. Press the WX soft key to view weather information for the waypoint. Figure 4-115 GFDS Weather - METARs Detail and Legend 4-133 190-00601-02 Rev. J Garmin G500/G600 Pilot’s Guide...
- Page 290 The next option will be highlighted. 4. Press the small MFD knob to cancel selection or to end editing and return to the WX page or turn the large MFD knob to the next option. 4-134 Garmin G500/G600 Pilot’s Guide 190-00601-02 Rev. J...
-
Page 291: Winds Aloft
3,000 foot increments. Selected Altitude Product Age Present Position Winds Aloft Symbol Winds Aloft Altitude Soft Keys Figure 4-116 GFDS Weather - Winds Aloft Figure 4-117 GFDS Weather - Winds Aloft Legend 4-135 190-00601-02 Rev. J Garmin G500/G600 Pilot’s Guide... - Page 292 The next option will be highlighted. 4. Press the small MFD knob to cancel selection or to end editing and return to the WX page or turn the large MFD knob to the next option. 4-136 Garmin G500/G600 Pilot’s Guide 190-00601-02 Rev. J...
-
Page 293: Gfds Tfrs
2. Turn the small MFD knob to change the highlighted value. 3. Press ENT to accept the displayed value. 4. Press the small MFD knob to cancel selection or to end editing and return to the GFDS Weather Map page. 4-137 190-00601-02 Rev. J Garmin G500/G600 Pilot’s Guide... -
Page 294: Fis-B Weather (Optional)
ADS-B/FIS-B receiver. This can lead to the ADS-B/FIS-B receiver, and subsequently the GDU 620, displaying the status of the FIS-B data as “received” and “current” even though some of the data for the region is missing. 4-138 Garmin G500/G600 Pilot’s Guide 190-00601-02 Rev. J... -
Page 295: Nexrad Abnormalities
(from very weak to very strong). So, a more convenient number for calculations and comparison, a decibel (or logarithmic) scale (dBZ), is used. The dBZ values increase as the strength of the signal returned to the radar increases. 4-139 190-00601-02 Rev. J Garmin G500/G600 Pilot’s Guide... -
Page 296: Nexrad
4.10.5 NEXRAD Weather Setup 1. While viewing the FIS-B weather page, press the Menu key. 2. With the Weather Setup selection highlighted, press ENT. 4-140 Garmin G500/G600 Pilot’s Guide 190-00601-02 Rev. J... -
Page 297: Weather Page Map Orientation
3. Press ENT to accept the displayed value. The next option will be highlighted. 4. Press the small MFD knob to cancel selection or to end editing and return to the Navigation Map page or turn the large MFD knob to the next option. 4-141 190-00601-02 Rev. J Garmin G500/G600 Pilot’s Guide... -
Page 298: Nexrad Legend
The next option will be highlighted. 4. Press the small MFD knob to cancel selection or to end editing and return to the Navigation Map page or turn the large MFD knob to the next option. 4-142 Garmin G500/G600 Pilot’s Guide 190-00601-02 Rev. J... -
Page 299: Nexrad Source
Continental US NEXRAD (CONUS) The Display CONUS NEXRAD selection shows NEXRAD radar information for the entire continental United States. CONUS NEXRAD data is updated every 15 minutes. Figure 4-122 FIS-B CONUS NEXRAD 4-143 190-00601-02 Rev. J Garmin G500/G600 Pilot’s Guide... - Page 300 Cover Regional NEXRAD The Regional NEXRAD selection shows available regional NEXRAD radar information from reporting ground stations within 500 NM of the aircraft location. Figure 4-123 FIS-B Regional NEXRAD 4-144 Garmin G500/G600 Pilot’s Guide 190-00601-02 Rev. J...
-
Page 301: Sigmets And Airmets
When enabled, SIGMET/AIRMETs advise the pilot of potentially hazardous weather to all aircraft. SIGMET/AIRMET data covers icing, turbulence, dust, and volcanic ash as issued by the National Weather Service. The update rate is every 12 minutes. 4-145 190-00601-02 Rev. J Garmin G500/G600 Pilot’s Guide... - Page 302 The next option will be highlighted. 4. Press the small MFD knob to cancel selection or to end editing and return to the Navigation Map page or turn the large MFD knob to the next option. 4-146 Garmin G500/G600 Pilot’s Guide 190-00601-02 Rev. J...
- Page 303 Figure 4-126 FIS-B AIRMETs/SIGMETs Detail and Legend When enabled, the following AIRMETs are available for display: • Icing • Turbulence • IFR conditions • Mountain obscuration • Surface winds 4-147 190-00601-02 Rev. J Garmin G500/G600 Pilot’s Guide...
-
Page 304: Airep/Pirep
4. Press the small MFD knob to cancel selection or to end editing and return to the Navigation Map page or turn the large MFD knob to the next option. Product Age Cursor Location Info Selected PIREP PIREP Detail Figure 4-127 FIS-B AIREPs/PIREPs 4-148 Garmin G500/G600 Pilot’s Guide 190-00601-02 Rev. J... - Page 305 1. While viewing a Map or Weather page, Use the small and large MFD knobs to move the cursor to highlight a AIREP/PIREP. Press ENT. 2. Press ENT or the small MFD knob to return to the Weather page. Figure 4-128 FIS-B AIREPs/PIREPs Detail and Legend 4-149 190-00601-02 Rev. J Garmin G500/G600 Pilot’s Guide...
-
Page 306: Metars
MFD FIS-B Weather Map page (1, 2, or 3). When Off is selected, METARs will not be shown. For a value (such as 150 NM) selected, METAR data will be shown at map ranges of that value (150 NM), and lower. 4-150 Garmin G500/G600 Pilot’s Guide 190-00601-02 Rev. J... - Page 307 METAR flag. Press ENT. 2. The Waypoint Information page for that airport will now be shown. Press the WX soft key to view weather information for the waypoint. Figure 4-130 FIS-B Weather - Textual METARs 4-151 190-00601-02 Rev. J Garmin G500/G600 Pilot’s Guide...
-
Page 308: Winds Aloft
The next option will be highlighted. 4. Press the small MFD knob to cancel selection or to end editing and return to the Navigation Map page or turn the large MFD knob to the next option. 4-152 Garmin G500/G600 Pilot’s Guide 190-00601-02 Rev. J... -
Page 309: Fis-B Tfrs
2. Turn the small MFD knob to change the highlighted value. 3. Press ENT to accept the displayed value. 4. Press the small MFD knob to cancel selection or to end editing and return to the FIS-B Weather Map page. 4-153 190-00601-02 Rev. J Garmin G500/G600 Pilot’s Guide... -
Page 310: Fis-B Product Times
Data Link Receiver. Weather Product Expiration Time (Minutes) CONUS NEXRAD SIGMETs / AIRMETs METARs Winds Aloft PIREPS NOTAMs/TFRs Table 4-29 FIS-B Weather Data Timing 4-154 Garmin G500/G600 Pilot’s Guide 190-00601-02 Rev. J... -
Page 311: 4.11 Stormscope
Pilot’ s Guide that are designed to help you relate the cell or strike patterns shown on the display to the size and location of thunderstorms that may be near your aircraft. Figure 4-134 Stormscope 4-155 190-00601-02 Rev. J Garmin G500/G600 Pilot’s Guide... - Page 312 2. Lightning strikes will be cleared from the display and the Rate value will be reset. NOTE: When Heading is not available (N/A), the pilot must clear the strikes after each turn. 4-156 Garmin G500/G600 Pilot’s Guide 190-00601-02 Rev. J...
-
Page 313: Additional Features (Optional)
The Traffic Map Page shows surrounding TAS or TIS traffic data in relation to the aircraft’ s current position and altitude. The Traffic option is designed to assist in detection and avoidance of other aircraft. 190-00601-02 Rev. J Garmin G500/G600 Pilot’s Guide... -
Page 314: Flitecharts And Chartview
Cover The optional Synthetic Vision Technology (SVT) is a visual enhancement to the G500/G600. SVT is displayed as a forward-looking display of the topography immediately in front of the aircraft. SVT information is shown on the primary flight display (PFD). -
Page 315: Chartview (Optional)
The ChartView database subscription is available from Jeppesen, Inc. ChartView is an optional feature that requires enablement by a Garmin dealer. Available data includes: • Arrivals (STAR) •... -
Page 316: Flitecharts
The MFD FliteCharts depiction shows the aircraft position on the moving map in the plan view of approach charts. FliteCharts database subscription is available from Garmin. Available data includes: • Arrivals (STAR) •... -
Page 317: Determining Chart Database Type, Coverage, And Currency
NOTE: Messages displayed in yellow also appear in a message banner along the bottom of the Chart page. The date currency of the installed chart databases are shown both during power-up and on the AUX - System Status page. 190-00601-02 Rev. J Garmin G500/G600 Pilot’s Guide... - Page 318 Database verification failed. No database is installed. Blank line. GDU 620 system is not configured for any chart data. Contact a Garmin- authorized service center for configuration. [1] When the effective or expiration date is the current day, the following message is displayed at the bottom of the page: “Check local rules for database effective times.”...
-
Page 319: Selecting A Chart
Chart page displays “Getting newer charts.” This process can take several minutes. The G500/G600 will only allow the pilot to select the chart type in normal mode if it is configured for ChartView. When in-air, the pilot cannot select the field to change the chart source, and a small message is displayed underneath the Chart Type line that reads “Chart Type can only be changed when on ground”. -
Page 320: Selecting A New Chart By Fpl, Nrst, Or Recent
3. Turn the large MFD knob to select the desired identifier and then press ENT. 5.1.4.3 Selecting a Chart Manually A chart for a different airport may be chosen by selecting the identifier for the desired airport. Airport Identifier Selection Figure 5-8 Airport Identifier Selection Garmin G500/G600 Pilot’s Guide 190-00601-02 Rev. J... -
Page 321: Chart Auto-Selection
1. While viewing the Chart page of the FPL page group, press the SELECT soft key to activate chart selection. 2. Turn the large MFD knob to highlight the field to the right of the airport identifier. 190-00601-02 Rev. J Garmin G500/G600 Pilot’s Guide... - Page 322 Cover 3. Turn the small MFD knob to highlight the desired chart. Figure 5-9 Activate Chart Selection for the Current Airport (ChartView) Press ENT to accept and view the selected chart. 5-10 Garmin G500/G600 Pilot’s Guide 190-00601-02 Rev. J...
-
Page 323: Using Charts
5.1.5.1 Chart Zooming and Panning Chart zooming and Panning allows viewing charts closer to examine details. NOTE: Panning mode is indicated by the presence of scroll bars. 5-11 190-00601-02 Rev. J Garmin G500/G600 Pilot’s Guide... - Page 324 Pan mode and activate scroll bars on the edges of the chart. Turn the large and small MFD knobs to move around the chart. 3. Press the small MFD knob to cancel the scroll bars and exit panning. 5-12 Garmin G500/G600 Pilot’s Guide 190-00601-02 Rev. J...
-
Page 325: Viewing Chart Details In Chartview
Chart details are not available for airport diagrams or SID/STAR charts. 1. Press the Detail key to view detailed views of the current chart. The Detail key is only available with ChartView. Figure 5-12 Selected Chart for the Current Airport (ChartView) 5-13 190-00601-02 Rev. J Garmin G500/G600 Pilot’s Guide... - Page 326 Figure 5-13 Detail of the Selected Chart (Header Shown) 3. Press the Back key to return to the view of the full chart. 5-14 Garmin G500/G600 Pilot’s Guide 190-00601-02 Rev. J...
-
Page 327: Setting The Altitude Minimums Alerter
GDU 620 and will be synchronized on both units. NOTE: If you highlight the Minimums Altitude field on the FPL page and press the CLR key, it will turn the minimums functionality off. 5-15 190-00601-02 Rev. J Garmin G500/G600 Pilot’s Guide... -
Page 328: Viewing Chart Notams
If an active NOTAM (Notice to Airmen) exists for the selected chart, the NOTAM soft key will be available. Press the NOTAM soft key to view the NOTAM or select View NOTAMs from the Chart Options menu. Figure 5-16 Chart NOTAM 5-16 Garmin G500/G600 Pilot’s Guide 190-00601-02 Rev. J... -
Page 329: Day/Night View
NOTE: Once an adjustment is made to the percentage field in Auto mode, the chart must be redrawn (zoomed in or out, or another chart selected) before the switch from Day to Night is seen. 5-17 190-00601-02 Rev. J Garmin G500/G600 Pilot’s Guide... -
Page 330: Safetaxi
(AMMD). SafeTaxi and Chartview are to be used by the flight crew to orient themselves on the airport surface to improve pilot situational awareness during ground operations. 5-18 Garmin G500/G600 Pilot’s Guide 190-00601-02 Rev. J... -
Page 331: Using Safetaxi
MFD knob to activate the cursor. 2. Turn the MFD knobs to move the cursor on the Hot Spot border or into the Hot Spot area and then press the ENT key. 5-19 190-00601-02 Rev. J Garmin G500/G600 Pilot’s Guide... - Page 332 3. An information window will be shown on the MFD. After viewing, press the small MFD knob, CLR, or ENT keys to remove the information window. Press the small MFD knob again to cancel the cursor. 5-20 Garmin G500/G600 Pilot’s Guide 190-00601-02 Rev. J...
-
Page 333: Safetaxi Cycle Number And Revision
The EXPIRES date appears in white when data is current and in yellow when expired. SafeTaxi REGION NOT AVAILABLE appears in white if SafeTaxi data is not available on the database card. Expired SafeTaxi data is never disabled. 5-21 190-00601-02 Rev. J Garmin G500/G600 Pilot’s Guide... -
Page 334: Sirius Xm Satellite Radio Entertainment
Data Radio ID, or both, must be provided to Sirius XM Satellite Radio to activate the entertainment subscription. The Sirius XM Satellite Radio Activation Instructions are included with the unit (also available at www.garmin.com, P/N 190-00355-04). Sirius XM Satellite Radio and XM WX Satellite Weather subscriptions are sold separately. - Page 335 Page and a yellow Activation Required message is displayed in the center of the Weather Data Link Page (Map Page Group). The Service Class refers to the groupings of weather products available for subscription. 5-23 190-00601-02 Rev. J Garmin G500/G600 Pilot’s Guide...
-
Page 336: Sirius Xm Satellite Radio Information
This is only used for the initial subscription or to make a change. NOTE: Refer to the GDL 69/69A Sirius XM Satellite Radio Activation Instructions (190-00355-04, Rev G, or later) for further information. 5-24 Garmin G500/G600 Pilot’s Guide 190-00601-02 Rev. J... -
Page 337: Sirius Xm Satellite Radio Entertainment
2. Turn the small MFD knob to the XM Radio page. Active Channel Window Available Channel Window Channel Scroll Bar Selected Channel Category Window Volume Bar Graph Page Name Soft Keys Figure 5-22 Sirius XM Satellite Radio 5-25 190-00601-02 Rev. J Garmin G500/G600 Pilot’s Guide... -
Page 338: Channel Categories
2. Press ALL to show the channels for all categories. Use the large and small MFD knobs to select desired channel. 3. Press ENT to save the selection or press the small MFD knob to cancel selection. 5-26 Garmin G500/G600 Pilot’s Guide 190-00601-02 Rev. J... -
Page 339: Selecting A Sirius Xm Satellite Radio Channel
5. Press CHNL and then the DIR CH soft key to directly select a channel in the active category. Use the large and small MFD knobs to select desired channel. 6. Press ENT to save the selection or press the small MFD knob to cancel selection. 5-27 190-00601-02 Rev. J Garmin G500/G600 Pilot’s Guide... -
Page 340: Sirius Xm Satellite Radio Volume
Figure 5-27 XM Radio Volume Controls 3. Press MUTE to mute the radio volume. 4. Press MUTE again or the VOL + or VOL – soft keys to unmute the radio volume. 5-28 Garmin G500/G600 Pilot’s Guide 190-00601-02 Rev. J... -
Page 341: Sirius Xm Satellite Radio Channel Presets
1. While viewing the XM Radio page of the AUX page group, press the PRESETS soft key. 2. Press the preset soft key for the desired stored channel, such as PS1. 3. Press the MORE soft key to display the next series of presets. 5-29 190-00601-02 Rev. J Garmin G500/G600 Pilot’s Guide... -
Page 342: Gdl 69/69A Data Link Receiver Troubleshooting
1. Turn the large MFD knob to select the AUX Page Group. 2. Turn the small MFD knob to select the System Status Page (the last page in the AUX Page Group). GDL 69 Status OK LRU Selection Figure 5-29 LRU Status Window 5-30 Garmin G500/G600 Pilot’s Guide 190-00601-02 Rev. J... -
Page 343: Autopilot Operation
Cover Autopilot Operation The G500/G600 is able to interface to certain autopilot systems to provide the functions described in this section. Please refer to your particular Airplane Flight Manual and autopilot documentation for specific information and operating instructions. 5.4.1 GAD 43 Attitude The GAD 43 Adapter may Optionally provide attitude information from a Garmin Attitude and Heading Reference System to certain autopilots. -
Page 344: Heading
The selected altitude may be alternately armed or disarmed by pressing and holding the ALT key on the PFD bezel. Figure 5-32 Pressing and Holding the ALT Key to Arm/Disarm the Selected Altitude 5-32 Garmin G500/G600 Pilot’s Guide 190-00601-02 Rev. J... -
Page 345: Autopilot Navigation
Procedure Turns and Holding Patterns. The autopilot must have the ability to interpret the GPSS commands. The G500/G600 can provide GPSS information to autopilots that have built-in support for GPSS commands, as well as to older autopilots that do not have built-in support for GPSS. -
Page 346: Autopilot Operation With The Gdu 620 Emulating Gpss
5.4.5 Flight Director Display If autopilot flight director commands are interfaced to the G500/G600, they will be presented as a single cue flight director on the PFD. Control of the flight director is accomplished via the autopilot/flight director controller; there are no pilot controls or adjustments for the flight director on the G500/G600. -
Page 347: Vertical Speed Control
G500/G600, the command bars will be displayed at the maximum distance allowed by the G500/G600. As the aircraft pitch changes to satisfy the command bars, the bars will continue to be displayed at the maximum distance from the aircraft attitude icon until the aircraft pitch deviation is within the command display limit. -
Page 348: Autopilot Mode Annunciations
Status information will be located to the left of the HSI (NAV STATUS Style 2). Autopilot Status Roll Modes Pitch Modes Active Mode Active Mode Armed Mode Armed Mode Figure 5-38 Autopilot Annunciations on Top of PFD 5-36 Garmin G500/G600 Pilot’s Guide 190-00601-02 Rev. J... -
Page 349: Synthetic Vision Technology (Optional)
Synthetic Vision Technology (Optional) The optional Synthetic Vision Technology (SVT) is a visual enhancement to the G500/G600. SVT is displayed as a forward-looking display of the topography immediately in front of the aircraft. SVT information is shown on the primary flight display (PFD). -
Page 350: Svt Operation
• SYN TERR soft key enables synthetic terrain depiction. • HRZN HDG soft key enable horizon heading marks and digits. • APTSIGNS soft key enables airport signposts. Figure 5-40 SVT Soft Keys 5-38 Garmin G500/G600 Pilot’s Guide 190-00601-02 Rev. J... -
Page 351: Activating And Deactivating Svt
3. Press the SYN TERR soft key to view the SVT display. When SVT™ is enabled, the pitch ladder will display a different pitch scale. Figure 5-41 Pitch Scale with SVT Enabled Figure 5-42 Pitch Scale with SVT Disabled 5-39 190-00601-02 Rev. J Garmin G500/G600 Pilot’s Guide... -
Page 352: Svt Features
The Zero-Pitch Line is drawn completely across the display and provides a reference line by which to judge aircraft attitude with respect to the horizon. It is not necessarily aligned with the terrain horizon, particularly when the terrain is sloped or mountainous. 5-40 Garmin G500/G600 Pilot’s Guide 190-00601-02 Rev. J... -
Page 353: Horizon Heading
APT SIGNS soft key. Airport Sign without Identifier Airport Sign with Identifier (Between 9 NM and 15 NM) (Between 4.5 NM and 9.0 NM) Figure 5-45 Airport Signs 5-41 190-00601-02 Rev. J Garmin G500/G600 Pilot’s Guide... -
Page 354: Runway Depiction
A runway that is associated with an approach in the loaded flight plan is outlined with a white rectangle, with the actual runway, in that rectangle. Runway Figure 5-48 Depiction of Runway with Loaded Approach 5-42 Garmin G500/G600 Pilot’s Guide 190-00601-02 Rev. J... -
Page 355: Traffic
Traffic is displayed in three dimensions, appearing larger as they are getting closer, and smaller when they are further away. Traffic on PFD Traffic on MFD Figure 5-49 Traffic Depiction on PFD and MFD 5-43 190-00601-02 Rev. J Garmin G500/G600 Pilot’s Guide... -
Page 356: Obstacles
SVT TERRAIN or TAWS Alert from that obstacle. Obstacles greater than 1000 feet below the aircraft’ s altitude are not shown. Obstacles are shown behind the airspeed and altitude displays. 5-44 Garmin G500/G600 Pilot’s Guide 190-00601-02 Rev. J... -
Page 357: Field Of View
MFD with an angle of approximately 50º represent the forward horizontal field of view shown on the PFD. V-Shaped Lines Depict PFD Field of View (angle is approx. 50°) Figure 5-51 MFD and PFD Field of View Comparison 5-45 190-00601-02 Rev. J Garmin G500/G600 Pilot’s Guide... - Page 358 4. Turn the small MFD knob to select On or Off. Press the ENT key to confirm your selection. 5. Press the small MFD knob to return to the Navigation Map Page. 5-46 Garmin G500/G600 Pilot’s Guide 190-00601-02 Rev. J...
-
Page 359: Unusual Attitudes
• The position of the aircraft exceeds the range of the terrain database. • The terrain database is out of date using an older terrain database card. Blue Band - Sky Representation Full Display Terrain Figure 5-54 Unusual Attitude Display - Blue Band 5-47 190-00601-02 Rev. J Garmin G500/G600 Pilot’s Guide... - Page 360 Cover Brown Band - Ground Representation Figure 5-55 Unusual Attitude Display - Brown Band 5-48 Garmin G500/G600 Pilot’s Guide 190-00601-02 Rev. J...
-
Page 361: Annunciations And Alerts
Flight Manual and ADAS+ ETM documentation for the system description and operating procedures. Alert Message Description Action ADC(1/2) ALT EC • ADC 1 or ADC 2 • Contact a Garmin dealer for Altitude Error service. Correction is unavailable. • Alert is enabled... - Page 362 • Verify that self-test mode is not • AHRS 1 or AHRS 2 enabled. is operating • Check the AFMS for limitations. exclusively in no-GPS • Contact a Garmin dealer for reversionary mode. service. • AHRS 1 or AHRS 2 is using the backup GPS source.
- Page 363 CONFIG AUD NOT AVAIL • Audio system is not • Contact a Garmin dealer for available. service. AUD SYS FAIL • Audio system failure. • Contact a Garmin dealer for service. 190-00601-02 Rev. J Garmin G500/G600 Pilot’s Guide...
- Page 364 • Reinsert the datacard, if necessary. aviation database. • Datacard may have been ejected. CAL LOST • Calibration data is • Contact a Garmin dealer for lost. service. CHT DB ERR • Datacard’s charts • Reload charts database. database is incomplete.
- Page 365 Cover Alert Message Description Action DATALINK • ADS-B fault: UAT • Contact a Garmin dealer for receiver. service. • ADS-B fault: 1090 receiver. • FIS-B weather has failed. • GDL 88 ADS-B Failure. Unable to transmit ADS-B messages. • GDL 88 ADS-B fault.
- Page 366 Cover Alert Message Description Action DATALINK • GDL 88 configuration • Contact a Garmin dealer for (cont) module needs service. service. • GDL 88 is inoperative or connection to GDU is lost. • GDL 88 CSA failure. • GDL 88 external traffic system has a low battery.
- Page 367 Cover Alert Message Description Action DSCRT CONFIG • Discrete input/output • Contact a Garmin dealer for configuration error. service. ENG SENSOR • Configuration error. • Contact a Garmin dealer for UNIT (1/2) service. • Communication with sensors is halted or lost.
- Page 368 • GDU AHRS Monitor • Contact a Garmin dealer for fault. service. • Pitch Deviation fault. • Contact a Garmin dealer for service. • Roll Deviation fault. • Contact a Garmin dealer for service. • Yaw Rate Deviation •...
- Page 369 Cover Alert Message Description Action GAD 43 • AHRS A429 Attitude • Contact a Garmin dealer for Invalid fault. service. • AHRS Pitch Out of • Contact a Garmin dealer for Range fault. service. • AHRS Attitude Invalid • Contact a Garmin dealer for fault.
- Page 370 • Use an alternate navigation GPS 1 or GPS 2 is source. lost. GPS(1/2) PPS • Timing data from • Contact a Garmin dealer for FAIL GPS 1 or GPS 2 is service. lost. GSR FAIL • GSR has failed.
- Page 371 • HDG features are disabled or defaulted to GPS1 TRK. • GDU is in the reversionary track-based mode. HTAWS • External HTAWS is • Contact a Garmin dealer for not available. Internal service. TERRAIN-HSVT alerting is enabled. • External HTAWS configuration mismatch.
- Page 372 Cover Alert Message Description Action <LRU> SERVICE • The indicated LRU • Contact a Garmin dealer for requires service. service. <LRU> VOLTAGE • The indicated • Contact a Garmin dealer for LRU has low service. voltage. Display is automatically dimmed to reduce power usage.
- Page 373 • Register with GFDS. inoperative. GFDS is not registered. ROL NO COMP • No data from one • Contact a Garmin dealer for or more roll attitude service. sensors. RS-232 CONFIG • RS-232 configuration • Contact a Garmin dealer for error.
- Page 374 • Update database. database error in TAWS B or TERRAIN-SVT only. TRAFFIC • ADS-B In traffic • Contact a Garmin dealer for alerting has failed. service. • ADS-B In traffic has failed. • TAS/TCAS has been in standby for more than 60 seconds.
- Page 375 WX ALERT • Possible severe • Check weather radar. weather ahead. WX RADAR • Communication with • Contact a Garmin dealer for weather radar is lost. service. WX RDR • Weather radar • Contact a Garmin dealer for SERVICE service.
-
Page 376: System Status
In the LRU Status column, a green check means the unit is present and operat- ing properly, while a red “X” indicates an absence or failure. Active Databases Database Sync System LRUs Figure 6-1 System Status Displays 6-16 Garmin G500/G600 Pilot’s Guide 190-00601-02 Rev. J... -
Page 377: Symbols
Soft Surface, Non-serviced Airport Private Airport Heliport Intersection LOM (compass locator at outer marker) NDB (Non-directional Radio Beacon) VOR/DME ILS/DME or DME-only VORTAC TACAN VRP (Visual Reporting Point) Table 7-1 Map Page Symbols 190-00601-02 Rev. J Garmin G500/G600 Pilot’s Guide... -
Page 378: Safetaxi Symbols
Designated Water Areas Table 7-2 SafeTaxi Symbols Traffic Symbols Description Symbol (Highest to Lowest Priority) Traffic Advisory (TA), In Range Traffic Advisory (TA), Out of Range Proximate Advisory (PA) Other Traffic Table 7-3 Traffic Symbols Garmin G500/G600 Pilot’s Guide 190-00601-02 Rev. J... - Page 379 Directional Surface Vehicle Table 7-4 ADS-B Traffic Symbols NOTE: Color of basic and proximate traffic is dependent on airborne/on-ground status of target (target is brown when on the ground, see the surface vehicles). 190-00601-02 Rev. J Garmin G500/G600 Pilot’s Guide...
-
Page 380: Basemap Symbols
Cover Basemap Symbols Symbol Description Interstate Highway State Highway US Highway National Highway - 2-digit drawn inside Small City or Town Medium City Large City Table 7-5 Basemap Symbols Garmin G500/G600 Pilot’s Guide 190-00601-02 Rev. J... -
Page 381: Map Tool Bar Symbols
Wire Obstacles Enabled and Not Available Indicator (Software version 5.12 and later) StormScope StormScope Enabled and Not Available Indicator Traffic Enabled and Available Indicator Traffic Enabled and Not Available Indicator Table 7-6 Map Tool Bar Symbols 190-00601-02 Rev. J Garmin G500/G600 Pilot’s Guide... -
Page 382: Ownship Symbols
Cover Ownship Symbols Symbol Description Generic Airplane Low-Wing Prop High-Wing Prop Kit Plane Turboprop Twin-Engine Prop Single-Engine Jet Business Jet Simple Airplane 2-Blade Rotorcraft 3-Blade Rotorcraft 4-Blade Rotorcraft Table 7-7 Ownship Symbols Garmin G500/G600 Pilot’s Guide 190-00601-02 Rev. J... -
Page 383: Miscellaneous Symbols
MFD Wind Vector (w/ valid GPS solution) PFD Wind Vector styles Parallel Track Waypoint Restricted/Prohibited/Warning/Alert TFR (Temporary Flight Restrictions) Class B Airspace Class C Airspace Class D Airspace User Waypoint Airspace Altitude Label (Upper/Lower Limits) Table 7-8 Miscellaneous Symbols 190-00601-02 Rev. J Garmin G500/G600 Pilot’s Guide... - Page 384 Cover This page intentionally left blank Garmin G500/G600 Pilot’s Guide 190-00601-02 Rev. J...
-
Page 385: Glossary
Automated Weather Observing System BARO barometric setting backcourse Bearing The compass direction from the present position to a destination waypoint bearing center runway ºC degrees Celsius Course Deviation Indicator CHNL channel cloud clear CONFIG configuration 190-00601-02 Rev. J Garmin G500/G600 Pilot’s Guide... - Page 386 The recommended minimum altitude within ten miles left or right of the desired course on an active flight plan or direct-to enter error En route Safe Altitude Estimated Time of Arrival Estimated Time En Route Garmin G500/G600 Pilot’s Guide 190-00601-02 Rev. J...
- Page 387 The direction an aircraft is pointed, based upon indications from a magnetic compass or a properly set directional gyro HFOM Horizontal Figure of Merit mercury hectopascal Horizontal Protection Level HSDB High-Speed Data Bus 190-00601-02 Rev. J Garmin G500/G600 Pilot’s Guide...
- Page 388 LTNG lightning Magnetic MAG VAR Magnetic Variation MapMX A proprietary data format used to forward navigation information from the Garmin GPS units to the GDU maximum MAXSPD maximum speed (overspeed) barometric minimum descent altitude METAR Aviation Routine Weather Report Garmin G500/G600 Pilot’s Guide...
- Page 389 NAVigation AID Negative Climb Rate Non-Directional Beacon NEXRAD Next Generation Radar Outside Air Temperature Omni Bearing Selector Proximity Advisory personal computer Premature Descent Alert Primary Flight Display P. POS Present Position parallel track quantity 190-00601-02 Rev. J Garmin G500/G600 Pilot’s Guide...
- Page 390 STATS statistics STBY standby standard Special Use Airspace SUSP suspend Synthetic Vision software system true Traffic Advisory TACAN Tactical Air Navigation System Terminal Aerodrome Forecast True Airspeed Traffic Advisory System Total Air Temperature Garmin G500/G600 Pilot’s Guide 190-00601-02 Rev. J...
- Page 391 VHF Omni-directional Range VORTAC very high frequency omnidirectional range station and tactical air navigation Vertical speed Vertical Speed Indicator WAAS Wide Area Augmentation System WGS-84 World Geodetic System - 1984 waypoint(s) weather XPDR transponder cross-track 190-00601-02 Rev. J Garmin G500/G600 Pilot’s Guide...
- Page 392 Cover This page intentionally left blank Garmin G500/G600 Pilot’s Guide 190-00601-02 Rev. J...
-
Page 393: A.1 Sd Card Use And Databases
APPENDIX A A.1 SD Card Use and Databases The G500/G600 System uses Secure Digital (SD) cards to load and store various types of data. For basic flight operations, SD cards are required for database storage as well as database updates. - Page 394 Thursdays) after expiration date. ChartView Jeppesen terminal SD card 14 days (on Contact Optional feature procedures Fridays) Jeppesen that requires Garmin dealer enablement. Disables 70 days after expiration date. Table A-1 Database List Garmin G500/G600 Pilot’s Guide 190-00601-02 Rev. J...
-
Page 395: Aviation Databases
(www.jeppesen.com) for ChartView subscription and update information. Updating the Aviation Database 1. With the G500/G600 System OFF, insert the SD card containing the aviation database update into the either card slot of the GDU 620 to be updated (label of SD card should face up). - Page 396 8. Turn the small MFD knob to scroll through the list and check that all databases are current and there are no errors. If a database is highlighted in yellow, it is either expired or the G500/G600 can not determine the date. 9. Power down the GDU 620.
-
Page 397: Garmin Databases
A.1.2 Garmin Databases WARNING: The data contained in the terrain and obstacle databases comes from government agencies. Garmin accurately processes and cross- validates the data, but cannot guarantee the accuracy and completeness of the data. The following GDU 620 databases are stored on Supplemental datacards provided by Garmin: •... - Page 398 • Updated database obtained from the Garmin web site • Existing Supplemental Database SD Card (P/N 010-00769-xx) It may be necessary to have the system configured by a Garmin authorized service facility in order to use certain database features. Garmin G500/G600 Pilot’s Guide...
- Page 399 Aviation, ChartView, FliteCharts, SafeTaxi, or any other database must be inserted into the lower slot on the GDU 620. 3. Apply power to the G500/G600 System. View the MFD power-up splash screen. Check that the databases are initialized and displayed on the splash screen.
- Page 400 Cover This page intentionally left blank Garmin G500/G600 Pilot’s Guide 190-00601-02 Rev. J...
-
Page 401: Index
Altitude 1-1, 1-5, 1-16, 1-21, 2-11, 2-14, Baro-corrected altitude 4-4 2-15, 3-17, 3-31, 3-37, 3-39, 3-69 Barometric minimum 2-15 Altitude alerter 2-14, 5-15 Altitude alerting 2-14 Altitude Bug 1-16, 2-1, 2-13 Altitude capture 5-32 190-00601-02 Rev. J Garmin G500/G600 Pilot’s Guide... - Page 402 Display brightness 1-21, 1-22, 3-31, 3-32 Combined NEXRAD 4-142 Display units 1-22, 2-34, 3-31, 3-39, 3-40 Compass card 2-19, 2-21 Distance 1-21, 3-7, 3-9, 3-10, 3-12, 3-13, Continental US NEXRAD 4-140 3-39, 3-67, 3-70 Garmin G500/G600 Pilot’s Guide 190-00601-02 Rev. J...
- Page 403 GAD 43 1-1, 1-2, 2-3, 5-31, 6-6 1-16, 2-1, 2-19–2-34, 5-42 GDC 74A ii, 1-1, 1-5, 1-8 Hot spots 5-18, 5-19 GDL 69/69A 1-2, 1-10, 3-21, 3-41, 3-42, Hrzn Hdg 2-5 4-1, 5-1, 5-22, 5-24, 5-25, 5-30 Hurricanes 4-136 190-00601-02 Rev. J Garmin G500/G600 Pilot’s Guide...
- Page 404 Navigation map 1-13, 1-18, 3-1, 3-2, 3-10, 4-5, 4-28, 4-52, 5-18, 5-19 Magnetometer 1-2, 1-6, 1-8 Navigation source iii, 2-3, 2-19, 2-22–2- Making a phone call 3-65 24, 2-27, 2-28, 3-37, 3-67 Map 3-2 Garmin G500/G600 Pilot’s Guide 190-00601-02 Rev. J...
- Page 405 4-14, 4-27, 4-53, 4-54 Reflectivity 4-60, 4-61, 4-93, 4-100, Panning 3-7, 5-12, 5-19 4-137 Parallel track 7-7 Regional NEXRAD 4-141 Part Sun 4-57 Register with GFDS 4-113 PFD 1-4, 1-15 Restore defaults 3-32, 3-69 190-00601-02 Rev. J Garmin G500/G600 Pilot’s Guide...
- Page 406 Speed 1-5, 1-21, 2-5, 2-8, 2-11, 2-18, Terrain alerts 4-23, 4-26, 4-29, 4-30, 5-37 3-13, 3-31, 3-33, 3-39, 4-20, 4-40 Terrain data 3-11, 3-16, 4-8, 4-9, A-5 Speed range 2-7 Terrain obstacle symbols 4-12, 7-4 STAB 4-108 Garmin G500/G600 Pilot’s Guide 190-00601-02 Rev. J...
- Page 407 Winds aloft 4-56, 4-75, 4-132, 4-149, 4-151 Winds aloft altitude 4-133, 4-149 VDI 2-24, 5-41 Wind speed 3-13 Vector Duration 4-51 Wind vector 1-21, 2-29, 3-11, 3-13, 3-31, Vector motion 4-50 3-34, 7-7 190-00601-02 Rev. J Garmin G500/G600 Pilot’s Guide...
- Page 408 XM radio channel presets 5-29 XM radio channels 5-27 XM radio volume 5-28 XM Satellite Radio 1-10, 5-22 XM troubleshooting 5-30 XM weather 3-68, 4-52 XM weather/radio 1-10 XTK 2-22 Zero pitch line 5-41 Garmin G500/G600 Pilot’s Guide 190-00601-02 Rev. J...
- Page 410 © 2008-2016 Garmin Corporation Garmin International, Inc. 1200 East 151 Street, Olathe, Kansas 66062, U.S.A. Tel. 913.397.8200 or 866.739.5687 Fax 913.397.8282 Garmin AT, Inc. 2345 Turner Road SE, Salem, Oregon 97302, U.S.A. Tel. 503.581.8101 Fax. 503.364.2138 Garmin (Europe) Ltd. Liberty House, Bulls Copse Road, Hounsdown Business Park, Southampton, SO40 9RB, U.K.