Table of Contents
Advertisement
Advertisement
Table of Contents

Related Manuals for Genie TZ-34/20


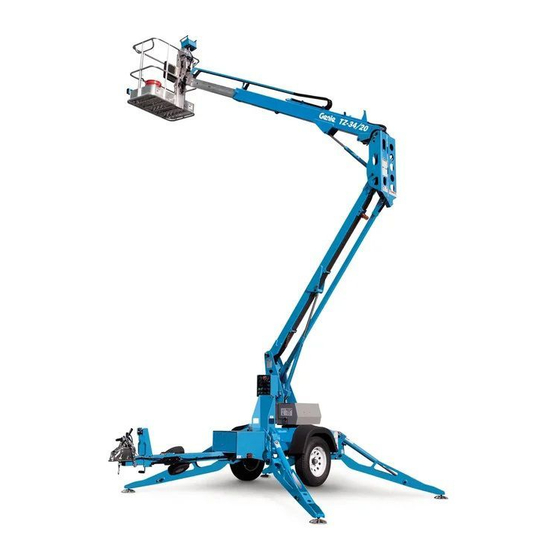
Summary of Contents for Genie TZ-34/20
-
Page 2: Introduction
Technical Publications Genie has endeavored to deliver the highest degree of accuracy possible. However, continuous improvement of our products is a Genie policy. Therefore, product specifi cations are subject to change without notice. Readers are encouraged to notify Genie of errors and send in suggestions for improvement. -
Page 3: Revision History
REFERENCE EXAMPLES: Honda Engine_Section 2_Specifi cations. Electronic Version A-6,B-3,C-7_Section 3_Maintenance Procedure. Click on any procedure or page number 3-2, 6-4, 9-1_Section 4_Repair Procedure. highlighted in blue to view the update. 5-35, 5-56, 5-104_Section 5_Schematic Page #. Part No. 825934 Genie TZ-34/20... - Page 4 REFERENCE EXAMPLES: Honda Engine_Section 2_Specifi cations. Electronic Version A-6,B-3,C-7_Section 3_Maintenance Procedure. Click on any procedure or page number 3-2, 6-4, 9-1_Section 4_Repair Procedure. highlighted in blue to view the update. 5-35, 5-56, 5-104_Section 5_Schematic Page #. Genie TZ-34/20 Part No. 825934...
-
Page 5: Serial Number Legend
April 2016 Introduction Serial Number Legend Part No. 825934 Genie TZ-34/20... -
Page 6: Safety Rules
Be sure to wear protective eye wear and other protective clothing if the situation warrants it. Be aware of potential crushing hazards such as moving parts, free swinging or unsecured components when lifting or placing loads. Always wear approved steel-toed shoes. Genie TZ-34/20 Part No. 825934... - Page 7 Be sure to properly dispose of old oil or other fl uids. Use an approved container. Please be environmentally safe. Be sure that your workshop or work area is properly ventilated and well lit. Part No. 825934 Genie TZ-34/20...
-
Page 8: Table Of Contents
Inspect the Manuals and Decals ...............3 - 6 Perform Pre-operation Inspection ..............3 - 7 Perform Function Tests ..................3 - 7 Torque the Lug Bolts - ANSI/CSA/AS ...............3 - 7 Torque the Lug Bolts - CE.................3 - 8 Genie TZ-34/20 Part No. 825934 viii... - Page 9 B-12 Service the Tongue Jack .................3 - 17 Checklist C Procedures Grease the Platform Overload Mechanism (if equipped) ........3 - 18 Test the Platform Overload System (if equipped) ...........3 - 18 Perform Axle Maintenance - ANSI/CSA/AS ............3 - 20 Part No. 825934 Genie TZ-34/20...
- Page 10 Primary Boom Lift Cylinder ................4 - 13 Platform Leveling Cylinders ................4 - 14 Secondary Boom Components Secondary Boom ....................4 - 17 Secondary Boom Lift Cylinder ................4 - 19 Ground Controls Level Sensor ....................4 - 20 Genie TZ-34/20 Part No. 825934...
- Page 11 Hydraulic and Mechanical Brakes ..............4 - 35 Parking Brake ....................4 - 35 Outriggers 10-1 Outrigger Components ...................4 - 36 10-2 Outrigger Cylinder ..................4 - 37 Platform Overload Components 11-1 Platform Overload System ................4 - 38 Part No. 825934 Genie TZ-34/20...
- Page 12 Platform Control Box Wiring Diagrams - AS/CE ............5 - 18 Electrical Schematics - ANSI/CSA Electrical Schematic - ANSI/CSA ................5 - 20 Electrical Schematics - AS/CE Electrical Schematic - AS/CE ...................5 - 24 Hydraulic Schematics Hydraulic Schematic ....................5 - 28 Genie TZ-34/20 Part No. 825934...
-
Page 13: Specifi Cations
Tire size 8 x 2 For operational specifi cations, refer to the Operator's Manual. Continuous improvement of our products is a Genie policy. Product specifi cations are subject to change without notice. Part No. 825934 Genie TZ-34/20 2 - 1... -
Page 14: Performance Specifi Cations
Chevron Rando HD equivalent Note: Genie specifi cations require additional Viscosity grade Multi-viscosity equipment and special installation instructions for Viscosity index the approved optional fl uids. Consult the Genie Service Department before use. Cleanliness level, minimum 15/13 Water content, maximum 200 ppm Chevron Rando HD oil is fully compatible and mixable with Shell Donax TG (Dexron III) oils. -
Page 15: Manifold Component Specifi Cations
Solenoid valve, 2 position 2 way, N.C. 29 to 31 24V DC with diode (schematic items W, X, Y and Z) Continuous improvement of our products is a Genie policy. Product specifi cations are subject to change without notice. Part No. 825934 Genie TZ-34/20... -
Page 16: Hydraulic Hose And Fitting Torque Specifi Cations
SAE Dash size Torque ORFS or 37° JIC fi ttings and hose ends. Genie specifi cations require that fi ttings and hose 14 ft-lbs / 19 Nm ends be torqued to specifi cation when they are 23 ft-lbs / 31.2 Nm removed and installed or when new hoses or fi... - Page 17 fi ttings and hose ends are custom-size O-rings. hex nut They are not standard SAE size O-rings. They are reference mark available in the O-ring fi eld service kit (Genie part body hex fi tting number 49612). 3 Working clockwise on the body hex fi tting, 2 Lubricate the O-ring before installation.
- Page 18 Section 2 • Specifi cations January 2016 SPECIFICATIONS 10.9 12.9 2 - 6 Genie TZ-34/20 Part No. 825934...
-
Page 19: Scheduled Maintenance Procedures
Repair any machine damage or malfunction injury. before operating the machine. Indicates a potentially hazardous Use only Genie approved replacement parts. situation which, if not avoided, may result in property damage. Machines that have been out of service for a period longer than 3 months must complete the Indicates that a specifi... -
Page 20: Pre-Delivery Preparation Report
Make copies of the Maintenance Inspection Report to use for each inspection. Maintain completed forms for a minimum of 4 years or in compliance with employer, jobsite and governmental regulations and requirements. 3 - 2 Genie TZ-34/20 Part No. 825934... - Page 21 Inspector company Terex South Dakota, Inc USA Genie UK 500 Oak Wood Road The Maltings, Wharf Road PO Box 1150 Grantham, Lincolnshire Watertown, SD 57201-6150 NG31- 6BH England (605) 882-4000 (44) 1476-584333 Part No. 825934 Genie TZ-34/20 3 - 3...
- Page 22 Section 3 • Scheduled Maintenance Procedures January 2016 This page intentionally left blank. 3 - 4 Genie TZ-34/20 Part No. 825934...
-
Page 23: Maintenance Inspection Report
After repair, place a check in the “R” box. Legend Y = yes, acceptable N = no, remove from service R = repaired Part No. 825934 Genie TZ-34/20 3 - 5... -
Page 24: Checklist A Procedures
In addition, maintaining all of the safety and Note: Contact your authorized Genie distributor instructional decals in good condition is mandatory or Genie if replacement manuals or decals are for safe machine operation. Decals alert operators needed. and personnel to the many possible hazards associated with using this machine. -
Page 25: Perform Pre-Operation Inspection
Function tests are designed to discover any malfunctions before the machine is Dexter Axle Operation Maintenance Service Manual put into service. A malfunctioning machine must Genie part number 84376 never be used. If malfunctions are discovered, the machine must be tagged and removed from service. -
Page 26: Torque The Lug Bolts - Ce
(Demco part number BH20023). Section 2, Specifi cations. Demco Model 91 Owner/Operator Manual Required maintenance procedures and additional Genie part number 84592 axle information is available in the KNOTT Axle Service Manual (KNOTT part number P005). KNOTT Axle Service Manual... -
Page 27: Perform 30 Day Service
fi rst 30 days or 40 hours of usage. After this interval, refer to Genie specifi cations require that this procedure be the maintenance tables for continued scheduled performed every 100 hours of operation. -
Page 28: Checklist B Procedures
2 Put on protective clothing and eye wear. 3 Be sure that the battery cable connections are free of corrosion. Battery Charger 4 Be sure that the battery retaining fasteners and cable connections are tight. 3 - 10 Genie TZ-34/20 Part No. 825934... -
Page 29: Inspect The Electrical Wiring
Maintaining electrical wiring in good condition is essential to safe operation and good machine performance. Failure to fi nd and replace burnt, Genie requires that this procedure be performed chafed, corroded or pinched wires could result every 250 hours or quarterly, whichever comes in unsafe operating conditions and may cause fi... -
Page 30: Test The Manual Override
Result: The thumbscrew should move easily. Result: The thumbscrew should move easily. 10 To close the valve, push the thumbscrew in and turn fully in a counterclockwise direction and release. 3 - 12 Genie TZ-34/20 Part No. 825934... -
Page 31: Test The Platform Rotation (If Equipped)
Result: The thumbscrew should move easily. 16 To close the valve, pull the thumbscrew out and turn fully in a counterclockwise direction and release. Note: The machine functions will not operate unless the valves are closed. Part No. 825934 Genie TZ-34/20 3 - 13... -
Page 32: Perform Hydraulic Oil Analysis
If the hydraulic oil is not replaced at the two year inspection, test the oil quarterly. Dexter Axle Operation Maintenance Service Manual Genie part number 84376 Replace the oil when it fails the test. See E-1, Test or Replace the Hydraulic Oil. -
Page 33: Check The Wheel Bearings - Ce
5 Lightly grease the ball mount. Bearings - CE. Required maintenance procedures and additional axle information is available in the KNOTT Axle Service Manual (KNOTT part number P005). KNOTT Axle Service Manual Genie part number 84443 Part No. 825934 Genie TZ-34/20 3 - 15... -
Page 34: Perform Axle Maintenance - Ce
Required maintenance procedures and additional Service Manual (KNOTT part number P005). axle information is available in the KNOTT Axle Service Manual (KNOTT part number P005). KNOTT Axle Service Manual Genie part number 84443 KNOTT Axle Service Manual Genie part number 84443... -
Page 35: Inspect The Parking Brake
5 Check each tire with an air pressure gauge and add air as needed. Refer to Section 2, Specifi cations. Bodily injury hazard. An over- infl ated tire can explode and could result in death or serious injury. Part No. 825934 Genie TZ-34/20 3 - 17... -
Page 36: Checklist C Procedures
Mechanism (if equipped) System (if equipped) Genie specifi cations require Genie specifi cations require that this procedure be that this procedure be performed every 500 hours performed every 500 hours or 6 months, whichever or 6 months, whichever comes fi rst. Perform this comes fi... - Page 37 11 Lift the test weight off the platform fl oor using a suitable lifting device Result: The platform overload indicator light should turn off at both the ground and platform controls. Part No. 825934 Genie TZ-34/20 3 - 19...
-
Page 38: Replace The Hydraulic Tank Breather Cap Models With Optional Hydraulic Oil
Operation Maintenance Service Manual 1 Remove and discard the hydraulic tank (Dexter part number LIT-001-00). breather cap. Dexter Axle Operation Maintenance Service Manual 2 Install a new cap onto the tank. Genie part number 84376 3 - 20 Genie TZ-34/20 Part No. 825934... -
Page 39: Grease The Axle Wheel Bearings Ce
KNOTT Axle Service Manual 1 Loosen the wheel lug bolts. Do not remove Genie part number 84443 them. 2 At the ground controls, extend the outriggers until the axle is off the ground and the machine is level. -
Page 40: Adjust The Brakes - Ce
Service Manual (KNOTT part number P005). the wheel only in the direction of travel. KNOTT Axle Service Manual 4 Ease off the adjusting screw approximately Genie part number 84443 one-half turn in a counterclockwise direction, until the wheel turns freely. -
Page 41: Checklist D Procedures
3 Extend and retract the boom through the entire Dexter Axle Operation Maintenance Service Manual range of motion to check for tight spots that Genie part number 84376 may cause binding or scraping of the boom. Note: Always maintain squareness between the outer and inner boom tubes. -
Page 42: Replace The Hydraulic Tank Return Filter
3 Apply a thin layer of fresh oil onto the gasket of 5 Clean up any oil that may have spilled during the new oil fi lter. the replacement procedure. Properly discard the used fi lter. 3 - 24 Genie TZ-34/20 Part No. 825934... -
Page 43: Check The Turntable Rotation Bearing Bolts
1 Be sure that each turntable rotation bearing mounting bolt above the turntable is torqued in sequence to specifi cation. See below. Tongue Bearing-to-turntable bolt torque sequence Part No. 825934 Genie TZ-34/20 3 - 25... -
Page 44: Inspect For Turntable Bearing Wear
1 inch / 2.5 cm from the turntable rotation bearing. Bearing to swing chassis 250 ft-lbs 200 ft-lbs 339 Nm 271 Nm *Not lubricated from serial number TZ3416-1689. **Lubricated to serial number TZ3416-1688. 3 - 26 Genie TZ-34/20 Part No. 825934... - Page 45 Result: The measurement is less than 0.055 inch / 1.40 mm. The bearing is good. Result: The measurement is more than 0.055 inch / 1.40 mm. The bearing is worn and needs to be replaced. Part No. 825934 Genie TZ-34/20 3 - 27...
-
Page 46: Checklist E Procedure
5 Tag and disconnect the wire harness from the motor controller and 275A fuse. 6 Pull the trailer wiring harness through the power unit module bulkhead. 3 - 28 Genie TZ-34/20 Part No. 825934... - Page 47 fi lter. fasteners. Do not overtighten. 17 Apply a thin layer of fresh oil to the gasket of the new oil fi lter. Part No. 825934 Genie TZ-34/20 3 - 29...
- Page 48 Section 3 • Scheduled Maintenance Procedures January 2016 This page intentionally left blank. 3 - 30 Genie TZ-34/20 Part No. 825934...
- Page 49 Be sure that all necessary tools and parts are Indicates a potentially hazardous available and ready for use. situation which, if not avoided, Use only Genie approved replacement parts. could result in death or serious injury. Read each procedure completely and adhere to the instructions.
-
Page 50: Platform Components
Crushing hazard. The platform could become unbalanced and fall Remove the platform rotate assembly from the if not properly supported when the machine. pin is removed. 6 Remove the platform from the platform rotator assembly. 4 - 2 Genie TZ-34/20 Part No. 825934... - Page 51 6 Remove the gear assembly retaining nut from How to Remove the Platform. the top of the shaft. rotate gear assembly rotate gear shaft oil seal gear shaft seal plate rotate handle shaft cover pinion rotate shaft handle Part No. 825934 Genie TZ-34/20 4 - 3...
- Page 52 Torque to specifi cation. 14 Install the case over the gear assembly and onto the shaft seal plate. Install and securely tighten the retaining fasteners. Do not over tighten. 4 - 4 Genie TZ-34/20 Part No. 825934...
- Page 53 January 2016 Section 4 • Repair Procedures This page intentionally left blank. Part No. 825934 Genie TZ-34/20 4 - 5...
-
Page 54: Primary Boom Components
AND secondary lift cylinder rod-end pivot pin secondary boom pivot pin secondary boom link pivot pin platform level master cylinder 4 - 6 Genie TZ-34/20 Part No. 825934... -
Page 55: Cable Track
Loosen hydraulic connections very slowly to allow the oil pressure to dissipate gradually. Do not allow oil to squirt or spray. Part No. 825934 Genie TZ-34/20 4 - 7... - Page 56 8 Securely lock the hinge bar for each link. 9 Operate the boom extend/retract function through a full cycle to ensure smooth operation of the new section of cable track. 4 - 8 Genie TZ-34/20 Part No. 825934...
-
Page 57: Primary Boom
Note: Looking at the ground control box, the cable is at the far right and directly under the secondary boom up/down button. 4 Tag and disconnect the 8-pin wire harness connector behind the ground control box. Part No. 825934 Genie TZ-34/20 4 - 9... - Page 58 Lower the cylinder onto the chassis. Cables and hoses can be Crushing hazard. The cylinder damaged if they are kinked or could fall if not properly supported pinched. when the pivot pin is removed. 4 - 10 Genie TZ-34/20 Part No. 825934...
- Page 59 20 Remove the primary boom from the machine. mounting bracket from the boom extension. Crushing hazard. The primary boom could become unbalanced and fall if not properly supported when removed from the machine. Part No. 825934 Genie TZ-34/20 4 - 11...
- Page 60 Note: For ease of assembly, note the quantity and location of shims during disassembly. 11 Tag, disconnect and plug the hydraulic hoses from the platform level slave cylinder at the cable track. Cap the fi ttings. 4 - 12 Genie TZ-34/20 Part No. 825934...
-
Page 61: Primary Boom Lift Cylinder
Loosen hydraulic connections very slowly to allow Use caution when removing the cylinder from the machine. the oil pressure to dissipate gradually. Do not allow oil to squirt or spray. Part No. 825934 Genie TZ-34/20 4 - 13... -
Page 62: Platform Leveling Cylinders
Do not allow oil to machine. squirt or spray. 4 - 14 Genie TZ-34/20 Part No. 825934... - Page 63 It is part of the closed loop hydraulic squirt or spray. circuit that keeps the platform level through the entire range of boom motion. The master cylinder is located inside the mid pivot. Part No. 825934 Genie TZ-34/20 4 - 15...
-
Page 64: Secondary Boom Components
AND secondary lift cylinder rod-end pivot pin secondary boom pivot pin secondary boom link pivot pin platform level master cylinder 4 - 16 Genie TZ-34/20 Part No. 825934... -
Page 65: Secondary Boom
Do not allow oil to squirt or spray. Component damage hazard. Cables and hoses can be damaged if they are kinked or pinched. Part No. 825934 Genie TZ-34/20 4 - 17... - Page 66 17 Attach a lifting strap of suitable capacity from when the pin is removed. an overhead crane to the lift cylinder. Do not 24 Remove the secondary boom from the apply any lifting pressure. machine. 4 - 18 Genie TZ-34/20 Part No. 825934...
-
Page 67: Secondary Boom Lift Cylinder
Loosen hydraulic connections very slowly to allow Use caution when removing the cylinder from the machine. the oil pressure to dissipate gradually. Do not allow oil to squirt or spray. Part No. 825934 Genie TZ-34/20 4 - 19... -
Page 68: Ground Controls
1 Perform this procedure with the machine on a tilt level sensor fi rm, level surface that is free of obstructions. adjusting fastener "X" indicator 4 - 20 Genie TZ-34/20 Part No. 825934... - Page 69 Result: The outriggers will lower and adjust to with step 6. level the machine and raise the wheels off the ground. Use the bubble level located below the ground controls to confi rm that the machine is level. Part No. 825934 Genie TZ-34/20 4 - 21...
- Page 70 Result: The tilt alarm does not sound. The level sensor is faulty and must be replaced. Repeat this procedure beginning with step 6. 24 Return the outriggers to the stowed position. 4 - 22 Genie TZ-34/20 Part No. 825934...
- Page 71 Result: The outriggers will lower and adjust to level the machine and raise the wheels off the ground. Use the bubble level located below the ground controls to confi rm that the machine is level. FUNCTION MANIFOLD PLATFORM TONGUE Part No. 825934 Genie TZ-34/20 4 - 23...
-
Page 72: Hydraulic Power Unit
Hose fi tting ............To function manifold "P" ..... 10-12 ft-lbs / 14-16 Nm Sight gauge ........G ... Hydraulic fl uid level ........106 in-lbs / 12 Nm Red Beaded Security Tie 4 - 24 Genie TZ-34/20 Part No. 825934... - Page 73 January 2016 Section 4 • Repair Procedures HYDRAULIC POWER UNIT Part No. 825934 Genie TZ-34/20 4 - 25...
-
Page 74: Valve Adjustments - Hydraulic Power Unit
Tip-over hazard. Do not adjust the relief valve higher than specifi ed. 7 Hold the relief valve screw and securely tighten the lock nut. Be sure the relief valve screw does not turn. 4 - 26 Genie TZ-34/20 Part No. 825934... -
Page 75: Hydraulic Pump
Loosen hydraulic connections very slowly to allow the oil pressure to dissipate gradually. Do not allow oil to squirt or spray. 4 Tag and disconnect the electrical wiring from the valve coils. Part No. 825934 Genie TZ-34/20 4 - 27... -
Page 76: Function Manifold Components
Flow regulator, 0.4 gpm / 1.5 L/min ..AL ..Platform level/turntable rotate circuit ..7-8 ft-lbs / 9.5-10.5 Nm Relief valve, 1200 psi / 82.7 bar ... AM ..Turntable rotate circuit ......11-13 ft-lbs / 15-17 Nm 4 - 28 Genie TZ-34/20 Part No. 825934... - Page 77 January 2016 Section 4 • Repair Procedures MANIFOLDS Part No. 825934 Genie TZ-34/20 4 - 29...
-
Page 78: Outrigger Counterbalance Valve Manifold Components
The outrigger manifold is located under the hydraulic power unit cover. Index Schematic Description Item Function Torque Counterbalance valve ......AN..Outrigger Retract ........19-22 ft-lbs / 25-30 Nm Counterbalance valve ......AO ..Outrigger Extend ........19-22 ft-lbs / 25-30 Nm 4 - 30 Genie TZ-34/20 Part No. 825934... - Page 79 Rotation Brake Valve Manifold Components The turntable rotation brake manifold is located under the roadside turntable cover. Index Schematic Description Item Function Torque Turntable rotation brake valve ......Outrigger Retract ........7-8 ft-lbs / 9.5-10.5 Nm Part No. 825934 Genie TZ-34/20 4 - 31...
-
Page 80: Valve Coils
January 2016 MANIFOLDS How to Test a Coil Diode Valve Coils Genie incorporates spike-suppressing diodes in all of its coils. Properly functioning coil diodes protect How to Test a Coil the electrical circuit by suppressing voltage spikes. Voltage spikes naturally occur within a function... - Page 81 Resistor, 10 Note: If testing a single-terminal coil, connect the Genie part number 27287 negative lead to the internal metallic ring at either end of the coil. 5 Momentarily connect the positive lead from the...
-
Page 82: Turntable Rotation Components
Do not allow oil to squirt or spray. 4 Remove the turntable rotation motor mounting fasteners and remove the turntable rotation motor from the machine. 4 - 34 Genie TZ-34/20 Part No. 825934... -
Page 83: Axle Components
Note: When the axle is installed, the brakes should be bled. Refer to the appropriate brake manufacturer's manual that was shipped with your Genie TZ. Part No. 825934 Genie TZ-34/20 4 - 35... -
Page 84: Trailer Components
Operation Maintenance Service Manual Maintenance Service Manual (Dexter part number LIT-001-00). (Dexter part number LIT-001-00). Dexter Axle Operation Maintenance Service Manual Dexter Axle Operation Maintenance Service Manual Genie part number 84376 Genie part number 84376 2 Chock the wheels. Mechanical Brake System - 3 Release the parking brake. -
Page 85: Outrigger Components
3 Tag, disconnect and plug the hydraulic hoses at the outrigger cylinder. Cap the fi ttings. 4 Remove the pin retaining fasteners from the outrigger pivot pin. Do not remove the pin. Part No. 825934 Genie TZ-34/20 4 - 37... -
Page 86: Outrigger Cylinder
Do not allow oil to squirt or spray. 4 Tag and disconnect the wire harness from the outrigger cylinder valve coil. 4 - 38 Genie TZ-34/20 Part No. 825934... -
Page 87: Platform Overload Components
6 Using a suitable lifting device, place an switch wires. Securely install the wires onto the appropriate test weight equal to that of the limit switch. maximum platform capacity at the center of the platform fl oor. Part No. 825934 Genie TZ-34/20 4 - 39... - Page 88 Result: All platform control functions should not operate. 16 Turn the key switch to ground control. 17 Test all machine functions from the ground controls. Result: All ground control functions should not operate. 4 - 40 Genie TZ-34/20 Part No. 825934...
-
Page 89: Hydraulic Schematics
Be sure that all necessary tools and test Malfunction Identify Troubleshoot equipment are available and ready for use. symptoms discovered problem still exists Inspect Perform Return to and test repair service problem solved Part No. 825934 Genie TZ-34/20 5 - 1... -
Page 90: Electrical Abbreviations Legend
CR70 Turntable rotate turntable/platform rotate left) BN62 Function enable (boom up, boom extend, turntable/platform rotate right) BN63 Primary boom up/down BN64 Secondary boom up/down BN65 Boom extend/retract BN66 Turntable rotate BN67 Platform level up/down 5 - 2 Genie TZ-34/20 Part No. 825934... - Page 91 Hydraulic power unit N.C. Normally closed NCHO Normally closed, held open N.O. Normally Open NOHC Normally open, held closed Power switch Emergency Stop button at ground controls Emergency Stop button at plat. controls Part No. 825934 Genie TZ-34/20 5 - 3...
-
Page 92: Wire Color Legend
Primary up Turntable rotate left Turntable rotate right Boom retract Boom extend Left rear outrigger Right rear outrigger Left front outrigger Right front outrigger Outrigger retract Outrigger extend Secondary down Secondary up 5 - 4 Genie TZ-34/20 Part No. 825934... -
Page 93: Limit Switch Legend
January 2016 Section 5 • Schematics Limit Switch Legend Item Description Schematic Boom limit switches LS18 / LS18A Outrigger limit switches LS12/LS13/LS14/LS15 Part No. 825934 Genie TZ-34/20 5 - 5... -
Page 94: Electrical Symbols Legend
Key switch Hour meter EMERGENCY STOP Emergency stop button, Motor controller normally closed Alarm Circuit breaker Battery charger Solenoid valve with diode N.C.H.O. N.O.H.C. N.C. Limit switch Quick disconnect Level sensor Toggle switch 5 - 6 Genie TZ-34/20 Part No. 825934... -
Page 95: Hydraulic Abbreviations Legend
Priority fl ow regulator, adjustable Primary boom up/down Relief valve - turntable rotate circuit Relief valve - primary boom Relief valve - secondary boom Secondary boom up/down Relief valve - turntable rotate circuit Boom extend/retract Part No. 825934 Genie TZ-34/20 5 - 7... -
Page 96: Hydraulic Symbols Legend
Check valve, directional valve hand pump pilot to open Double acting cylinder with cushion Solenoid operated 2 position 3 way directional valve Bi-directional Filter motor Double acting cylinder Relief valve Counterbalance valve 5 - 8 Genie TZ-34/20 Part No. 825934... -
Page 97: Trailer Lighting Wiring Diagram - Ansi/Csa
Trailer Lighting Wiring Diagram - ANSI/CSA RIGHT SIDE MARKER QD12 TRAILER PLUG BN/YL RIGHT REAR TAIL LIGHT 1 GN 2 YL 3 BN/YL LEFT SIDE MARKER 3 BN LEFT REAR 4 WH TAIL LIGHT Part No. 825934 Genie TZ-34/20 5 - 9... -
Page 98: Trailer Lighting Wiring Diagram - Mechanical Axle, Ce
8 WH/BK TURN BACKUP RIGHT REAR TAIL LIGHT LEFT REAR TAIL LIGHT LEFT REAR TAIL LIGHT SIDE MARKER TURN SIGNAL FOG LIGHT RED REFLECTOR REVERSE LIGHT BRAKE LIGHT 7 LICENSE PLATE LIGHT 5 - 10 Genie TZ-34/20 Part No. 825934... -
Page 99: Trailer Lighting Wiring Diagram - Hydraulic Axle, As
8 WH/BK TURN BACKUP RIGHT REAR TAIL LIGHT LEFT REAR TAIL LIGHT LEFT REAR TAIL LIGHT SIDE MARKER TURN SIGNAL FOG LIGHT RED REFLECTOR REVERSE LIGHT BRAKE LIGHT 7 LICENSE PLATE LIGHT Part No. 825934 Genie TZ-34/20 5 - 11... -
Page 100: Ground Control Box Wiring Diagram - Ansi/Csa
TB24 OR/WH TB13 BN51 RIGHT REAR OUTRIGGER BN57 BN53 RIGHT FRONT BN55 OUTRIGGER TURNTABLE GN/WH C3-T ROTATE SECONDARY GN/WH BOOM TB15 UP/DOWN OR/WH C3-U ES0441G CR64A TERMINAL 30 ALARM HOUR METER Tb23 5 - 12 Genie TZ-34/20 Part No. 825934... - Page 101 RD/WH C1B-B CR77 DOWN ENABLE TB4A CR78A 5.1V DC LIFT CUT-OUT TB17 ZENER DIODE CR28 TERMINAL 87 BN55 TB24 3.3V DC ZENER DIODE CR28 TERMINAL 87A ES0441G C1B-E C1B-F CR77 TERMINAL 30 Part No. 825934 Genie TZ-34/20 5 - 13...
-
Page 102: Platform Control Box Wiring Diagram - Ansi/Csa
CR74 TERMINAL 87 AND CR78B TERMINAL 30 CR78B TERMINAL 86 CR78B TERMINAL 85 HORN BK/WH C1P-G AUTO-STYLE BK/WH HORN BN66 (OPTION) BN67 OR/BK BN66 CR78B BN64 LIFT CUT-OUT BN61 BN62 CR74 FUNCTION ENABLE C1P-C ES0441G 5 - 14 Genie TZ-34/20 Part No. 825934... - Page 103 January 2016 Section 5 • Schematics This page intentionally left blank. Part No. 825934 Genie TZ-34/20 5 - 15...
-
Page 104: Ground Control Box Wiring Diagram - As/Ce
CR75 TERMINAL 85 TB24 BN51 RIGHT REAR OUTRIGGER GN/WH BN53 RIGHT FRONT BN57 GN/WH BN55 OUTRIGGER TB15 OR/WH TURNTABLE SECONDARY TB13 ROTATE OR/WH BOOM UP/DOWN ES0441G CR64 TERMINAL 30 ALARM HOUR METER TB24 5 - 16 Genie TZ-34/20 Part No. 825934... - Page 105 CR78A 5.1V DC LIFT CUT-OUT ZENER DIODE CR28 TERMINAL 87 BN55 ES0441G 4.3V DC ZENER DIODE CR28 TERMINAL 87A 5 OHM TB24 C1B-E C3-A C1B-F CR65B TB24 CR77 TERMINAL 30 U6 CUT-OUT Part No. 825934 Genie TZ-34/20 5 - 17...
-
Page 106: Platform Control Box Wiring Diagrams - As/Ce
C1P-G BK/WH CR55 BN66 LOAD SENSE BN67 OR/RD 2 LIMIT SWITCH HARNESS OR/BK BN66 CR78B U35-3 GN/WH C1P-N BN64 LIFT CUT-OUT U35-3 BK BN61 BN62 TO GROUND CR74 FUNCTION ENABLE C1P-C ES0441G 5 - 18 Genie TZ-34/20 Part No. 825934... -
Page 107: Electrical Schematic - Ansi/Csa
Section 5 • Schematics January 2016 Electrical Schematic - ANSI/CSA 5 - 20 5 - 19... - Page 108 ENABLE LS12 LS13 LS14 LS15 CR64 (10) BN49 TB12 TB13 TB14 TB15 CR65A AUTOLEVEL (12) ENABLE CR61 TB11 TB11 CR76 CR76 (11) (11) CR75 CR75 CR72 BATTERY 24V 275AMP. U6-B+ BATTERY GROUND ES0441G 5 - 20 TZ-34/20 Part No. 825934...
- Page 109 CR67 LS12 LS14 CR77 CR70 (15) CR72 CR69 (13) CR68 CR70 CR68 CR67 CR69 CR70 LOAD BATTERY 24V U6-B+ 47 mH 2.5 AMP 0.034 OHM 200 OHM MOTOR CONTROLLER MOTOR BATTERY GROUND ES0441N Part No. 825934 TZ-34/20 5 - 21...
- Page 110 January 2016 Section 5 • Schematics Electrical Schematic - ANSI/CSA 5 - 21 5 - 22...
-
Page 111: Electrical Schematic - As/Ce
Section 5 • Schematics January 2016 Electrical Schematic - AS/CE 5 - 24 5 - 23... - Page 112 LS13 LS14 LS15 CR64 LOAD (10) SENSE BN49 TB12 TB13 TB14 TB15 CR65A AUTOLEVEL (12) ENABLE CR61 TB11 TB11 CR76 CR76 (11) (11) CR75 CR75 CR72 BATTERY 24V 275AMP. U6-B+ BATTERY GROUND ES0441G 5 - 24 TZ-34/20 Part No. 825934...
- Page 113 CR67 LS12 LS14 CR77 CR70 (15) CR72 CR69 (13) CR68 CR70 CR68 CR67 CR69 CR70 LOAD BATTERY 24V U6-B+ 47 mH 2.5 AMP 0.034 OHM 200 OHM MOTOR CONTROLLER MOTOR BATTERY GROUND ES0441N Part No. 825934 TZ-34/20 5 - 25...
- Page 114 January 2016 Section 5 • Schematics Electrical Schematic - AS/CE 5 - 25 5 - 26...
-
Page 115: Hydraulic Schematic
Section 5 • Schematics January 2016 Hydraulic Schematic 5 - 28 5 - 27... - Page 116 110.3 bar 124.1 bar 3300 psi 227.5 bar 4000 psi 275.8 bar 0.34 gpm FUNCTION 1.3 L/min MANIFOLD 3500 psi 241.3 bar HS7042K HYDRAULIC 1.3 gpm POWER 4.9 L/min 18 psi 1.2 bar UNIT 5 - 28 TZ-34/20 Part No. 825934...
- Page 117 Genie North America Phone 425.881.1800 Toll Free USA and Canada 800.536.1800 Fax 425.883.3475 Genie Australia Pty Ltd. Phone +61 7 3375 1660 Fax +61 7 3375 1002 Genie Scandinavia Genie China Phone +46 31 57 51 00 Fax +46 31 57 51 04...