Sign In
Upload
Manuals
Brands
HP Manuals
Docking Station
Compaq TR1105
HP Compaq TR1105 Manuals
Manuals and User Guides for HP Compaq TR1105. We have
6
HP Compaq TR1105 manuals available for free PDF download: Hardware Manual, Startup Manual, Software Manual, Reference Manual
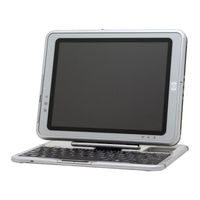
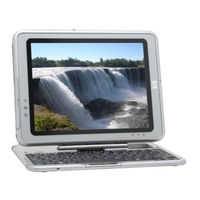
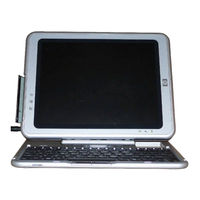
HP Compaq TR1105 Hardware Manual (165 pages)
Compaq Tablet PC TC1100 Series Hardware Guide
Brand:
HP
| Category:
Tablet
| Size: 11.1 MB
Table of Contents
Table of Contents
3
1 External Components
10
Pen Components
10
Tablet PC Components
11
Front: Lights and Bluetooth
11
Front: Pen-Activated Buttons
12
Right Side: Power Switch and Power/Standby Light
13
Right Side: Windows Security and Display Toggle Buttons
14
Right Side: Esc, Tab and Q Menu Buttons
15
Right Side: Jog Dial and Antenna
16
Lower Side
17
Left Side: Attachment Slots and Keyboard Connector
18
Left Side: Security Cable Slot, Vent and Antenna
19
Top: Connectors and Jacks
20
Top: Pen Holder and LAN Connection Lights
21
Top: Card Slots, Buttons and Tether Eyelet
22
Back: Attachment Features and Hard Drive Bay
23
Back: Battery Bay
24
Back: Memory and Mini PCI Compartment
25
Back: Labels
26
Back: Tilt Feet and Pad Feet
27
Additional Tablet PC Standard Components
28
Documentation Cds
29
Cords and Cables
30
Adapters and Accessories
31
Tablet PC Keyboard Components
32
Front: Lights and Pointing Device
32
Front: Keys
33
Front: Positioning and Security Features
34
Top
35
Back
36
Additional Keyboard Standard Component
37
2 Pen, Command Controls and Keyboards
38
Pen
38
Entering Information with the Pen
39
Performing Other Procedures with the Pen
40
Calibrating the Pen
41
Setting Pen Preferences
42
Command Controls
43
Identifying Command Controls
43
Command Controls Quick Reference
44
Using Command Controls
45
Windows Security Button
48
Setting Command Control Preferences
51
Returning All Command Controls to Default Settings
53
On-Screen Keyboard
54
Tablet PC Keyboard
55
Using the Pointing Device
56
Using the Keypad
57
Using F11/F12
60
3 Battery Packs
61
Running the Tablet PC on Battery Power
61
Replacing a Battery Pack
62
Removing a Battery Pack
62
Inserting a Battery Pack
64
Securing a Battery Pack
66
Accessing the Battery Pack Security Screw
66
Inserting a Battery Pack Security Screw
67
Charging a Battery Pack
68
Charging a New Battery Pack
69
Charging an In-Use Battery Pack
69
Monitoring the Charge in a Battery Pack
70
Obtaining Accurate Charge Information
70
Displaying Charge Information on the Screen
70
Displaying Charge Information on a
72
Battery Pack
72
Managing Low-Battery Conditions
73
Identifying Low-Battery Conditions
73
Resolving Low-Battery Conditions
74
Initiating and Resuming from Standby or Hibernation
75
Calibrating a Battery Pack
76
When to Calibrate
76
How to Calibrate
76
Recharging the Battery Pack
78
Battery Conservation Procedures and Settings
79
Conserving Power as You Work
79
Selecting Power Conservation Settings
79
Storing a Battery Pack
80
Disposing of a Used Battery Pack
81
Finding more Power Information
81
4 Drives
82
Adding a Drive to the System
82
Understanding Drive Terms
83
Terms for Types of Drives
83
Terms for Drive Media
83
Caring for Drives
84
Inserting or Removing Drive Media
85
Inserting a CD or DVD
85
Removing a CD or DVD (with Power)
86
Removing a CD or DVD (Without Power)
87
Inserting a Diskette
88
Removing a Diskette
88
Using Drive Media
89
Avoiding Standby and Hibernation
89
Displaying Media Contents
89
Caring for Drive Media
90
Finding more Drive Software Information
91
5 Audio
92
Adjusting Volume
92
Using the Volume Control Icon
92
Using the Q Menu
93
Using the Internal Speakers
94
Using the Internal Microphone
95
Connecting an Audio Device
96
Identifying Audio Jacks
96
Using the Audio-Out Jack
97
Using the Headset Jack
97
Using the Microphone Jack
98
Finding Audio and Video Software Information
98
6 Internal Modem
99
Connecting the Modem
100
Selecting Connectors
100
Connecting the Modem to an RJ-11 Jack
101
Connecting the Modem with an Adapter
102
Setting Country Preferences
103
Displaying the Current Country Configuration
103
Adding a Country Configuration
103
Solving Travel Connection Problems
104
Accessing Communication Software
106
Finding at Command Information
106
7 Network Connections
107
Connecting the Network Cable
108
Turning a Network Connection off and on
109
Using the LAN Connection Lights
109
Accessing the Network at Startup
110
Enabling a NIC for Startup
110
Responding to a Network Service Boot Prompt
111
Finding Wireless LAN Information
111
8 External Device Connections
112
Standard Device
112
USB Device
113
Tablet PC Keyboard
114
Attaching the Tablet PC to the Keyboard
114
Adjusting the Tablet PC and Keyboard
116
Closing the Tablet PC and Keyboard
117
Transporting the Tablet PC and Keyboard
118
Detaching the Tablet PC from the Keyboard
119
Cable Lock
121
9 Additional Hardware Options
122
Obtaining Upgrades
122
Using a PC Card
122
Selecting a PC Card
123
Configuring a PC Card
123
Inserting a PC Card
124
Stopping and Removing a PC Card
124
Using an SD Card
125
Configuring an SD Card
126
Inserting an SD Card
126
Stopping and Removing an SD Card
127
Increasing Memory
128
Displaying Memory Information
128
Removing or Inserting a Memory Module
129
10 Maintenance, Shipping and Travel
134
Maintaining Software
134
Protecting Hardware
135
Using Portfolios
136
Attaching a Portfolio
136
Detaching a Portfolio
138
Cleaning Hardware
139
Cleaning the Screen
139
Cleaning a Tablet PC Keyboard
140
Replacing Hardware
141
Replacing the System Hard Drive
141
Replacing a Pointing Stick Cap
146
Preparing the Tablet PC for Shipping or Travel
147
Traveling with the Tablet PC
148
Checklist for Travelers
148
Contacting HP
149
11 Specifications
151
Tablet PC and Tablet PC Keyboard Dimensions
151
Tablet PC Operating Environment
152
Tablet PC Rated Input Power
152
Modem Specifications
153
Finding more Environmental Information
153
Advertisement
HP Compaq TR1105 Startup Manual (122 pages)
HP Tablet PC Series
Brand:
HP
| Category:
Laptop
| Size: 13.39 MB
Table of Contents
Using this Guide
3
Table of Contents
5
1 Setting up the Tablet PC
9
Setting up Tablet PC Hardware with a Tablet PC
9
Keyboard
9
Before You Begin
11
Opening the Portfolio
12
Opening the Tablet PC and Keyboard
13
Inserting the Battery Pack
14
Securing a Battery Pack
18
Setting up the Tablet PC and Keyboard as a Notebook
19
Connecting the Tablet PC to External Power
23
Turning on the Tablet PC
25
Setting up Tablet PC Hardware with a Standard USB
26
Keyboard
26
Before You Begin
27
Opening the Portfolio
28
Inserting the Battery Pack
29
Securing a Battery Pack
30
Connecting a Standard USB Keyboard
32
Connecting the Tablet PC to External Power
33
Turning on the Tablet PC
35
Setting up the Software
36
Setting up the Pen
38
Entering Information with the Pen
38
Performing Other Procedures with the Pen
39
Calibrating the Pen
40
Using the Pen Holder
41
Selecting Regional Settings
41
Selecting Regional Settings in a Multilingual User Interface (MUI)
42
Selecting Screen Settings
42
Setting up Wireless LAN
43
Using Wireless Utilities
43
Setting up Bluetooth
46
Turning off the Tablet PC
46
Using the Tablet PC Safely
47
2 Beginning to Use the Tablet PC
49
Getting Information about the Tablet PC
49
Taking the Product Tour
49
Accessing Operating System Documentation
49
Obtaining Modem and Network Information
50
Using the Documentation Library CD
50
Opening the Documentation Library CD
51
Selecting a Guide
52
Installing Optional Software
54
Using Portfolios
55
Detaching the Portfolio from the Keyboard
56
Attaching the Portfolio to the Keyboard
57
Detaching the Portfolio from the Tablet PC
58
Attaching the Portfolio to the Tablet PC
59
Using the Tablet PC Keyboard
60
Attaching the Tablet PC to the Keyboard
60
Adjusting the Tablet PC and Keyboard
62
Closing the Tablet PC and Keyboard
63
Transporting the Tablet PC and Keyboard
64
Detaching the Tablet PC from the Keyboard
65
3 Maintaining and Protecting the Tablet PC
67
Cleaning the Screen
67
Protecting the Tablet PC from Power Surges
68
Protecting the Tablet PC against Viruses
68
Replacing a Battery Pack
69
Removing a Battery Pack
69
Inserting a Battery Pack
72
Finding more Power and Battery Pack Information
74
4 Solving Problems
75
Quick Solutions Checklist
75
Is the Tablet PC Receiving Power
75
Is the Tablet PC Turned on
77
Is the Tablet PC in Standby or Hibernation
77
Is the Tablet PC Overheating
78
Is the Image Not Visible
78
Is the System Unresponsive
79
Is an External Device Not Working
80
Are You Using All Available Documentation
80
Is Software Functioning Abnormally
81
Using HP Help and Support
81
Preparing to Call HP Customer Care
83
Taking the Tablet PC to a Service Provider
84
Identifying Exterior Hardware
85
Pen Components
85
Tablet PC Components
86
Front: Lights and Bluetooth
86
Front: Pen-Activated Buttons
87
Right Side: Power Switch and Power/Standby
88
Light
88
Right Side: Display Toggle and Windows Security Buttons
89
Right Side: Esc, Tab and Q Menu Buttons
90
Right Side: Jog Dial and Antenna
91
Lower Side
92
Left Side: Attachment Slots and Keyboard
93
Connector
93
Left Side: Security Cable Slot, Vent and Antenna
94
Top: Connectors and Jacks
95
Top: Pen Holder and LAN Connection Lights
96
Top: Card Slots, Buttons and Tether Eyelet
97
Back: Attachment Features and Hard
98
Drive Bay
98
Back: Battery Bay
99
Back: Memory and Mini PCI Compartment
100
Back: Labels
101
Back: Tilt Feet and Pad Feet
102
Additional Tablet PC Standard Components
103
Documentation Cds
103
Cord and Cables
104
Adapters and Accessories
105
Tablet PC Keyboard Components
106
Front: Lights and Pointing Device
106
Front: Keys
107
Front: Positioning and Security Features
108
Top
109
Back
110
Additional Keyboard Standard Component
111
HP Compaq TR1105 Software Manual (103 pages)
HP Tablet PC Series
Brand:
HP
| Category:
Laptop
| Size: 5.82 MB
Table of Contents
Table of Contents
3
1 Power
8
Selecting a Power Source
8
Understanding Standby and Hibernation
10
Standby
10
Hibernation
10
Choosing Standby, Hibernation or Shutdown
11
When You Leave Your Work
11
When the Power Supply Is Uncertain
12
While Using Drive Media
12
Standby, Hibernation and Shutdown Procedures
13
Identifying the Power/Standby Light and Power Switch
13
Using the Default Power Procedures
13
Using Emergency Shutdown Procedures
15
Using the Power Meter Icon
16
Setting Power Preferences
17
Changing the Power Switch Function
17
Setting a Standby Password
17
Selecting, Creating or Changing a Power Scheme
18
Finding more Battery Power Information
19
2 Menu and Desktop Video Profiles
20
Q Menu
20
Identifying Q Menu Controls
20
Displaying and Closing the Q Menu
21
Selecting an Item from the Q Menu
21
Obtaining Information about
22
System-Defined Items
22
Setting Q Menu Preferences
22
Removing a Q Menu Item
23
Adding a Listed Item to the Q Menu
23
Using a System-Defined Item
26
Extended Desktop
30
Shut down
35
Power Controls
35
Desktop Video Profiles
36
Identifying Profiles and Modes
36
Using the Default Profiles
41
Enabling the Default Profiles
43
Customizing the Profiles (Optional)
44
Changing the Video Settings
45
Defining Applications to Launch
45
Change Mode Service
46
Tablet PC Button Driver
47
3 Software Updates and Restorations
49
Preparing for a Software Update
49
Accessing Tablet PC Model Information
49
Accessing ROM Version Information
49
Updating Software from a CD
51
Updating Software from the Internet
51
Downloading and Installing a System ROM Update
52
Downloading and Installing a KBC ROM Update
53
Downloading a KBC ROM Update
54
Downloading and Installing a Non-ROM Softpaq
55
Installing an Alternative Operating System
56
Operating System
56
Enabling and Switching MUI Languages
57
Switching the Language on the Tablet Input Panel
57
Restoring the Operating System and MUI
58
Reinstalling the Windows XP and Tablet PC Edition Operating Systems
58
Installing the Microsoft .NET Framework
59
Reinstalling the Microsoft Windows XP
60
Professional MUI
60
Reinstalling the Tablet PC MUI
61
Updating Bluetooth Software through the Flash Upgrade Utility
61
4 Passwords
63
Passwords Quick Reference
63
Managing Passwords
63
Setting Preferences in the Setup Utility
64
Forgetting Passwords
64
Combining HP and Windows Passwords
65
Determining Password Status
66
Using a Power-On Password
67
Setting a Power-On Password
67
Responding to a Power-On Password Prompt
68
Changing or Clearing a Power-On Password
68
Using a Supervisor Password
69
Setting a Supervisor Password
69
Responding to a Supervisor Password Prompt
70
Changing or Clearing a Supervisor Password
71
Using Drivelock
72
Protecting a Hard Drive with Drivelock
72
Accessing a Protected Hard Drive
73
Changing or Clearing a Drivelock Password
74
400 CD and DVD Software
75
Using Cds and Dvds
75
Finding Insertion and Removal Instructions
75
Avoiding Standby and Hibernation
75
Displaying Media Contents
76
Playing Cds with Windows Media Player
77
Playing an Audio CD
77
Playing a Video CD
77
Accessing Windows Media Player Help
78
Playing Dvds with Windvd
79
Installing Windvd
79
Accessing Windvd Help
79
Starting a DVD
80
Using DVD Regional Settings
81
6 Boot Order
82
Understanding the Search Sequence
82
Identifying Boot Order Controls
83
Setting a Boot Order Preference
84
Starting up from a NIC
85
7 Setup, Restore and Support Utilities
86
Selecting the Setup Utility
86
Using the Setup Utility
87
Identifying Setup Utility Controls
88
Restoring the Setup Utility Defaults
89
Setting a Setup Utility Access Preference
90
Displaying Information on the Main Menu
91
Selecting from the Security Menu
92
Selecting from the Advanced Menu
93
Selecting from the Exit Menu
94
Backing up and Restoring Data
95
Setting a System Restore Point
95
Restoring to a System Restore Point
95
Using HP Help and Support
96
Advertisement
HP Compaq TR1105 Reference Manual (61 pages)
HP Tablet PC Series Docking Station
Brand:
HP
| Category:
Docking Station
| Size: 3.64 MB
Table of Contents
Table of Contents
3
1 Identifying the Components
6
Docking Station Components
7
Front View
7
Right Side View
8
Back View
9
Left Side View
10
Tablet PC Components
11
Keyboard Components
13
2 Docking and Undocking the Tablet PC
14
Connecting to a Power Source
15
Docking the Tablet PC
16
Keyboard Considerations
16
Docking in the Portrait Position
18
Docking in the Landscape Position
22
Docking the Tablet PC with the Keyboard Attached
25
Undocking the Tablet PC
27
Turning the System on and off
28
Using Desktop Video Profiles
29
Setting up the Hardware
30
Enabling Default Profiles
31
Customizing Profiles (Optional)
32
Identifying the Profile
32
Changing the Windows Control Definitions
32
Changing the Hot Key Definitions
33
Changing the Video Settings
33
Defining Applications to Launch
34
Saving the Profile
34
Using Personal Profiles
34
4 Using the Tablet PC Docking Station and Screen Protector
35
Changing the Orientation and Viewing Angle
36
Changing the Orientation
36
Changing the Viewing Angle of the Tablet PC
38
Using Optional Multibay Devices
39
Inserting and Removing Devices
40
Using External Multibay Devices
42
Using Security Features
42
Connecting and Using External Devices
43
Connecting Standard External Devices
44
Connecting Monitors
45
Connecting USB Devices
45
Using Communications Devices
46
Attaching and Detaching the Screen Protector
47
Attaching the Screen Protector to the Tablet PC
47
Detaching the Screen Protector from the Tablet PC
49
Attaching the Screen Protector to the Keyboard
50
Keyboard
50
Keyboard
51
Getting Help
52
HP Customer Care
52
HP Web Site
53
HP Authorized Reseller
53
Troubleshooting Problems, Causes and Solutions
54
Docking Problems
54
Tablet PC Orientation Problems
55
Multibay Device Problems
55
External Device Problems
56
Dimensions
57
Operating Environment
57
Rated Input Power
58
HP Compaq TR1105 Startup Manual (42 pages)
HP Tablet PC Series Docking Station
Brand:
HP
| Category:
Docking Station
| Size: 3.92 MB
Table of Contents
Startup Guide
1
Table of Contents
3
1 Getting Started
5
Unpacking the Box
6
Identifying the Docking Station Components
7
Front View
7
Right Side View
8
Back View
9
Left Side View
10
Using this Product Safely
11
2 Docking and Undocking the Tablet PC
13
Connecting to a Power Source
14
Docking the Tablet PC in the Portrait Position
15
Keyboard Considerations
15
Changing the Orientation and Viewing Angle
21
Changing the Orientation
21
Changing the Viewing Angle of the Tablet PC
23
Using an External Keyboard and Mouse
25
Using Multibay Devices
27
Inserting and Removing Devices
28
Undocking the Tablet PC
31
Turning the System on and off
32
3 Enabling the Default Desktop Video Profiles
33
Setting up the Hardware
34
Enabling the Default Profiles
35
4 Getting Help
37
HP Customer Care
37
HP Web Site
38
HP Authorized Reseller
38
Troubleshooting Problems, Causes and Solutions
39
Docking Problems
39
Tablet PC Orientation Problems
40
Multibay Device Problems
40
HP Compaq TR1105 Hardware Manual (37 pages)
Brand:
HP
| Category:
Tablet
| Size: 3.07 MB
Table of Contents
Table of Contents
3
External Components
10
Pen Components
10
Tablet PC Components
11
Front: Lights and Bluetooth
11
Front: Pen-Activated Buttons
12
Right Side: Power Switch and Power/Standby Light
13
Right Side: Windows Security and Display Toggle Buttons
14
Right Side: Esc, Tab and Q Menu Buttons
15
Right Side: Jog Dial and Antenna
16
Lower Side
17
Left Side: Attachment Slots and Keyboard Connector
18
Left Side: Security Cable Slot, Vent and Antenna
19
Top: Connectors and Jacks
20
Top: Pen Holder and LAN Connection Lights
21
Top: Card Slots, Buttons and Tether Eyelet
22
Back: Attachment Features and Hard Drive Bay
23
Back: Battery Bay
24
Back: Memory and Mini PCI Compartment
25
Back: Labels
26
Back: Tilt Feet and Pad Feet
27
Additional Tablet PC Standard Components
28
Documentation Cds
29
Cords and Cables
30
Adapters and Accessories
31
Tablet PC Keyboard Components
32
Front: Lights and Pointing Device
32
Front: Keys
33
Front: Positioning and Security Features
34
Top
35
Back
36
Additional Keyboard Standard Component
37
Advertisement
Related Products
HP THUNDERBOLT DOCK G4
HP Compaq Presario,Presario 2500
HP Tr3000 - Rugged Tablet PC
Hp TR3271
HP Tx1210us - Pavilion - Turion 64 X2 1.9 GHz
HP TouchSmart tm2-2200
HP Pavilion t370
HP T5537A
HP TeemTalk 5.0
HP ThinkPad Dock II
HP Categories
Desktop
Laptop
Server
Monitor
Switch
More HP Manuals
Login
Sign In
OR
Sign in with Facebook
Sign in with Google
Upload manual
Upload from disk
Upload from URL