Xerox Color C60 User Manual
Hide thumbs
Also See for Color C60:
- Installation manual (34 pages) ,
- Quick use manual (3 pages) ,
- Quick manual (1 page)
Table of Contents
Advertisement
Advertisement
Table of Contents
Troubleshooting

Subscribe to Our Youtube Channel
Related Manuals for Xerox Color C60


Summary of Contents for Xerox Color C60
-
Page 1: User Guide
Software Version 1.0 ® Xerox Color C60/C70 Printer User Guide... - Page 2 SquareFold , CentreWare , Scan to PC Desktop , and Xerox Extensible Interface Platform are trademarks of Xerox Corporation in the United States and/or other countries. Product status, build status, and/or specifications are subject to change without notice. Microsoft ®...
-
Page 3: Table Of Contents
Control Panel......................2-5 Internal Components....................2-6 Paper Trays........................2-7 Paper Trays 1 and 2..................2-7 Paper Trays 3 and 4..................2-7 Bypass Tray (Tray 5).................2-7 Offset Catch Tray..................2-7 Telephone and Fax Connection Option............2-8 Standard Features.......................2-8 Energy Saver Mode......................2-9 Xerox ® Color C60/C70 Printer User Guide... - Page 4 Turning Off the Printer.......................3-6 General Power Off....................3-6 Turning Off Main Power..................3-6 Assigning a Network Address..................3-8 Using CentreWare Internet Services................3-8 Finding the Printer's IP Address...............3-8 Accessing CentreWare Internet Services............3-9 4 Loading Media...................4-1 Accepted Media........................4-1 Xerox ® Color C60/C70 Printer User Guide...
- Page 5 5 Printing......................5-1 Printing Overview.........................5-1 Saving a Set of Commonly Used Printing Options in Windows......5-1 Saving a Set of Commonly Used Printing Options for Macintosh....5-2 Xerox® Services for UNIX® Systems (XSUS)............5-2 Launching XSUS........................5-3 Printing from Linux......................5-3 Launching Xerox Printer Manager..............5-3 Printing from a Linux Workstation..............5-3 Printing Features........................5-4...
- Page 6 2-Sided Book Copying................6-11 Specifying the Original Size..............6-12 Erasing the Edges of a Copy...............6-12 Shifting the Image.................6-12 Rotating the Image................6-13 Inverting the Image................6-13 Output Format Adjustments................6-14 Creating Booklets...................6-14 Including Covers..................6-15 Page Layout....................6-16 Creating Posters..................6-16 Xerox ® Color C60/C70 Printer User Guide...
- Page 7 Setting Email Options..................7-10 Scanning to a Computer....................7-11 Scanning to a Home Directory..................7-11 Storing to a USB Flash Drive..................7-12 Setting Scan Options.......................7-13 Scan Settings......................7-13 Additional Scanning Options................7-13 Advanced Settings....................7-13 Layout Adjustment....................7-14 Filing Options/E-mail Options.................7-14 Xerox ® Color C60/C70 Printer User Guide...
- Page 8 Using Chain Dial....................8-11 Creating Fax Comments....................8-12 9 Maintenance....................9-1 General Precautions......................9-1 Locating the Serial Number.....................9-2 Billing and Usage Information..................9-2 Cleaning the Printer......................9-3 Cleaning the Document Glass and Document Cover.......9-3 Cleaning the Exterior.....................9-4 Ordering Supplies.........................9-4 Consumables......................9-4 Xerox ® Color C60/C70 Printer User Guide...
- Page 9 Clearing Jams at 2e in the C/Z Folder..........10-10 Clearing Jams at 2f in the C/Z Folder..........10-11 Clearing Jams at 2g in the C/Z Folder.........10-13 Minimizing Paper Jams....................10-14 Print Quality Problems....................10-15 Copy and Scan Problems.....................10-15 Fax Problems........................10-16 Problems Sending Faxes.................10-16 Xerox ® Color C60/C70 Printer User Guide...
- Page 10 Clearing Jams in the Booklet Tray..............12-12 13 Standard/Booklet Maker Finisher..........13-1 Standard/Booklet Maker Finisher Components............13-2 Manual Decurling Feature on the Finisher..........13-4 Folding Feature.....................13-5 Fold Types........................13-5 Loading Paper/Tabs in Tray T1 (Post-Process Inserter)........13-5 Maintenance........................13-7 Standard/Booklet Maker Consumable Supplies........13-7 viii Xerox ® Color C60/C70 Printer User Guide...
- Page 11 Standard/Booklet Maker Finisher Specifications........13-43 Optional C/Z Folder Specifications.............13-44 14 SquareFold Trimmer Module............14-1 Overview..........................14-1 Identifying the Components..................14-3 Main Components....................14-3 Paper Path.......................14-4 Control Panel......................14-5 Square Fold Feature......................14-6 Square Fold Options....................14-6 Trimmer Feature........................14-7 Trimmer Options....................14-8 Trim Guidelines.....................14-9 Xerox ® Color C60/C70 Printer User Guide...
- Page 12 Eurasian Economic Community Certification...........15-5 Ozone Release.......................15-5 Wireless Compliance...................15-6 Labeling Requirements.................15-6 Copy Regulations.......................15-6 United States......................15-6 Canada........................15-8 Other Countries.....................15-9 Fax Regulations.......................15-10 United States......................15-10 Fax Send Header Requirements.............15-10 Data Coupler Information..............15-10 Canada........................15-11 Canada CS 03 Issue 9...............15-12 European Union....................15-12 Xerox ® Color C60/C70 Printer User Guide...
- Page 13 North America........................16-1 European Union.........................16-1 Domestic/Household Environment...............16-2 Professional/Business Environment..............16-2 Collection and Disposal of Equipment and Batteries......16-2 Business Users in the European Union..........16-3 Disposal Outside of the European Union........16-3 Battery Symbol.....................16-3 Battery Removal....................16-3 Other Countries........................16-3 Xerox ® Color C60/C70 Printer User Guide...
- Page 14 Table of Contents Xerox ® Color C60/C70 Printer User Guide...
-
Page 15: Safety
Safety Your printer and the recommended supplies have been designed and tested to meet strict safety requirements. Attention to the following information ensures the continued safe operation of your Xerox ® printer. Warning Symbols Symbol Description WARNING or CAUTION: Ignoring this warning could cause serious injury or even death. -
Page 16: Emergency Turn Off
Warning Unauthorized alterations, which can include the addition of new functions or connection ® of external devices, can affect the product certification. For details, contact your Xerox representative. Emergency Turn Off If any of the following conditions occur, turn off the printer immediately and disconnect the power cord from the electrical outlet. -
Page 17: Electrical Safety
® materials only. Warning Unauthorized alterations, which can include the addition of new functions or connection of external devices, can affect the product certification. For details, contact your Xerox ® representative. Electrical Supply The electrical supply for the device must meet the requirements stated on the data plate on the rear of the device. -
Page 18: Power Cord Safety Information
The power cord is attached to the printer as a plug-in device on the back of the printer. If it is necessary to disconnect all electrical power from the printer, disconnect the power cord from the electrical outlet. For details, see Turning Off the Printer. Xerox ® Color C60/C70 Printer User Guide... -
Page 19: Operational Safety
• Covers, which require tools for removal, protect the hazard areas within the printer. Do not remove the protective covers. • Ensure that the rear right cover is attached. Open this cover when connecting an interface cable. Xerox ® Color C60/C70 Printer User Guide... -
Page 20: Consumable Information
Use of non-Xerox supplies is not recommended. The Xerox Warranty, Service Agreement, and Total Satisfaction Guarantee do not cover damage, malfunction, or degradation of performance caused by use of non-Xerox supplies, or the use of Xerox supplies not specified for this printer. The Total Satisfaction Guarantee is available in the United States and Canada. -
Page 21: Maintenance Safety
® • Always exercise care when moving or relocating your printer. Contact your Xerox representative to arrange the relocation of your printer. • Never throw toner, print/drum cartridges, or toner containers into an open flame. -
Page 22: Printer Symbols
Moving parts. To avoid personal injury, use caution. Environmental, Health, and Safety Contact Information For more information on Environment, Health, and Safety in relation to this Xerox product and supplies, contact the following customer help lines: United States and Canada:... -
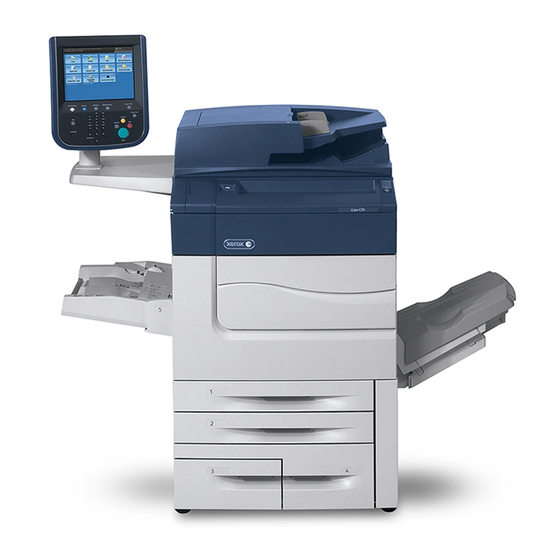
Page 23: Product Overview
• Printer Information • Consumables • Optional Accessories • Getting Additional Information Introduction The Xerox Color C60/C70 shown alone and configured with the following: 2-drawer OHCF, Vertical Transport, CZ-Folder, and Business Ready Finisher with Booket Maker. Xerox ® Color C60/C70 Printer... -
Page 24: Printer Configurations
Printer Configurations Printer Model/Configuration Description The Xerox Color 60 This printer model prints at speeds of up to 65 ppm for Black and white, and up to 60 ppm for color The Xerox Color 70 This printer model prints at speeds of up to 75 ppm for Black... -
Page 25: Right-Front View
4. Tray 5 (Bypass) 5. Paper Trays 1 - 4 6. Duplex Automatic Document Feeder 7. 5. Power On/Off Button 8. Front Cover 9. Main Power Switch (located behind front cover). See Internal Components. Xerox ® Color C60/C70 Printer User Guide... -
Page 26: Right-Rear View
Product Overview Right-Rear View 1. Output Tray 2. Power Cord 3. Ground Fault Interrupt Switch Duplex Automatic Document Feeder 1. Document Feeder Tray Xerox ® Color C60/C70 Printer User Guide... -
Page 27: Control Panel
Job Status. Displays job progress information on the touch screen. Machine Status. Displays the current status of the machine on the touch screen. Log In/Out. Provides password protected access to the System Administration menu used to adjust the defaults of the machine. Xerox ® Color C60/C70 Printer User Guide... -
Page 28: Internal Components
Language. Press to change the touch screen language and keyboard settings. Help. Access the Online Help system. Internal Components 1. Toner Cartridges 2. Drum Cartridges 3. Main Power Switch 4. Fuser Unit 5. Waste Toner Container Xerox ® Color C60/C70 Printer User Guide... -
Page 29: Paper Trays
The Offset Catch Tray (OCT) is an output tray that can hold up to 500 sheets of paper and allows each set or stack to be offset from the previous to enable easy separation. Xerox ® Color C60/C70 Printer User Guide... -
Page 30: Telephone And Fax Connection Option
• Copy, print, mobile print • Standard fax, Internet fax • Scan to PC, USB, or e-mail • Network Accounting • Single-pass, duplex automatic document feeder • 2400 x 2400 dpi resolution • Automatic 2-sided printing Xerox ® Color C60/C70 Printer User Guide... -
Page 31: Energy Saver Mode
Product Overview • Integrated scanner • Standard paper capacity (4 Trays and Bypass): 3,260 sheets • Color touch screen on integrated Control Panel • Xerox Extensible Interface Platform ® to connect to third-party software from the touch screen • Foreign Device Interface •... -
Page 32: Toner Cartridges
6% area coverage. Optional Accessories Input Devices These optional input devices are compatible with your printer. High-Capacity Feeder The one-tray, high-capacity feeder (HCF) provides a 2,000 sheet, letter-size (A4) input feeding source (Tray 6). 2-10 Xerox ® Color C60/C70 Printer User Guide... -
Page 33: Oversized High-Capacity Feeder
500 sheets of paper. The Right Center Tray is used for offset and/or stapled output and can hold up to 1,500 sheets. Both trays can be used for hole punched output (optional). The Bottom Fin- isher Tray is used for receiving saddle-stapled booklets. Xerox ® Color C60/C70 Printer 2-11 User Guide... -
Page 34: Standard Finisher/Booklet Maker Finisher
25 sheets and from 8.5 x 11 in./A4 or 12 x 18 in./SRA3. The optional Folder is used for C-folding and Z-folding of 8.5 x 11 in./A4 output and 11 x 17 in./A3. 2-12 Xerox ® Color C60/C70 Printer User Guide... -
Page 35: Xerox® Squarefold® Trimmer
A follow-on finisher, such as the Standard Finisher, is necessary to gather punched output. For more information, go to www.xerox.com and select the GBC AdvancedPunch User Documentation. CZ Fold Unit The optional folder enables you to create publications featuring bi-fold, C-fold, Z-fold, and Engineering Z-fold. -
Page 36: Interface Module
- For the European Union: www.xerox.com/europaper • User Guide (PDF) Software and Documentation: www.xerox.com/support. Enter Xerox Color C60/C70 Printer in the Search or Choose field and select the desired documentation. • Online Support Assistant, driver downloads, and Technical support: www.xerox.com/Support •... -
Page 37: Installation And Setup
• Using CentreWare Internet Services Before Using the Printer Xerox Welcome Center If you need assistance during or after product installation, visit the Xerox website for online solutions and support: www.xerox.com/office/worldcontacts. If you require further assistance, contact our experts at the Xerox Welcome Center: •... -
Page 38: Installation And Setup Overview
Instructions for installing the print drivers, utilities, and setting up the network are provided in the System Administrator’s Guide. Locate the System Administrator Guide at www.xerox.com/support. Enter Xerox Color C60/C70 Printer in the Search or Choose field and select the desired documentation. -
Page 39: Turning On The Printer
• The Power On/Off Button, located on the right side of the top front panel. This is the power button you will use to turn the printer on and off as workflow requires. Xerox ® Color C60/C70 Printer User Guide... -
Page 40: Turning On Main Power
Do not turn main power off immediately after turning it on. Doing so may damage the printer's internal hard drive or cause a printer malfunction. To turn on the main printer power: 1. Open the front cover. Xerox ® Color C60/C70 Printer User Guide... -
Page 41: General Power On
Note The entire powering-up process (to power on and complete a self-test) takes approximately 3 minutes. Certain functions of the machine, such as copying, will be available before other functions, such as printing. Xerox ® Color C60/C70 Printer User Guide... -
Page 42: Turning Off The Printer
Caution Switch the main power off before unplugging the power cord. Unplugging the power cord with the main power on may damage the printer's internal hard drive or cause a printer malfunction. Xerox ® Color C60/C70 Printer User Guide... - Page 43 Saver button is blinking. This may cause damage to the printer's internal hard drive or cause a printer malfunction. To turn Off the Main Power Switch: 1. Open the front cover. 2. Press the Main Power Switch to the Off position. 3. Close the front cover. Xerox ® Color C60/C70 Printer User Guide...
-
Page 44: Assigning A Network Address
• TCP/IP and HTTP must be enabled in the printer. For details, refer to the System Administrator Guide at www.xerox.com/support. Enter Xerox Color C60/C70 Printer in the Search or Choose field and select the desired documentation. Finding the Printer's IP Address The printer's IP address is required to use CentreWare Internet Services. -
Page 45: Accessing Centreware Internet Services
1. Make sure the printer is connected correctly and switched on. 2. At your computer, open a Web browser. 3. Type the IP address of the printer in the Web browser's address field. The CentreWare Internet Services Welcome page appears. Xerox ® Color C60/C70 Printer User Guide... - Page 46 Installation and Setup 3-10 Xerox ® Color C60/C70 Printer User Guide...
-
Page 47: Loading Media
Your printer is designed to be used with a variety of media types. Follow the guidelines in this section to ensure the best print quality and to avoid jams. For best results, use Xerox printing media specified for your printer. Recommended Media A complete list of recommended media types is available at: •... -
Page 48: General Media Loading Guidelines
• Do not open sealed packages of glossy paper until you are ready to load them into the printer. • Store glossy paper flat in the original packaging. • Remove all other paper from the tray before loading glossy paper. Xerox ® Color C60/C70 Printer User Guide... -
Page 49: Media That Can Damage Your Printer
• Some specialty media is packaged inside resealable plastic bags. Store the media inside the bag until you are ready to use it. Keep unused media in the bag and reseal it for protection. Xerox ® Color C60/C70 Printer User Guide... -
Page 50: Paper Types/Weights Accepted In Trays
Hole Punched HW 1 (106-128 gsm) * Hole Punched HW 2 (177-220 gsm) Hole Punched HW 3 (221-256 gsm) Coated 1 (106 -128 gsm) * Coated 1 Reloaded (106-128 gsm) * Coated 2 (151-176 gsm) * Xerox ® Color C60/C70 Printer User Guide... -
Page 51: Tray Capabilities
• Tray 4 can hold up to 1140 sheets of 90 gsm paper. • Tray 4 can accommodate paper sizes including 8.5" x 11"/A4, 7.25" x 10.5", and B5. Loading Paper in Trays 1 - 4 To load paper: Xerox ® Color C60/C70 Printer User Guide... - Page 52 To secure the guides in position, release the levers. 4. Load the paper against the left-hand side of the tray. 5. Adjust the guides so they touch the edges of the stack. Xerox ® Color C60/C70 Printer User Guide...
-
Page 53: Loading Paper In Tray 5 (Bypass Tray)
3. Insert the paper either long-edge or short-edge first, face up. Larger paper sizes can only be fed short-edge first. Load punched paper with holes to the right. Load labels and transparencies face up with top edge towards the front of the tray. Xerox ® Color C60/C70 Printer User Guide... -
Page 54: Loading Envelopes In Tray 5 (Bypass Tray)
3. Choose the envelope size on the printer's touch screen, then touch Confirm. If the envelope size does not appear, touch Change Settings. Select HeavyWeight 2 as the Media Type and Custom Size. Use the +,- signs to enter the envelope size. Touch Save. Xerox ® Color C60/C70 Printer User Guide... -
Page 55: Loading Paper In The High Capacity Feeder
Caution Never use envelopes with windows or metal clasps; they can damage the printer. Damage caused by using unsupported envelopes is not covered under the Xerox warranty, service agreement, or Total Satisfaction Guarantee. The Total Satisfaction Guarantee is available in the United States and Canada. Coverage may vary outside these areas; please contact your local representative for details. -
Page 56: Loading Paper In The Oversized High Capacity Feeder
5. Push in the tray gently and completely. When the loaded tray is closed, the tray position is automatically adjusted in the front/back direction based on the paper size. A pop-up window may appear asking you to confirm the type and size of the stock. 4-10 Xerox ® Color C60/C70 Printer User Guide... -
Page 57: Loading Paper In The Post-Process Inserter
6. If required, choose paper size, type, or color on the printer's touch screen, then touch Confirm. 7. If you have not changed the media type, touch Cancel to retain the previous settings. Xerox ® Color C60/C70 Printer 4-11 User Guide... - Page 58 Loading Media 4-12 Xerox ® Color C60/C70 Printer User Guide...
-
Page 59: Printing
2. In your software application, click File, then Print. 3. Select your printer from the list. 4. Access the print driver settings by selecting Properties (Windows) or Xerox Features (Macintosh). The title of the button may vary depending on your application. -
Page 60: Saving A Set Of Commonly Used Printing Options For Macintosh
5. Type a name for the printing options, then click OK. 6. The set of options is saved and will appear in the Presets list. To print using these options, select the name from the list. Xerox® Services for UNIX® Systems (XSUS) ®... -
Page 61: Launching Xsus
You can also submit print requests through the command line using lp/lpr. ® To create a job ticket using the Xerox print driver: 1. Open the Xerox ®... -
Page 62: Printing Features
• Any die-cut specialty media, such as business cards • Extra Heavyweight • Heavyweight Gloss Printing a 2-Sided Document Options for automatic 2-Sided Printing are specified in the print driver. Application settings for portrait or landscape orientation are used. Xerox ® Color C60/C70 Printer User Guide... -
Page 63: Selecting The Paper To Use
The Color Correction options provide simulations of different color devices. Automatic is the recommended correction for general image processing. Different color reference models are supported and may vary based on your operating system and/or print driver type. Xerox ® Color C60/C70 Printer User Guide... -
Page 64: Booklets
• Use the applicable paper tray as the source for printing cover pages. Xerox ® Color C60/C70 Printer User Guide... -
Page 65: Insert Pages
1, 6, 9, 10, and 11, type: 1, 6, 9-11. • Paper: The Paper field displays the Use Job Settings default size, color, and type of paper to use for the exception pages. Xerox ® Color C60/C70 Printer User Guide... -
Page 66: Scaling
You can print custom size paper from Trays 1, 2, 3, 4 and 5 (Bypass Tray). Custom size paper settings are saved in the print driver and are available for you to select in all your applications. Xerox ® Color C60/C70 Printer User Guide... -
Page 67: Job Completion Notification
The option folds your prints in half (single or bifolding) or in thirds (C-fold or Z-fold types). The folding option is selected from the print driver. These fold types are available: • Single Fold (Bi-Fold) • C-Fold • Z-Fold • Z-Fold Half Sheet Xerox ® Color C60/C70 Printer User Guide... -
Page 68: Printing From A Usb Flash Drive
Media Card Reader. Note Ensure that a USB Flash Drive is not present in the USB port located on the left side of the top front panel. 5-10 Xerox ® Color C60/C70 Printer User Guide... -
Page 69: Copying
Cancel to cancel the job completely. 5. If desired, change the copy settings. For details, see Basic Settings. 6. Press the green Start button on the Control Panel. Xerox ® Color C60/C70 Printer User Guide... -
Page 70: Document Glass
• The document glass automatically detects standard paper sizes. Caution When scanning a bound document, do not attempt to force the document feeder cover closed. Doing so may damage the document feeder cover. Duplex Automatic Document Feeder Xerox ® Color C60/C70 Printer User Guide... -
Page 71: Basic Settings
• Color: This option copies in full color output using all four printing colors (cyan, magenta, yellow, and black). • Black and White: This option copies in black and white only. Colors in the original are converted to shades of gray. Xerox ® Color C60/C70 Printer User Guide... -
Page 72: Reducing Or Enlarging The Image
The printer automatically selects the paper tray to use for copying based on settings made by the System Administrator. To use a different paper type for copying on letterhead, colored paper, or different paper sizes, select the paper tray loaded with the desired paper. Xerox ® Color C60/C70 Printer User Guide... -
Page 73: Specifying 2-Sided Originals Or Copies
1, 2, 3, 4, 5, 6; 1, 2, 3, 4, 5, 6; 1, 2, 3, 4, 5, 6 To choose collated copies: 1. Touch Copy on the touch screen. 2. Touch Copy Output. 3. Touch Collated. Xerox ® Color C60/C70 Printer User Guide... -
Page 74: Uncollated Copies
The screen shows the location of the staple on the page. Note Stapling options are dependent upon paper feed orientation (short edge or long edge). If the desired stapling option is unavailable, touch Paper Supply, then choose the appropriate tray. Xerox ® Color C60/C70 Printer User Guide... -
Page 75: Hole Punching Copies
To specify the original type: 1. Touch Copy on the touch screen, then touch the Image Quality tab. 2. Touch Original Type. 3. In the Original Type window: Xerox ® Color C60/C70 Printer User Guide... -
Page 76: Adjusting The Darkness, Sharpness, And Saturation
Contrast is the difference between light and dark areas in an image. To reduce or increase the contrast of the copies: 1. Touch Copy on the Control Panel, then touch the Image Quality tab. 2. Touch Image Enhancement. Xerox ® Color C60/C70 Printer User Guide... -
Page 77: Selecting Color Effects
• To adjust the levels for highlights, midtones, and shadows, touch the pointer, then move it toward + or . 5. Touch Save. Adjusting the Color Shift If you have a color original, you can adjust the hue of the copy colors. Xerox ® Color C60/C70 Printer User Guide... -
Page 78: Adjusting The Gloss Level
You must use the document glass to make copies from books, magazines, or other bound documents. Do not place bound originals in the document feeder. 6-10 Xerox ® Color C60/C70 Printer User Guide... -
Page 79: 2-Sided Book Copying
3. To specify the copy start page and copy end page, touch Starting and Ending Page. • For Starting Page: touch Left Page or Right Page. • For Ending Page: touch Left Page or Right Page. Xerox ® Color C60/C70 Printer 6-11 User Guide... -
Page 80: Specifying The Original Size
Shifting the Image You can change the placement of the image on the copy page. This is useful if the image size is smaller than the page size. 6-12 Xerox ® Color C60/C70 Printer User Guide... -
Page 81: Rotating The Image
Originals can be printed as mirror images; this reflects each image left to right on the page. Originals can be printed as negative images; the positive image is printed as a negative. Xerox ® Color C60/C70 Printer 6-13 User Guide... -
Page 82: Output Format Adjustments
Touch Binding Shift, then touch the plus or minus (+/-) buttons to set the shift. Touch Save. 6. To add covers, touch Covers, then touch Blank Cover, Print on Both or 1-Sided Covers Print Outside. 6-14 Xerox ® Color C60/C70 Printer User Guide... -
Page 83: Including Covers
Side 2, or Print on Both. Touch the tray to use for the covers, then touch the tray to use for the main body. 5. To include only a front cover or only a back cover: Xerox ® Color C60/C70 Printer 6-15 User Guide... -
Page 84: Page Layout
3. Touch Output Size, then touch the desired size of the poster. 4. To select the width and length enlargement percentages independently, touch Enlargement %, then touch the plus or minus buttons. To set the width and length proportionally, touch Lock X-Y%. 6-16 Xerox ® Color C60/C70 Printer User Guide... -
Page 85: Adding Annotations
2. Touch an existing stored prefix to use for the Bates Stamp. To create a new prefix, touch an Available prefix, then touch Edit. Using the touch screen keyboard, enter the new prefix, then touch Save. Xerox ® Color C60/C70 Printer 6-17 User Guide... -
Page 86: Adding Watermarks
8. The watermark image is faint so the content of the page can be seen. To make the watermark visible on copies used as originals, touch Watermark Effect, then touch Embossed or Outline, then touch Save. 9. Touch Save. 6-18 Xerox ® Color C60/C70 Printer User Guide... -
Page 87: Id Card Copy
Shift Value arrow keys on the touch screen. For both shift options, you can specify the Tab Stock Size and Tab Stock Type using the buttons on the touch screen. 4. Touch Save. Xerox ® Color C60/C70 Printer 6-19 User Guide... -
Page 88: Advanced Copying
Off: the first page of the next segment prints on the next available side. On: the first page of the next segment prints on Side 1 of a new sheet of paper. 6-20 Xerox ® Color C60/C70 Printer User Guide... - Page 89 Touch Save. • Watermarks: (See Adding Watermarks.) Select settings, then touch Save. • Face Up/Down Output: Select the desired orientation then touch Save. 3. Touch Save. Xerox ® Color C60/C70 Printer 6-21 User Guide...
-
Page 90: Printing A Sample Copy
• In the Copy screen, touch Next Original. • Touch Start on the touch screen, or press the green Start button on the Control Panel. Copying continues. 7. For each additional set, repeat Step 6. 6-22 Xerox ® Color C60/C70 Printer User Guide... -
Page 91: Delete Outside/Delete Inside
To save the current copy settings: 1. On the touch screen, touch Copy. 2. Touch the Job Assembly tab, then touch Stored Programming. 3. Using the touch screen keyboard, enter a name for the saved settings. Xerox ® Color C60/C70 Printer 6-23 User Guide... -
Page 92: Folding
Depending on your overall printer configuration, you can also specify stapling, covers, and collation options on the Folding page. Note To create booklets with booklet formatting, use the Booklet Creation feature. Folding does not apply the same characteristics to the page. 6-24 Xerox ® Color C60/C70 Printer User Guide... -
Page 93: Scanning
• Scanning to a Computer • Scanning to a Home Directory • Storing to a USB Flash Drive • Setting Scan Options • Using the Xerox Scan Utility Scanning Overview Note Scanning must be enabled before use. For details, see the System Administrator Guide. -
Page 94: Loading Original Documents
• Email address • Windows computer • Home directory • USB Flash Drive • Computer using Xerox Scan Utility • Application using TWAIN or WIA Note Print, copy, and fax jobs can print while you are scanning original documents or downloading files from the printer’s hard drive. -
Page 95: Duplex Automatic Document Feeder
3. On the touch screen, touch Store to Folder. 4. Touch the desired folder. If a password is required, enter the password using the alphanumeric keypad, then touch Confirm on the touch screen. Xerox ® Color C60/C70 Printer User Guide... -
Page 96: Printing Stored Files At The Printer
Rotating the preview does not rotate the printed output. 4. When finished, touch Close. To view a summary of file information: 1. While in the Send from Folder view, touch the desired file in the file list. 2. Touch Review. Xerox ® Color C60/C70 Printer User Guide... -
Page 97: Using Job Flow Sheets
Note If Send from Folder is not enabled, contact your System Administrator. For details, refer to the System Administrator Guide at www.xerox.com/support. Enter Xerox Color C60/C70 Printer in the Search or Choose field and select the desired documentation. Using Job Flow Sheets Job Flow Sheets allow you to execute a series of registered actions, such as Send as Fax or Print, for a file stored in a folder. -
Page 98: Retrieving Scanned Files To Your Computer Using Centreware Internet Services
Add Thumbnail. 3. To apply MRC High Compression to PDF and XPS format files, select the Enabled check box next to MRC High Compression. Select the desired quality from the Quality drop-down list. Xerox ® Color C60/C70 Printer User Guide... -
Page 99: Creating A Folder
4. In the Scan navigation pane at the left of the page, click Folder. 5. In the Folder list, click Create next to an Available folder. Note If necessary, scroll the page to see available folders. Xerox ® Color C60/C70 Printer User Guide... -
Page 100: Deleting A Folder
If the folder contains files, they must be deleted before the folder can be deleted. 6. Click OK to confirm that you want to delete the folder. If required, enter the folder password, then click Apply. Xerox ® Color C60/C70 Printer User Guide... -
Page 101: Scanning To A Network File Repository
1. Load the original on the document glass or in the document feeder. 2. On the Control Panel, press the Services Home button. 3. Touch E-Mail. 4. Specify the recipient using one of these methods: Xerox ® Color C60/C70 Printer User Guide... -
Page 102: Setting Email Options
To request a read receipt: 1. On the printer Control Panel, press the Services Home button. 2. Touch E-Mail, then touch the E-mail Options tab. 3. Touch Read Receipts, then touch On. 4. Touch Save. 7-10 Xerox ® Color C60/C70 Printer User Guide... -
Page 103: Scanning To A Computer
5. The template defines the scan settings as well as the destination of the image. To change any of the scan settings, touch the four menus at the bottom of the touch Xerox ® Color C60/C70 Printer 7-11 User Guide... -
Page 104: Storing To A Usb Flash Drive
Printing from a USB Flash Drive. Caution Do not remove the USB Flash Drive while a file is being stored. Damage to stored files may occur. Remove the USB Flash Drive before turning the printer off. 7-12 Xerox ® Color C60/C70 Printer User Guide... -
Page 105: Setting Scan Options
Resolution, File Size, Photographs, and Shadow Suppression. To use Advanced Settings: 1. On the printer Control Panel, press Services Home. 2. Touch the desired scan method. 3. Touch the Advanced Settings tab. Xerox ® Color C60/C70 Printer 7-13 User Guide... -
Page 106: Layout Adjustment
Using the plus or minus buttons, enter the value. Filing Options/E-mail Options Filing Options/E-mail Options provide additional settings for naming images, choosing image formats, adding meta data, and behavior if a file name already exists. To use Filing Options: 7-14 Xerox ® Color C60/C70 Printer User Guide... - Page 107 Choose from: Do Not Save, Rename New File, Overwrite Existing File, Add to Existing Folder, or AddDateStamp to File Name. Login Name Enter Login Name if required. Password Enter password if required. Xerox ® Color C60/C70 Printer 7-15 User Guide...
- Page 108 Scanning 7-16 Xerox ® Color C60/C70 Printer User Guide...
-
Page 109: Faxing
• Faxing from your Computer: Using the settings in the print driver, the current print job is sent as a fax. Note Fax capability must be enabled by the System Administrator before use. For details, see the System Administrator Guide. Xerox ® Color C60/C70 Printer User Guide... -
Page 110: Loading Original Documents
When scanning a bound document, do not attempt to force the document feeder cover closed. Doing so may damage the document feeder cover. Duplex Automatic Document Feeder Insert originals face up. Adjust the paper guides so they fit against the originals. Xerox ® Color C60/C70 Printer User Guide... -
Page 111: Sending A Fax
Chain Dial can be performed when viewing the list of individual addresses in the Address Book. For details, see Using Chain Dial. 6. To include a cover page: Touch Cover Page, then touch Print Cover Page. Xerox ® Color C60/C70 Printer User Guide... -
Page 112: Server Fax
4. Enter the number using the alphanumeric keypad, then touch Add. 5. Touch New Recipients, enter the number using the touch screen keyboard, touch Add, then touch Close. 6. To use a number previously stored in the Address Book: Touch Address Book. Xerox ® Color C60/C70 Printer User Guide... -
Page 113: Sending An Internet Fax
The Internet Fax service must be enabled before use, and an SMTP server must be configured. For details, refer to the System Administrator Guide at www.xerox.com/support. Enter Xerox Color C60/C70 Printer in the Search or Choose field and select the desired documentation. -
Page 114: Receiving Faxes
Faxing 2. Select your printer from the list. 3. Access the print driver settings by selecting Properties or Preferences (Windows), or Xerox Features for Macintosh. The title of the button may vary depending on your application. 4. Select printer features. -
Page 115: Setting The Fax Resolution
• Mixed Size Originals, for scanning originals of different standard sizes. 4. Touch Save. Book Faxing 1. Touch Fax on the touch screen. 2. Touch the Layout Adjustment tab, then touch Book Faxing. 3. Touch one of the following options: • Off (Default). Xerox ® Color C60/C70 Printer User Guide... -
Page 116: Reduce/Enlarge
Send to Folder: Off/On, Folder Number, Folder Passcode (enables sending a file directly to a folder on a remote fax machine by setting the Folder Number and Folder Passcode using the alphanumeric keypad) Xerox ® Color C60/C70 Printer User Guide... -
Page 117: More Fax Options
TIFF-S: use for A4, 210 x 297mm (8.5 x 11 in.) originals with Standard or Fine Resolution TIFF-F or TIFF-J: use for A3, 297x420mm (11 x 17 in.) originals with Superfine Resolution Pages per Side Off, On (touch plus or minus buttons to set quantity) Xerox ® Color C60/C70 Printer User Guide... -
Page 118: Adding Address Book Entries
Note Address Book entries can also be managed in CentreWare Internet Services. For details, refer to the System Administrator Guide at www.xerox.com/support. Enter Xerox Color C60/C70 Printer in the Search or Choose field and select the desired documentation. Adding an Individual Address 1. -
Page 119: Deleting A Group
6. Touch Add. The numbers are added together in the Recipient List. 7. Touch Save. The combined number appears as a single recipient in the Recipient(s) list. 8. Touch Close. The fax can now be sent. Xerox ® Color C60/C70 Printer 8-11 User Guide... -
Page 120: Creating Fax Comments
4. On the next screen, touch an (available) comment in the scrolling list. 5. Enter the comment using the touch screen keyboard, then touch Save. 6. Touch Close. The comment is ready to use. 8-12 Xerox ® Color C60/C70 Printer User Guide... -
Page 121: Maintenance
Do not use pressurized air spray cleaning aids on or in the printer. Some pressurized air spray containers contain explosive mixtures and are not suitable for use in electrical applications. Use of such cleaners can result in a risk of explosion and fire. Xerox ® Color C60/C70 Printer User Guide... -
Page 122: Locating The Serial Number
• Make sure any parts removed during cleaning are replaced before you plug in the printer. Locating the Serial Number When ordering supplies or contacting Xerox for assistance, you will be asked to provide the printer's serial number. View the printer serial number from the printer's touch screen: 1. -
Page 123: Cleaning The Printer
Use a lint-free cloth lightly dampened with Xerox Anti-Static or another suitable non-abrasive glass cleaner to clean the document glass and the CVT glass to its left. Use a lint-free cloth, Xerox Cleaning Fluid or Xerox Film Remover to clean the under side of the document cover and the document feeder. -
Page 124: Cleaning The Exterior
Use of toner other than Genuine Xerox Toner may affect print quality and printer reliability. It is the only toner designed and manufactured under strict quality controls by Xerox for specific use with this printer. Xerox ® Color C60/C70 Printer... -
Page 125: When To Order Supplies
Use of non-Xerox supplies is not recommended. The Xerox Warranty, Service Agreements, and Total Satisfaction Guarantee do not cover damage, malfunction, or degradation of performance caused by use of non-Xerox supplies, or the use of Xerox supplies not specified for this printer. The Total Satisfaction Guarantee is available in the United States and Canada. - Page 126 6. Gently tilt the new cartridge up and down, and then left and right to redistribute the toner. 7. Install the toner cartridge by aligning the arrows on the cartridge evenly with the printer until you hear a click. Xerox ® Color C60/C70 Printer User Guide...
-
Page 127: Replacing The Fuser
Warning To avoid burns wait at least 5-10 minutes after powering off the printer to allow the fuser to cool down, and observe warning labels inside. 3. Carefully pull out the Transfer Module. Xerox ® Color C60/C70 Printer User Guide... - Page 128 7. Insert the new Fuser into the Transfer module while holding the Amber-Gold handle. 8. Close the Transfer module. 9. Turn Handle #2 to the locked position. 10. Close the Front Door of the printer. Xerox ® Color C60/C70 Printer User Guide...
-
Page 129: Replacing The Waste Toner Container
Use a broom or a cloth moistened with a neutral detergent. 5. Hold the used waste toner container firmly with both hands and put it into the provided plastic bag. Xerox ® Color C60/C70 Printer User Guide... -
Page 130: Replacing The Drum Cartridges
2. Make sure the machine has stopped running, and open the Front Door. 3. Pull down the R1-R4 handle. 4. Raise the Release Handle. 5. Open a bag including a new drum cartridge. Place the new drum cartridge near the machine. 9-10 Xerox ® Color C60/C70 Printer User Guide... - Page 131 7. Open the Drum Drawer. 8. Remove the old drum cartridge by holding the finger rings provided at the both ends of the drum cartridge and gently lifting up. Xerox ® Color C60/C70 Printer 9-11 User Guide...
-
Page 132: Replacing The Charge Corotron
13. Return the R1-R4 handle to the original position and close the front door. 14. Insert the used drum cartridge into an empty container for recycling. Replacing the Charge Corotron 1. Make sure the machine has stopped running, and open the Front Door. 9-12 Xerox ® Color C60/C70 Printer User Guide... - Page 133 10. Push in the Drum Drawer completely. Return the Release Handle to its original position. 11. Return the R1-R4 handle to the original position and close the front door. 12. Insert the used Charge Corotron into an empty container for recycling. Xerox ® Color C60/C70 Printer 9-13 User Guide...
-
Page 134: Recycling Supplies
Maintenance Recycling Supplies For information on Xerox supplies recycling programs, go to www.xerox.com/gwa. Some routine maintenance items come with a prepaid return label. Please use it to return used components in their original boxes for recycling. 9-14 Xerox ® Color C60/C70 Printer... -
Page 135: Troubleshooting
To see a list of the fault messages that have been displayed on the printer: 1. Press the Machine Status button. 2. On the touch screen, touch the Faults tab. 3. Touch Current Faults, Current Messages, or Fault History. 4. Touch Close. Xerox ® Color C60/C70 Printer 10-1 User Guide... -
Page 136: General Troubleshooting
Control Panel. The printer is in power saving mode. It takes time for printing to start in power saving mode. The job is very complex. Wait. No action needed. 10-2 Xerox ® Color C60/C70 Printer User Guide... -
Page 137: Printer Resets Or Turns Off Frequently
Troubleshooting Paper Jams The printer is designed to function with minimal paper jams using Xerox-accepted media types only. Other media types may cause more frequent paper jams. If accepted media is jamming frequently in one area, that area may need to be cleaned or repaired. -
Page 138: Paper Jam Message Stays On
Probable Causes Solutions Unaccepted media of the wrong size, Do not use unaccepted media. Use only Xerox-ap- thickness, or type is in use. proved media. For details, see Accepted Media. Recheck the paper path inside the module and re- move all jammed paper. -
Page 139: Clearing Paper Jams
3. If the paper is torn, remove the tray completely and check inside the printer for torn pieces of paper. 4. Reload the tray with undamaged paper, then push the tray in until it stops. 5. On the printer touch screen, touch Confirm. Xerox ® Color C60/C70 Printer 10-5 User Guide... -
Page 140: Clearing Paper Jams From Tray 5 (Bypass Tray)
Also, clear any jammed sheets from the Bypass (Tray 5) feeder. Then, open the Front Cover. 2. Turn Handle 2 to the right until it is in the horizontal position, then pull out the Transfer Module. 10-6 Xerox ® Color C60/C70 Printer User Guide... -
Page 141: Clearing Jams In The C/Z Folder
Clearing Jams at 2a in the C/Z Folder To clear jams at 2a in the C/Z Folder: 1. Open the front door of the C/Z Folder. 2. Lift up green handle 2a. Xerox ® Color C60/C70 Printer 10-7 User Guide... -
Page 142: Clearing Jams At 2B In The C/Z Folder
4. Return green handle 2a to its original position. 5. Close the front door of the C/Z Folder. Clearing Jams at 2b in the C/Z Folder To clear jams at 2b in the C/Z Folder: 10-8 Xerox ® Color C60/C70 Printer User Guide... - Page 143 2. Move green lever 2b to the left. 3. Carefully remove the paper. Note If the paper is torn, remove all torn pieces from the folder. 4. Return lever 2b to its original position. Xerox ® Color C60/C70 Printer 10-9 User Guide...
-
Page 144: Clearing Jams At 2E In The C/Z Folder
To clear jams at 2e in the C/Z Folder: 1. To access lever 2e, open the front door of the C/Z Folder and then open the Folder tray 2d. 2. Move green lever 2e to the right. 10-10 Xerox ® Color C60/C70 Printer User Guide... -
Page 145: Clearing Jams At 2F In The C/Z Folder
5. Close the Folder tray, and then close the front door of the C/Z Folder. Clearing Jams at 2f in the C/Z Folder To clear jams at 2f in the C/Z Folder: Xerox ® Color C60/C70 Printer 10-11 User Guide... - Page 146 2. Move green lever 2f to the right. 3. Carefully remove the paper. Note If the paper is torn, remove all torn pieces from the folder. 4. Return green lever 2f to its original position. 10-12 Xerox ® Color C60/C70 Printer User Guide...
-
Page 147: Clearing Jams At 2G In The C/Z Folder
Clearing Jams at 2g in the C/Z Folder To clear jams at 2g in the C/Z Folder: 1. Open the front door of the C/Z Folder: 2. Move green lever 2g to the right. 3. Carefully remove the paper. Xerox ® Color C60/C70 Printer 10-13 User Guide... -
Page 148: Minimizing Paper Jams
4. Return green lever 2g to its original position. 5. Close the front door of the C/Z Folder. Minimizing Paper Jams The printer is designed to function with minimal paper jams using Xerox supported paper. Other paper types can cause jams. Adhere to the following: •... -
Page 149: Print Quality Problems
Print Quality Problems Caution The Xerox Warranty, Service Agreement, or Total Satisfaction Guarantee does not cover damage caused by using unsupported paper or specialty media. The Total Satisfaction Guarantee is available in the United States and Canada. Coverage may vary outside these areas;... -
Page 150: Fax Problems
The document is scanned The document feeder guides Adjust the document feeder guides at an angle. are not adjusted to the width to fit the width of the document. of the document. 10-16 Xerox ® Color C60/C70 Printer User Guide... -
Page 151: Problems Receiving Faxes
The printer will not answer if memory is low. De- lete stored documents and jobs and wait for the existing job to complete. This will increase avail- able memory. Xerox ® Color C60/C70 Printer 10-17 User Guide... -
Page 152: Getting Help
Getting Help Control Panel Messages Xerox provides several automatic diagnostic tools to help you produce and maintain print quality. The control panel provides you with information and troubleshooting help. When an error or warning condition occurs, the control panel touch screen displays a message informing you of the problem. -
Page 153: Web Resources
To access the Online Support Assistant, go to printer includes online Technical Support, www.support.xerox.com/support and enter Xerox Recommended Media List, Online Sup- Color C60/C70 in the Search or Choose field. port Assistant, driver downloads, docu- mentation, and more. Supplies for the printer http://www.xerox.com/printer-supplies/enus.html A resource for tools and information, www.xerox.com/office/businessresourcecenter... - Page 154 Troubleshooting 10-20 Xerox ® Color C60/C70 Printer User Guide...
-
Page 155: Printer Specifications
61.96 in 1573.8 mm Depth 32 in 804 mm Height to top of Document Feeder 45.43 in 1153.9 mm Height to top of Control Panel 54.72 1390 mm Weight 544 lb 247 kg Xerox ® Color C60/C70 Printer 11-1 User Guide... -
Page 156: Base Unit, High Capacity Feeder, Interface Module, And Standard Finisher
• 110 - 127 VAC +10/-6 % • Power Consumption 1.936 kVA or less • Frequency 50/60 (Hz) +/- 3% • Receptacle NEMA Number 5-20R • Cycles 60 Hz For Europe: • 220-240 VAC +/- 10% 11-2 Xerox ® Color C60/C70 Printer User Guide... -
Page 157: Performance Specifications
Maximum Resolution: 600x600 dpi Print Speed Maximum print speeds vary by printer model and whether you are printing color pages or black and white pages. Xerox Color C60: • Color: 60 ppm • Black and White: 65 ppm Xerox Color C70: •... - Page 158 Printer Specifications 11-4 Xerox ® Color C60/C70 Printer User Guide...
-
Page 159: Business Ready Finisher And Booklet Maker
The Business Ready finisher adds several professional-level finishing options to your printer while requiring minimal additional space to do so. The finisher is available with or without an optional booklet maker. Business Ready Finisher Business Ready Finisher with Booklet Maker Xerox ® Color C60/C70 Printer 12-1 User Guide... -
Page 160: Identifying The Components
• Emptying the Hole Punch Waste Container Replacing Staples in the Main Stapler Unit To replace staples in the main stapler unit: 1. Open the front door of the Business Ready finisher. 12-2 Xerox ® Color C60/C70 Printer User Guide... - Page 161 4. Pinch both sides of the staple refill (1)and remove it from the cartridge (2). 5. Insert the front side of the new staple refill into the staple cartridge (1), then push the rear side into the cartridge (2). Xerox ® Color C60/C70 Printer 12-3 User Guide...
-
Page 162: Replacing Staples In The Booklet Maker Component
3. To remove the staple cartridge from the booklet maker, push down on the staple cartridge handle as shown, then pull the cartridge out and up. 4. Turn the staple cartridge over. 12-4 Xerox ® Color C60/C70 Printer User Guide... -
Page 163: Emptying The Hole Punch Waste Container
2. Remove the hole punch waste container from its slot near the top left of the finisher. • Wait 10 seconds before reinserting the container into the printer. The hole punch counter resets after 10 seconds. Xerox ® Color C60/C70 Printer 12-5 User Guide... - Page 164 3. Empty the container. 4. Insert the container all the way into the finisher. 5. Close the front door of the Business Ready finisher. 12-6 Xerox ® Color C60/C70 Printer User Guide...
-
Page 165: Troubleshooting
2. Open the front door of the Business Ready finisher. 3. Lift green handle 3a. 4. Carefully remove the paper. • If the paper is torn, remove all torn pieces from the finisher. Xerox ® Color C60/C70 Printer 12-7 User Guide... -
Page 166: Clearing Jams In The Finisher At Position 3C
Clearing Jams in the Finisher at Position 3c To clear jams at position 3c: 1. Open the front door of the Business Ready finisher. 2. Move green lever 3c to the left. 12-8 Xerox ® Color C60/C70 Printer User Guide... -
Page 167: Clearing Jams In The Finisher At Position 3D
4. Return green lever 3c to its original position. 5. Close the front door of the Business Ready finisher. Clearing Jams in the Finisher at Position 3d To clear jams at position 3d: Xerox ® Color C60/C70 Printer 12-9 User Guide... - Page 168 1. Open the front door of the finisher, and locate green lever 3d. 2. Move green lever 3d to the right. 3. Carefully remove the paper. Note If the paper is torn, remove all pieces from the finisher. 12-10 Xerox ® Color C60/C70 Printer User Guide...
-
Page 169: Clearing Jams In The Finisher At Position 4
1. Open the front door of the Business Ready finisher. 2. Using the green handle, pull out unit 4until it stops. 3. To remove the jammed paper, turn green knob 4 in either direction as shown. Xerox ® Color C60/C70 Printer 12-11 User Guide... -
Page 170: Clearing Jams In The Booklet Tray
Clearing Jams in the Booklet Tray To clear jams in the booklet tray: 1. Open the front door of the Business Ready finisher. 2. To release the jammed paper, turn green knob 4 in the direction shown. 12-12 Xerox ® Color C60/C70 Printer User Guide... - Page 171 3. To remove the paper, pull it in the direction shown. Note If the paper is torn, remove all torn pieces from the finisher. 4. Close the front door of the Business Ready finisher. Xerox ® Color C60/C70 Printer 12-13 User Guide...
- Page 172 Business Ready Finisher and Booklet Maker 12-14 Xerox ® Color C60/C70 Printer User Guide...
-
Page 173: Standard/Booklet Maker Finisher
Standard/Booklet Maker Finisher This chapter includes: • Standard/Booklet Maker Finisher Components • Loading Paper/Tabs in Tray T1 (Post-Process Inserter) • Maintenance • Finisher Problem Solving • Specifications Xerox ® Color C60/C70 Printer 13-1 User Guide... -
Page 174: Standard/Booklet Maker Finisher Components
2. The Standard or Booklet Maker Finisher (above illustration shows the Booklet Maker Finisher) Note The Standard Finisher or Booklet Maker Finisher may be referred to simply as the Finisher. The Standard/Booklet Maker finisher is comprised of the following components: 13-2 Xerox ® Color C60/C70 Printer User Guide... - Page 175 (This tray is also known as the Interposer). • Tray T1 holds a maximum of 200 sheets when using 20 lb./75 gsm paper. • Paper can be loaded in the LEF or SEF direction. Xerox ® Color C60/C70 Printer 13-3 User Guide...
-
Page 176: Manual Decurling Feature On The Finisher
The button should be set to Auto for most situations. The button automatically switches to the Auto mode when: The machine is switched on The machine exits the Energy Saver mode 13-4 Xerox ® Color C60/C70 Printer User Guide... -
Page 177: Folding Feature
(Post-Process Inserter) 1. If necessary, remove any remaining media that is currently loaded in Tray T1. 2. Hold the center of the paper guides and slide them to their desired paper size. Xerox ® Color C60/C70 Printer 13-5 User Guide... - Page 178 UI. From the Tray Properties window, enter the correct paper information, including size, type, weight, and if necessary, decurler and/or alignment option. 5. Select OK to save the information and close the Tray Properties window. 13-6 Xerox ® Color C60/C70 Printer User Guide...
-
Page 179: Maintenance
Always refer to www.xerox.com for the latest Consumable Replaceable Units (CRUs) part numbers. Store supply items and Xerox parts in their original packages in a convenient location. Supply Item Supply Unit Shipped with finisher/reorder quantity Staple cartridge / staple waste... - Page 180 4. Hold the positions as indicated by the arrow and remove the staple cartridge from the unit. 5. Push a new staple cartridge into the unit. 6. Reinstall the cartridge unit to its original position in the finisher. 13-8 Xerox ® Color C60/C70 Printer User Guide...
-
Page 181: Replace The Booklet Staple Cartridge
When this booklet stapler needs to be replaced, a message appears on the UI. 1. Make sure that the machine has stopped printing. 2. Open the Right Cover on the finisher. Xerox ® Color C60/C70 Printer 13-9 User Guide... - Page 182 4. Hold the tabs of the staple cartridge unit and lift to remove it. 5. While holding the tabs of a new staple cartridge, push it into the unit. 6. Push the staple cartridge unit to its original position in the machine. 13-10 Xerox ® Color C60/C70 Printer User Guide...
-
Page 183: Replacing The Staple Waste Container On The Finisher
1. Make sure that the machine has stopped printing. 2. Open the Right Cover on the finisher. 3. Locate the Staple Waste Container ( R5) in the finisher, and move the lock lever to the unlock position. Xerox ® Color C60/C70 Printer 13-11 User Guide... - Page 184 5. Place the used staple waste container into a supplied plastic bag. Note Do not return a disassembled (used) container to the Customer Support Center. 6. Hold the new staple waste container by the R5 handle area and push it into the machine. 13-12 Xerox ® Color C60/C70 Printer User Guide...
-
Page 185: Empty The Punch Waste Container
1. Make sure that the machine has stopped printing. 2. Open the Right Cover on the finisher. Xerox ® Color C60/C70 Printer 13-13 User Guide... - Page 186 Standard/Booklet Maker Finisher 3. Pull the container out of the finisher ( R4). 4. Discard all the punch scraps in an appropriate container. 5. Reinsert the empty container into the machine. 13-14 Xerox ® Color C60/C70 Printer User Guide...
-
Page 187: Finisher Problem Solving
Paper jams in Tray T1 (Post Process Inserter) 1. Press the Cover button. 2. Open cover 1e and then remove the jammed paper and all paper loaded in the tray. Xerox ® Color C60/C70 Printer 13-15 User Guide... -
Page 188: Paper Jams At Lever 1A And Knob 1C
Paper Jams at Lever 1a and Knob 1c 1. Make sure that the machine has stopped printing. 2. Open the finisher left cover. 3. Move lever 1a downwards and turn knob 1c left. Remove the jammed paper. 13-16 Xerox ® Color C60/C70 Printer User Guide... -
Page 189: Paper Jams At Lever 1D
The machine will not operate if the cover is open even slightly. Paper Jams at Lever 1d 1. Make sure that the machine has stopped printing. 2. Open the finisher left cover. Xerox ® Color C60/C70 Printer 13-17 User Guide... - Page 190 If paper is torn, check inside the machine and remove it. 4. Move the lever 1d to the original position. 5. Close the finisher left cover completely. Note The machine will not operate if the cover is open even slightly. 13-18 Xerox ® Color C60/C70 Printer User Guide...
-
Page 191: Paper Jams At Lever 1B
3. Move the lever 1b to the right and remove the jammed paper. Note If paper is torn, check inside the machine and remove it. 4. Move the lever 1b to the original position. 5. Close the finisher left cover completely. Xerox ® Color C60/C70 Printer 13-19 User Guide... -
Page 192: Paper Jams At Lever 3B And 3D
3. Move the levers 3band 3d; remove the jammed paper. Note If paper is torn, check inside the machine and remove it. 4. Return the levers 3b and 3d to their original positions. 5. Close the Right Cover on the finisher. 13-20 Xerox ® Color C60/C70 Printer User Guide... -
Page 193: Paper Jams At Lever 3E And Knob 3C
3. Move the lever 3e and turn the knob3c; remove the jammed paper. Note If paper is torn, check inside the machine and remove it. 4. Return the lever 3e to its original position. Xerox ® Color C60/C70 Printer 13-21 User Guide... -
Page 194: Paper Jams At Lever 3G And Knob 3F
1. Make sure that the machine has stopped printing. 2. Open the Right Cover on the finisher. 3. Move the lever 3g and turn the knob 3f and remove the jammed paper. 13-22 Xerox ® Color C60/C70 Printer User Guide... -
Page 195: Paper Jams At Lever 4B And Knob 3A
Paper Jams at Lever 4b and Knob 3a 1. Make sure that the machine has stopped printing. 2. Open the Right Cover on the finisher. 3. Move the lever 4b and turn the knob 3a; remove the jammed paper. Xerox ® Color C60/C70 Printer 13-23 User Guide... -
Page 196: Paper Jams At Lever 2A And Knob 3A
A message will display and the machine will not operate if the right cover is open even slightly. Paper Jams at Lever 2a and Knob 3a 1. Make sure that the machine has stopped printing. 2. Open the Right Cover on the finisher. 13-24 Xerox ® Color C60/C70 Printer User Guide... - Page 197 4. Return the lever 2a to its original position. 5. Close the Right Cover on the finisher. Note A message will display and the machine will not operate if the right cover is open even slightly. Xerox ® Color C60/C70 Printer 13-25 User Guide...
-
Page 198: Paper Jams At Lever 2B And Knob 2C
3. Move the lever 2b to the left and turn the knob 2c to the right; remove the jammed paper. Note If paper is torn, check inside the machine and remove it. 4. Return the lever 2b to its original position. 13-26 Xerox ® Color C60/C70 Printer User Guide... -
Page 199: Paper Jams At 2C, 2E, 2F, And 2D
If paper is torn, check inside the machine and remove it. 4. If you cannot remove the paper, return the lever 2e/2f to its original position. Swing the lever 2e/2f, turn the knob 2c to the right, and remove the jammed paper. Xerox ® Color C60/C70 Printer 13-27 User Guide... -
Page 200: Paper Jams At 2D And Lever 2G
1. Make sure that the machine has stopped printing. 2. Open the Right Cover on the finisher. 3. Pull out the folder output tray (2d), swing lever 2g out, and remove the jammed paper. 13-28 Xerox ® Color C60/C70 Printer User Guide... -
Page 201: Paper Jams At Unit 4 And Knob 4A
A message will display and the machine will not operate if the right cover is open even slightly. Paper Jams at Unit 4 and Knob 4a 1. Make sure that the machine has stopped printing. 2. Open the Right Cover on the finisher. Xerox ® Color C60/C70 Printer 13-29 User Guide... -
Page 202: Paper Jams At Finisher Top Tray
A message will display and the machine will not operate if the right cover is open even slightly. Paper Jams at Finisher Top Tray 1. Make sure that the machine has stopped printing. 2. Remove jammed paper from the finisher top tray. 13-30 Xerox ® Color C60/C70 Printer User Guide... -
Page 203: Paper Jams At Finisher Stacker Tray
The machine will not operate if the cover is open even slightly. Paper Jams at Finisher Stacker Tray 1. Make sure that the machine has stopped printing. 2. Remove jammed paper from the finisher stacker tray. Xerox ® Color C60/C70 Printer 13-31 User Guide... -
Page 204: Paper Jams At The Optional Booklet Maker Tray
1. Make sure that the machine has stopped printing. 2. Open the Right Cover on the finisher. 3. Turn knob 4a and remove any jammed paper from the optional booklet maker tray. 13-32 Xerox ® Color C60/C70 Printer User Guide... -
Page 205: Stapler Faults
5. Flattened staple 6. Entire staple rising up 7. Staple rising up with center pressed in If the output is stapled as shown in the figure above, contact our Customer Support Center. Xerox ® Color C60/C70 Printer 13-33 User Guide... -
Page 206: Staple Jams In The Standard Staple Cartridge
4. Check the inside of the finisher for any remaining staples, and if necessary, remove them. 5. Open the staple cartridge unit as shown and remove the jammed staple. 13-34 Xerox ® Color C60/C70 Printer User Guide... -
Page 207: Staple Jams In The Booklet Maker Cartridge
Staple Jams in the Booklet Maker Cartridge Note Always check inside the finisher for any individual staples or staple remnants. 1. Make sure that the machine has stopped printing. 2. Open the Right Cover on the finisher. Xerox ® Color C60/C70 Printer 13-35 User Guide... - Page 208 4. Hold the tabs of the staple cartridge unit and lift to remove it. 5. Remove the jammed staples from the cartridge. Warning To avoid injury to your fingers, carefully remove the jammed staples from the cartridge. 13-36 Xerox ® Color C60/C70 Printer User Guide...
-
Page 209: Reinserting A Misaligned Standard Staple Cartridge
A message will display and the machine will not operate if the right cover is open even slightly. Reinserting a Misaligned Standard Staple Cartridge Use this procedure if the standard staple cartridge is inserted incorrectly into the machine. Xerox ® Color C60/C70 Printer 13-37 User Guide... -
Page 210: Reinserting Misaligned Standard Staple Cartridge
4. If necessary, raise the staple cartridge unit as shown and remove the jammed staple. 5. Move the lever on the rear of the staple cartridge unit in the downward direction. 13-38 Xerox ® Color C60/C70 Printer User Guide... - Page 211 6. While holding the lever down, turn over the unit and remove the staple cartridge from the unit. 7. Detach the outside staples along the line. 8. Push a new staple cartridge into the unit. Xerox ® Color C60/C70 Printer 13-39 User Guide...
-
Page 212: Fault Codes
If an error code appears that is not listed in the table below, or if an error persists after following the listed solution, then contact your Xerox Customer Support Center. If an error code is displayed, all print data of the machine as well as print data stored in the machine's built-in memory is discarded. - Page 213 Check staples and reset correctly. ready 024-978 Booklet Finisher staple opera- Check staples and reset correctly. tion is not ready 024-979 The staple cartridge is empty Check staples. Follow procedures to remove and replace staple cartridge. Xerox ® Color C60/C70 Printer 13-41 User Guide...
- Page 214 124-709 The number of pages exceeds Decrease the number of pages, or the number of pages that can cancel the stapling settings, then try be stapled to print again. 13-42 Xerox ® Color C60/C70 Printer User Guide...
-
Page 215: Specifications
“Interposer”) Executive (7.25 x 10.5 in.) The machine does not print on paper loaded in Tray 8. Capacity: 200 sheets when using Xerox 20 lb./75 gsm paper. Paper type: 64-220 gsm Optional C/Z Fold tray Capacity: minimum 30 sheets Supported paper weight: 64-90 gsm Supported paper sizes: A4 (SEF) and 8.5x11 in. -
Page 216: Optional C/Z Folder Specifications
• Fold and Staple: 25 sheets (64 - 79 gsm) (May need service call to enable.) • Fold only: 5 sheets When using Xerox 20 lb./75 gsm paper, only 14 sheets can be stapled if adding a cover. Paper sizes: • Maximum: A3, 13 x 18 in. - Page 217 C-Fold and Z-Fold Paper size: A4/8.5 x 11 inches Number of sheets to be folder: 1 sheet Minimum capacity: 30 sheets when using Xerox 20 lb. / 75 gsm paper. Paper Type: 16-24 lb. / 64-90 gsm Output Tray: C/Z Folder tray...
- Page 218 Standard/Booklet Maker Finisher 13-46 Xerox ® Color C60/C70 Printer User Guide...
-
Page 219: Squarefold Trimmer Module
• Hints and Tips • Problem Solving • Specifications Overview The SquareFold Trimmer Module is an optional finishing device that is used in conjunction with another optional finishing device that contains a booklet maker. Xerox ® Color C60/C70 Printer 14-1 User Guide... - Page 220 Trimmer Module. The Hints and Tips section provides valuable information about setting up your jobs, which in turn ensures the best possible output for your print/copy jobs. You may want to run one or more test prints/copies before running larger jobs. 14-2 Xerox ® Color C60/C70 Printer User Guide...
-
Page 221: Identifying The Components
The top covers cannot be opened during normal operation or when the machine is idle. The covers can be opened only when an indicator is lit and a jam/fault occurs within the SquareFold Trimmer Module. Xerox ® Color C60/C70 Printer 14-3 User Guide... -
Page 222: Paper Path
Booklets exiting/leaving the SquareFold Trimmer Module may contain trim remnants/scraps from the previously trimmed booklet. This is due to static electricity build-up and is normal. If booklets contain trim remnants/scraps, simply remove and discard them. 14-4 Xerox ® Color C60/C70 Printer User Guide... -
Page 223: Control Panel
The Square Fold options are available from your computer’s print driver, from your print server, or from your machine’s UI (if it is a copier/printer). This is discussed in more detail in the section entitled "Square Fold options." Xerox ® Color C60/C70 Printer 14-5 User Guide... -
Page 224: Square Fold Feature
The more pressure applied to the booklet, the more square the booklet spine will be. +2 is the greatest amount of pressure that can be applied to the booklet. 14-6 Xerox ® Color C60/C70 Printer User Guide... -
Page 225: Trimmer Feature
The Trimmer Feature can be selected/accessed from your computer’s print driver or from the print server. Note The Trimmer feature is available only when your machine is connected to both a finisher with a booklet maker and the SquareFold Trimmer Module. Xerox ® Color C60/C70 Printer 14-7 User Guide... -
Page 226: Trimmer Options
Important! You may have to experiment with various settings in order to determine the best settings for your particular job. Also, you may want to run one or more test prints before running larger jobs in order to ensure the best possible booklet output. 14-8 Xerox ® Color C60/C70 Printer User Guide... -
Page 227: Trim Guidelines
24 lbs. (90 gsm) (297x420mm) (210x297mm) 11x17 in./A3 8.5x11 in./A4 80 lbs. (297x420mm) (210x297mm) (216gsm) 11x17 in./A3 8.5x11 in./A4 20 lbs. (80 gsm) (297x420mm) (210x297mm) 11x17 in./A3 8.5x11 in./A4 24 lbs. (90 gsm) (297x420mm) (210x297mm) Xerox ® Color C60/C70 Printer 14-9 User Guide... -
Page 228: Hints And Tips
8.5 x 14 in./B4 paper. The front cover, which was trimmed, displays the entire image. 2. This same booklet was printed on 8.5 x 11 in./A4 paper. The image on the front cover is truncated after trimming it. 14-10 Xerox ® Color C60/C70 Printer User Guide... -
Page 229: Follow These Tips
The covers can be opened only when an indicator is lit and a jam/fault occurs within the SquareFold Trimmer Module. For indicator details, refer to the Control Panel information earlier in this section. Xerox ® Color C60/C70 Printer 14-11 User Guide... -
Page 230: Clearing Jams
Use the following procedure to clear jams when the E1 and/or E2 LED is lit on the SquareFold Trimmer Module Control Panel. 1. Make sure that the machine is not in operation, and press the button on the left cover of the Trimmer unit to open the cover. 14-12 Xerox ® Color C60/C70 Printer User Guide... - Page 231 2. Remove the jammed paper. 3. If you cannot remove the paper in Step 2, open the right cover of the finisher. 4. Turn the knob 4a to the right, and then remove the jammed paper. Xerox ® Color C60/C70 Printer 14-13 User Guide...
-
Page 232: Clearing E3 Jams
Trimmer Module Control Panel. 1. Make sure that the machine is not in operation, and press the button on the right cover of the Trimmer unit to open the cover. 2. Remove the jammed paper. 14-14 Xerox ® Color C60/C70 Printer User Guide... -
Page 233: Fault Codes
5. If necessary, follow any remaining instructions on the machine’s UI. 6. If fault persists, repeat Steps 1-5; if fault persists after that, call for ser- vice. Xerox ® Color C60/C70 Printer 14-15 User Guide... - Page 234 Booklet Tray on the Square- 1. Remove any booklets from the tray. Fold Trimmer Module is full. 2. If fault persists, power off/on the machine. 3. If fault persists, call for service. 14-16 Xerox ® Color C60/C70 Printer User Guide...
-
Page 235: Specifications
• 5-25 sheet booklet (up to 100 imaged sides) at 200 lb. (79 gsm) • Cut amount: 2-20mm, adjustable in 0.1 mm increments Paper Weights 16 lb. bond-90 lb. cover (60-220 gsm) Xerox ® Color C60/C70 Printer 14-17 User Guide... - Page 236 SquareFold Trimmer Module 14-18 Xerox ® Color C60/C70 Printer User Guide...
-
Page 237: Basic Regulations
• Product Safety Certification • Material Safety Data Sheets Basic Regulations Xerox has tested this printer to electromagnetic emission and immunity standards. These standards are designed to mitigate interference caused or received by this printer in a typical office environment. -
Page 238: Canada
• Connect the equipment into an outlet on a circuit different from that to which the receiver is connected. Consult the dealer or an experienced radio/TV technician for help. Changes or modifications to this equipment not approved by Xerox can void the authority of the user to operate this equipment. Warning To ensure compliance with Part 15 of the FCC rules, use shielded interface cables. -
Page 239: European Union Lot 4 Imaging Equipment Agreement Environmental Information
45 ppm monochrome the duplex function has ® been auto enabled, during the setup and driver installation. Some Xerox models below these speed bands may also be enabled with 2-sided printing settings defaulted on at the time of install. - Page 240 Before you turn off Energy Saver mode or set a long activation time, consider the increase in product power consumption. To learn more about Xerox participation in sustainability initiatives, go to: www.xerox.com/about-xerox/environment/enus.html. Default Energy Saver Settings for Product The printer is ENERGY STAR ®...
-
Page 241: Germany
Ozone is heavier than air and is not produced in amounts large enough to harm anyone. Install the printer in a well-ventilated room. For more information in the United States and Canada, go to www.xerox.com/environment. In other markets, please contact your local Xerox representative or go to www.xerox.com/environment_europe. Xerox ®... -
Page 242: Wireless Compliance
• This device may not cause harmful interference. • This device must accept any interference received, including interference that may cause undesired operation. Changes or modifications to this equipment not specifically approved by the Xerox ® Corporation may void the user's authority to operate this equipment. - Page 243 Act of Congress. • Adjusted Compensation Certificates for Veterans of the World Wars. 2. Obligations or Securities of any Foreign Government, Bank, or Corporation. Xerox ® Color C60/C70 Printer 15-7 User Guide...
-
Page 244: Canada
Penalties of fine or imprisonment may be imposed on those guilty of making such reproductions. • Current bank notes or current paper money • Obligations or securities of a government or bank 15-8 Xerox ® Color C60/C70 Printer User Guide... -
Page 245: Other Countries
• Copyright material or trademarks without the consent of the owner • Postage stamps and other negotiable instruments This list is not inclusive and no liability is assumed for either its completeness or accuracy. In case of doubt, contact your legal counsel. Xerox ® Color C60/C70 Printer 15-9 User Guide... -
Page 246: Fax Regulations
US:AAAEQ##TXXXX. The digits represented by ## are the REN without a decimal point (for example, 03 is a REN of 0.3). For earlier products, the REN is separately shown on the label. 15-10 Xerox ® Color C60/C70 Printer User Guide... -
Page 247: Canada
Ask your local Telephone Company for the modular jack type installed on your line. Connecting this machine to an unauthorized jack can damage telephone company equipment. You, not Xerox, assume all responsibility and/or liability for any damage caused by the connection of this machine to an unauthorized jack. -
Page 248: Canada Cs 03 Issue 9
Directive ® ® This Xerox device has been self-certified by Xerox for pan-European single terminal connection to the analog public switched telephone network (PSTN) in accordance with Directive 1999/5/EC. This device has been designed to work with the national public switched telephone... -
Page 249: New Zealand
ES 203 021-1/2/3 technical specifications for terminal equipment for use on analog-switched telephone networks in the European Economic Area. If you have problems with your product, contact your local Xerox representative. This product can be configured to be compatible with other country networks. Before reconnecting the device to a network in another country, contact your Xerox representative for assistance. -
Page 250: South Africa
This device is certified by the following agencies using the following safety standards: Agency Standard Underwriters Laboratories Inc. (US/Canada) UL60950-1 (2007) 2nd EditionCSA 22.2 No. 60950- 1-07 2nd Edition Underwriters Laboratories Inc. (Europe) IEC60950-1:2005 (2nd Edition) +A1:2009EN60950- 1:2006 (2nd Edition) +A11:2009 +A1:2010+A12:2011 (CB Scheme) 15-14 Xerox ® Color C60/C70 Printer User Guide... -
Page 251: Material Safety Data Sheets
Material Safety Data Sheets For Material Safety Data information regarding your printer, go to: • North America: www.xerox.com/msds • European Union: www.xerox.com/environment_europe For the Customer Support Center phone numbers, go to www.xerox.com/office/worldcontacts. Xerox ® Color C60/C70 Printer 15-15 User Guide... - Page 252 Regulatory Information 15-16 Xerox ® Color C60/C70 Printer User Guide...
-
Page 253: Recycling And Disposal
Recycling and Disposal All Countries If you are managing the disposal of your Xerox product, please note that the printer may contain lead, mercury, perchlorate, and other materials whose disposal may be regulated due to environmental considerations. The presence of these materials is fully consistent with global regulations applicable at the time that the product was placed on the market. -
Page 254: Domestic/Household Environment
In accordance with European legislation, end of life electrical and electronic equipment subject to disposal must be managed within agreed procedures. Prior to disposal, please contact your local reseller or Xerox representative for end of life take-back information. Collection and Disposal of Equipment and Batteries... -
Page 255: Business Users In The European Union
Use of this symbol establishes compliance with the requirements set out by the Directive. Battery Removal Batteries should only be replaced by a manufacturer-approved service facility. Other Countries Please contact your local waste management authority to request disposal guidance. Xerox ® Color C60/C70 Printer 16-3 User Guide... - Page 256 Recycling and Disposal 16-4 Xerox ® Color C60/C70 Printer User Guide...
Need help?
Do you have a question about the Color C60 and is the answer not in the manual?
Questions and answers