
Subscribe to Our Youtube Channel
Related Manuals for Allnet ALL1681205


Summary of Contents for Allnet ALL1681205
-
Page 1: User Manual
ALL1681205 1200 Mbps PLC Ethernet Bridge USER MANUAL ALLNET GmbH Computersysteme 2015 – All rights reserved Irrtum und Änderungen vorbehalten... - Page 2 APPLY TO THE PARTIES. IN NO EVENT WILL THE SELLERS’ TOTAL CUMULATIVE LIABILITY OF EACH AND EVERY KIND IN RELATION TO THE PRODUCT OR ITS SOFTWARE EXCEED THE AMOUNT PAID BY CUSTOMER FOR THE PRODUCT. Page 2 of 44 ALLNET GmbH Computersysteme 2015 – All rights reserved...
-
Page 3: Table Of Contents
Private Network Name ..................34 Quality of Service ....................38 Devices ....................... 39 Firmware Upgrade ..................... 40 Appendix ..........................42 FCC Statement ....................42 Safety Warnings ........................ 43 CE Declaration ........................44 Page 3 of 44 ALLNET GmbH Computersysteme 2015 – All rights reserved... -
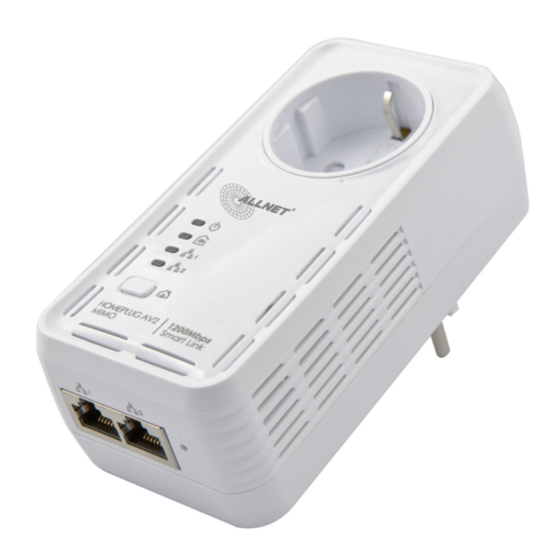
Page 4: About The Device
The ALL1681205 was designed with the valued customers in mind. To maximize the usage of power outlets, the ALL1681205 is built with its own pass through. In concept, you are simply plugging in a power outlet into your power outlet. No power outlets are wasted whenever you are using your ALL1681205. -
Page 5: How Does It Work
Red means below 30 Mbps; Amber means 30 to 120 Mbps; and Green means more than 120 Mbps. Page 5 of 44 ALLNET GmbH Computersysteme 2015 – All rights reserved... -
Page 6: Direct Connection
HomePlug AV2. You may use the built-in pass through as a power outlet. Note: Page 6 of 44 ALLNET GmbH Computersysteme 2015 – All rights reserved... -
Page 7: Device Design
When Simple Connect is pressed for 10 seconds, it will randomize the Simple Private Network Name. Connect Press 2 seconds to join or add to another network. Button Page 7 of 44 ALLNET GmbH Computersysteme 2015 – All rights reserved... - Page 8 LED will turn OFF and turn ON to confirm the Private 1 & 2 Network Name reset. (Ethernet is connected) • The LED flashes to indicate Ethernet activity. Page 8 of 44 ALLNET GmbH Computersysteme 2015 – All rights reserved...
-
Page 9: Getting Started
HomePlug AV2 to your computer or Ethernet device. (Optional) Install HomePlug AV2 Utility Install HomePlug AV2 apply manual Utility Software configuration changes monitor device activity. Ready to Use Page 9 of 44 ALLNET GmbH Computersysteme 2015 – All rights reserved... -
Page 10: Planning Your Network
Local Network Share ultrafast Internet connection with any computer wherever it is in the house. Page 10 of 44 ALLNET GmbH Computersysteme 2015 – All rights reserved... - Page 11 ALL1681205 - User Manual Gaming Network Connect your gaming console to the Internet and compete with other online players. Page 11 of 44 ALLNET GmbH Computersysteme 2015 – All rights reserved...
- Page 12 ALL1681205 - User Manual Entertainment Network Experience IP TV streaming into your home entertainment system. Page 12 of 44 ALLNET GmbH Computersysteme 2015 – All rights reserved...
- Page 13 ALL1681205 - User Manual Media Network Realize your high tech lifestyle by converging your IP devices into a single network. Page 13 of 44 ALLNET GmbH Computersysteme 2015 – All rights reserved...
-
Page 14: Pairing The Device
3. In ROOM B plug in your HomePlug AV2 into the wall socket then connect it to your computer’s Ethernet Port using an Ethernet cable. Your HomePlug AV2 is now ready to use. Page 14 of 44 ALLNET GmbH Computersysteme 2015 – All rights reserved... -
Page 15: How To Use The Simple Connect Button
Simple Connect provides a more convenient way of creating your HomePlug AV2 network without the need to open the HomePlug AV2 Utility software from a computer. The button has three main functions which include: Page 15 of 44 ALLNET GmbH Computersysteme 2015 – All rights reserved... -
Page 16: Resetting The Private Network Name
(Ethernet is connected). The Powerline pair the devices. The Power LED will blink Activity LED will switch OFF on both units. to indicate that the button is pressed. Page 16 of 44 ALLNET GmbH Computersysteme 2015 – All rights reserved... - Page 17 Press the Simple Connect button of HomePlug AV2 X for 10 seconds. Powerline Activity LED will turn OFF. Power LED will Turn OFF and ON indicating that the Private Network Name has been randomized. Page 17 of 44 ALLNET GmbH Computersysteme 2015 – All rights reserved...
- Page 18 Press the Simple Connect button for 2 seconds on HomePlug Y. After you release the button, the Power LED will blink. If the Power LED did not blink, press Simple Connect again for two seconds. Page 18 of 44 ALLNET GmbH Computersysteme 2015 – All rights reserved...
- Page 19 2 and 3 until the LEDs of both devices switch OFF and on twice, indicating that they are paired with one another. Page 19 of 44 ALLNET GmbH Computersysteme 2015 – All rights reserved...
- Page 20 ALL1681205 - User Manual Step 4 To confirm if the connection was established, check the LEDs. The Power LEDs the Powerline Activity LEDs on both HomePlugs are ON. Page 20 of 44 ALLNET GmbH Computersysteme 2015 – All rights reserved...
- Page 21 HomePlug AV2 to a power strip or power extension as much as possible. Other electrical devices plugged in the power strip produce electrical noise that may affect the overall performance of the HomePlug. Page 21 of 44 ALLNET GmbH Computersysteme 2015 – All rights reserved...
- Page 22 Upon connection, HomePlug X’s LEDs will blink simultaneously and then the Power LED lights ON steadily. Ethernet LED will be ON if there are Ethernet devices connected to its Ethernet ports. Page 22 of 44 ALLNET GmbH Computersysteme 2015 – All rights reserved...
- Page 23 Press Simple Connect for 10 seconds from HomePlug X. After you release the button, The Power LED and Ethernet LED would blink. If the Power and Ethernet LED did not blink, press Simple Connect again for 10 Note: seconds. Page 23 of 44 ALLNET GmbH Computersysteme 2015 – All rights reserved...
- Page 24 Press Simple Connect Button for two seconds on HomePlug Y (existing HomePlug). After you release the button, the Power LED will continuously blink. If the Power did not blink, press Simple Connect again for two seconds. Page 24 of 44 ALLNET GmbH Computersysteme 2015 – All rights reserved...
- Page 25 ALL1681205 - User Manual Step 4 Press Simple Connect Button again on the HomePlug X within two minutes after you press Simple Connect from the existing network. Page 25 of 44 ALLNET GmbH Computersysteme 2015 – All rights reserved...
- Page 26 HomePlug AV2 to a power strip or power extension as much as possible. Other electrical devices in the power strip produce electrical noise that may affect the overall performance of the HomePlug. Page 26 of 44 ALLNET GmbH Computersysteme 2015 – All rights reserved...
- Page 27 The exact connection rate value can also be viewed by using the HomePlug AV2 Utility. The connection rating is present on both GBR and DEU devices. Page 27 of 44 ALLNET GmbH Computersysteme 2015 – All rights reserved...
-
Page 28: Power Saving Mode
AV2 is also on a Power Saving mode. If another device is on a Power Saving Mode, the HomePlug AV2 Utility may Note: detect the device but would be unable to configure its respective setting. Page 28 of 44 ALLNET GmbH Computersysteme 2015 – All rights reserved... -
Page 29: Setup The Homeplug Av2S
AV2 Utility software. To use Simple Connect, please refer to Joining an Existing HomePlug AV2 Network. To use the HomePlug AV Utility, please refer to Private Network Name. Page 29 of 44 ALLNET GmbH Computersysteme 2015 – All rights reserved... -
Page 30: About The Homeplug Av Utility
300 MHz Processor 128 Mb of RAM .NET Framework Windows Installer 3.1 for Windows XP (32 and 64 bit) Network Interface Card CD-ROM 128 Mb of free hard disk space Page 30 of 44 ALLNET GmbH Computersysteme 2015 – All rights reserved... -
Page 31: Installation
Operating System .NET Framework version to be installed XP /Vista/Windows 7 32-bit .NET Framework 3.5 SP 1 32-bit XP /Vista/Windows 7 64-bit .NET Framework 3.5 SP 1 64-bit Page 31 of 44 ALLNET GmbH Computersysteme 2015 – All rights reserved... -
Page 32: Opening Homeplug Av Utility
AV Ethernet Adapter, and then click HomePlug AV Utility. The User Interface The HomePlug AV Utility user interface is divided into multiple tabs. These tabs include: Home Private Network Name Quality of Service Devices Firmware Upgrade Page 32 of 44 ALLNET GmbH Computersysteme 2015 – All rights reserved... -
Page 33: Home
View devices in the network • Upgrade the firmware When you select any of the tasks available, you will be forwarded to the respective tab of the selected task you have chosen. Page 33 of 44 ALLNET GmbH Computersysteme 2015 – All rights reserved... -
Page 34: Private Network Name
In case you cannot connect into the network after changing the Private Network Note: Name, please POWER CYCLE the device. To POWER CYCLE the device, disconnect and then reconnect your HomePlug to the wall socket. Page 34 of 44 ALLNET GmbH Computersysteme 2015 – All rights reserved... -
Page 35: Local Private Network Name
This field is case sensitive. It accepts 8 to 64 alphanumeric characters including punctuation marks but no spaces. 4. Tick the Change Private Network Name of remote device checkbox. Page 35 of 44 ALLNET GmbH Computersysteme 2015 – All rights reserved... - Page 36 After changing the Private Network Name of the remote HomePlug AV/AV2 device, it will no longer be able to communicate with your local HomePlugs not unless you are using a similar Private Network Name for your local HomePlugs. Page 36 of 44 ALLNET GmbH Computersysteme 2015 – All rights reserved...
-
Page 37: Simulate Simple Connect Button
2. Select a Simulate Simple Connect Button action: a. Simple Connect b. NMK (Network Membership Key) Randomize c. AVLN (Audio/Video Logical Network) Status 3. Click Simulate Button Push. Page 37 of 44 ALLNET GmbH Computersysteme 2015 – All rights reserved... -
Page 38: Quality Of Service
1. Open HomePlug AV2 Utility. 2. Click Quality of Service. 3. Check Enable QoS. 4. Select a QoS mode. 5. Click Apply. When the process is complete, Settings Applied appears. Page 38 of 44 ALLNET GmbH Computersysteme 2015 – All rights reserved... -
Page 39: Devices
• Remote Client Address: Displays the MAC Address of the Ethernet network adapter connected to the HomePlug AV/AV2. • Connection Rate: Displays the Transmit and Receive connection rates. Page 39 of 44 ALLNET GmbH Computersysteme 2015 – All rights reserved... -
Page 40: Firmware Upgrade
Name and MAC address settings. Before you proceed with the upgrade, you need to have both (1) the configuration file (PIB extension) and (2) the firmware file (NVM extension). You can download upgrade files from the product’s Web site. It is highly recommended to use OFFICIALLY RELEASED ALLNET Firmware only. Note: These... - Page 41 2. Launch the HomePlug AV Utility. 3. Click Factory Default. You can also perform a reset to the factory default when you press the RESET Note: button on the device 3 seconds. Page 41 of 44 ALLNET GmbH Computersysteme 2015 – All rights reserved...
-
Page 42: Appendix
Increase the separation between the equipment or devices Connect the equipment to an outlet other than the receiver’s Consult a dealer or an experienced radio/TV technician for assistance Page 42 of 44 ALLNET GmbH Computersysteme 2015 – All rights reserved... -
Page 43: Safety Warnings
Do not expose your device to dust or corrosive liquids. Do not use this product near water sources. Make sure to connect the cables to the correct ports. Do not obstruct the ventilation slots on the device. Page 43 of 44 ALLNET GmbH Computersysteme 2015 – All rights reserved... -
Page 44: Ce Declaration
ALL1681205 - User Manual Page 44 of 44 ALLNET GmbH Computersysteme 2015 – All rights reserved...
Need help?
Do you have a question about the ALL1681205 and is the answer not in the manual?
Questions and answers