
Related Manuals for Extech Instruments 382100


Summary of Contents for Extech Instruments 382100
- Page 1 User’s Manual 1200A 3-Phase Power Analyzer/Datalogger MODEL 382100 Distributed by MicroDAQ.com, Ltd. www.MicroDAQ.com (603) 746-5524...
-
Page 2: Table Of Contents
5-11 Appendix - Measurement Definitions .............. .35 6.0 MAINTENANCE 6-1 Cleaning ........................ .35 6-2 Battery Replacement ................... .35 7.0 PC INTERFACE 7-1 RS-232 Protocol ................36 7-2 Download Data from SD Card ............37 382100-EU-EN v2.2 07/13 Distributed by MicroDAQ.com, Ltd. www.MicroDAQ.com (603) 746-5524... -
Page 3: Introduction
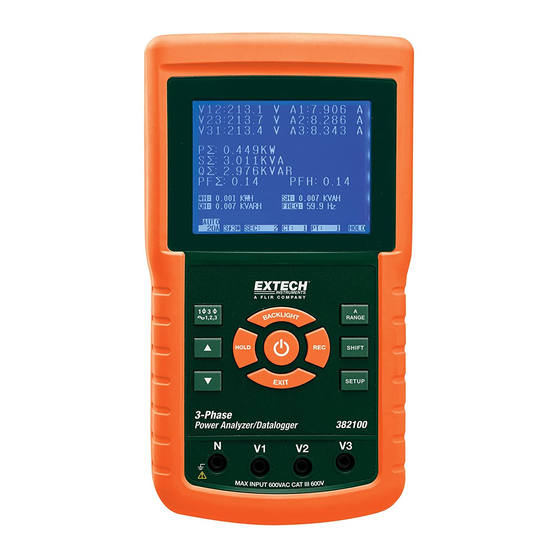
1.0 Introduction Congratulations on your purchase of the Model 382100 Power Analyzer. This instrument is fully tested and calibrated prior to delivery; proper use and care of this meter will provide years of reliable service. 1.1 Features Large dot-matrix, numerical, backlit LCD ... -
Page 4: Safety
Safety Symbols: CAUTION RISK OF ELECTRIC SHOCK Environmental Conditions Installation Category III 600V Pollution Degree 2 Altitude limit: 2000m Indoor use only Relative Humidity maximum: 80% 382100-EU-EN v2.2 07/13 Distributed by MicroDAQ.com, Ltd. www.MicroDAQ.com (603) 746-5524... -
Page 5: Specifications
Eight (8) ‘AA’ 1.5VDC batteries or AC - DC 9V power adapter Power Consumption Meter: 300 mA DC; Clamp: 20 mA DC Max. Conductor size Clamp can accommodate up to 86 mm (3.4” ) diameter 382100-EU-EN v2.2 07/13 Distributed by MicroDAQ.com, Ltd. www.MicroDAQ.com (603) 746-5524... -
Page 6: Electrical Specifications
For three phase/four wire and three phase/three wire configurations: PF = (PF1 + PF2 + PF3) / 3 For single phase three wire configurations: PF = (PF1 + PF2) / 2 382100-EU-EN v2.2 07/13 Distributed by MicroDAQ.com, Ltd. www.MicroDAQ.com (603) 746-5524... - Page 7 ± (1%+0.008 KVAR) 10.00 to 99.99 KVAR 0.01 KVAR ± (1%+0.08 KVAR) 100.0 to 999.9 KVAR 0.1 KVAR ± (1%+0.8 KVAR) 0.000 to 9.999 MVAR 0.001 MVAR ± (1%+0.008 MVAR) 382100-EU-EN v2.2 07/13 Distributed by MicroDAQ.com, Ltd. www.MicroDAQ.com (603) 746-5524...
- Page 8 ± (2%+0.008 KVARH) 10.00 to 99.99 KVARH 0.01 KVARH ± (2%+0.08 KVARH) 100.0 to 999.9 KVARH 0.1 KVARH ± (2%+0.8 KVARH) 0.000 to 9.999 MVARH 0.001 MVARH ± (2%+0.008 MVARH) 382100-EU-EN v2.2 07/13 Distributed by MicroDAQ.com, Ltd. www.MicroDAQ.com (603) 746-5524...
-
Page 9: Meter Description
3-15 SD card socket 3-16 RS232 socket 3-17 Reset button 3-18 9V adapter socket 3-19 Battery compartment 3-20 Stand 3-21 Current Sense Jaw 3-22 Trigger 3-23 Plug for current probe 382100-EU-EN v2.2 07/13 Distributed by MicroDAQ.com, Ltd. www.MicroDAQ.com (603) 746-5524... -
Page 10: Measurement Preparation
9. SHIFT KEY (3-11, Fig. 1): Used for programming the functions on the set-up screen 10. UP (▲) KEY (3-3, Fig. 1): Press to move the cursor up 11. DOWN (▼) KEY (3-4, Fig. 1): Press to move the cursor down 382100-EU-EN v2.2 07/13 Distributed by MicroDAQ.com, Ltd. www.MicroDAQ.com... - Page 11 (Fig. 4-4b), use the ▲ or ▼ key to select 1P/2W, 1P/3W, 3P/3W, or 3P/4W for the File Name function. Figure 4-4a: SHIFT Key (Screen 1) Figure 4-4b: SHIFT Key (Screen 2) 382100-EU-EN v2.2 07/13 Distributed by MicroDAQ.com, Ltd. www.MicroDAQ.com (603) 746-5524...
-
Page 12: Meter Setup Functions (Sd Card, Pt/Ct, Audible Beeper, Decimal Point, Clamp Type, Rs-232, Time/Date, Reset Key)
3. Press ▲ or y continuously for at least two seconds to scroll quickly. 4. Press SHIFT once, the symbol " SHIFT1" will appear; then press y to enter Screen 2 (Folder Name -> File Name) Figure 4-5-1a: Folder Name (Screen 1) 382100-EU-EN v2.2 07/13 Distributed by MicroDAQ.com, Ltd. www.MicroDAQ.com (603) 746-5524... - Page 13 The screen will show the recording date and time in the REC Date option area for existing data files Figure 4-5-2a: File Name (Screen 1) Figure 4-5-2b: File Name (Screen 2) 382100-EU-EN v2.2 07/13 Distributed by MicroDAQ.com, Ltd. www.MicroDAQ.com (603) 746-5524...
- Page 14 4 (Fig. 4-5-2d), use▲ or ▼ to select 1P/2W(1P2), 1P/3W(1P3), 3P/3W(3P3), or 3P/4W(3P4) Now use the SHIFT KEY to select the desired functions Figure 4-5-2c: File Name (Screen 3) Figure 4-5-2d: File Name (Screen 4) 382100-EU-EN v2.2 07/13 Distributed by MicroDAQ.com, Ltd. www.MicroDAQ.com (603) 746-5524...
- Page 15 The display will show the " SHIFT1 " symbol after the SHIFT KEY is pressed again, press ▼ to enter the next setting (Sampling Time ~ Delete File) Figure 4-5-3a: Sampling Rate (Screen 1) Figure 4-5-3b: Sampling Rate (Screen 2) 382100-EU-EN v2.2 07/13 Distributed by MicroDAQ.com, Ltd. www.MicroDAQ.com (603) 746-5524...
- Page 16 Press ▼ in screen 1 (Fig. 4-5-4a) to enter the next setting function (Delete File → SD Format) Figure 4-5-4a: Delete File (Screen 1) Figure 4-5-4b: Delete File (Screen 2) 382100-EU-EN v2.2 07/13 Distributed by MicroDAQ.com, Ltd. www.MicroDAQ.com (603) 746-5524...
- Page 17 Press SETUP again to confirm the formatting of the SD CARD Press ▼ in screen 1(Fig.4-5-5a) to enter the next setting function (SD Format → PT) Figure 4-5-5a: Format SD Card Screen 1 Figure 4-5-5: Format SD Card Screen 2 382100-EU-EN v2.2 07/13 Distributed by MicroDAQ.com, Ltd. www.MicroDAQ.com (603) 746-5524...
- Page 18 Press SHIFT again to return to screen 1 (Fig. 4-5-6a) and then press ▼ to enter the next function (PT CT) Figure 4-5-6a: PT Setup (Screen 1) Figure 4-5-6b: PT Setup (Screen 2) 382100-EU-EN v2.2 07/13 Distributed by MicroDAQ.com, Ltd. www.MicroDAQ.com (603) 746-5524...
- Page 19 Press SHIFT again to return to screen 1 (Fig. 4-5-7a) then press ▼ to enter the next function (CT → BEEP) Figure 4-5-7a: CT Setup (Screen 1) Figure 4-5-7b: CT Setup (Screen 2) 382100-EU-EN v2.2 07/13 Distributed by MicroDAQ.com, Ltd. www.MicroDAQ.com (603) 746-5524...
- Page 20 Press SHIFT again to return to screen 1 (Fig. 4-5-8a) and then press ▼ to enter the next function (BEEPER → Decimal type) Figure 4-5-8a: Beeper (Screen 1) Figure 4-5-8b: Beeper (Screen 2) 382100-EU-EN v2.2 07/13 Distributed by MicroDAQ.com, Ltd. www.MicroDAQ.com (603) 746-5524...
- Page 21 Press SHIFT again to return to screen 1 and then press ▼ to enter the next function (Decimal type → Clamp type) Figure 4-5-9a: Decimal (Screen 1) Figure 4-5-9b: Decimal (Screen 2) 382100-EU-EN v2.2 07/13 Distributed by MicroDAQ.com, Ltd. www.MicroDAQ.com (603) 746-5524...
- Page 22 Press SHIFT again to return to screen 1 (Fig. 4-5-10a) and then press ▼ to enter the next function (Clamp type → RS232 Output Select) Figure 4-5-10a: Clamp Type (Screen 1) Figure 4-5-10b: Clamp Type (Screen 2) 382100-EU-EN v2.2 07/13 Distributed by MicroDAQ.com, Ltd. www.MicroDAQ.com (603) 746-5524...
- Page 23 Press ▼ in screen 1 to enter the next setup function (Year -> Month) The settings (Month -> Date), (Date -> Hour), (Hour -> Minute), (Minute -> Second) are configured by the same method as described above in steps 1 and 2 382100-EU-EN v2.2 07/13 Distributed by MicroDAQ.com, Ltd. www.MicroDAQ.com...
- Page 24 FREE SIZE: Amount of free memory space TOTAL SIZE: Maximum memory size of card Note that SD and SDHC cards can be used 4.5.15 RESET Key Press the RESET key to reboot the instrument. 382100-EU-EN v2.2 07/13 Distributed by MicroDAQ.com, Ltd. www.MicroDAQ.com (603) 746-5524...
-
Page 25: Φ 2W (Single Phase Two Wires) Measurement
Connect the Clamp (A1) to the conductor (A1) Connect Clamp 1 (A1) to the A1 terminal of the instrument The related measurement factors will appear on the display Measurement definitions can be found in Appendix 1 (5-11) 382100-EU-EN v2.2 07/13 Distributed by MicroDAQ.com, Ltd. www.MicroDAQ.com (603) 746-5524... -
Page 26: Φ 3W (Single Phase Three Wires) Measurement
Connect Clamp 1 and Clamp 2 (A1 and A2) to the A1 and A2 terminals of the instrument The related measurement factors will appear on the display Measurement definitions can be found in Appendix 1 (5-11) Fig. 5-2 382100-EU-EN v2.2 07/13 Distributed by MicroDAQ.com, Ltd. www.MicroDAQ.com (603) 746-5524... -
Page 27: Φ 3W (Three Phase Three Wires) Measurement
Connect the three (3) Clamps to the meter using the A1, A2, and A3 terminals The related measurement factors will appear on the display Measurement definitions can be found in Appendix 1 (5-11) Fig. 5-3 382100-EU-EN v2.2 07/13 Distributed by MicroDAQ.com, Ltd. www.MicroDAQ.com (603) 746-5524... -
Page 28: Φ 4W (Three Phase Four Wires) Measurement
Connect the Clamps (A1, A2, A3) to the meter’s A1, A2, A3 terminals The related measurement factors will appear on the display Measurement definitions can be found in Appendix 1 (5-11) Fig. 5-4 382100-EU-EN v2.2 07/13 Distributed by MicroDAQ.com, Ltd. www.MicroDAQ.com (603) 746-5524... - Page 29 Connect the Clamps (A1, A2, A3) to the meter’s A1, A2, A3 terminals The related measurement factors will appear on the display Measurement definitions can be found in Appendix 1 (5-11) Fig. 5-5 382100-EU-EN v2.2 07/13 Distributed by MicroDAQ.com, Ltd. www.MicroDAQ.com (603) 746-5524...
-
Page 30: Data Logger
WTA01002.XLS) Press the REC KEY twice to stop datalogging Instructions are provided elsewhere in this manual for exporting the stored data to a spreadsheet on a PC Fig. 5-6b 382100-EU-EN v2.2 07/13 Distributed by MicroDAQ.com, Ltd. www.MicroDAQ.com (603) 746-5524... -
Page 31: Data Hold
During a measurement, press the HOLD KEY once, the display will show “HOLD” on the bottom right side of the screen Press the HOLD KEY twice to disable the Data HOLD function; the “ HOLD” display will switch off Fig. 5-7a Fig. 5-7b 382100-EU-EN v2.2 07/13 Distributed by MicroDAQ.com, Ltd. www.MicroDAQ.com (603) 746-5524... -
Page 32: A (Current) Range Key
Use the A RANGE KEY to step through the available display ranges Press and hold the A RANGE KEY for at least for 2 seconds to change from MANUAL RANGE to AUTO RANGE Fig. 5-9a Fig. 5-9b 382100-EU-EN v2.2 07/13 Distributed by MicroDAQ.com, Ltd. www.MicroDAQ.com (603) 746-5524... - Page 33 When the LOW BAT indicator appears, replace the batteries as described in the Battery Replacement section of this manual. Use of weak batteries will comprise measurement accuracy and meter performance. 382100-EU-EN v2.2 07/13 Distributed by MicroDAQ.com, Ltd. www.MicroDAQ.com (603) 746-5524...
-
Page 34: Appendix - Measurement Definitions
3CD 3W : Three phases by three wires 3CD 4W : Three phases by four wires SEC : The sampling time of data logger CT : Current transformer PT : Potential transformer 382100-EU-EN v2.2 07/13 Distributed by MicroDAQ.com, Ltd. www.MicroDAQ.com (603) 746-5524... -
Page 35: Maintenance
You can hand over your used batteries / accumulators at collection points in your community or wherever batteries / accumulators are sold! Disposal: Follow the valid legal stipulations in respect of the disposal of the device at the end of its lifecycle 382100-EU-EN v2.2 07/13 Distributed by MicroDAQ.com, Ltd. www.MicroDAQ.com (603) 746-5524... -
Page 36: Pc Interface
For example : Display reading = 1234; D8 to D1 is : 00001234 End Word RS232 settings Baud rate 9600 Parity No parity Data bit no. 8 Data bits Stop bit Stop bit 382100-EU-EN v2.2 07/13 Distributed by MicroDAQ.com, Ltd. www.MicroDAQ.com (603) 746-5524... -
Page 37: Download Data From Sd Card
SD Card to the PC (file name examples: 3P401001.XLS, 1P201001.XLS, 1P301001.XLS, 3P301001.XLS) The data files can be opened directly into a spreadsheet program Example 1 – Data File opened in spreadsheet Example 2 – Data File opened in spreadsheet 382100-EU-EN v2.2 07/13 Distributed by MicroDAQ.com, Ltd. www.MicroDAQ.com (603) 746-5524... - Page 38 Examples 3 and 4 – Data File opened in spreadsheet Example 5 – Data File opened in spreadsheet Example 6 – Data File opened in spreadsheet 382100-EU-EN v2.2 07/13 Distributed by MicroDAQ.com, Ltd. www.MicroDAQ.com (603) 746-5524...
- Page 39 Example Graphic Screen 1 Example Graphic Screen 2 Example Graphic Screen 3 Example Graphic Screen 4 382100-EU-EN v2.2 07/13 Distributed by MicroDAQ.com, Ltd. www.MicroDAQ.com (603) 746-5524...
- Page 40 Example Graphic Screen 5 Copyright © 2013 FLIR Systems, Inc. Reservados todos los derechos, incluyendo el derecho de reproducción total o parcial en cualquier medio www.extech.com 382100-EU-EN v2.2 07/13 Distributed by MicroDAQ.com, Ltd. www.MicroDAQ.com (603) 746-5524...
Need help?
Do you have a question about the 382100 and is the answer not in the manual?
Questions and answers