Table of Contents
Advertisement
Available languages
Available languages
Advertisement
Table of Contents

Related Manuals for Microlife BP3AQ1


Summary of Contents for Microlife BP3AQ1
- Page 1 MLU3AQ1-APR09-1...
- Page 2 Automatic Blood Pressure Monitor with Clinical Accuracy Instruction Booklet for model# BP3AQ1 PLEASE NOTE: THIS MEDICAL INSTRUMENT MUST BE USED ACCORDING TO INSTRUCTIONS TO ENSURE ACCURATE READINGS.
-
Page 3: Table Of Contents
Microlife Automatic Blood Pressure Monitor Instruction Manual Table of contents Introduction 1.1. Features of your blood pressure monitor 1.2. Important information about self-measurement Important information on blood pressure and its measurement 2.1. How does high/low blood pressure arise? 2.2. Which values are normal? 2.3. -
Page 4: Introduction
1. Introduction 1.1. Features of your Microlife automatic blood pressure monitor Your blood pressure monitor is a fully automatic, digital blood pressure measuring device for use on the upper arm, which enables very fast and reliable measurement of the systolic and diastolic blood pressure as well as the pulse by way of the oscillometric method. -
Page 5: Important Information On Blood Pressure And Its Measurement
2. Important information on blood pressure and its measurement 2.1. How does high/low blood pressure arise? Your level of blood pressure is determined in the circulatory center of the brain and adjusts to a variety of situations through feedback from the nervous system. To adjust blood pressure, the strength and frequency of the heart (Pulse), as well as the width of circulatory blood vessels is altered. -
Page 6: What Can Be Done If Regular High/Low Values Are Obtained
Further information • If your values are mostly normal under resting conditions but exceptionally high under conditions of physical or psychological stress, it is possible that you are suffering from so-called “labile hypertension”. Consult your doctor. • Correctly measured diastolic blood pressure values above 120mmHg require immediate medical treatment. -
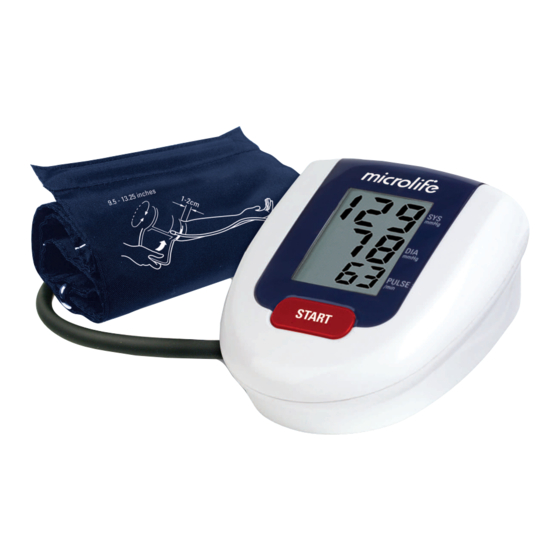
Page 7: Components Of Your Blood Pressure Monitor
B) Previous illnesses • Consistently follow all medical instructions for treating illnesses such as: • Diabetes (Diabetes mellitus or sugar diabetes) • Fat metabolism disorder • Gout C) Habits • Give up smoking completely • Drink only moderate amounts of alcohol •... -
Page 8: Operation Of Your Blood Pressure Monitor
Upper arm cuffs: The cuff is for arm circumference 22–32 cm or 9.5” - 13.25” (included) Microlife sells a large cuff for arm circumference 32-42 cm or 12” - 16” (call 1-800-568-4147 or visit www.microlifeusa.com) Please Note: Do not force cuff connection into the opening. -
Page 9: Using An A/C Power Adapter
• If the power is interrupted during the measurement (e.g. by removal of the adaptor from the wall socket), the instrument must be reset by removing the plug from the instrument. • Please consult Microlife if you have questions relating to the AC adaptor. 4.3. Tube connection Insert the cuff tube into the opening provided on the left side of the instrument, as shown in the diagram. -
Page 10: Common Sources Of Error
The permissible range is printed on the cuff. If this is not suitable for your use, please contact Microlife. Note: Only use clinically approved Microlife Cuffs. • A loose cuff or a sideways protruding air-pocket causes false measurement values. -
Page 11: Measuring Procedure
d) Tighten the cuff by pulling the end and close the cuff by affixing the velcro. Make sure that the cuff Index end falls between the OK lines when the cuff is in position. If it doesn’t, you are using the wrong cuff size. -
Page 12: Discontinuing A Measurement
b) After automatically reaching an individual pressure, the pump stops and the pressure slowly falls. The cuff- pressure is displayed during the measurement. If the inflation pressure is not sufficient, the monitor automatically re-inflates. c) When the device has detected your pulse, the heart symbol in the display begins to blink and a beep tone is audible for every pulse beat. -
Page 13: Error Messages/Troubleshooting
6. Error Messages/Troubleshooting If an error occurs during a measurement, the measurement is discontinued and a corresponding error code is displayed. (Example Error no. 1) Error No. Possible cause(s) ER 1 The systolic pressure was determined but after- wards the cuff pressure fell below 20 mmHg. This situation can occur, for example, if the tube becomes unplugged after the systolic blood pressure has been measured. - Page 14 Other possible errors and their solutions If problems occur when using the device, the following points should be checked: Malfunction Remedy The display remains blank when the instrument is • Check battery installation. switched ON although the batteries are in place. •...
-
Page 15: Care And Maintenance
7. Care and maintenance a) Do not expose the device to either extreme temperatures, humidity, dust or direct sunlight. b) The cuff contains a sensitive air-tight bubble. Handle this carefully and avoid all types of straining through twisting or buckling. c) Clean the device with a soft, dry cloth. -
Page 16: Warranty
8. Warranty Your Microlife blood pressure monitor is guaranteed for 5 years against manufacturers’ defects for the original purchaser only, from date of purchase. The warranty does not apply to damage caused by improper handling, accidents, professional use, not following the operating instructions or alterations made to the instrument by third parties. -
Page 17: Technical Specifications
Made in China Technical alterations reserved! Read the instructions carefully before using this device. Type BF applied part. 11. How to contact us: Distributed by: Microlife USA, Inc. Dunedin, FL 34698 ©2009 Microlife USA, Inc. Toll Free: 1-800-568-4147 Email: custserv@microlifeusa.com www.microlifeusa.com... - Page 18 Introducción 1.1. Características del modelo 1.2. Información importante sobre las automediciones Información importante sobre la presión sanguínea y su medición 2.1. ¿Como se origina la tensión arterial alta/baja? 2.2. ¿Cuales son los valores normales? 2.3. ¿Que podemos hacer si se miden regularmente valores altos/bajos? Los diversos componentes del tensiómetro Puesta en funcionamiento del tensiómetro 4.1.
- Page 19 1. Introducción 1.1.Características del modelo El modelo es un tensiómetro digital totalmente automático con un método de medición oscilométrico que permite una medición rápida y fiable de la presión arterial sistólica, diastólica y de la frecuencia del latido cardiaco. El modelo dispone de una pantalla de cristal líquido de grandes dimensiones, gracias a la cual es posible visualizar claramente el estado de funcionamiento y la presión del brazalete durante toda la medición.
- Page 20 2. Información importante sobre la presión sanguínea y su medición 2.1.¿Cómo se origina la tensión arterial alta/baja? El nivel de la tensión arterial se determina en una zona del cerebro, en el llamado centro circulatorio, y se adapta a cada situación concreta por retroalimentación, a través del sistema nervioso.
- Page 21 + Otras informaciones • En presencia de valores mayoritariamente normales en condiciones de reposo, pero excepcionalmente altos en condiciones de esfuerzo físico o psíquico, puede presentarse una «hipertensión lábil». Consulte a su medico si sospecha que puede ser su caso. •...
- Page 22 Brazalete: Para un brazo de 9.5”-13.25” (22-32cm) de contorno - incluído Para un brazo de 12”-16” (31-41cm)de contorno - accesorio opcional, vendido en las tiendas Microlife Nota: No fuerce la conexión del brazalete en la apertura del medidor. Asegúrese de que la conexión del brazalete no se intenta conectar en la aperture para la conexión...
- Page 23 4. Puesta en funcionamiento del tensiómetro 4.1. Colocación de las pilas Una vez desempaquetado el aparato, inserte primero las pilas. El compartimento de la batería está situado en la parte inferior del aparato (vea la ilustración). a) Retire la tapa como se indica en la figura b) Inserte las pilas (4 x tamaño AA 1.5V), teniendo en cuenta la polaridad indicada.
- Page 24 • Si tiene dudas sobre el adaptador consulte a Microlife. 4.3. Conexión del tubo Introduzca el tubo del brazalete en la toma que se encuentra a la izquierda del aparato, como indica la ilustración.
- Page 25 Una vez ajustado el brazalete, el brazo debe poder ser flexionado. En el caso de que la circunferencia del brazo del paciente no esté comprendida en tales medidas, brazaletes de medidas especiales (accesorios) pueden encontrarse en Microlife. Atención: Usar solamente brazaletes Microlife comprobados clínicamente.
- Page 26 d) Extender la extremidad libre del brazalete y cerrarlo con el cierre de velcro. Con el brazalete en posición, awegúrese de que el extremo Index (del brazalete) se encuentra entre las líneas OK del brazalete. Si no es el caso, usted está usando un brazalete de tamaño incorrecto.
- Page 27 b) Una vez alcanzada la presión inicial del brazalete, la bomba se para y la presión empezará lentamente a disminuir. Veremos visualizada la presión del brazalete y un valor de control. En caso de que la presión de inflado no sea suficiente, el monitor vuelve a inflar el brazalete automáticamente hasta un nivel más elevado.
- Page 28 6. Mensaje de error/funcionamiento defectuoso En caso de errores se visualizarán los siguientes mensajes: Error no. Posible(s) causa(s) ER 1 Se ha determinado la presión sistólica y después la presión del brazalete ha descendido por deba- jo de 20 mmHg.Tal situación puede ocurrir p.ej. cuando después de haber medido la presión sistólica se ha desconectado el tubo del brazalete.
- Page 29 Problemas de mal funcionamiento y su corrección En caso de mal funcionamiento de alguno de los elementos del aparato, compruebe los siguientes puntos y tome las medidas indicadas. Funcionamiento defectuoso Remedio Cuando el aparato se pone en marcha y la 1.
- Page 30 7. Cuidados y mantenimiento a) Evite exponer el tensiómetro a temperaturas extremas, a la humedad, al polvo y a la irradiación de los rayos del sol. b) Quite las manchas del brazalete o la goma con un paño húmedo. No lavar el brazalete. c) Limpiar el aparato con un trapo suave y seco.
- Page 31 8. Garantía Su monitor de presión microlife tiene garantía por 5 años para cubrir defectos de fabricación válidos para el comprador únicamente, a partir de la fecha de adquisición. La garantía no cubre daños causados por mal uso, accidentes, uso profesional, el no seguimiento de las instrucciones de uso o alteraciones hechas al dispositivo por terceras personas.
- Page 32 El fabricante se reserva el derecho de realizar modificaciones en las especificaciones técnicas Lea las instrucciones cuidadosamente antes de usar este dispositivo. Mecanografíe la partición aplicada FB. 11. Contacto para ayuda: Distribuido por: Microlife USA, Inc. Dunedin, FL 34698 ©2009 Microlife USA, Inc. Toll Free: 1-800-568-4147 Email: custserv@microlifeusa.com www.microlifeusa.com...
Need help?
Do you have a question about the BP3AQ1 and is the answer not in the manual?
Questions and answers