Table of Contents
Advertisement
Available languages
Available languages
Advertisement
Chapters
Table of Contents

Related Manuals for Microlife BP3AB0-H


Summary of Contents for Microlife BP3AB0-H
- Page 1 BP 3ABO-H Semi-automatic Blood Pressure Monitor Instruction Manual Tensiómetro automático Instrucciones de uso PLEASE NOTE: THIS MEDICAL INSTRUMENT MUST BE USED ACCORDING TO INSTRUCTIONS TO ENSURE ACCURATE READINGS. Questions? Call toll free at 1-800-568-4147...
-
Page 2: Table Of Contents
Semi-automatic Blood Pressure Monitor Instruction Manual (model # BP 3ABO-H) Table of contents 1. Introduction 1.1 Features of your blood pressure monitor. 1.2 Important information about self-measurement 2. Important information on the subject of blood pressure and its measurement 2.1. How does high/low blood-pressure arise? 2.2. -
Page 3: Introduction
1. Introduction 1.1. Features of your blood pressure monitor. This blood pressure monitor (BP 3ABO-H) is a semi-automatic, digital blood pressure measuring device for use on the upper arm. It enables very fast and reliable measurement of the systolic and diastolic blood pressure as well as the pulse through the oscillometric method of measuring. The device offers a clinically tested measurement accuracy and has been designed to be user- friendly. -
Page 4: Which Values Are Normal
diseases. 2.2 Which values are normal? Blood pressure is too high if at rest, your diastolic pressure is above 90mmHg and/or the systolic blood pressure is over 160mmHg. You should bring these values to the attention of your doctor immediately. Long-term values at this level endanger your health due to the associated advancing damage to the blood vessels in your body. - Page 5 2.3. What can be done if your blood pressure valves are consistently high or low? a) Please consult your doctor. Increased blood pressure values (various forms of hypertension) are associated with considerable health risks. The concern is the arterial blood vessels of your body, which are endangered due to constriction caused by deposits in the vessel walls.
-
Page 6: Inserting The Batteries
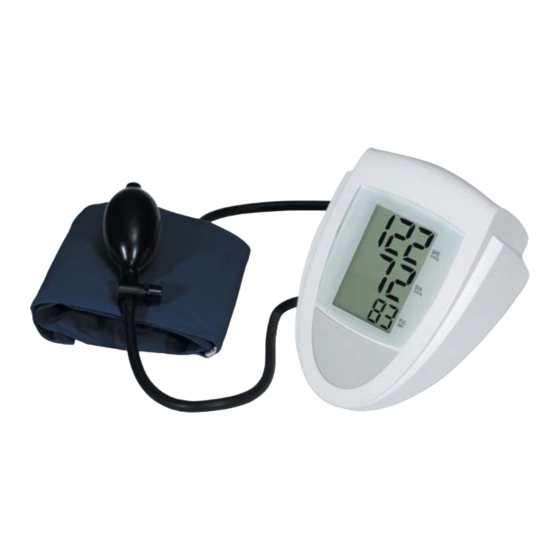
3. Components of the blood-pressure monitor a) Measuring unit Systolic Diastolic Pulse ON/OFF Memory button Quick release valve T Connector Pumping bulb Cuff b) Cuff: Regular cuff (model # S102-m) for arm circumference 9-13” Large cuff for arm circumference 13-17” (available as special accessory) 4. -
Page 7: Tube Connection
• Selecting the correct cuff size is of extraordinary importance. The cuff size is dependent upon the circumference of the arm (measured in the center). The permissible range is printed on the cuff. If your cuff does not fit properly, contact microlife. Note: Only use clinically approved microlife cuffs! •... -
Page 8: Fitting The Cuff
5.3. Fitting the cuff a) Pass the end of the cuff through the metal stirrup so that a loop is formed. The Velcro closer must be facing outwards. (Ignore this step if the cuff has already been prepared.) b) Push the cuff over your left upper arm so that the tube points in the direction of the lower arm. -
Page 9: Measuring Procedure
Comment: If it is not possible to fit the cuff to the left arm, it can also be placed on your right arm. However, all measurements should be made using the same arm. 5.4. Measuring procedure After the cuff has been appropriately positioned, the measurement can begin: a) Switch on the instrument by pressing the On/Off/Memory button. -
Page 10: Inflating Further
5.5. Inflating further If the cuff is not inflated sufficiently, the measurement is stopped after a few seconds and a flashing arrow pointing upwards appears in the display. It is then necessary to inflate at least 20 mmHg higher than the previous value. The instruction to inflate further can appear several times if the pressure is still not sufficient. -
Page 11: Error Messages/Troubleshooting
6. Error messages/Troubleshooting If an error occurs during a measurement, the measurement is discontinued and a corresponding error code is displayed. (example: error no. 1) Error No. Possible cause(s) ERR 1 The systolic pressure was determined but afterwards the cuff pressure fell below 20 mmHg. The tube may have become unplugged. - Page 12 (see technical data) under the supervision of the Technical Monitoring Association Essen (RWTüV-Essen). Contact microlife if there are technical problems with your blood pressure monitor. Never attempt to repair the instrument yourself! Any unauthorised opening of the instrument invalidates all warranty claims!
-
Page 13: Care And Maintenance
Never open the device! This will invalidate the manufacturer warranty. Periodical recalibration Sensitive measuring devices must from time to time be checked for accuracy. We recommend a periodical inspection of your monitor every 2 years. Contact microlife about the need for an accuracy check. -
Page 14: Warranty
8. Warranty The blood pressure monitor (BP 3ABO-H) is waranteed for 5 years from date of purchase. This guarantee includes the instrument and the cuff. The warranty does not apply to damage caused by improper handling, accidents, not following the operating instructions or alterations made to the instrument by third parties. -
Page 15: Technical Specifications
Large cuff for arm circumference 32–42 cm (13”-17”) available as a special accessory. Technical alterations reserved! 11. How to contact us: Microlife USA, Inc. 424 Skinner Boulevard Suite C, Dunedin, FL 34698 Toll Free: 800-568-4147 • Telephone: 727-451-0484 • Fax: 727-451-0492 custserv@microlifeusa.com • www.microlifeusa.com... - Page 16 Tensiómetro semi-automatico Manual de instrucciones Tabla de contenido 1. Introducción 1.1. Características del 3ABO-H 1.2. Información importante sobre las automediciones 2. Informaciones importantes sobre la tensión arterial y su medición 2.1. ¿Cómo se origina la tensión arterial alta/baja? 2.2. ¿Cuáles son los valores normales? 2.3.
-
Page 17: Introducción
1. Introducción 1.1. Características del BP 3ABO-H El tensiómetro digital BP 3ABO-H es un aparato semi-automático que permite medir la presión arterial sistólica y diastólica y el pulso, de forma rápida y fiable, mediante un método de medición oscilométrico. El aparato ofrece una exactitud de medición muy alta y clínicamente comprobada, y ha sido diseñado para proporcionar un máximo de sencillez en su utilización. -
Page 18: Cuáles Son Los Valores Normales
2.2 ¿Cuáles son los valores normales? La tensión arterial es excesiva si en reposo la presión diastólica es superior a 90 mmHg y/o la presión arterial sistólica es superior a 160mmHg. En este caso, consulte con su médico de forma inmediata. -
Page 19: Qué Podemos Hacer Si Se Miden Regularmente Valores Altos/Bajos
2.3. ¿Qué podemos hacer si se miden regularmente valores altos/bajos? a) Consulte con su médico. b) Los valores altos de la tensión arterial (diversas formas de hipertensión) están asociadas a medio y largo plazo con riesgos importantes para la salud. Esto afecta a los vasos sanguíneos de su cuerpo, que están en peligro debido a la constricción causada por los depósitos en las paredes de los vasos (arterioesclerosis). -
Page 20: Los Diversos Componentes Del Monitor De Tensión Arterial
D) Constitución física • Haga deporte de forma regular. • Elija deportes que requieran vigor y evite aquellos que requieran fuerza. • Evite llegar al límite de su capacidad. • En caso de haber sufrido enfermedades con anterioridad y/o tener una edad superior a los 40 años, consulte con su médico antes de comenzar a practicar deporte. -
Page 21: Puesta En Funcionamiento Del Monitor De Tensión Arterial
4. Puesta en funcionamiento del monitor de tensión arterial 4.1. Colocación de las pilas Una vez desempaquetado el aparato, inserte primero las pilas. El compartimento de la batería está situado en la parte inferior del aparato (vea la ilustración). a) Retire la tapa como se indica en la figura b) Inserte las pilas (4 x tamaño AA 1.5V), teniendo en cuenta la polaridad indicada. -
Page 22: Desarrollo De Una Medición
5. Desarrollo de una medición 5.1. Antes de la medición: • Evite comer, fumar, así como cualquier forma de ejercicio directamente antes de la medición. Todos estos factores influyen sobre el resultado de la medición. Busque y encuentre tiempo para relajarse sentado en un sillón en una atmósfera tranquila durante unos diez minutos antes de la medición. -
Page 23: Ajuste Del Brazalete
5.3. Ajuste del brazalete a) Pasar el extremo del brazalete (con tope de goma integrado) a través del arco metálico. El cierre de Velcro debe quedar mirando al exterior. (Si el brazalete ya está preparado, sáltese este paso.) b) Coloque el brazalete en la parte superior del brazo, de manera que el tubo señale la parte inferior del brazo. -
Page 24: Procedimiento De Medición
5.4. Procedimiento de medición Una vez colocada la muñequera correctamente, puede comenzar la medición: a) Ponga en marcha el aparato presionando el botón O/I y Memoria. El tubo no debería estar,aún, conectado al aparato. En la pantalla aparece lo siguiente durante 2 segundos: (Diagrama.)., Un corto pi-pi-piip indica que el aparato ha equilibrado su presión con la ambiental y la medición puede empezar. -
Page 25: Inflado Adicional
5.5. Inflado adicional Cuando el brazalete no se ha inflado lo suficiente, la medición se interrumpe y tras unos segundos aparece en la pantalla una flecha que señala hacia arriba. Indica que es neceario inflar más el brazalete, como mínimo hasta alcanzar 20 mmHg por encima del valor anterior. -
Page 26: Mensajes De Error/Funcionamiento Defectuoso
.6. Mensajes de error/funcionamiento defectuoso Si se produce un error durante una medición, se interrum-pe la medición y se visualiza el correspondiente código de error (ejemplo: error nº 1). Error No. Posible(s) causa(s) ERR 1 Se ha medido la presión sistólica, pero después la presión del brazalete ha descendido por debajo de 20 mmHg. - Page 27 Otros posibles funcionamientos defectuosos y su solución Si aparecen problemas al usar el aparato, deben comprobarse los siguientes puntos y, si es necesario, deben tomarse las medidas correspondientes: Funcionamiento defectuoso Remedio La pantalla permanece vacía al conectar el 1. Compruebe que la polaridad de las pilas aparato a pesar de que las pilas están sea la correcta y si es necesario colocadas.
-
Page 28: Cuidados Y Mantenimiento, Recalibración
Consulte con su farmacéutico o vendedor especializado si su tensiómetro presenta problemas técnicos. No intente jamás arreglar el instrumento Ud. mismo. La abertura no autorizada del instrumento dejará sin efecto cualquier reclamación de garantía. 7. Cuidados y mantenimiento, recalibración a) Evite exponer el tensiómetro a temperaturas extremas, a la humedad, al polvo y a la irradiación de los rayos del sol. -
Page 29: Estándares De Referencia
9. Estándares de referencia Estándar del aparato: El aparato cumple los requerimientos del estándar europeo sobre instrumentos de control de la presión arterial no invasivos EN1060-1 / 12:95 EN1060-3 / 09:97 DIN 58130, NIBP – investigación clínica ANSI / AAMI SP10, NIBP – requerimientos Compatibilidad electromagnética: El aparato cumple las especificaciones del estándar europeo EN 60601-1-2 Ensayo clínico:... -
Page 30: Especificaciones Técnicas
10. Especificaciones técnicas Peso: 265 g (pilas incluidas) Dimensiones: 131 x 174 x 73 mm –5 a +50°C Temperatura de almacenamiento: Humedad: 15 a 85% de humedad relativa como máximo Temperatura de funcionamiento: 10 a 40°C Pantalla: Pantalla LCD (display de cristal líquido) Método de medición: oscilométrico Sensor de presión:...
Need help?
Do you have a question about the BP3AB0-H and is the answer not in the manual?
Questions and answers