
Related Manuals for Ganz ZN1-V4FN3


Summary of Contents for Ganz ZN1-V4FN3
- Page 1 PixelPro GXi IPX/IPN Series ZN1-V4FN3/FN4IPN8102 Installation Guide ZN1-V4FN3, ZN1-V4FN4 04-2014-A...
-
Page 2: Precaution
PixelPro GXi Series ZN1-V4FN3/FN4 Installation Guide Precaution Please read this manual carefully before installing the units. Never disassemble the main unit and the camera unit. Unauthorized disassembly may cause equipment failure or damage to the unit. Do not install the product on unstable brackets, unstable or vibrating surfaces since this could cause damage to the product. -
Page 3: Safety Instruction
PixelPro GXi Series ZN1-V4FN3/FN4 Installation Guide Safety Instruction 1) Read these instructions. 2) Keep these instructions. 3) Heed all warnings. 4) Follow all instructions. 5) Do not use this apparatus near water. 6) Clean only with a dry cloth. 7) Do not block any of the ventilation openings. Install in accordance with the manufacturer's instructions. -
Page 4: Table Of Contents
PixelPro GXi Series ZN1-V4FN3/FN4 Installation Guide Table of Contents Precaution ........................... 2 Safety Instruction ........................ 3 1. FEATURES ........................5 2. PACKAGE CONTENTS ......................6 3. PART NAMES ........................7 4. INSTALLATION ......................... 9 4.1. Camera Unit Installation ....................9 4.2. -
Page 5: Features
PixelPro GXi Series ZN1-V4FN3/FN4 Installation Guide 1. FEATURES Camera Pinhole camera 1/3” 1080p CMOS Image Sensor Digital Day/Night Digital WDR Video H.264 Baseline, Main, High profile(MPEG-4 Part 10/AVC), MJPEG(Motion JPEG) Max 30fps in 1080p ... -
Page 6: Package Contents
PixelPro GXi Series ZN1-V4FN3/FN4 Installation Guide 2. PACKAGE CONTENTS Please unpack the package carefully and handle the equipment with care. The package contains: Camera Unit Main Unit Universal Plugs Power Adaptor (12VDC) Double-sided tape Covert Cover Rotate Ring Surface Mount Bracket... -
Page 7: Part Names
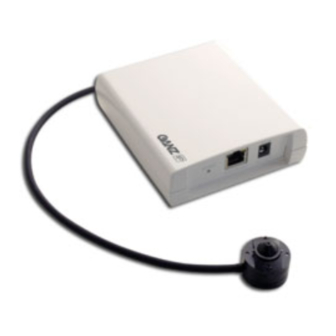
PixelPro GXi Series ZN1-V4FN3/FN4 Installation Guide 3. PART NAMES Main Unit ④ ⑤ ⑥ ⑦ * Model herein and its appearance are subject to change without any prior notice. ① Terminal connector Connector for cable connection for digital input / output. Refer to “... - Page 8 PixelPro GXi Series ZN1-V4FN3/FN4 Installation Guide Camera Unit with conjoined accessories ① ③ ④ ⑤ ② * Models herein and their appearance are subject to change without any prior notice. ① Camera Pinhole camera ② Camera DIN connector Connector to be inserted to the camera connector on the main unit ③...
-
Page 9: Installation
PixelPro GXi Series ZN1-V4FN3/FN4 Installation Guide 4. INSTALLATION The installation method of ZN1-V4FN3 and ZN1-V4FN4 is identical. The installation method of the camera unit differs depending on your bracket type, but the rest of the overall installation process is the same. - Page 10 PixelPro GXi Series ZN1-V4FN3/FN4 Installation Guide 3) Peel off the other side of the tape, and stick (Behind the wall or the taped surface to the installation surface above the ceiling) by placing it with the screw head upward and...
- Page 11 PixelPro GXi Series ZN1-V4FN3/FN4 Installation Guide Surface Installation for fixed angle 1) Place the camera on a desired installation surface. 2) Cover the camera with the surface mount bracket by routing the camera’s cable into the cable holder on the bracket. Then, fasten...
- Page 12 PixelPro GXi Series ZN1-V4FN3/FN4 Installation Guide Surface Installation for pan/tilt adjustment 1) Drill a hole on a desired installation surface, and insert an anchor block into the hole. 2) Fix the pan/tilt bracket by inserting the tapping screw (M4x25) to be passed through the screw hole on the bracket and tightening it into the anchor block.
-
Page 13: Main Unit Installation
PixelPro GXi Series ZN1-V4FN3/FN4 Installation Guide 4.2. Main Unit Installation The main unit can be mounted on the installation surface by the built-in slide plates. 1) Pull out both slide plates at the bottom of the main unit. 2) Place the main unit on the installation surface by... -
Page 14: Setting The Image Attribute
PixelPro GXi Series ZN1-V4FN3/FN4 Installation Guide 4.3. Setting the Image Attribute Through the camera’s webpage, users can configure image settings. The menu of image attribute is available under Video Appearance menu in Setup > Video & Audio > Camera. The... -
Page 15: Connections
PixelPro GXi Series ZN1-V4FN3/FN4 Installation Guide 5. CONNECTIONS DI/DO terminal connector 1) Connect external input/output devices (e.g. alarm device) optionally if they are necessary. Refer to the reference below for the appropriate connections. DO (Alarm) – For connecting an external device such as relays and LEDs. - Page 16 PixelPro GXi Series ZN1-V4FN3/FN4 Installation Guide DI (Sensor) – For connecting a device such as a PIR and a door/window sensor. Do the electrical wiring correctly referring to the following information. Function Specifications Ground Input 0 to 5 VDC Max load: 50mA Internal +3.3V...
- Page 17 PixelPro GXi Series ZN1-V4FN3/FN4 Installation Guide LAN connector 3) Connect the main unit to the network using an Ethernet cable (RJ45). Then, install the ferrite core on the Ethernet cable. Refer to the explanations below for the ferrite core installation.
-
Page 18: Configuration
PixelPro GXi Series ZN1-V4FN3/FN4 Installation Guide 6. CONFIGURATION 6.1. Set up network environment The default IP address of the device is 192.168.XXX.XXX. Users can identify the IP address of the device from converting the MAC address’s hexadecimal numbers, which is attached to the device. -
Page 19: Custom Ip Environment
PixelPro GXi Series ZN1-V4FN3/FN4 Installation Guide 6.1.2. Custom IP Environment IPAdminTool is a management tool, which automatically scans all of the network products for users to perform administrative tasks, which includes network configurations, firmware update, device reboot, and device organizations. -
Page 20: View Video On Web Page
PixelPro GXi Series ZN1-V4FN3/FN4 Installation Guide 6.2. View video on web page Type the proper IP address to view the live streaming images through a web browser. The default username and password is root / pass. 6.2.1. ActiveX Installation When the browser asks to install the AxUMF software, click “Install” to proceed. -
Page 21: View Video Using Ipadmin Tool
PixelPro GXi Series ZN1-V4FN3/FN4 Installation Guide 6.2.2. View video using IPAdmin Tool IPAdminTool automatically searches all activated network encoders and IP cameras and shows the product name, IP address, MAC address and etc. 1. From the IPAdminTool’s product list, select the device by highlighting it. -
Page 22: Reset
PixelPro GXi Series ZN1-V4FN3/FN4 Installation Guide 6.3. Reset Perform the following procedures to reset your device: Press the reset button for 2 seconds while the device is in use. Wait for the system to reboot. Please do not hold for more than 2 seconds. Otherwise, the camera may be switched to its Factory Default settings. -
Page 23: Safe Mode
PixelPro GXi Series ZN1-V4FN3/FN4 Installation Guide 6.5. Safe Mode What is Safe Mode? Your IP camera or encoder could encounter an unexpected occasion such as broken firmware file or uncompleted loading of firmware file during system booting. To restore the device from the occasions, the device provides the emergency firmware as a factory default. - Page 24 PixelPro GXi Series ZN1-V4FN3/FN4 Installation Guide There is another method to update firmware, which is using IPAdminTool. Please refer to ‘IPAdminTool User’s Manual.pdf’ for the detailed procedure. Note If your device is still at safe mode after trying to update firmware, please contact your local agency to get further assistance.
-
Page 25: Appendix (A): Specifications
PixelPro GXi Series ZN1-V4FN3/FN4 Installation Guide APPENDIX (A): SPECIFICATIONS Summary Camera Module Image Sensor 1/3” 1080p CMOS CMOS Effective Pixels 1920 x 1080 Scanning system Progressive scanning Resolution 1920 x 1080 ZN1-V4FN4 Min. Color: 1.4Lux / BW: 0.01Lux (DSS ON) -
Page 26: Electrical Characteristics
PixelPro GXi Series ZN1-V4FN3/FN4 Installation Guide Electrical Characteristics Power Source 12VDC / PoE (IEEE802.3af ) Power Consumption 3.6W @ 12VDC Video Output Audio Input Audio Output Max 50mA@5VDC, TTL level 1.5V threshold Max 50mA@24VDC On-state resistance:50 Ω (max continuous) Environment Condition... -
Page 27: Appendix (B): Power Over Ethernet
PixelPro GXi Series ZN1-V4FN3/FN4 Installation Guide APPENDIX (B): POWER OVER ETHERNET The Power over Ethernet (PoE) is designed to extract power from a conventional twisted pair Category 5 Ethernet cable, conforming to the IEEE 802.3af Power-over-Ethernet (PoE) standard. The IEEE 802.3af allows for two power options for Category 5 cables. -
Page 28: Appendix (C): Dimensions
PixelPro GXi Series ZN1-V4FN3/FN4 Installation Guide APPENDIX (C): DIMENSIONS [ Main Unit ] (Unit: mm) 06-2014-B... - Page 29 PixelPro GXi Series ZN1-V4FN3/FN4 Installation Guide [ Camera Unit ] (Unit: mm) 06-2014-B...
- Page 30 PixelPro GXi Series ZN1-V4FN3/FN4 Installation Guide [ Bracket ] Covert Cover Surface Mount Bracket Pan / Tilt Bracket (Unit: mm) 06-2014-B...
-
Page 31: Appendix (D): Hexadecimal-Decimal Conversion Table
PixelPro GXi Series ZN1-V4FN3/FN4 Installation Guide APPENDIX (D): HEXADECIMAL-DECIMAL CONVERSION TABLE Refer to the following table when converting the MAC address of the device to the IP address. Hex Dec 06-2014-B... - Page 32 PixelPro GXi Series ZN1-V4FN3/FN4 Installation Guide 06-2014-B...
- Page 33 PixelPro GXi Series ZN1-V4FN3/FN4 Installation Guide 06-2014-B...
- Page 34 PixelPro GXi Series ZN1-V4FN3/FN4 Installation Guide 06-2014-B...
-
Page 35: Revision History
PixelPro GXi Series ZN1-V4FN3/FN4 Installation Guide REVISION HISTORY MAN# DATE(M/D/Y) Comments 06-2014-A 06/06/2014 First release version 06-2014-B 06/10/2014 Revised screws information 06-2014-B...
Need help?
Do you have a question about the ZN1-V4FN3 and is the answer not in the manual?
Questions and answers