Table of Contents
Advertisement
Quick Links
Advertisement
Table of Contents

Related Manuals for iNFinuvo Hovo 510


Summary of Contents for iNFinuvo Hovo 510
- Page 1 Model No. Hovo 510...
-
Page 2: Table Of Contents
Contents Contents…………………………………………………………………………………………… Applications……………………………………………………………………………………… Main Features…………………………………………………………………………………… Package Contents……………………………………………………………………………… Introduction……………………………………………………………………………………… Structure Introduction………………………………………………………………………………………… Battery Installation & Replacement………………………………………………………………………… Cleaner Operations…………………………………………………………………………………………… Manual Charging & Auto Charging………………………………………………………………………… Remote Control……………………………………………………………………………………………… Virtual Blocker………………………………………………………………………………………………… Charging Station……………………………………………………………………………………………… Maintenance of the Cleaner…………………………………………………………………… Dust Bin………………………………………………………………………………………………………… Filter…………………………………………………………………………………………………………… Main Brush and Floor Brush………………………………………………………………………………… Front Wheel…………………………………………………………………………………………………… Trouble Shooting…………………………………………………………………………………... -
Page 3: Applications
Applicability: This roboticvacuum cleaner is designed to be used in homes and small offices. It is not for outdoor use or commercial use. It has excellent cleaning results on various hard floors (wood, tile, stone, vinyl, etc) and short-pile carpets. NOTE: It is not suitable for cleaning plush or long-pile carpets. -
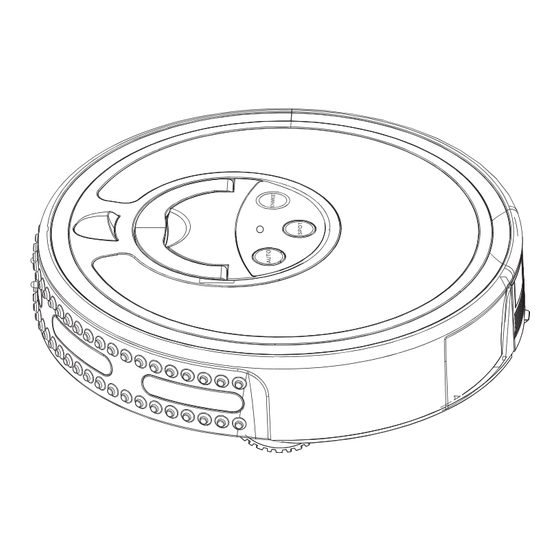
Page 4: Introduction
Introduction Main Unit Features SPOT/spot cleaning AUTO/automatic cleaning Handle Power indicator CHARGE / charge Top cover Signal receiver Auto-charging electrodes obstacle d tection sensors Floor brush Left wheel Dust box UV light Cliff detection sensor Main brush Battery cover Power switch Front wheel Side brush DC socket... -
Page 5: Battery Installation & Replacement
Battery Replacement & Install 1. Remove 2 screws to open battery compartment door. (See Fig. 1) 2. Connect battery plug to the connector on main unit. (See Fig. 2) 3. Make sure battery polarity is correct to avoid potential damage to the machine. 4. - Page 6 Battery replacement on Virtual Blocker: 1. Open battery door (see Fig. 1). 2. Install 2 AA size batteries (not included) in correct polarity (+/-) (See Fig. 2 and Fig. 3) 3. Please take the battery out if the cleaner will not be used for a long time. Fig 2 Fig 1 Fig3...
-
Page 7: Cleaner Operations
Functions of Buttons Power Switch (on main unit): After the cleaner is powered on, it will enter into standby mode, and power indicator light would be on. Tips: The power indicator light is on when the cleaner is working; The power indicator is blinking when battery charging is in progress; The power indicator will stop blinking after it is fully charged. -
Page 8: Manual Charging & Auto Charging
Manual Charging & Auto Charging: Manual Charging: 1. You can use either AC adapter or charging station to charge the cleaner manually. 2. Method 1: Turn on the cleaner and connect adapter’s output plug to the socket on cleaner (See Fig. 1). manual charging Fig.1 3. -
Page 9: Remote Control
Remote Control: Control Panel of Remote Control: Day of week Emission signal Current time Pre-set to select all or turn Scheduled clean time off charging indicators Set cleaning schedule Charge Set current time (clock) TIMER Speed Automatic cleaning Stop Power button Spot cleaning Confirm Direction buttons... - Page 10 Functions Introduction of Remote Control: SPEED selection: press “SPEED” button on the remote control, you can choose fast or slow speed. fast speed slow speed TIMER (Setting up clock) Press “ ” button first and then press button to move the blinking digit on the remote TIMER control screen to switch between hour, minute &...
-
Page 11: Virtual Blocker
Virtual Blocker: Signal transmitting Power indicator Power switch Code check button Tip: You should perform code check before using Virtual blocker; otherwise it will not work. Code check steps: A : Turn off the cleaner first, and turn on the Virtual blocker (with power indicator on); B : Keep holding the code check button on the Virtual blocker;... -
Page 12: Charging Station
Charging Station: indicator Infrared signal transmitting window Code check button (backside) Charging electrode DC socket Tips: Before you use the charging station, code check is required. Otherwise, it will not work. Code check steps: A: Turn off the cleaner; B: Press and hold the code check button of docking station; (Tip: code check button is inside a hole, so you need to use a tool to press it down) C: Turn on the cleaner;... -
Page 13: Maintenance Of The Cleaner
Maintenance of the Cleaner: Removal of Dust Bin: A. Hold the bottom of cleaner with your hand, and press the release button on dust bin (See Fig. 1) Fig. 1 B. Remove the dust bin from cleaner. (See Fig. 2) Fig. -
Page 14: Filter
Filter Replacement & Cleaning: A. Press the two side clips over the dust bin to open the fencing plate. If the rubber part attached to fencing plate is worn out, you need to take it out and replace it. (See Fig. 1) Take out Fig. -
Page 15: Main Brush And Floor Brush
Tip: Sometimes, the rubber cleaning head might fall off when you clean the dust bin. Please follow the instruction below to re-install it. Rubber cleaning head Fig. 1 Fig. 2 Fig. 3 1. Put the dustbin and rubber cleaning head in position as shown in Fig. 1. 2. -
Page 16: Front Wheel
Cleaning of Main Brush and Floor Brush: 1. To keep your cleaner always working at peak performance, regularly clear hairs and debris around the brushes & wheels. Clean the dust around the air intake. Rotate the brush slowly and cut any tangled hair and twisted thread, etc with scissors or pull them out. -
Page 17: Technical Specifications
Technical Specifications: Main Cleaner Unit Rated Voltage DC 14.4V Battery Ni-MH battery (normal charging time: 3~4 hours) Running Time 60 min. Rated Power ºF Operating Temperature 14 to 113 Operating Humidity Range ≤ 90% RH Wireless Remote ISM Frequency Band 2.4GHz Dimensions 12.6 in. -
Page 18: Safety Precautions
Safety Precautions: Caution No one else can disassemble, maintain or Don’t use other charger from other supplier, transform product except or it may cause damage to the cleaner. qualified technicians designated by manufacturer, or it may cause electric shock or personal injury. Don’t over bend the power cord or Don’t touch power cord with wet hand, put large weight on it, or it may cause short... - Page 19 "CE" marking states that the product is compliant to European Directives: 2006/95/EC Low Voltage Directive 2004/108/EC EMC Directive It is possible to request a full copy of Declaration of compliance to the Distributor: This product comply with the rules of RoHs Directive(2002/95/CE) This product comply with the rules of EupDirective(2002/125/CE) Contact Technical Service Center (www.hovobots.com) for warranty service.
Need help?
Do you have a question about the Hovo 510 and is the answer not in the manual?
Questions and answers