Table of Contents
Advertisement
Quick Links
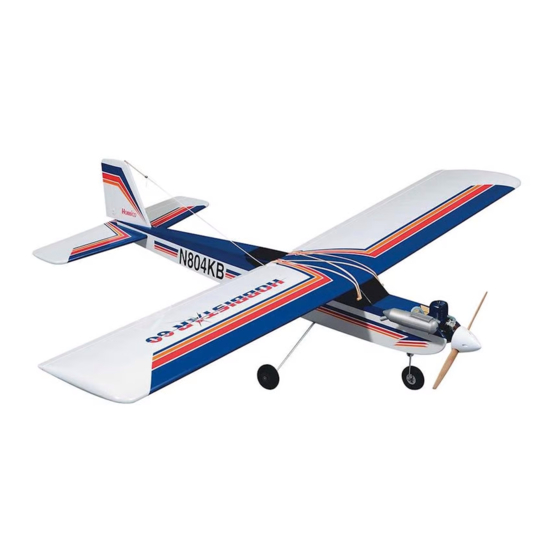
Wingspan: 71" [1,803mm]
Wing area: 887.5" [57.24 sq. dm.]
Weight: 7 lbs [3,630g]
Wing loading: 18 oz/sq ft [55 g/sq. cm]
Length: 55" [1,397mm]
Radio: 4-ch (four servos)
Engine: .61 two-stroke, .91 four-stroke
[10cc 2-stroke, 15cc 4-stroke]
If you, as the original owner of this model, discover defects in parts and workmanship within 90 days of purchase, Hobbico will repair or replace
it – at the option of our authorized U.S. repair facility, Hobby Services – without charge. Our liability does not include the cost of shipping to us.
However, Hobby Services will pay shipping expenses to return your model to you. You must provide proof of purchase, such as your original
purchase invoice or receipt, for your model's warranty to be honored. This warranty does not apply to damage or defects caused by misuse or
improper assembly, service or shipment. Modifications, alterations or repair by anyone other than Hobby Services voids this warranty. We are
sorry, but we cannot be responsible for crash damage and/or resulting loss of kits, engines, accessories, etc.
Your Hobbistar .60 MKII ARF must be returned directly to Hobby Services for warranty work. The address is: Hobby Services, Attn: Service
Department, 1610 Interstate Drive, Champaign, IL 61822-1067. Phone: (217) 398-0007. Please follow the instructions below when returning
your model. This will help our experienced technicians to repair and return it as quickly as possible.
1. ALWAYS return your entire system, including airplane and radio.
2. Disconnect the receiver battery switch harness and make sure that the transmitter is turned off. Disconnect all batteries and drain all fuel.
3. Include a list of all items returned and a THOROUGH, written explanation of the problem and service needed. If you expect the repair to be
covered under warranty, also include your proof of purchase.
4. Include your full return address and a phone number where you can be reached during the day.
If your model is past the 90 day warranty period or is excluded from warranty coverage, you can still receive repair service through Hobby Services
at a nominal cost. Repair charges and postage may be prepaid or billed COD. Additional postage charges will be applied for non-warranty returns.
All repairs shipped outside the United States must be prepaid in U.S. funds only. All pictures, descriptions and specifications found in this
instruction manual and on the product package are subject to change without notice. Hobbico maintains no responsibility for inadvertent errors.
© Copyright 2001
ASSEMBLY INSTRUCTIONS
90-DAY LIMITED WARRANTY
HCAZ3083 for HCAA2101 V1.0
Advertisement
Table of Contents

Related Manuals for Hobbico Hobbistar 60 MKII


Summary of Contents for Hobbico Hobbistar 60 MKII
-
Page 1: Assembly Instructions
90-DAY LIMITED WARRANTY If you, as the original owner of this model, discover defects in parts and workmanship within 90 days of purchase, Hobbico will repair or replace it – at the option of our authorized U.S. repair facility, Hobby Services – without charge. Our liability does not include the cost of shipping to us. - Page 2 As a distributor, we support our retailers by referring all business to them, so our support team does not normally sell these items. Please feel free to visit www.hobbico.com and click on “Where to Buy” to assist you in locating a dealer in your area.
- Page 3 Kit / Airframe Parts & Hardware Hardware Kit / Airframe Parts 11 Wing Joiner 12 Aileron Servo Tray 1 Wing with Ailerons 13 Plywood Servo Tray 2 Fuselage 14 Engine Mount Straps 3 Stab with Elevators 15 Aileron Servo Tray Blocks 4 Fin with Rudder 16 Wing Joining Tape 5 Spinner...
-
Page 4: Radio Equipment
Other Items You’ll Need: Glues Choose 6-minute and 30-minute epoxy, such as Great Planes ® ™ Epoxy, which has been formulated especially for R/C model building. Pro Epoxies offer a strong bond and a variety of curing times suited for every step of assembly. -
Page 5: Before You Fly
Protect Your Model, Yourself & Others... Follow This Important Safety Precaution than 2,500 chartered clubs across the country. our Hobbico Hobbistar .60 MKII is not a toy, Through the AMA, you should either be able to but rather a sophisticated, working model that locate a modeler nearby that can help, or at functions very much like an actual airplane. -
Page 6: Wing Assembly
Wing Assembly 4. Use masking tape to hold the two wing halves together while the epoxy cures. Wipe away any excess epoxy from the wing surface with Isopropyl 1. Locate three plywood wing joiners. Using alcohol. 6-minute epoxy, glue them together to form the wing joiner. -
Page 7: Prepare The Fuselage
6. Use a hobby knife to cut away the material that you have just marked with the felt-tip pen. Cut lightly, being sure that you do not cut into the surface of the wood. 8. Locate the blue wing joining material. Peel off the backing and carefully place it over the seam on the top and bottom of the wing. - Page 8 2. Turn the fuselage over and cut away the 6. Apply a piece of masking tape across the top covering on the bottom of the fuselage for the of the fuselage at the back of the wing saddle. landing gear. Mark the center of the fuselage on the tape.
- Page 9 8. Once the stab has been properly positioned, 11. With the stabilizer in place in the rear of the use a felt-tip marker and trace the outline of the fuselage, step back a few feet and look at the fuse onto the stabilizer. Do this on both the top and stabilizer in relation to the wing.
-
Page 10: Landing Gear Installation
Use a triangle to make sure that the fin is to be drilled at a 30° angle. Cut one of the white perpendicular to the stab. Once you are satisfied tubes to 11" and rough it up with 240-grit sandpaper. with the fit, glue the fin to the fuselage with Insert the tube into the fuselage so that the end of 6-minute epoxy. -
Page 11: Engine Installation
Engine Installation 6. Slide the 18" wire control rod into the white nylon tube. Install the wire onto the control horn 1. Locate the two metal engine mount straps. and retain it in place with the 1/16" wheel collar and 4-40 set screw. 2. -
Page 12: Pushrod Installation
4. Assemble the fuel tank using the above sketch and the following instructions. Push the two aluminum tubes through the rubber stopper until 1/2" [13mm] of the tubes protrudes from the front of the stopper. Slide the large cap onto the front of 8. -
Page 13: Radio Installation
HINGE LINE CORRECT INCORRECT 2. Insert the threaded end of the elevator 4. Position the rudder control horn on the pushrod into the fuselage, working it around until rudder. Make a mark with a felt-tip pen where the the end of the rod is extending through the exit hole holes need to be drilled. - Page 14 Mount the switch to the fuselage following the instructions included with your radio system. 5. Plug the switch into the receiver and the 2. Using the hardware that comes with your receiver battery. Plug the servos into the receiver servos, install the servos as shown. Use a 1/6" (consult your radio instruction manual for proper [1.5mm] drill to pre-drill the holes for the servo installation if you are unfamiliar with this).
- Page 15 10. Turn on the transmitter and receiver. Set the throttle to full open. Install the pushrod into the 7. Set the rudder and elevator so they are in the other screw-lock pushrod connector, then open the neutral position as shown. carburetor on your engine to full open.
-
Page 16: Final Assembly
15. Cut off two leftover servo arms as shown in the above diagram. These will be used to make a simple strain relief for your receiver antenna. 17. After cutting the servo arms, thread the antenna through the hole you drilled in the fuselage and attach the antenna to the vertical fin with a rubber band and T-pin as shown above. -
Page 17: Control Surface Throws
Control Surface Throws 4-CHANNEL RADIO SETUP (STANDARD MODE 2) Note: Throws are measured at the widest part of ELEVATOR MOVES UP the elevators, rudder and ailerons. We recommend 4-CHANNEL TRANSMITTER the following control surface throws as a starting point: RIGHT AILERON MOVES UP LEFT AILERON MOVES DOWN 4-CHANNEL TRANSMITTER... -
Page 18: Charge The Batteries
nose drops, it is “nose heavy” and you must add Charge the Batteries weight* to the tail to balance the model. Note: Nose weight may be easily installed by using Follow the battery charging procedures in your a “spinner weight.” Tail weight may be added by radio instruction manual. -
Page 19: Ground Check The Model
Use safety glasses when starting or running Ground Check the Model engines. Do not run the engine in an area of loose gravel or sand; the propeller may throw such Inspect your radio installation and confirm that all material in your face or eyes. the control surfaces respond correctly to the Keep your face and body as well as all spectators transmitter inputs. - Page 20 Elasticity present in flexible plastic pushrods; Side-play of pushrod in guide tube caused by tight You will find the Hobbistar 60 MKII a predictable, bends; Sloppy fit of Z-bend in servo arm; easy flying airplane. The plane is very good for...
-
Page 21: Flight Trimming
attitude plane descends. Maintain bottom of the aft fuse. Make the string into a bridle harness and suspend the entire model inverted (yes, approximately 1/3rd throttle until you are above the with the wing on!). If the right wing always drops, sink end of the runway. - Page 22 is correct, the model should continue along the same flight vertical fall off, as will rudder errors. Even though we path for at least a dozen plane lengths before gravity balance the wing statically before leaving for the field, we starts to naturally bring it down.
- Page 23 TRIM FEATURE MANEUVERS OBSERVATIONS CORRECTIONS CONTROL Fly general circles and Try for hands off straight Readjust linkages so that CENTERING random maneuvers. and level flight. Tx trims are centered. CONTROL Random maneuvers A. Too sensitive, jerky If A, change linkages to THROWS controls.
- Page 24 BUILDING NOTES Kit Purchased Date: __________________ Date Construction Finished: __________ Where Purchased: ___________________ Finished Weight:____________________ Date Construction Started: _____________ Date of First Flight:__________________ FLIGHT LOG...
Need help?
Do you have a question about the Hobbistar 60 MKII and is the answer not in the manual?
Questions and answers