
Related Manuals for Azkoyen VITALE S


Summary of Contents for Azkoyen VITALE S
-
Page 1: User Manual
AZKOYEN USER MANUAL VITALE “S” COFFEE MACHINE MANUAL REFERENCE: 81037070; EDITION 01-2013... - Page 2 User Manual - 2 -...
-
Page 3: Table Of Contents
User Manual USER MANUAL .......................... 1 VITALE “S” COFFEE MACHINE....................1 WARNINGS..........................4 General Maintenance Electrical CHAPTER 1. GENERAL CHARACTERISTICS................6 1.1.- Description of the machine. 1.3.- Description of the main components CHAPTER 2. INSTALLATION AND STARTING-UP ..............8 2.1.- Choice of location for the machine 2.2. -
Page 4: Warnings
Incorrect use of the machine The use of non-original replacement parts and unauthorised modifications AZKOYEN reserves the right to apply improvements arising as a result of its constant research to the present model without prior notice. This manual is an integral part of the machine and, as such, must always be kept inside it so that it may be consulted at any time. -
Page 5: Electrical
THE MACHINE INCLUDES DANGEROUS HIGH-VOLTAGE COMPONENTS. DO NOT DISCONNECT ANY COMPONENT. ONLY THE TECHNICAL SERVICE IS AUTHORISED TO DO SO. THE POWER CABLE MAY ONLY BE REPLACED BY TECHNICAL STAFF AUTHORISED BY AZKOYEN. Make sure that the electrical installation, socket and automatic switch are appropriately dimensioned for machine consumption. -
Page 6: Chapter 1. General Characteristics
User Manual CHAPTER 1. GENERAL CHARACTERISTICS 1.1.- Description of the machine. The machines on the VITALE range are TABLETOP coffee soluble beverage machines especially designed for use in areas with medium coffee consumption, such as waiting rooms, medium-sized offices, etc. There are three machine configuration options: Instant, only with soluble products... -
Page 7: Description Of The Main Components
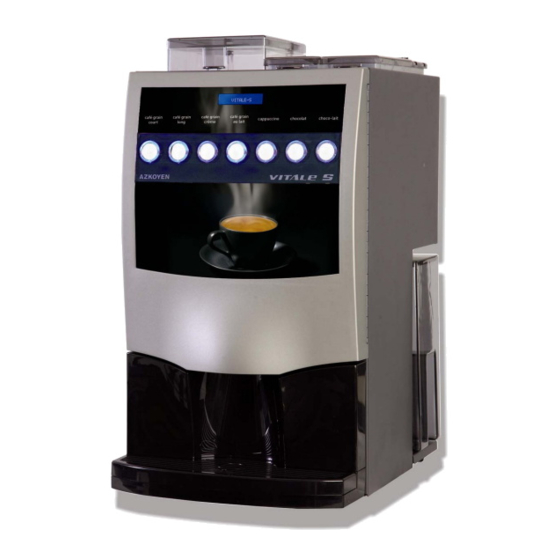
User Manual 1.3.- Description of the main components Coffee bean container Soluble product container Ground coffee doser Soluble product blender Coffee bean group Rubber threshold Drip tray Programming button Upper photo Display Lower photo Tray full level Water tank - 7 -... -
Page 8: Chapter 2. Installation And Starting-Up
User Manual CHAPTER 2. INSTALLATION AND STARTING-UP 2.1.- Choice of location for the machine The machine must be placed on a unit or support so that it is stable and cannot be accidentally knocked over. THE INSTALLATION OPERATIONS REQUIRED FOR THE INITIAL START-UP OF THESE MACHINES MUST BE PERFORMED BY QUALIFIED TECHNICAL STAFF. -
Page 9: Chapter 3. Description Of The Machine
User Manual CHAPTER 3. DESCRIPTION OF THE MACHINE 3.1.- Soluble product hoppers The Instant and Mixed machines have 2 or more soluble product containers. These containers extract the product via a spindle to the Blender, where it is mixed with water sent from the boiler. -
Page 10: Bean Coffee Group (Espresso Machines)
User Manual 3.5.- Bean coffee group (Espresso Machines) The coffee beans are stored in the grinder hopper. When a serving is requested, the brewing group moves to the loading position and the grinder grinds the amount of coffee programmed, sending it to the doser, where the coffee is dosed and then falls to the brewing piston. The group then advances to the brewing position and the piston tamps the coffee. -
Page 11: Settings And Adjustments
User Manual To extract the brewing piston, 1. Set the group to stand-by position by entering programming and pressing button 6 (see programming). 2. Remove the securing pin. 3. Pull the piston upwards. 4. If you wish to dismantle the piston completely, remove the securing clip. -
Page 12: Changing Product Fall In The Milk And Chocolate Hoppers
User Manual 3.8.- Changing product fall in the milk and chocolate hoppers If you wish to change the order in which the products fall into the blender, then you can release the rear cover and change the order of the connectors. The hopper which had direct fall then becomes inclined and vice versa. -
Page 13: How Do We Communicate With The Machine
CHAPTER 4. Programming 4.1.- How do we communicate with the machine? The VITALE S machine uses a selection keypad to communicate with the machine user. When the machine is in programming status, the programmable functions are accessed by pressing the different buttons. - Page 14 User Manual The first function available appears on the screen of the machine: 010 LISTING The buttons flash. Press a button to access the function or the P button to quit. Use pushbutton 1 (on machines with 3 and 7 pushbuttons) to lower the function No. and pushbutton 2 to raise the function No..
- Page 15 User Manual The following is a list of the programmable or executable functions: Function Description F010 On-screen display of incidents history F030 Machine test F110 Accountancy of money sold per selection F111 Accountancy of units sold per selection F120 Accountancy of total money sold F121 Accountancy of total units sold F171...
- Page 16 User Manual 4.4.- Service programming. 4.4.1.- What is a service? A service is the act that the machine performs every time that a customer presses a selection. More specifically, a service is the steps that the machine must take in order to complete the operation that has been selected.
- Page 17 User Manual 4.4.2. Function 315 PROG. SERVICE. The complete configuration of each service can be programmed at function 315. Within this configuration, you can program the various steps that the machine must perform in order to provide that service, the time that it starts during the service and the duration. Once function 315 is accessed, choose the service to program, pushing the corresponding selection button.
- Page 18 User Manual The 4th button only works when editing the 2nd digit or higher. This button does not exist on 3- button machines and so in order to modify a digit that has already passed, it is necessary to continue to the end of the number and access the edition of the value again, Finish by pressing “P”.
- Page 19 User Manual 315 PRG. SERVICE → ← S.01 BLACK COF. → → → MODIFY STEP P1 00.0 PROD2 01.6 P2 01.0 PROD3 01.0 ← ← + / − START 00.0 SEGS START 02.5 SEGS ← + / − TYPE WATER + MIX TYPE WATER + MIX TYPE WATER ONLY TYPE MIX ONLY...
-
Page 20: Chapter 5 - Troubleshooting And Maintenance
User Manual CHAPTER 5 – TROUBLESHOOTING AND MAINTENANCE 5.1 - Reset If your machine is out of service, enter and exit programming by pressing the programming button twice. 5.2 – Error detected by the machine. The machine communicates different errors it detects in the normal serving function through different illuminated button combinations. - Page 21 User Manual The dimensions of the photos are as follows (in mm): VISIBLE VISIBLE AREA AREA Profile Servings label Selection sheet VISIBLE AREA Photo To change either of the two sheets, remove the cover inside the door and pull the old photo out. To insert the new photo, lift the securing tabs slightly so that the photo slides underneath and is secured.
-
Page 22: Chapter 6. Cleaning The Machine
User Manual CHAPTER 6. CLEANING THE MACHINE. 6.1 – Parts which need to be cleaned regularly The following parts of the machine need to be cleaned depending on the number of servings the machine performs. Liquid tray. Simply lift it slightly to extract the box and then the tray. On inserting the box, the pivots (P) underneath must be positioned in the grooves on the bottom of the machine. -
Page 23: Cleaning Cycle For The Group Brewing Chamber
User Manual 6.3.- Cleaning cycle for the group brewing chamber For hygiene reasons, this process should be performed at least once every three months in order to eliminate coffee particles from the brewing chamber. Use special detergent tablets for super-automatic coffee machines. There are tablets weighing 2 to 3 g available on the market. -
Page 24: Descaling Cycle
User Manual 6. 3 espressos are then made one after another and the cycle finishes. 7. For correct cleaning, you should remove the upper piston and clean the upper filter with cleaning paper or a brush to eliminate any particles which may remain on the filter. 6.4.- Descaling cycle. -
Page 25: Replacing The Water Filter
User Manual Process: 1. Pour the contents of the citric acid sachet (100 g) into the tank with 2.5 litres of water (water tank just over half full) and stir with a long utensil, such as a spoon, to dissolve the mixture. -
Page 26: Exterior Cleaning
User Manual 6.5 – Exterior cleaning Do not use spray! Use warm water (between 20°C and 40°C) and one of the following products: Washing-up liquid, neutral shampoo, alcohol-free window cleaner. Rinse with a 2% vinegar (acetic acid) solution and dry with a soft cloth or duster. If there are stubborn stains (grease, beverages, etc.), use a solution of water and sanitary alcohol (96º...
Need help?
Do you have a question about the VITALE S and is the answer not in the manual?
Questions and answers
Can you hook up a straight water supply to this machine?
Yes, the Azkoyen VITALE S can be connected to a straight water supply, but if it is fitted with a filter, the minimum water pressure must be 1 Kg/cm².
This answer is automatically generated