Advertisement
Quick Links
293 Wright Street, Delavan, WI 53115
© 2004, Sta-Rite Industries PRINTED IN U.S.A.
"C" and "CC" Series
Installation/Operation/Parts
For further operating, installation,
or maintenance assistance:
Call 1-262-728-9181
OWNER'S MANUAL
Centrifugal Pumps
S150 (Rev. 2/23/04)
Advertisement

Subscribe to Our Youtube Channel
Related Manuals for STA-RITE C Series


Summary of Contents for STA-RITE C Series
- Page 1 OWNER’S MANUAL Centrifugal Pumps 293 Wright Street, Delavan, WI 53115 “C” and “CC” Series Installation/Operation/Parts For further operating, installation, or maintenance assistance: Call 1-262-728-9181 © 2004, Sta-Rite Industries PRINTED IN U.S.A. S150 (Rev. 2/23/04)
- Page 2 Safety READ AND FOLLOW SAFETY INSTRUCTIONS! This is the safety alert symbol. When you see this symbol on your pump or in this manual, look for one of the following signal words and be alert to the potential for personal injury: warns about hazards that will cause serious personal injury, death or major property damage if ignored.
- Page 3 Repair Parts ....................9-11 LIMITED WARRANTY Sta-Rite Industries warrants to the original consumer of the products listed below, that they will be free from defects in material and workmanship for the Warranty Period from the date of original installation or manufacture as noted.
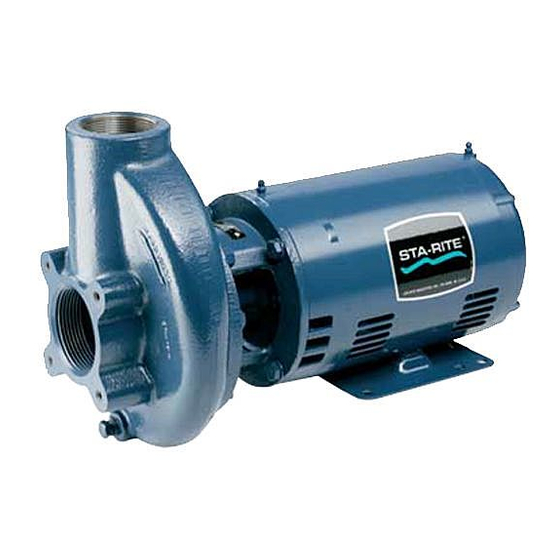
- Page 4 Installation SERIES C/CC CENTRIFUGAL PUMPS The “C” and “CC” Series pumps are close coupled pumps with optional traps. “CC” Series have cast iron volutes and adapters. “C” Series have bronze volutes and adapters. Impellers on both series are bronze. INSTALLATION Location of Unit Install pump as close to liquid source as possible, using short, simple suction piping.
- Page 5 Installation / Maintenance Wiring NOTICE: For 575 volt installations, see motor nameplate. Consult a licensed electrician for wiring information. Installation must meet code. For 200, 230, and 460 volt installations, check fusing/wiring data chart (Table I, below) before connecting pump to power source. Check that voltage/frequency on motor nameplate are identical with volt- age/frequency of incoming power supply.
- Page 6 Maintenance MAINTENANCE Little or no maintenance to pump is required other than possible replace- ment of shaft seal after a reasonable period of operation (see below). Lubricate motor according to motor manufacturer’s instructions. Periodic greasing is required for most motors. PUMP STORAGE Drain pump to prevent freezing.
- Page 7 Maintenance INSTALLING NEW SEAL 1. NOTICE: Seal faces are highly polished and lapped. Handle with care. Any mar, nick or scratch on seal face will cause it to leak. BE SURE to install with polished faces toward each other. 2. Clean polished surface of ceramic seat with clean cloth. 3.
-
Page 8: Troubleshooting
Troubleshooting Read symptom describing problem below at left. Causes Hazardous voltage. Can shock, burn or for problems (bottom) are keyed to numbers at right. kill. Take all normal precautions for the voltage involved. Check pump for causes listed at right and correct those that apply. -
Page 9: Repair Parts
Repair Parts 8” and 11” Suction Trap 6” Suction Trap NOTICE: Traps are not included with pumps. 1128 0695 1839 0695 Part Description Cast Iron Bronze Lock Handle C154-18D C154-18D Cover - 6” C30-30 C3-78DZZ Cover - 8” C3-105 C3-105D Cover - 11”... - Page 10 Model numbers with a “3” in them indicate a 3-Phase motor. Model numbers with a “2” in them indicate a 200V motor. NOTE: C Series with different hydraulic numbers (CCMH-93) are older models that use different parts. Consult factory for older models.
- Page 11 Model numbers with a “3” in them indicate a 3-Phase motor. Model numbers with a “2” in them indicate a 200V motor. (†) Model number CCH2J3-138S has no Water Slinger. NOTE: C Series with different hydraulic numbers (CCMH-93) are older models that use different parts. Consult factory for older models.
Need help?
Do you have a question about the C Series and is the answer not in the manual?
Questions and answers