Advertisement
Guidelines for Installing Interactive Whiteboard 600i system with K.O.H. Rail system
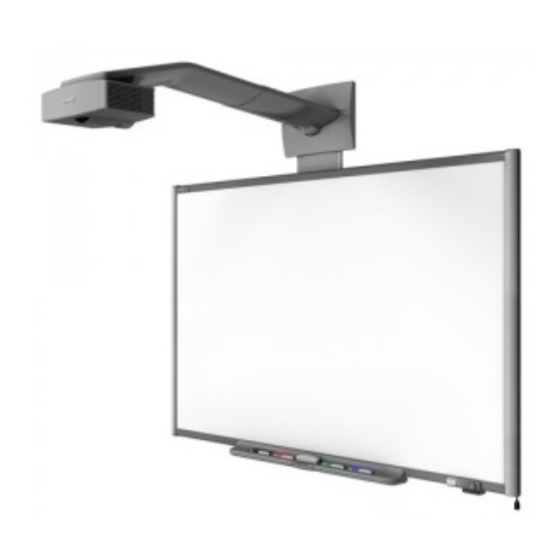
K.O.H mounting spacers
K.O.H.
rail
K.O.H.
Smart board
bracket
Preparing for the installation
SMART includes a "mounting template" with each of its 600i interactive whiteboard
systems. This mounting template can NOT be used since the SMART board will hang
from the rail.
The first procedure is to plan where to position/mount the Unifi projector, make
sure it's at a safe height, while maintaining enough space for airflow above the
unit.(see SMART's instruction).
Be sure to position the projector bracket/KOH mounting spacers no less than 5"
(12.7 cm) from the ceiling to provide adequate airflow around the projector.
page 1 of 3 K.O.H. installation manual for SMART 600i
Advertisement
Table of Contents

Related Manuals for SMART 600i


Summary of Contents for SMART 600i
- Page 1 Preparing for the installation SMART includes a “mounting template” with each of its 600i interactive whiteboard systems. This mounting template can NOT be used since the SMART board will hang from the rail. The first procedure is to plan where to position/mount the Unifi projector, make sure it’s at a safe height, while maintaining enough space for airflow above the...
- Page 2 SMART’s “mounting plate” should be 3“ inches. Proceed to Installation You should install the Smart board on the KOH rail system before you install the KOH mounting spacers and projector. 1. Install KOH rail per instructions. (Above the whiteboard/blackboard if that is the application).
- Page 3 (continued from page 2) K.O.H. MOUNTING STRIPS/SPACERS FOR 680i3 3. Measure 3” from the top of the SMART board’s frame and mark it. This marks the bottom where the KOH mounting block will be positioned/installed. 4. Attach SMARTs’ “mounting plate” using appropriate long screws or bolts (not included in KOH kit).
Need help?
Do you have a question about the 600i and is the answer not in the manual?
Questions and answers