Table of Contents
Advertisement
Quick Links
Download this manual
See also:
User Manual
Advertisement
Table of Contents

Subscribe to Our Youtube Channel
Related Manuals for SMART Board 600i3


Summary of Contents for SMART Board 600i3
- Page 1 SMART Board™ 600i3 Interactive Whiteboard System Configuration and User’s Guide...
- Page 2 SMART Board, GoWire, the SMART logo and smarttech are trademarks or registered trademarks of SMART Technologies ULC in the U.S. and/or other countries. Bluetooth is a trademark owned by Bluetooth SIG, Inc. and is used by SMART Technologies ULC under license. Sanford. EXPO and EXPO2 are registered trademarks of Newell Rubbermaid. All other third-party product and company names may be trademarks of their respective owners.
-
Page 3: Important Information
Important Information Read This Section First NOTE If you own a SMART product other than a SMART Board™ 600i3 interactive whiteboard system, refer to the installation guide that came with your product for relevant warnings and maintenance instructions. In this document, “SMART Board 600i3 interactive whiteboard system” refers to the SMART Board 600 series interactive whiteboard and its UF55/UF55w projector, accessories and optional equipment. - Page 4 Failure to follow the installation instructions shipped with your SMART product could result in personal injury and damage to the product. • Make sure that an electrical socket is near to your SMART product and remains easily accessible during use. •...
- Page 5 Wear protective eyewear while changing the lamp. Failure to do so can cause injury or loss of eyesight if the lamp shatters or bursts. – Use only replacement lamps approved by SMART Technologies. Contact your authorized SMART reseller for replacement parts. –...
- Page 6 IN T RO D UC T IO N – IMP O RT AN T IN F O RMA TI O N – remove the battery when the remote control is unused for an extended period – do not heat, disassemble, short or recharge the battery, or expose it to fire or high temperatures –...
- Page 7 IN T RO D UC T IO N – IMP O RT AN T IN F O RMA TI O N • You must connect the USB cable that came with your SMART Board interactive whiteboard to a computer that has a USB compliant interface and that bears the USB logo.
-
Page 8: Transporting The Smart Board 600I3 Interactive Whiteboard System
Transporting the SMART Board 600i3 Interactive Whiteboard System If you need to ship any part of your SMART Board 600i3 interactive whiteboard system, repack it with the original packaging. If the original packaging is no longer available, you may purchase replacement packaging from your authorized SMART reseller. -
Page 9: Table Of Contents
Read This Section First ................i Safety Warnings, Cautions and Important Information.......i Transporting the SMART Board 600i3 Interactive Whiteboard System ...vi About Your SMART Board 600i3 Interactive Whiteboard System ......1 SMART Board 600i3 Interactive Whiteboard System Features...... 2 Interactive Whiteboard Features .............. 3 UF55/UF55w Projector System Features.......... - Page 10 Focusing the Image................12 Performing an Image Alignment............. 13 Securing the Pen Tray and the Interactive Whiteboard......17 Connecting Your SMART Board 600i3 Interactive Whiteboard System ..... 19 Installing SMART Notebook Software ............20 Connecting the Cables to the UF55/UF55w Projector........21 Routing the Cables.................
- Page 11 Lamp Failure ..................36 Ready Light Isn’t Lit................36 Interactive Whiteboard Indicators and Controls..........37 Maintaining Your SMART Board 600i3 Interactive Whiteboard System ..... 39 Preventing Damage to Your Interactive Whiteboard ........39 Cleaning Your Interactive Whiteboard ............40 Cleaning the Pen Tray .................. 41 Cleaning the UF55/UF55w Projector ............
- Page 12 CO N T EN TS Source Selection ..................57 Video Control ..................57 Audio Control ..................58 Network Information ................59 System Information ................60 Hardware Environmental Compliance..............61 Waste Electrical and Electronic Equipment Regulations (WEEE Directive)..................61 Restriction of Certain Hazardous Substances (RoHS Directive)...................
-
Page 13: About Your Smart Board 600I3 Interactive Whiteboard System
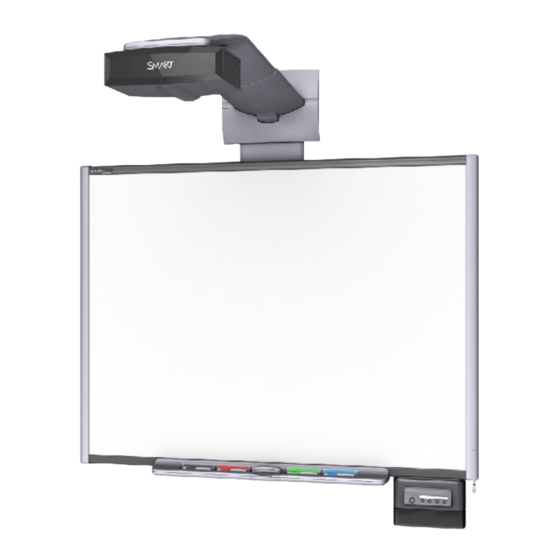
About Your SMART Board 600i3 Interactive Whiteboard System The SMART Board 600i3 interactive whiteboard system combines the UF55/UF55w wall mounted, short-throw projector system with a SMART Board 600 series interactive whiteboard. Topics in this chapter describe the features and accessories that you can use with your SMART Board 600i3 interactive whiteboard system: •... -
Page 14: Smart Board 600I3 Interactive Whiteboard System Features
Ink Aware applications in digital ink using a pen tray pen or your finger, and then save these notes either in the application or to a SMART Notebook file for future reference and distribution. -
Page 15: Interactive Whiteboard Features
Other features of the interactive whiteboard include: • A SMART Pen Tray that automatically detects when you pick up a pen or the eraser from the pen tray. • Pen tray buttons that activate Help functions and, when used with a computer, activate the on-screen keyboard and right-click functions •... -
Page 16: Ecp And Cable
YCbCr with proper adaptors, not included) • an S-video (4-pin mini-DIN) and associated audio (two RCA jacks) • a Composite video (RCA jack) and associated audio (two RCA jacks) A specialized harness cable provided by SMART allows output to the projector. -
Page 17: Standard Accessories
CH A P T E R 1 – A BO U T Y O U R S M A R T B O A R D 6 0 0 i 3 I N T E R A C T I V E WH ITE BOARD S YS T E M Standard Accessories SMART provides the following accessories with your SMART Board 600i3 interactive whiteboard system. Remote Control The remote control lets you control the system and set up your UF55/UF55w projector. -
Page 18: Optional Accessories
Cat 5 to USB Cable Extender (CAT5-XT) Use the SMART Cat 5 to USB cable extender to extend your interactive whiteboard’s USB connection up to 120' (36.6 m) using RJ45 Cat 5 cable (not included). The extender includes two 6' (1.8 m) USB cables to connect your computer and your... -
Page 19: Installing Your Smart Board 600I3 Interactive Whiteboard System
Do not use the instructions in your SMART Board interactive whiteboard product box. This chapter includes additional information, optional installation procedures and tips to consider before you install a SMART Board 600i3 interactive whiteboard system. Topics covered include: •... -
Page 20: Environmental Requirements
• Securing the Pen Tray and the Interactive Whiteboard (page 17) Environmental Requirements Before installing your SMART Board 600i3 interactive whiteboard system, review the following environmental requirements. Temperature Range SMART Board 600i3 interactive whiteboard systems can operate in a temperature range of: •... -
Page 21: Water And Fluid Resistance
WHITEB OARD S YS T E M Water and Fluid Resistance SMART Board 600i3 interactive whiteboard systems are for indoor use only and don’t meet any salt-spray or water ingress requirements. Don’t pour or spray any liquids directly onto the interactive whiteboard, the UF55/UF55w projector or any of its sub- components. -
Page 22: Before Installing Your Smart Board 600I3 Interactive Whiteboard System
Before Installing Your SMART Board 600i3 Interactive Whiteboard System Choose a location for your SMART Board 600i3 interactive whiteboard system that is far from bright light sources, such as windows or overhead lighting. Bright light sources can cause distracting shadows on the interactive whiteboard and can reduce the contrast of the projected image. -
Page 23: After Installing Your Smart Board 600I3 Interactive Whiteboard System
Vertical keystone errors can occur when you mount the UF55/UF55w projector and the SMART Board 600 series interactive whiteboard on an uneven surface or a wall that has obstructions. -
Page 24: Focusing The Image
12 | CH A P T E R 2 – I NSTAL LI NG YOUR S MAR T BOAR D 60 0i3 IN TE RAC T IVE WHITEB OARD S YS T E M The image appears shorter across the right side when the distance from the projector to the right of the screen is shorter than the distance to the left of the screen. -
Page 25: Performing An Image Alignment
If you don’t have a computer, use the projector’s default blue background so that you can see the full projected image clearly. • SMART doesn’t recommend adjusting the digital keystoning within the projector. Instead, use the mechanical adjustment described below. To perform an initial 1. - Page 26 14 | CH A P T E R 2 – I NSTAL LI NG YOUR S MAR T BOAR D 60 0i3 IN TE RAC T IVE WHITEB OARD S YS T E M To adjust the 1. If the bottom edge of the projected image is smaller than the top edge of the projector alignment projected image, and the sides of the projected image slope inward toward the bottom of the projected image, tilt the projector down or raise the projector’s...
- Page 27 Don’t pay attention to the position of the left and right edges in relation to the interactive whiteboard during this step. 4. Move your SMART Board interactive whiteboard left or right on its mounting bracket to center the image on the interactive whiteboard.
- Page 28 16 | CH A P T E R 2 – I NSTAL LI NG YOUR S MAR T BOAR D 60 0i3 IN TE RAC T IVE WHITEB OARD S YS T E M 6. Move the projector forward or backward on the boom to make the image larger or smaller.
-
Page 29: Securing The Pen Tray And The Interactive Whiteboard
WH IT EBOARD SYS T E M Securing the Pen Tray and the Interactive Whiteboard Because the pen tray that comes with your SMART Board interactive whiteboard is detachable, you may want to safeguard it—and the interactive whiteboard at the same time—by anchoring it with a security cable. - Page 30 18 | CH A P T E R 2 – I NSTAL LI NG YOUR S MAR T BOAR D 60 0i3 IN TE RAC T IVE WHITEB OARD S YS T E M Because you can remove the pen tray without tools, you may want to securely attach it to its brackets.
-
Page 31: Connecting Your Smart Board 600I3 Interactive Whiteboard System
Connecting Your Guest Computer to the ECP’s Inputs (page 25) – Connecting Peripheral Visual or Audio-Visual Devices (page 26) NOTES • To connect your 600 series interactive whiteboard, see the SMART Board 600 Series Interactive Whiteboard Installation and User’s Guide (document 1414). •... -
Page 32: Installing Smart Notebook Software
WH ITE BOARD S YS T E M Installing SMART Notebook Software When you connect a computer with SMART Notebook software to your system, you can display and interact with Ink Aware programs on your SMART Board interactive whiteboard. You can connect the video output of a hardware device, such as a VCR or DVD player, to the interactive whiteboard system’s ECP to display this video signal... -
Page 33: Connecting The Cables To The Uf55/Uf55W Projector
When connecting cables from the UF55 projector to models 560, 580, 660 and 680 interactive whiteboards, make sure all cables pass along the top of the SMART Board mounting bracket and down the left or right side of the interactive whiteboard. - Page 34 22 | CH A P T E R 3 – C O N N E C T I N G Y O U R S M A R T B O A R D 6 0 0 I 3 I NT E R A C T I V E WH ITE BOARD S YS T E M To connect the power, 1.
- Page 35 23 | CH A P T E R 3 – C O N N E C T I N G Y O U R S M A R T B O A R D 6 0 0 I 3 I NT E R A C T I V E WH ITE BOARD S YS T E M 4.
- Page 36 24 | CH A P T E R 3 – C O N N E C T I N G Y O U R S M A R T B O A R D 6 0 0 I 3 I NT E R A C T I V E WH ITE BOARD S YS T E M 6.
-
Page 37: Connecting Your Guest Computer To The Ecp's Inputs
ECP to connect your host computer’s video output. • Most laptops require configuration to output VGA signals. To connect your guest 1. Turn off your SMART Board interactive whiteboard system. computer’s video or audio 2. Make sure that you have a shielded output to your ECP VGA cable (not included) and an audio cable with 3.5 mm plugs... -
Page 38: Connecting Peripheral Visual Or Audio-Visual Devices
To connect a DVD player, VCR, document camera, digital camera or other peripheral visual or audio-visual device to the SMART Board interactive whiteboard system, you must connect the device’s video and audio outputs to the ECP. You can have up to three peripheral devices and a host computer connected at one time. -
Page 39: Using Your Smart Board 600I3 Interactive Whiteboard System
Chapter 4 Using Your SMART Board 600i3 Interactive Whiteboard System This chapter describes the basic operation of your interactive whiteboard system, how to retrieve system information and how to access the projector’s image adjustment options. Topics covered include: • Turning the System On and Off and Selecting an Input (page 28) •... -
Page 40: Turning The System On And Off And Selecting An Input
Consider leaving the system on between uses. Repeatedly turning the lamp on and off can reduce its life. Using Your Interactive Whiteboard Refer to your SMART Board 600 series Interactive Whiteboard Installation and User’s Guide (document 1414) on using information about your interactive whiteboard. -
Page 41: Using Your Uf55/Uf55W Projector
4. Press enter when you’re satisfied with the settings. Menu Options NOTE The menu heading at the top of all settings is SMART UF55 Settings. Menu Settings Description Heading Image Display... - Page 42 0 to 100. NOTE: Do not adjust this option unless advised to do so by a certified SMART Technical Support Specialist. You can apply these settings only after all other changes to the boom are made. Applies to the VGA inputs only.
- Page 43 Specialist. Aspect Adjusts the image output to Fill Screen, Match Input Ratio or 16:9. Start up Selects the type of start up screen to SMART/User, Screen Capture User Start up Screen or Preview Start up Screen. Default Set to Resets all of your projector settings to their factory...
- Page 44 32 | CH A P T E R 4 – U S I N G Y O U R S M A R T B O A R D 6 0 0 i 3 I N T E R A C T I V E WH ITE BOARD S YS T E M Menu Settings...
-
Page 45: Troubleshooting Your Smart Board 600I3 Interactive Whiteboard System
Troubleshooting Your SMART Board 600i3 Interactive Whiteboard System This chapter provides basic troubleshooting information for your SMART Board 600i3 interactive whiteboard system. For more complex issues or issues not mentioned in this section, please contact your authorized SMART reseller or consult the... -
Page 46: System Warning Lights
RS-232 connector at the projector (located below the power cable) and power supply. If nothing changes after checking your power cord, RS-232 connector and power supply, call your authorized SMART reseller. Solid amber The projector is receiving power but it is turned off. -
Page 47: Errors
4. Reconnect the power cord. 5. If the previous steps don’t resolve the issue and your projector still doesn’t turn on, unplug the power cord, and then contact your authorized SMART reseller. Fan Failure If the Fan Failure indicator message appears and your projector turns off during use, one of the following issues is occurring: •... -
Page 48: Color Wheel Failure
2. Reconnect the power cord. 3. If the previous steps don’t resolve the issue, the lamp might be at the end of its life. See page 43 or go to the SMART Technical Support website for information on how to replace the lamp. -
Page 49: Interactive Whiteboard Indicators And Controls
5. If the previous steps don’t resolve the issue, disconnect the power cord and then contact your authorized SMART reseller. Interactive Whiteboard Indicators and Controls The SMART Board 600 series interactive whiteboard includes the following indicators and controls: • The ready light LED • The pen tray LEDs and buttons •... - Page 50 38 | CH A P T E R 5 – T R O U B L E S H O O T I N G Y O U R S M A RT B O A R D 6 0 0 i 3 I NT E R A C T I V E WHITE BO ARD SY S T E M...
-
Page 51: Maintaining Your Smart Board 600I3 Interactive Whiteboard System
Board 600i3 Interactive Whiteboard System This chapter includes methods for preventing damage to and properly cleaning your SMART Board 600i3 interactive whiteboard system. Follow the additional instructions and recommendations in your SMART Board 600 Series Interactive Whiteboard Installation and User’s Guide... -
Page 52: Cleaning Your Interactive Whiteboard
CH A P T E R 6 – MA INT AI NI NG YO UR S MAR T BOAR D 60 0i3 IN T ERA CT IVE WH ITE BOARD S YS T E M Cleaning Your Interactive Whiteboard For cleaning instructions, refer to your SMART Board 600 Series Interactive Whiteboard Installation and User’s Guide (document 1414). -
Page 53: Cleaning The Pen Tray
41 | CH A P T E R 6 – MA INT AI NI NG YO UR S MAR T BOAR D 60 0i3 IN T ERA CT IVE WH ITE BOARD S YS T E M Cleaning the Pen Tray If the infrared sensors in the bottom of the pen tray’s recesses are obstructed, the sensors don’t reliably detect when a pen or the eraser is removed or replaced. -
Page 54: Cleaning The Projector
42 | CH A P T E R 6 – MA INT AI NI NG YO UR S MAR T BOAR D 60 0i3 IN T ERA CT IVE WH ITE BOARD S YS T E M Cleaning the Projector Follow these guidelines to clean the projector: •... -
Page 55: Replacing Your Uf55/Uf55W Projector Lamp
Appendix A Replacing Your UF55/ UF55w Projector Lamp This appendix has detailed instructions on how to replace your projector lamp. Topics covered include: • Replacing the Projector Lamp (page 43) – Removing the Projector from the Boom (page 45) – Replacing the Projector Lamp Module (page 47) –... - Page 56 Wear protective eyewear while changing the lamp. Failure to do so can cause injury or loss of eyesight if the lamp shatters or bursts. – Use only replacement lamps approved by SMART Technologies. Contact your authorized SMART reseller for replacement parts.
-
Page 57: Removing The Projector From The Boom
45 | AP PENDI X A – RE PLA CI NG Y O UR U F5 5/ UF 55 w PR O J ECT O R LA MP Removing the Projector from the Boom Before you can replace the projector lamp, you must remove the projector from the boom. - Page 58 46 | AP PENDI X A – RE PLA CI NG Y O UR U F5 5/ UF 55 w PR O J ECT O R LA MP 5. If you use a projector padlock, make sure you remove it from the locking loop. If you need access to your projector locking screw, loosen the wingnut and slide the projector all the way back, away from the interactive whiteboard’s screen, and then re-tighten the wingnut.
-
Page 59: Replacing The Projector Lamp Module
47 | AP PENDI X A – RE PLA CI NG Y O UR U F5 5/ UF 55 w PR O J ECT O R LA MP Replacing the Projector Lamp Module After you remove the lamp from the boom, follow these instructions to replace the lamp. - Page 60 48 | AP PENDI X A – RE PLA CI NG Y O UR U F5 5/ UF 55 w PR O J ECT O R LA MP 5. Pull up on the lamp module’s handle, and then remove the lamp. IMPORTANT Recycle or dispose of the lamp module according to your local waste authority.
-
Page 61: Replacing The Projector
49 | AP PENDI X A – RE PLA CI NG Y O UR U F5 5/ UF 55 w PR O J ECT O R LA MP Replacing the Projector WARNING Two people are required to replace the projector. To replace the projector 1. -
Page 62: Resetting The Lamp Timer
You unable to reset the Display Hour value because it is the running total hours the projector has been in use. 5. Press the Menu button on the remote control. The SMART UF55 Settings menu appears. 6. Select to confirm that Lamp Hours has been reset to zero. -
Page 63: Remotely Managing Your Smart Board 600I3 Interactive Whiteboard System
SMART Board 600i3 Interactive Whiteboard System This appendix has detailed instructions on how to set up your computer or room control system to manage your SMART Board 600i3 interactive whiteboard system settings. Topics covered include: • Connecting Your Room Control System to the ECP (page 52) –... -
Page 64: Connecting Your Room Control System To The Ecp
52 | AP PENDI X B – RE MOTELY MA NAGI NG YOUR S MART BOARD 60 0I 3 I N T E R A C T I V E W H I T E B O A RD S Y S T E M Connecting Your Room Control System to the ECP You can externally manage projector settings by connecting a computer or room... - Page 65 53 | AP PENDI X B – RE MOTELY MA NAGI NG YOUR S MART BOARD 60 0I 3 I N T E R A C T I V E W H I T E B O A RD S Y S T E M Setting Value Stop Bits...
-
Page 66: Uf55/Uf55W Programming Commands
54 | AP PENDI X B – RE MOTELY MA NAGI NG YOUR S MART BOARD 60 0I 3 I N T E R A C T I V E W H I T E B O A RD S Y S T E M UF55/UF55w Programming Commands Powerstate Controls The UF55/UF55w projector responds to commands only at certain power levels and... - Page 67 55 | AP PENDI X B – RE MOTELY MA NAGI NG YOUR S MART BOARD 60 0I 3 I N T E R A C T I V E W H I T E B O A RD S Y S T E M To allow the ECP to 1.
-
Page 68: Powerstate Control
56 | AP PENDI X B – RE MOTELY MA NAGI NG YOUR S MART BOARD 60 0I 3 I N T E R A C T I V E W H I T E B O A RD S Y S T E M Powerstate Control The Powerstate control allows the projector to turn on or off and switch between other related controls. -
Page 69: Source Selection
57 | AP PENDI X B – RE MOTELY MA NAGI NG YOUR S MART BOARD 60 0I 3 I N T E R A C T I V E W H I T E B O A RD S Y S T E M Source Selection The Source Selection control allows you to switch between input sources. -
Page 70: Audio Control
58 | AP PENDI X B – RE MOTELY MA NAGI NG YOUR S MART BOARD 60 0I 3 I N T E R A C T I V E W H I T E B O A RD S Y S T E M Field Possible Values Description... -
Page 71: Network Information
59 | AP PENDI X B – RE MOTELY MA NAGI NG YOUR S MART BOARD 60 0I 3 I N T E R A C T I V E W H I T E B O A RD S Y S T E M Network Information The Network Information commands allow you to display various types of network information. -
Page 72: System Information
60 | AP PENDI X B – RE MOTELY MA NAGI NG YOUR S MART BOARD 60 0I 3 I N T E R A C T I V E W H I T E B O A RD S Y S T E M System Information The System Information commands allow you to display various types of system information. -
Page 73: Hardware Environmental Compliance
Appendix C Hardware Environmental Compliance SMART Technologies supports global efforts to ensure that electronic equipment is manufactured, sold and disposed of in a safe and environmentally friendly manner. Waste Electrical and Electronic Equipment Regulations (WEEE Directive) Waste Electrical and Electronic Equipment regulations apply to all electrical and electronic equipment sold within the European Union. -
Page 74: Packaging
SMART Technologies products fall under this classification and meet the requirements for China’s EIP regulations. U.S. Consumer Product Safety Improvement Act The United States has enacted the Consumer Product Safety Improvement Act which limits the lead (Pb) content in products. SMART Technologies is committed to complying with this initiative. -
Page 75: Customer Support
Technical Support If you experience difficulty with your SMART product, please contact your local reseller before contacting SMART Technical Support. Your local reseller can resolve most issues without delay. NOTE To locate your local reseller, visit www2.smarttech.com/st/en-US/Where+to+Buy. -
Page 76: General Inquiries
Toll Free 1.888.42.SMART (U.S./Canada) +1.403.228.2500 E-mail info@smarttech.com Warranty Product warranty is governed by the terms and conditions of SMART’s “Limited Equipment Warranty” that shipped with the SMART product at the time of purchase. Registration To help us serve you, register online at www.smarttech.com/registration. -
Page 77: Index
Position adjustment options, 27, 29, 30 Act, 62 Automatically switching source inputs, 31 contact information, 64 covered electronic devices, 62 customer support, 63–64 batteries, 61 Before installing your SMART Board 600i3, 10 Damage Before installing your system preventing, 39 Environmental requirements, 8 documentation, 63... - Page 78 Cable, 17 Securing the pen tray to the interactive whiteboard, 8, 17 Serial Number Keystone locating, 42 Definition, 11 SMART Board 600 series interactive whiteboard Cleaning, 40 Features, 3 Optional accessories, 6 Limited Equipment Warranty, 64 SMART Board 600i3 interactive...
- Page 79 Technical Support, 63 Image adjustment options, 32 training, 63 Selecting an input, 28 Troubleshooting Starting up your SMART Board 600i3 Warning lights, 34 interactive whiteboard system, 28 troubleshooting articles, 63 Using the remote control, 27, 29 Turning on your system, 28...
- Page 80 68 | IN DE X...
- Page 82 Toll Free 1.866.518.6791 (U.S./Canada) or +1.403.228.5940 www.smarttech.com...
Need help?
Do you have a question about the Board 600i3 and is the answer not in the manual?
Questions and answers