Table of Contents
Advertisement
Advertisement
Chapters
Table of Contents
Troubleshooting

Related Manuals for SMART Board 685ix


Summary of Contents for SMART Board 685ix
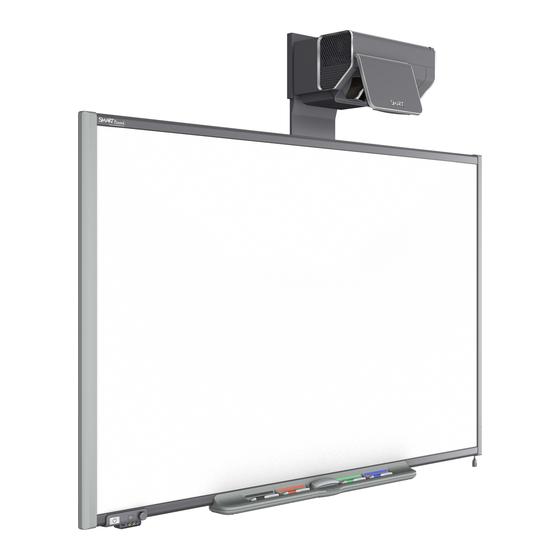
- Page 1 SMART Board™ 685ix Interactive Whiteboard System Configuration and User’s Guide...
-
Page 2: Technical Support
SMART Technologies ULC. Information in this manual is subject to change without notice and does not represent a commitment on the part of SMART. -
Page 3: Important Information
Important Information Read This Section First NOTE If you own a SMART product other than a SMART Board™ 685ix interactive whiteboard system, refer to the installation guide that came with your product for relevant warnings and maintenance instructions. In this document, “SMART Board 685ix interactive whiteboard system” refers to the SMART Board 685 interactive whiteboard and its UX60 projector, accessories and optional equipment. -
Page 4: Safety Warnings, Cautions And Important Information
Failure to follow the installation instructions shipped with your SMART product could result in personal injury and damage to the product. • Make sure that an electrical socket is near your SMART product and remains easily accessible during use. •... - Page 5 IN T ROD UC T ION – IMP O RT AN T IN F O RMA TI O N • If the lamp has shattered or burst: – Call an authorized SMART reseller for instructions. Do not attempt to replace the lamp. – Do not touch the glass fragments because they can cause injury.
- Page 6 • You must connect the USB cable that came with your SMART Board interactive whiteboard to a computer that has a USB compliant interface and that bears the USB logo. In addition, the USB source computer must be compliant with CSA/UL/EN 60950 and bear the CE mark and CSA and/or UL mark(s) for CAS/UL 60950.
-
Page 7: Whiteboard System
Transporting the SMART Board 685ix Interactive Whiteboard System If you need to ship any part of your SMART Board 685ix interactive whiteboard system, repack it with the original packaging. If the original packaging is no longer available, you can purchase replacement packaging from your authorized SMART reseller. - Page 8 IN T RO D UC T IO N – IMP O RT AN T IN F O RMA TI O N...
-
Page 9: Table Of Contents
SMART Board 685ix Interactive Whiteboard System Features...... 2 Standard Accessories..................6 Optional Accessories ..................8 Before Installing Your SMART Board 685ix Interactive Whiteboard System ..11 Environmental Requirements ............... 12 Using Your UX60 Projector ................. 15 Components of the UX60 Projector .............. 16 Remote Control..................... - Page 10 Troubleshooting Image Issues..............57 Other Common Issues.................. 60 Occasional Maintenance Instructions ............64 Remotely Managing Your SMART Board 685ix Interactive Whiteboard System 71 Connecting Your Serial Interface to the UX60 Projector ......73 RS-232 Programming Commands..............75 Simple Network Management Protocol (SNMP)........... 87 Web Page Management ................
- Page 11 CON T EN TS Technical Support..................109 Shipping and Repair Status ................ 109 General Inquiries ..................110 Warranty ..................... 110 Registration....................110 Index ......................... 111...
- Page 12 –...
-
Page 13: About Your Smart Board 685Ix Interactive Whiteboard System
UX60 projector with a SMART Board 685 or SBD685 interactive whiteboard. Topics in this chapter describe the features and accessories you can use with your SMART Board 685ix interactive whiteboard system, as well as other compatible products available from SMART. •... -
Page 14: Smart Board 685Ix Interactive Whiteboard System Features
SMART Board Interactive Whiteboard Features SMART Board 685 and SBD685 interactive whiteboards include many features of other SMART Board interactive whiteboards, such as a resistive touch screen and a pen tray. The SB685 and SBD685 perform best with the UX60 projector because of its exceptional color performance, aspect ratio, input response and short-throw image distance. -
Page 15: Smart Software
• a security device to prevent theft of the pen tray or the interactive whiteboard SMART Software To use the features of the interactive whiteboard, you must install SMART software on your computer. SMART software includes: • SMART Product Drivers •... -
Page 16: Introducing The Smart Board Sbd600 Series Interactive Whiteboard
Whiteboard SMART Board interactive whiteboards are now available in two series. The SMART Board 600 series is the standard and most popular interactive whiteboard; the SMART Board SBD600 series features Dual-User mode, which enables two people to touch or write simultaneously on either side of the interactive screen in SMART Notebook software. -
Page 17: Ux60 Projector System Features
UX60 Projector System Features The UX60 projector system includes an ultra-short-throw projector for use with SMART Board 685 interactive whiteboards, an extended control panel (ECP), an ECP harness cable and a sturdy support system for classroom environments. The features of the projector system include: •... -
Page 18: Standard Accessories
(two RCA jacks) on the front of the ECP – A USB A receptacle on the front of the ECP Standard Accessories SMART provides the following accessories with your SMART Board 685ix interactive whiteboard system. Standard SMART Board Interactive Whiteboard Accessories Pen Tray Tools The pen tray tools include four pens and an eraser. -
Page 19: Standard Ux60 Projector Accessories
CH A P T E R 1 – A BO U T Y O U R S M A R T B O A R D 6 8 5 I X I N T E R A C T I V E WH ITE BOARD S YS T E M Eraser The eraser resembles a rectangular chalkboard eraser. -
Page 20: Optional Accessories
SMART software. SMART GoWire Auto-launch Cable for SMART Meeting Pro Software (GW-MP) This cable contains SMART Meeting Pro software and starts it automatically on a guest computer, providing full access to all interactive whiteboard software tools without installing SMART software. -
Page 21: Cat 5 To Usb Cable Extender (Cat5-Xt)
SMART Hub SE240 SMART Hub SE240 The SMART Hub SE240 is available as a stand-alone product, or as an upgrade package to the SMART Hub VE220. In addition to whiteboarding and using digital ink, with the SMART Hub SE240 you can: •... - Page 22 10 | CH A P T E R 1 – A BO U T Y O U R S M A R T B O A R D 6 8 5 I X I N T E R A C T I V E WH ITE BOARD S YS T E M...
-
Page 23: Before Installing Your Smart Board 685Ix Interactive Whiteboard System
ECP. The instructions in your SMART Board 685 interactive whiteboard product box do not include instructions for installing the UX60 projector or ECP. This chapter includes requirements to consider before you install a SMART Board 685ix interactive whiteboard system. Topics covered include: •... -
Page 24: Environmental Requirements
Water and Fluid Resistance SMART Board 685ix interactive whiteboard systems are for indoor use only and don’t meet any salt-spray or water ingress requirements. Don’t pour or spray any liquids directly onto the interactive whiteboard, the UX60 projector or any of its sub-components. -
Page 25: Choosing A Location
I N T E R A C T I V E W H I T E B O A RD S Y S T E M Dust and Scratching SMART Board 685ix interactive whiteboard systems are for use in office and classroom environments and are not for industrial use, where heavy dust and pollutants can cause malfunctions or impaired operation. - Page 26 14 | CH A P T E R 2 – B EF O R E I N S T A L L IN G Y O U R S M A R T B O A RD 6 8 5 i x I N T E R A C T I V E W H I T E B O A RD S Y S T E M •...
-
Page 27: Using Your Ux60 Projector
Chapter 3 Using Your UX60 Projector This chapter describes the components of your UX60 projector, and the connections on the projector and ECP. It also explains how to set up your remote control and adjust your projector options. Topics covered include: •... -
Page 28: Components Of The Ux60 Projector
16 | CH A P T E R 3 – U SIN G Y O UR U X60 PR OJEC TOR Components of the UX60 Projector Below is a list of UX60 projector components. 1. Image reflection mirror 2. Infrared receiver 3. -
Page 29: Ux60 Projector Connection Diagrams
17 | CH A P T E R 3 – U SIN G Y O UR U X60 PR OJEC TOR UX60 Projector Connection Diagrams The following diagram and list describe the projector’s connection ports and the types of input you can connect to the projector. Remove the input/output cover on the left side of the projector to access the connection panel. -
Page 30: Remote Control
18 | CH A P T E R 3 – U SIN G Y O UR U X60 PR OJEC TOR 12. 3.5 mm audio-input connector (for VGA 1 connector) 13. HD-DB15 (VGA 1) input connector (computer analog signal/component video input) 14. - Page 31 19 | CH A P T E R 3 – U SIN G Y O UR U X60 PR OJEC TOR To access or replace the 1. Turn over the remote control. remote control battery 2. Hold down the side release on the left side of the battery holder and pull the battery holder completely out of the remote control.
-
Page 32: Using Your Remote Control
20 | CH A P T E R 3 – U SIN G Y O UR U X60 PR OJEC TOR Using Your Remote Control The UX60 projector remote control enables you to access on-screen projector menus and change projector settings. You can use the remote control’s Power button (or, alternatively, the ECP Power button) to turn on or turn off the projector system. -
Page 33: Extended Control Panel (Ecp)
4. Press the Hide button to hide or display the source image. 5. Press the Mode button to cycle through display modes: Bright Classroom, Dark Classroom, sRGB, User or SMART Presentation. 6. Press the Mute button to temporarily mute or un-mute the audio output from your speakers (not included). -
Page 34: Ecp Connection Diagram
22 | CH A P T E R 3 – U SIN G Y O UR U X60 PR OJEC TOR IMPORTANT • The ECP is not meant as a substitute for the remote control. There are no projector menu options on the ECP, so keep your remote control in a safe place. - Page 35 RCA jack audio-left input USB B receptacle (for secondary computers such as a laptop) RJ11 6-wire jack (for serial controller connector cable) USB A receptacle (SMART Board interactive whiteboard only) USB A receptacle (for any USB peripheral, up to 500mA)
- Page 36 24 | CH A P T E R 3 – U SIN G Y O UR U X60 PR OJEC TOR...
-
Page 37: Integrating Other Devices With Your Interactive Whiteboard System
Integrating Other Devices with Your Interactive Whiteboard System This chapter provides info on integrating your SMART Board 685ix interactive whiteboard system with peripheral devices, precautions to follow when connecting a new device to your interactive whiteboard system and basic software installation advice. -
Page 38: Connecting Computers And Peripheral Devices To Your Ux60 Projector
Attaching Sources and Outputs to Your UX60 Projector If you want to permanently connect a computer to your SMART Board interactive whiteboard system, SMART recommends that you use your own cables to connect your computer directly to the UX60 projector. Follow these instructions if you have a... - Page 39 WARNINGS • Two people are required to mount your SMART Board product because it may be too heavy for one person to safely maneuver. When you lift your interactive whiteboard, you and your assistant should stand on either side of the screen, supporting its weight at the bottom corners while balancing the top with your other hands.
- Page 40 CH A P T E R 4 – I NT EGR AT IN G OT HE R DEV ICE S WI T H Y O UR I NT ER ACT I VE WH IT E BOARD SYS T E M To access the projector’s 1. Turn off your SMART Board 685ix interactive whiteboard system. connection panel 2. Remove the two screws on both sides of the cable covers on the projector’s wall-mounting bracket.
- Page 41 29 | CH A P T E R 4 – I NT EGR AT IN G OT HE R DEV ICE S WI T H Y O UR I NT ER ACT I VE WH IT E BOARD SYS T E M To remove the interactive 1.
- Page 42 Make sure the cables don’t rest on the wall-mounting brackets. Cabling between the two wall-mounting brackets for the SMART Board 685ix interactive whiteboard system 4. Space your peripheral cables equally and give the cables some slack between the wire management clip and projector. Close the latch on the wire management clip, ensuring that the cables aren’t crossed....
- Page 43 31 | CH A P T E R 4 – I NT EGR AT IN G OT HE R DEV ICE S WI T H Y O UR I NT ER ACT I VE WH ITE BOARD S YS T E M 7.
-
Page 44: Temporarily Connecting Devices To Your Interactive Whiteboard System
3. Switch input sources to the peripheral by pressing the Input button on the ECP or remote control. Control your USB peripheral’s output through your computer or optional SMART Hub. IMPORTANT If your USB device does not work, the device may be malfunctioning or incompatible, or the USB port may be disabled. -
Page 45: Connecting Your Computer To The Wire Management Bundle
CH A P T E R 4 – I NT EGR AT IN G OT HE R DEV ICE S WI T H Y O UR I NT ER ACT I VE W HITE BOA RD S YS TE M Connecting Your Computer to the Wire Management Bundle Your SMART Board 685ix interactive whiteboard system includes a wire management bundle specifically designed for connecting secondary computers such as a laptop. NOTES •... -
Page 46: Video Format Compatibility
34 | CH A P T E R 4 – I NT EGR AT IN G OT HE R DEV ICE S WI T H Y O UR I NT ER ACT I VE WH ITE BOARD S YS T E M Video Format Compatibility The UX60 projector has a native video format and various video format compatibility modes. -
Page 47: Hd And Sd Signal Format Compatibility
35 | CH A P T E R 4 – I NT EGR AT IN G OT HE R DEV ICE S WI T H Y O UR I NT ER ACT I VE WH ITE BOARD S YS T E M Aspect Refresh “Match Input”... -
Page 48: Video System Signal Compatibility
36 | CH A P T E R 4 – I NT EGR AT IN G OT HE R DEV ICE S WI T H Y O UR I NT ER ACT I VE WH ITE BOARD S YS T E M Aspect Horizontal Vertical... -
Page 49: Connecting A Smart Hub To Your Extended Control Panel
Input button on the ECP. CAUTION If you are installing your SMART Hub on the wall or as part of a support system, please refer to the installation instructions for the SMART Hub or the system before following any instructions in this guide. - Page 50 105 and then return to the following set of instructions. To prepare your ECP for 1. Locate the SMART Hub DIP switch behind the jumper cover port. Using the SMART Hub use flat-head screwdriver, set the DIP switch to SE240 mode, as listed on the label.
-
Page 51: Installing Smart Software
5. Reconnect all cabling to the ECP, and reconnect the master power cable to the power outlet. 6. Connect the other end of the ECP’s USB cable to the SMART Hub. Refer to Using Your SMART Hub VE220 (document... - Page 52 40 | CH A P T E R 4 – I NT EGR AT IN G OT HE R DEV ICE S WI T H Y O UR I NT ER ACT I VE WH ITE BOARD S YS T E M...
-
Page 53: System
Securing the Pen Tray and Interactive Whiteboard on page 48 – Securing the Pen Tray to the Pen Tray Brackets on page 49 • Maintaining Your SMART Board 685ix Interactive Whiteboard System on page 50 – Preventing Damage to Your Interactive Whiteboard on page 50 –... -
Page 54: After Installing Your Smart Board 685Ix Interactive Whiteboard System
Keystone errors occur when the projected image isn’t perpendicular to the screen. Vertical keystone errors can occur when you mount the UX60 projector and the SMART Board 685 interactive whiteboard on an uneven surface or a wall that has obstructions. -
Page 55: Focusing The Image
6 8 5 i x I NT E R A C T I V E W H I TE BO A R D S Y S T E M Horizontal keystone errors can occur when you swivel the UX60 projector too far from the SMART Board 685 interactive whiteboard’s vertical center, when you mount the projector and the interactive whiteboard on an uneven surface or when the interactive whiteboard is slightly closer to the projector on one side than the other. -
Page 56: Aligning The Image After Installation
44 | CH A P T E R 5 – MAIN T AIN IN G AND T ROU BLES H O O T I N G Y O U R S M A RT B O A R D 6 8 5 i x I NT E R A C T I V E W H I TE BO A R D S Y S T E M To focus and Turn the focus dial clockwise or adjust the image... - Page 57 45 | CH A P T E R 5 – MAIN T AIN IN G AND T ROU BLES H O O T I N G Y O U R S M A RT B O A R D 6 8 5 i x I NT E R A C T I V E W H I TE BO A R D S Y S T E M •...
- Page 58 46 | CH A P T E R 5 – MAIN T AIN IN G AND T ROU BLES H O O T I N G Y O U R S M A RT B O A R D 6 8 5 i x I NT E R A C T I V E W H I TE BO A R D S Y S T E M WARNING When adjusting the projector’s image, only loosen the locking screw next to the lock and unlock symbols (see the gray screw in the previous illustration).
- Page 59 47 | CH A P T E R 5 – MAIN T AIN IN G AND T ROU BLES H O O T I N G Y O U R S M A RT B O A R D 6 8 5 i x I NT E R A C T I V E W H I TE BO A R D S Y S T E M 5.
-
Page 60: Securing The Pen Tray And Interactive Whiteboard
Securing the Pen Tray and Interactive Whiteboard Because the pen tray that comes with your SMART Board interactive whiteboard is detachable, you might want to safeguard it—and the interactive whiteboard at the same time—by anchoring it with a security cable. -
Page 61: Securing The Pen Tray To The Pen Tray Brackets
Securing the Pen Tray to the Pen Tray Brackets Because your SMART Board interactive whiteboard’s pen tray is detachable, you might want to safeguard it—and your interactive whiteboard—by locking it with two No. -
Page 62: Maintaining Your Smart Board 685Ix Interactive Whiteboard System
Older units don’t include this feature. Maintaining Your SMART Board 685ix Interactive Whiteboard System With proper care, your SMART Board interactive whiteboard will provide years of trouble-free service. For additional maintenance instructions and recommendations see your SMART Board 600 and SBD600 Series Interactive Whiteboard Installation and User’s Guide... -
Page 63: Cleaning Your Interactive Whiteboard
51 | CH A P T E R 5 – MAIN T AIN IN G AND T ROU BLES H O O T I N G Y O U R S M A RT B O A R D 6 8 5 i x I NT E R A C T I V E W H I TE BO A R D S Y S T E M Cleaning Your Interactive Whiteboard Follow these tips and procedures to keep the screen surface clean. -
Page 64: Cleaning The Pen Tray
52 | CH A P T E R 5 – MAIN T AIN IN G AND T ROU BLES H O O T I N G Y O U R S M A RT B O A R D 6 8 5 i x I NT E R A C T I V E W H I TE BO A R D S Y S T E M Cleaning the Pen Tray If the infrared sensors in the bottom of the pen tray’s recesses are obstructed, the sensors don’t reliably detect when a pen or the eraser is removed or replaced. -
Page 65: Troubleshooting Your Smart Board 685Ix Interactive Whiteboard System
Troubleshooting Your SMART Board 685ix Interactive Whiteboard System Use the following charts to troubleshoot your SMART Board 685ix interactive whiteboard system. If you’re unable to restore the system to a normal operating state, record the behavior of the warning lights, and call your authorized SMART reseller. - Page 66 These status lights are different from what you normally see on a SMART Board 685 interactive whiteboard, and are only valid when the interactive whiteboard system is connected to a computer source.
- Page 67 The interactive whiteboard is on and communicating with your computer. Flashing green The interactive whiteboard is on and communicating with your computer, but it’s in Mouse mode. Confirm that SMART software is installed on your computer. Flashing amber The interactive whiteboard system is turning on, is in service mode or it has detected a firmware error.
- Page 68 ECP’s 4 pin powered-mini-DIN connection. At the ECP, check the DB25 connector. If nothing changes after you check your connectors and power supply, call your authorized SMART reseller. Power: Solid amber The projector is off and receiving power. Press the power button on the ECP to turn it on.
-
Page 69: Troubleshooting Image Issues
Troubleshooting Image Issues Computers, peripherals, source inputs and their connection cables may not be correctly set up to transmit their signals to your SMART Board interactive whiteboard system. Refer to the video compatibility chart and the following section for information on resolving these issues. -
Page 70: Image Compatibility Issues
58 | CH A P T E R 5 – MAIN T AIN IN G AND T ROU BLES H O O T I N G Y O U R S M A RT B O A R D 6 8 5 i x I NT E R A C T I V E W H I TE BO A R D S Y S T E M 3. - Page 71 59 | CH A P T E R 5 – MAIN T AIN IN G AND T ROU BLES H O O T I N G Y O U R S M A RT B O A R D 6 8 5 i x I NT E R A C T I V E W H I TE BO A R D S Y S T E M Your Connected Laptop or PowerBook Computer Image Isn’t Projected Laptop and PowerBook computer settings can interfere with projector operations.
-
Page 72: Other Common Issues
Enter this IP address into your browser or SNMP agent. 4. If the previous steps don’t resolve the issue and you still don’t have network access, contact your authorized SMART reseller. Audio Mute and Audio System Errors A warning message appears when someone presses the Audio Mute option. -
Page 73: Projector Error States
5. Check that your source input, such as your computer or video device, isn’t in error and ensure that its audio output is on and isn’t set to the lowest volume position. 6. If the previous steps don’t resolve the issue, contact your authorized SMART reseller. Video Mute and Frozen Image Errors A warning message appears when someone presses the Video Mute option. - Page 74 1. Follow the steps 1 to 5 of To resolve the projector overheated error. failure error 2. If the lamp does not light up, turn off the projector and wait 15 minutes for the projector to cool down. 3. Disconnect the power cord, and then contact your authorized SMART reseller.
- Page 75 3. Reconnect the power cord, and then turn on the projector. 4. If the previous steps don’t resolve the issue, disconnect the power cord, and then contact your authorized SMART reseller. Lamp Failure If the “Lamp Failure” indicator message appears and the lamp turns off during use or won’t turn on, one of the following issues is occurring:...
-
Page 76: Occasional Maintenance Instructions
Thoroughly clean the area around the projector, and discard any edible items placed in that area because they could be contaminated. – Call an authorized SMART reseller for instructions. Do not attempt to replace the lamp. • Replacing the lamp in a wall-mounted projector can result in a fall or injury. - Page 77 Wear protective eyewear while changing the lamp. Failure to do so can cause injury or loss of eyesight if the lamp shatters or bursts. – Use only replacement lamps approved by SMART Technologies. Contact your authorized SMART reseller for replacement parts.
- Page 78 66 | CH A P T E R 5 – MAIN T AIN IN G AND T ROU BLES H O O T I N G Y O U R S M A RT B O A R D 6 8 5 i x I NT E R A C T I V E W H I TE BO A R D S Y S T E M 5.
-
Page 79: Slipping Projector Images
67 | CH A P T E R 5 – MAIN T AIN IN G AND T ROU BLES H O O T I N G Y O U R S M A RT B O A R D 6 8 5 i x I NT E R A C T I V E W H I TE BO A R D S Y S T E M To finish the projector 1. - Page 80 68 | CH A P T E R 5 – MAIN T AIN IN G AND T ROU BLES H O O T I N G Y O U R S M A RT B O A R D 6 8 5 i x I NT E R A C T I V E W H I TE BO A R D S Y S T E M To access the service 1.
- Page 81 69 | CH A P T E R 5 – MAIN T AIN IN G AND T ROU BLES H O O T I N G Y O U R S M A RT B O A R D 6 8 5 i x I NT E R A C T I V E W H I TE BO A R D S Y S T E M Performing a Projector Reset At some point during troubleshooting, you may need to reset all projector settings.
- Page 82 70 | CH A P T E R 5 – MAIN T AIN IN G AND T ROU BLES H O O T I N G Y O U R S M A RT B O A R D 6 8 5 i x I NT E R A C T I V E W H I TE BO A R D S Y S T E M...
-
Page 83: Remotely Managing Your Smart Board 685Ix Interactive Whiteboard System
System This chapter has detailed instructions on how to set up your computer or your room control system to remotely manage your SMART Board 685ix interactive whiteboard system settings. Additionally, you can add the interactive whiteboard system to your network, and you can access commands and generate reports through an RS-232 serial interface, a web browser or a Simple Network Management Protocol (SNMP) network connection. - Page 84 72 | CH A P T E R 6 – R E MO T E L Y M A N A G IN G Y O U R S M A RT B O A R D 6 85 IX I N T E R A C T I V E W H I T E B O A RD S Y S T E M –...
-
Page 85: Connecting Your Serial Interface To The Ux60 Projector
73 | CH A P T E R 6 – R E MO T E L Y M A N A G IN G Y O U R S M A RT B O A R D 6 85 IX I N T E R A C T I V E W H I T E B O A RD S Y S T E M Connecting Your Serial Interface to the UX60 Projector... - Page 86 74 | CH A P T E R 6 – R E MO T E L Y M A N A G IN G Y O U R S M A RT B O A R D 6 85 IX I N T E R A C T I V E W H I T E B O A RD S Y S T E M •...
-
Page 87: Rs-232 Programming Commands
75 | CH A P T E R 6 – R E MO T E L Y M A N A G IN G Y O U R S M A RT B O A R D 6 85 IX I N T E R A C T I V E W H I T E B O A RD S Y S T E M RS-232 Programming Commands UX60 Projector Power States... -
Page 88: Value-Based Command Methods
76 | CH A P T E R 6 – R E MO T E L Y M A N A G IN G Y O U R S M A RT B O A R D 6 85 IX I N T E R A C T I V E W H I T E B O A RD S Y S T E M Value-Based Command Methods Absolute Values and Adjustment Values... -
Page 89: Powerstate And Command Listing Controls
77 | CH A P T E R 6 – R E MO T E L Y M A N A G IN G Y O U R S M A RT B O A R D 6 85 IX I N T E R A C T I V E W H I T E B O A RD S Y S T E M Powerstate and Command Listing Controls These commands turn on or turn off the projector, request the projector’s current... -
Page 90: Source Selection Controls
78 | CH A P T E R 6 – R E MO T E L Y M A N A G IN G Y O U R S M A RT B O A R D 6 85 IX I N T E R A C T I V E W H I T E B O A RD S Y S T E M Powerstate Response Field Description Field... -
Page 91: General Source Controls
These commands control the appearance of your source. These settings are unavailable when the projector is off, or when the source is disconnected. Command Command Target Range Response set displaymode [target] =SMART Presentation displaymode=[target] =Bright Classroom =Dark Classroom =sRGB =User... -
Page 92: Additional Vga Source Controls
80 | CH A P T E R 6 – R E MO T E L Y M A N A G IN G Y O U R S M A RT B O A R D 6 85 IX I N T E R A C T I V E W H I T E B O A RD S Y S T E M Command Command Target Range... -
Page 93: Additional Composite Video Source Controls
81 | CH A P T E R 6 – R E MO T E L Y M A N A G IN G Y O U R S M A RT B O A R D 6 85 IX I N T E R A C T I V E W H I T E B O A RD S Y S T E M VGA Source Control Commands These commands control the appearance of your VGA source. -
Page 94: Audio Output Commands
82 | CH A P T E R 6 – R E MO T E L Y M A N A G IN G Y O U R S M A RT B O A R D 6 85 IX I N T E R A C T I V E W H I T E B O A RD S Y S T E M Composite Video Source Control Commands These commands control the appearance of your composite video source. -
Page 95: System Controls
83 | CH A P T E R 6 – R E MO T E L Y M A N A G IN G Y O U R S M A RT B O A R D 6 85 IX I N T E R A C T I V E W H I T E B O A RD S Y S T E M System Controls Allows you to switch system settings and access system information. - Page 96 =match =16:9 set projectionmode [target] =front projectionmode=[current] =ceiling =rear =rear ceiling set startupscreen [target] =smart startupscreen=[current] =usercapture =preview set groupname [description] Enter a descriptor no groupname=[description] more than 12 characters long. set projectorname [description] Enter a descriptor no projectorname=[description] more than 12 characters long.
- Page 97 85 | CH A P T E R 6 – R E MO T E L Y M A N A G IN G Y O U R S M A RT B O A R D 6 85 IX I N T E R A C T I V E W H I T E B O A RD S Y S T E M Command Target Command...
- Page 98 86 | CH A P T E R 6 – R E MO T E L Y M A N A G IN G Y O U R S M A RT B O A R D 6 85 IX I N T E R A C T I V E W H I T E B O A RD S Y S T E M System Information Commands (Passive) These commands control the current system settings.
-
Page 99: Simple Network Management Protocol (Snmp)
87 | CH A P T E R 6 – R E MO T E L Y M A N A G IN G Y O U R S M A RT B O A R D 6 85 IX I N T E R A C T I V E W H I T E B O A RD S Y S T E M Network Control Commands These commands control your network settings. -
Page 100: Accessing Web Page Management
2. Enter the IP address into the address line field, and press ENTER. The SMART UX60 Projector Settings dialog box appears. 3. Select the menu options in the left pane to access the settings on each page. 4. Select or enter your desired settings with your computer’s keyboard, and then press the Submit or action button next to the setting you have changed. - Page 101 (dependent on the television channel or media setup). Display Mode Adjusts the display mode to SMART Presentation, Bright Classroom, Dark Classroom, sRGB and User modes. See page 96 for a description of display modes. Brightness Adjusts projector brightness from 0 to 100.
- Page 102 90 | CH A P T E R 6 – R E MO T E L Y M A N A G IN G Y O U R S M A RT B O A R D 6 85 IX I N T E R A C T I V E W H I T E B O A RD S Y S T E M Submenu Settings Description...
- Page 103 See Video Format Compatibility on page 34 for appearance descriptions in each mode. Startup Screen Selects the type of start up screen to SMART or User. Once you change this setting, the on-screen display menu closes and captures the on-screen image.
-
Page 104: Network Settings
92 | CH A P T E R 6 – R E MO T E L Y M A N A G IN G Y O U R S M A RT B O A R D 6 85 IX I N T E R A C T I V E W H I T E B O A RD S Y S T E M Submenu Settings Description... - Page 105 Temperature warning conditions occur. Select the settings you want and then press Submit. NOTE The projector sends an alert e-mail (SMART Alert) to your e-mail address. Press the E-mail Alert Test to confirm your e-mail address by sending a test e-mail (SMART Alert-Test...
-
Page 106: Password Settings
94 | CH A P T E R 6 – R E MO T E L Y M A N A G IN G Y O U R S M A RT B O A R D 6 85 IX I N T E R A C T I V E W H I T E B O A RD S Y S T E M Password Settings This menu provides a security function allowing an administrator to manage usage for... -
Page 107: Ux60 Projector Menu Commands
UX60 projector’s output. These procedures are intended for experienced users, information technology administrators and facility managers that require access to advanced features. SMART Technologies has optimized the UX60 projector for best performance out of the box. Topics in this chapter include: •... -
Page 108: Source Image Adjustment
Source Image Adjustment Display Mode Presets SMART has provided a variety of display mode presets for users to easily change during a lesson or presentation. Display Mode presets allow you to project images from various sources with consistent color performance. You can access these settings by pressing the remote control’s Mode button in the Display region or the... -
Page 109: Hdmi Input Source Settings
97 | CH A P T E R 7 – U X60 P ROJEC T O R MEN U COMM AN DS VGA Settings Menu Description V-position Adjusts the vertical position of the projected image. Press the left arrow button on the remote control to move image down and press the right arrow button to move the image White Peaking Adjusts the image color brightness while providing more... -
Page 110: Video Source Settings
98 | CH A P T E R 7 – U X60 P ROJEC T O R MEN U COMM AN DS Video Source Settings You can adjust these settings only when you’re displaying a video source image. All modified settings register to the User display mode. Video Settings Menu Description Display Mode See page 96 for a description of the display mode presets. -
Page 111: Audio Settings Adjustment
99 | CH A P T E R 7 – U X60 P ROJEC T O R MEN U COMM AN DS Audio Settings Adjustment These settings apply to all connected audio sources. Audio Settings Menu Description Volume Adjusts the volume from 0 to 100. Press the left arrow button on the remote control to decrease or right arrow button to increase volume. - Page 112 NOTE This option is irreversible and resets all values. Startup Screen Submenu You can replace the standard SMART logo and slogan startup screen with an image representing your school, class, or organization. Startup Screen Description...
-
Page 113: Network Settings Adjustments
10 1 | CH A P T E R 7 – U X60 P ROJEC T O R MEN U COMM AN DS Startup Screen Description Submenu Capture User Press Enter on the remote control to perform an image Startup Screen screen capture. - Page 114 10 2 | CH A P T E R 7 – U X60 P ROJEC T O R MEN U COMM AN DS Network Settings Description Menu Projector Name Displays your projector’s name, as given by an administrator. Location Displays your projector’s location, as given by an administrator.
-
Page 115: Language Preference Setting
10 3 | CH A P T E R 7 – U X60 P ROJEC T O R MEN U COMM AN DS Language Preference Setting Select your language preference in the list. You can also adjust this setting from the projector’s network menu, or via the serial interface connection commands. - Page 116 10 4 | CH A P T E R 7 – U X60 P ROJEC T O R MEN U COMM AN DS Information Panel Description Firmware Version Displays the projector’s firmware version. NOTE This field isn’t editable. MPU Version Displays the projector microprocessor’s firmware version.
-
Page 117: Disabling Usb Communications
Appendix A Disabling USB Communications Disabling the ECP’s USB Port In some situations, you may need to disable the ECP’s front USB port. Disabling the USB port prevents users from using or saving documents to USB storage devices using the ECP’s front USB receptacle. The other USB receptacles will not be deactivated, as they’re required for the interactive whiteboard and computer connections to function. - Page 118 4. Insert the USB jumper cover into the USB A port on the front of the ECP. 5. If you’re preparing to attach a SMART Hub to your UX60 projector, see page 38. If not, continue with these instructions.
-
Page 119: Hardware Environmental Compliance
Appendix B Hardware Environmental Compliance SMART Technologies supports global efforts to ensure that electronic equipment is manufactured, sold and disposed of in a safe and environmentally friendly manner. Waste Electrical and Electronic Equipment Regulations (WEEE Directive) Waste Electrical and Electronic Equipment regulations apply to all electrical and electronic equipment sold within the European Union. -
Page 120: Packaging
SMART Technologies products fall under this classification and meet the requirements for China’s EIP regulations. U.S. Consumer Product Safety Improvement Act The United States has enacted the Consumer Product Safety Improvement Act which limits the lead (Pb) content in products. SMART Technologies is committed to complying with this initiative. -
Page 121: Customer Support
Technical Support If you experience difficulty with your SMART product, please contact your local reseller before contacting SMART Technical Support. Your local reseller can resolve most issues without delay. NOTE To locate your local reseller, visit www.smarttech.com/where. -
Page 122: General Inquiries
Toll Free 1.888.42.SMART (U.S./Canada) +1.403.228.2500 E-mail info@smarttech.com Warranty Product warranty is governed by the terms and conditions of SMART’s “Limited Equipment Warranty” that shipped with the SMART product at the time of purchase. Registration To help us serve you, register online at www.smarttech.com/registration. -
Page 123: Index
35 Bright classroom mode, 96 standard definition signals, 35 VESA RGB signals, 34 video system, 5 video system signal, 36 Connecting a SMART Hub, 37 Cables Consumer Product Safety Improvement optional accessories, 8, 9 Act, 108 security, 48... - Page 124 Documentation, 109 General inquiries, 110 Domain name system settings, 101 Dry-erase markers, 6 Hardware environmental compliance, 107–108 HDMI connecting a SMART Hub, 37 source controls, 79 functions, 21 source settings, 97 input button, 37 High definition signals, 35 overview, 7...
- Page 125 (MIB), 87 Projector overheated message appears, Markers, 6 MIB file, 87 Projector reset, 69, 89 Mounting height serial command, 86 SMART Board 685ix interactive whiteboard system, 13 Mute, 60 Registration, 110 Remote control battery, 18 Native video format, 34...
- Page 126 11 4 | IN DE X Secure information sharing SMART Notebook software, 4 disabling USB ports, 105 SMART GoWire auto-launch cable, 8 Security SMART Presentation, 96 SMART Technical Support, 109 cable, 48 optional screws, 49 SNMP, 87, 92 Serial controller...
- Page 127 11 5 | IN DE X U.S. regulations, 108 Value-based command methods, 76 USB cable VESA formats, 34 optional accessories, 8 VGA input optional Cat 5 accessories, 9 source settings, 80, 96 USB ports VGA out port disabling, 105 enabling your, 60, 86, 101 User defined settings, 96 Video format User’s guides, 109...
- Page 128 11 6 | IN DE X...
- Page 130 Toll Free 1.866.518.6791 (U.S./Canada) or +1.403.228.5940 www.smarttech.com...
Need help?
Do you have a question about the Board 685ix and is the answer not in the manual?
Questions and answers