
Subscribe to Our Youtube Channel
Related Manuals for Revolabs 01-HDVENU


Summary of Contents for Revolabs 01-HDVENU
- Page 1 Revolabs HD Venue™ Wireless Microphone System Models: 01-HDVENU, 03-HDVENUEU, 03-HDVENUCN, 03-HDVENUJP User and Set-up Guide...
- Page 2 © 2010 REVOLABS, INC. All rights reserved. No part of this document may be reproduced in any form or by any means without express written permission from Revolabs, Inc. Product specifications are subject to change without notice. R e v o l a b s H D V e n u e ™ W i r e l e s s M i c r o p h o n e S y s t e m M a n u a l 0 1 - H D V N U M A N - P A P - 1 1 M A R C H 2 0 1 2 ( R e v 2 .
-
Page 3: Table Of Contents
Safety and General Information ........................4 Introduction..............................6 System Components ..........................6 Installing the Revolabs HD Venue™ Base Station ..................7 To Install the Base Station: ........................7 Revolabs HD Venue™ Base Station Connections ................... 8 Configuring the Revolabs HD Venue Base Station .................. -
Page 4: Safety And General Information
Safety and General Information Please read the following information to ensure safe and efficient use of your Revolabs system. FCC User Information FCC ID: T5V01HDVENUNM Revolabs HD Venue™ Station FCC ID: T5V01HDEXEMIC Revolabs HD ™ Microphone FCC Notice to Users Users are not permitted to make changes or modify the equipment in any way. -
Page 5: European Compliance
Always obey the laws and regulations on the use of these products. 01-HDVENU North America UPCS Usage Restriction Due to the UPCS frequencies used, this product is licensed for operation only in the United States of America and Canada. -
Page 6: Introduction
VOIP communications, sound re-enforcement as well as many other environments requiring clear audio capture. The Revolabs HD Venue™ Wireless Microphone System has high definition audio, which allows the system to pick up the entire human voice spectrum. The HD Venue System combines innovative technology and ergonomic design, employing Multi-Carrier Time Division Multiple Access and Time Division Duplex (MC/TDMA/TDD) radio transmissions both to and from the microphone. -
Page 7: Installing The Revolabs Hd Venue™ Base Station
Installing the Revolabs HD Venue™ Base Station To Install the Base Station: The Revolabs HD Venue™ Base Station is designed to be installed into a standard 19‖ AV rack using the attached rack ears. 1. Install the HD Venue System into the rack. -
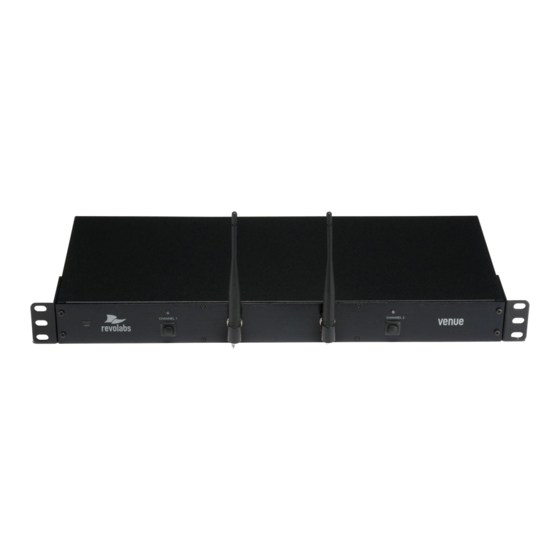
Page 8: Revolabs Hd Venue™ Base Station Connections
Revolabs HD Venue™ Base Station Connections The Revolabs HD Venue™ Base Station, shown below in front and rear panel views, manages wireless audio signal processing, pairing, and muting between the Revolabs microphones and the Base Station. Front View Rear View Controls and Connections: 1. -
Page 9: Configuring The Revolabs Hd Venue
NOTE: The USB port may exhibit static sensitivity. If the Base Station audio shuts down after handling, please power cycle the Base Station Note: The HD Venue System is not compatible with any other Revolabs system and therefore cannot be installed in the same room. The HD and Solo Wireless Microphones and Charger Bases are not interchangeable. -
Page 10: Using The Rear Panel Configuration Dip Switches
Using the Rear Panel Configuration DIP Switches 1 2 3 4 5 6 7 8 Feature Off (Default) Switch Individual Output Mixing Mixed Output Outputs Low Pass Filter No LPF Audio Output Line Level Mic Level Level Individual Mute Mode No Mutes Mutes Half of the... -
Page 11: Using The Revolabs Hd Control Panel Software
Using the Revolabs HD Control Panel Software A software program with graphical user interface is available for accessing control settings and real- time status of Revolabs HD Microphone Systems. A detailed description of how to use this tool is described below. - Page 12 Mics Unmute at Startup: By default the mics go into a muted state when they are removed from the charger. This is done to prevent handling noise as the microphone is placed into position. By selecting ‗Mics Unmuted at Startup‘, the mics will go into an unmuted state when removed from the charger. All Mic Mute: This feature removes the mics individual mute capability and causes both microphones to mute when the mute button on either microphone is pressed.
-
Page 13: Revolabs Hd Microphones And Hd Microphone Adapters
Using the HD Wearable Wireless Microphones The Revolabs HD Wearable Microphones, shown in the following figure, are paired to the Base Station and can be worn on the user‘s shirt pocket, lapel or on a lanyard. They provide high quality full duplex audio between each user and the conferencing or audio system. - Page 14 Note: Microphones in new systems must be paired to the Base Station with each microphone assigned to a unique channel on the base unit. See pairing instructions below. Revolabs HD Wearable Microphones turn on and mute automatically when removed from Charger Base, to reduce noise while being attached.
-
Page 15: Using The Hd Omni-Directional Tabletop Wireless Boundary Microphones
2. Mute button — press to mute, un-mute and pair microphone. 3. Audio jack — accepts a 2.5mm plug. 4. Charging port — docks to Revolabs HD Charger Bases. 5. Rubber feet — non-slip, vibration absorbing pads. 6. Acoustic Cover — protects delicate microphone element (non-removable). -
Page 16: Using The Hd Directional Tabletop Wireless Boundary Microphones
2. Rubber feet — non-slip, vibration absorbing pads. 3. Audio jack — accepts a 2.5mm plug. 4. Charging port — docks to Revolabs HD Charger Bases. 5. Mute button — press to mute, un-mute and pair microphone. 6. Acoustic Cover — protects microphone element (non-removable). -
Page 17: Using The Hd Xlr Microphone Wireless Adapter
1. Remove the microphone from the Charger Base to turn on and automatically mute the mic. (indicated by a flashing RED LED) 2. Directional Tabletop microphones should be located on the table with the acoustic cover pointed toward the users, trying to keep the microphone 2 to 6 feet (.6 to 2m) from the target person or two. -
Page 18: Using The Hd Wireless Adapter For Countryman Microphone
2. Charging Port — docks to all Revolabs HD Charger Bases. 3. Mute button — press to mute, un-mute and pair microphone. 4. LED display — visual status for mute, un-mute, and pairing. 5. XLR Female connector — balanced audio for dynamic microphones. -
Page 19: Pairing Wireless Microphones To Base Station
The adapter turns on and mutes automatically when removed from Charger Base (flashing RED LED). The Microphone Adapter is attached to a Countryman Microphone with the specific cable designed for Revolabs. The HD Wireless Adapter for Countryman microphone supplies the necessary phantom power specifically for the Countryman microphone. -
Page 20: Revolabs Hd Venue Tm Charger Base
Revolabs HD Venue Charger Base When microphones are not in use, they should be properly inserted into the Revolabs HD Charger Base. It is important to ensure that all system microphones are inserted fully in the base so that charging will occur. Features of the base are shown in the following figure. -
Page 21: Power Module
Revolabs HD Systems are field upgradable for the firmware portion of the Base Station and microphones. The firmware must be sent to the Base station using the Revolabs HD Panel. The software can be downloaded at www.revolabs.com/downloads. Updating the HD Venue Base Station and HD Microphones 1. -
Page 22: Revolabs Hd™ Indicator Leds
Revolabs HD™ Indicator LEDs The following tables show activities associated with the various states shown by the LEDs: Equipment Use Microphone LED Base Station Meaning Channel LEDs Microphone in Charger Solid RED Charging in Progress Base Solid GREEN Charging Complete... -
Page 23: Warranty
Warranty Revolabs, Inc. warrants this product to be free of manufacturing defects. Repair or replacement of any defective part or unit (at the discretion of the Seller) will be free of charge for the period defined in the Revolabs Professional Products Limited Warranty. -
Page 24: Specifications
Countryman Adapter: 1.5‖ (3.8 cm) x 0.8‖ (2.0 cm) x 3.3‖ (8.4 cm), 0.05 lb (0.02 kg) Shipping Weight 2.0 lbs (5.45 kg) Radio Frequency: 01-HDVENU 1.92 to 1.93 GHz (UPCS North America) (and other 01-HD* products) 03-HDVENUEU 1.88 to 1.90 GHz (DECT EU) -
Page 25: Index
Index Adjusting the Volume, 15 LED Display, 14 Base Station, 7 Mute Button, 14 Back Panel, 7 Pocket Clip, 14 Front Panel, 7 Microphones, 13 Channel LED indicators, 8 Pairing, 19 Channels, 9 Power Cord Receptacle, 20 Charger Bays, 20 Power In Receptacle, 8 Charging the Batteries, 21 Power Module, 21... - Page 26 Note: Microphones must be fully charged and paired to the Base Station prior to first use. R e v o l a b s H D V e n u e ™ W i r e l e s s M i c r o p h o n e S y s t e m M a n u a l 0 1 - H D V N U M A N - P A P - 1 1 M A R C H 2 0 1 2 ( R e v 2 .
Need help?
Do you have a question about the 01-HDVENU and is the answer not in the manual?
Questions and answers