Table of Contents
Advertisement
Advertisement
Table of Contents

Related Manuals for TIPTEL 3240


Summary of Contents for TIPTEL 3240
- Page 1 Tiptel3240 User Guide...
-
Page 2: Table Of Contents
Contents 1. Overview ..................................5 1.1. Introduction ..............................5 1.2. Features ................................. 6 1.3. Keypad ................................8 1.4. Icons introduction ..........................11 2. Installation ................................12 2.1. Check package contents ........................12 2.2. Connection diagram ..........................12 2.3. Installation Steps ............................. 13 3. - Page 3 3.23. DSS Key ..............................24 3.24. Hoteling ..............................25 3.25. Application ............................. 26 3.25.1. Text Message ..........................26 3.25.2. Voice Message .......................... 28 4. Settings ..................................32 4.1. Basic Settings ............................32 4.1.1. Language ............................32 4.1.2. Date & Time ..........................32 4.1.3.
- Page 4 5.14. Phone ->Dial Plan->Dial Now ......................65 5.15. Phone –>Action URL ........................... 67 5.16. PhoneBook->Local Phone Book ....................69 5.17. Phone Book->Remote Phone Book ....................70 5.18. Phone Book->Call log ......................... 71 5.19. Phone Book->LDAP ..........................72 5.20. Phone Book->BroadSoft ........................73 5.21.
-
Page 5: Overview
1.Overview 1.1.Introduction The Tiptel3240 is a featured 6-line IP phone with full duplex hands-free speakerphone. It can be directly connected to an Internet Telephony Service Provider or to an IP PBX. Based on the SIP standard, the Tiptel3240 has been tested to ensure comprehensive interoperability with equipment from VoIP infrastructure leaders enabling service providers to quickly roll-out competitive, feature rich services to their customers. -
Page 6: Features
1.2.Features Highlights HD Voice Up to 6 SIP Accounts 4.3‘’ 480x272 Graphical LCD with Backlight, 4-bit Graylevel Support 3-way Conference Support PoE Full Compatible with Asterisk, BroadSoft Platform Phone Features Support call waiting, call forwarding, call transfer Call on hold, mute, auto-answer, redial Phonebook (500 groups), Blacklist (100 groups), call logs (100 entries) 5 Remote Phone Book URL supported DND (Do Not Disturb) -
Page 7: Network Features
Dial Plan SMS,Voicemail,MWI message Notification Wideband Codec: G.722 Narrowband Codec: PCMA, PCMU, G.729, G723_53, G723_63, G726_16, G726_24, G726_32, G726_40 VAD, CNG , Echo Canceller Full-Duplex Speakerphone Network Features SIP V1(RFC2543), V2(RFC3261) Static IP/DHCP for IP configuration 3 DTMF modes: In-Band, RFC2833, SIP INFO HTTP/HTTPS Web Server for Management NTP for Auto Time Setting TFTP/FTP/HTTP/HTTPS Protocols... -
Page 8: Keypad
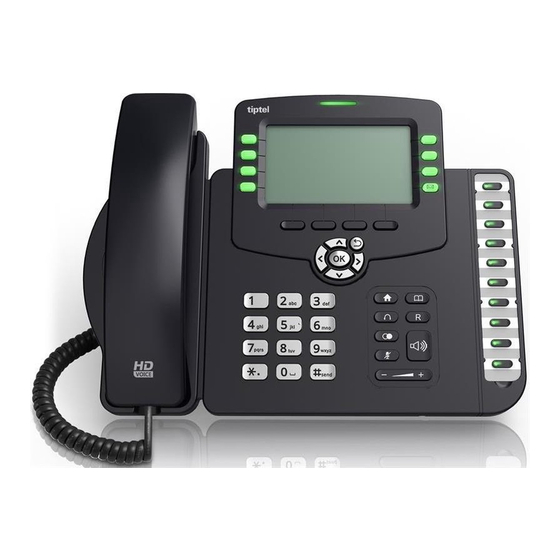
1.3.Keypad Keypad, LED, and function key definitions Keypad Description Navigation Assists you in selecting an item that you want to process Key name Function Description under the menu by pressing the Up, Down, Right or Left key. Press the center key to save. Key combination includes functions such as History/Favorites/Redial/CallReturn/HotDesking/XML Soft keys 1/2/ 3/4... - Page 9 Menu/MSG/Status/Book/Fwd/PickUp/Group PickUp/Intercom/Speed Dial/and so on. Home Back to the Home page Book View Local Phone Book/Blacklist/Remote Phone Book Headset Use the headset to call out or call in R key Forward the call to the third part Redial View the Missed Calls, Incoming Calls and Dialed Calls. Mute Press this key in calling mode and you can hear the other side, but the other side cannot hear you.
- Page 10 Rear view and panel descriptions Power switch Input: 5V DC 1.2A Port Port name Description Internet 10/100M Connect it to Network 10/100M Connect it to PC Port type: RJ-12 connector Handset Port type: RJ-9 connector Headset Port type: RJ-9 connector...
-
Page 11: Icons Introduction
1.4.Icons introduction... -
Page 12: Installation
2.Installation 2.1. Check package contents Please refer to the package list below to check the completeness of package SIP IP Phone unit Name Quantity handset RJ-9 Cable Power Adapter RJ-45 Cable Stand Quick installation guide 2.2.Connection diagram... -
Page 13: Installation Steps
2.3.Installation Steps Step 1 – Connect the power Connect the provided power adapter to the Power port and plug the adapter into an available power outlet. The LCD will display “Initializing, Please Wait…” ------------------------------------------------------------------------------------------------------- Note1: Never use a power adapter other than the one provided with Tiptel3240 Note2: Only Internet port supports POE. -
Page 14: Functions
3.Functions Make a call 3.1. 3.1.1.Call Devices User can make a phone call via the following methods : 1. Pick up the handset, icon will be shown on the idle screen. 2. Press the Handfree key, icon will be shown on the idle screen. 3. -
Page 15: Mute
current talking. During the conversation, User can alternate between Headset, Handset and Handfree by pressing the corresponding keys. Note: The will flash during the Incoming interface 3.3.Mute You can press the Mute key to make the user NOT be heard by the other party, but User can hear the other party. -
Page 16: Call Forward
3.7.Call Forward You can set the static forward to switch all the incoming calls to specified number; Also you can use dynamic forward to switch all the incoming calls forward to the number inputted when the phone is ringing. Forward: Enable call forward feature, Options as follows: Always forward: All the incoming calls will be the Switched unconditionally to specified ... -
Page 17: Consultation Transfer
3. Press the R key or the Trans soft key to transfer the hold talking to the number you want to transfer to; 4. Return to the Idle automatically ; Note: The UI will display Hold status interface when the number you want to transfer to is not existed. -
Page 18: Make Two Lines Talking Attend Conference
5. Press the Conference soft key to start 3-way conference. 6. Press the Split soft key to split to two lines standalone talking, then this two parties talking are under Hold status: 7. HOLD Press the Resume soft key to resume the current talking: 8. -
Page 19: Pickup
Account-->Press the Save soft key to save; 3.11.Pickup You can use pickup to answer other users’ incoming call. The IP phone tiptel3240 supports specified pickup and group pickup. Note: Press the group pickup only to answer line 1 incoming call if there are many lines incoming calls in group. -
Page 20: Auto-Redial
3.13.Auto-redial When hang-up by the other party, call failure during the calling, the phone will enter the auto-redial screen, and begin to count. Press OK for redial now or wait for the time is up. After trying the times of setting of auto-redial, the phone will hang-up automatically. To configure Auto Redial via Phone interface: 1. -
Page 21: Hotdesking
Answer the intercom incoming calling In default situation, the IP phone tiptel3240 will answer the intercom incoming calling automatically and make a noise. You can set the phone to enable silent mode when picking up the intercom call so that the other will not hear you 。 The features of intercom:... -
Page 22: Xml Browser
3.17.XML Browser XML Browser allows the users to develop and deploy custom services. Users need to pre-configure a custom service functions on the server, such as news, weather report, stock information. The user receives and displays the service information on the IP phone from the server, and all service information are transmitted in XML object. -
Page 23: Busy Lamp Field (Blf)
and you can choose to lock the function keys or all keys. And this function can only be configured through the web UI, please refer to the web interface for the details. Function Keys: The function keys are locked. You cannot use the LIINE KEYS, MESSAGE ... -
Page 24: Blflistcode
To configure a BLF key via phone user interface: PATH: Press Menu-->Features-->Programmable keys-->Line Keys/DSS keys(DSS keys only for Tiptel3240)-->BLF--> Save soft key; 3.21.BLFListCode BLF List:While using BroadSoft platform, the accounts which are monitored by the sip phone will reply the subscribe news in the form of xml list to improve efficiency. BLF List Code:While using BroadSoft platform,when press BLF List key configured the BLF LIST CODE,can Pick up call or Barge in call. -
Page 25: Hoteling
L Browser/DTMF/DND/ Menu/MSG/Status/Book/Fwd/PickUp/Group pickUp/Intercom/ Speed Dial To configure a DSS key via phone user interface: PATH: Press Menu-->Features-->Programmable keys-->DSS keys; 3.24.Hoteling Hoteling function enables the customer to login the own sip account on the Host ip phone, after login to the phone, the customer can use his own guest account on the host ip phone. Note: Hoteling is supported by Broadsoft platform, Please consult your administrator further information. -
Page 26: Application
Press GuestIn softkey to login the extension number 4723 and password The extension number 4723 is ready for use 3.25.Application 3.25.1. Text Message The IP phone tiptel3240 can send and answer text message. The phone will make a “Du” sound and present “N piece of new message” on the LCD( For example: 1 new message), and a twinkling message icon will appears。... - Page 27 Note: Not all servers support message feature. Read Text Message 1. Access Menu->Message->Text Message-> In box 2. press the OK key on the phone keyboard or the Enter soft key to enter the Text Message interface, Press the OK key on the phone keyboard or the Enter soft key to enter the in-box interface.
-
Page 28: Voice Message
Press the Send soft key to send message. Delete Text Message 1. In the Idle, press the Menu soft key 2. Press the main menu interface, Press the Down key on the phone keyboard to select message, Press the OK key on the phone keyboard or the Enter soft key to enter the Message interface:... - Page 29 Note: Not all servers support voice message. Voice Message You can leave a message when the user who you call is busy or unavailable. Leave a message according to the voice prompt of server, and then hang up after leaving the message. Set Visit account number of voice message via phone interface .
- Page 30 8. Press the OK key on the phone keyboard or the Save soft key to save and return to message interface. Check voice message 1. Press the Message key or the Connect soft key to call the Visit account number of voice message.
-
Page 32: Settings
4.Settings 4.1.Basic Settings 4.1.1. Language You can change the language through below method: Press Menu -> Settings -> Basic Setting -> Language 4.1.2. Date & Time 1. The IP phone displays Time and Date in Idle status. You can set the Time and Date obtain from SNTP server automatically or you can set the time and date manually. -
Page 33: Backlight
4.1.3. Backlight Set the screen backlight level and duration of backlight Press Menu -> Settings -> Basic Setting ->Backlight 4.1.4. Password Setting This function is to set into the advanced Settings password Press Menu -> Settings -> Advanced Setting ->Password Setting A dialog box “Enter Password:”... -
Page 34: Ring Tones
4.2.2. Ring Tones 1. The Ring Tone refers to incoming ring tone, which remind the user that new call is coming with the phone. The IP phone tiptel3240 supports phone ring tone to distinguish the incomings from other near phones’ ring tone; Besides, The IP phone tiptel3240 support specifying different incoming ring tones for multi-accounts in one phone equipment, At the same time, the IP phone tiptel3240 also support setting specific incoming ring tone for contacts. -
Page 35: Blacklists
4.3.1.1.2.ADD contact from All Calls History: Add contact from All Calls History in the phone interface: 1. Press the History soft key; 2. Press the Up or Down key on the phone keyboard to select the contact you want to add; 3. -
Page 36: History Management
10. Press the key or the Back soft key to unlink。 11. Press the Book soft key to enter the Phone Book Menu: 4.4.History Management The History management of IP phone tiptel3240 contains dialed calls, received calls, missed calls and forwarded calls and support 100 logs storage at most. You can check the history, make calls from the calls history and delete the calls history 。... -
Page 37: Basic Network Settings
4.5.2.1.Register an Account Register an account via phone interface: 1. Press the Menu soft key to enter setting interface to select advanced setting, input password(password: admin) to select account; 2. Select the account you want to set and press the Enter soft key; 3. -
Page 38: Static Ip Mode
4.6.2. Static IP Mode 1. In the LAN Port interface, press the Up or Down key on the phone keyboard to select Static IP, then Press the OK key on the phone keyboard or the Enter soft key to enter Static IP Setting interface and input IP address. -
Page 39: Reset To Factory
Port, press the OK key on the phone keyboard or the Enter soft key to enter LAN Port: 2. In the LAN Port interface, press the Up or Down key on the phone keyboard to configure the functionality Enable, VID, Priority: 3. -
Page 40: Web Interface
5.WEB Interface Web user interface (we will used Web UI for short in the following context) which is used for user or administration to check or change the IP SIP phone’s settings. Press the OK key on the phone keyboard to check the Phone’s IP address. ... -
Page 41: Status->Basic
5.1.Status->Basic 1. First you need to open a browser(for example IE) 2. Input the IP address in the browser’s address bar and then press the Enter key 3. If successfully connected to IP phone, it will prompt a login page. In the page, please input the username and password accordingly. -
Page 42: Account->Basic
server, Secondary DNS server, Primary NTP server and Secondary NTP server(NTP server is used to synchronize time from INTERNET automatically). To display device’s Account information and Registration status (account username, registered server’s address, Account Information Register result). Status->Basic page is used to display some basic information for IP Phone. Please refer to Note: corresponding page for any further information. - Page 43 Display Label: Which is displayed on the phone’s LCD screen. Display Name: Which is sent to the other call party for displaying. Register Name: Allocated by SIP server provider, used for authentication. User Name: Allocated by your SIP server provide, used for authentication.
-
Page 44: Account->Advanced
5.3.Account->Advanced Path: Web UI->Account->Advanced... - Page 46 To display current Account settings or to select which account Sections Description to display. SIP Account To display and configure available/unavailable codecs list. Codec means coder-decoder which is used to transfer analog Codecs signal to digital signal or vice versa. Familiar codecs are PCMU(G711U), PCMA(G711A), G722 (wid-bandth codecs), G723,G726,G729 and so on.
- Page 47 User=phone: If enabled, IP phone will send user=phone within SIP message. PTime: Interval time between two consecutive RTP packets. Anonymous Call: If enabled, all outgoing call for the designated account will be anonymous number. Anonymous Call Rejection: If enabled, all incoming anonym-out call for the designated account will be ...
-
Page 48: Network->Basic
into outgoing SIP message for designated account. 5.4.Network->Basic Path: Web UI->Network->Basic To display and configure LAN Port settings. Sections Description DHCP: If selected, IP phone will get IP address, Subnet LAN Port Mask, Default Gateway and DNS server address from ... -
Page 49: Network->Advanced
route all incoming and outgoing packets from PC port. 5.5.Network->Advanced Path: Web UI->Network->Advanced... - Page 50 To display and configure LLDP settings. Sections Description LLDP Active: To enable or disable LLDP feature. LLDP Packet interval: To configure the interval for LLDP admin ...
- Page 51 message. Note: LLDP stands for Link Layer Discovery Protocol, it’s used exchange device information between directly-connected devices. LLDP is often used to configure Voice Vlan automatically for IP phone. To display and configure Local RTP settings. Max RTP Port: Determine the maximum port that RTP Local RTP stream can use.
-
Page 52: Phone ->Time/Lang
Note: TR-069(Technical Report 069) is a technical specification entitled CPE WAN Management Protocol (CWMP).It defines an application layer protocol for remote management of end-user devices. To display and configure VPN settings. Active: To enable or disable VPN feature. Upload: To upload VPN client configuration file which is ... - Page 53 To choose the web language. Sections Description To choose the phone language. Web Language To configure time display settings. LCD Language Time Format: Determine what format to display on Format Setting Phone UI(12 hour/24 hour). Date Format: Determine what format to display on Phone UI for Date.
-
Page 54: Phone->Preference
Time&Date on Phone UI. To select how to configure time, it could be set by manually or get from INTERNET automatically via NTP server. Type Manual: To set Time and Date manually. Auto: To get Time via NTP server. Note: If you set time to be Manually, it only tak effect till next ... -
Page 55: Phone->Call Feature
The logo displays on the phone LCD. Sections Description To enable or disable Headset Mode. LCD Logo Active: If enabled, the default audio track will be headset Headset Mode mode, if audio track is changed during a call, it will be ... - Page 57 To display and configure Forward setting. Sections Description Note: There are three types of forward: Always Forward, Busy Forward Transfer Forward and No answer Forward. Always Forward: Any incoming call will be forwarded in any situation. Busy Forward: An incoming call will be forwarded if IP phone is busy.
- Page 58 administrator for special extension on your system. Intercom allows user to establish a call directly with the callee. Intercom Active: To enable or disable Intercom feature. Intercom Mute: If enabled, once the call established, the callee will be muted. ...
-
Page 59: Phone->Voice
incoming call is automatically answered. 5.9.Phone->Voice Path:Web UI->Phone->Voice Echo Canceller: To remove acoustic echo from a voice Sections Description communication in order to improve the voice quality . Echo Canceller VAD(Voice Activity Detection): Allow IP phone to detect the presence or absence of human speech during a call. ... -
Page 60: Phone->Key/Display
CNG(Comfort Noise Generation): Allow IP phone to generate comfortable background noise for voice communications during periods of silence in a conversation. It is a part of the silence suppression or VAD handling for VoIP technology. CNG, in conjunction with VAD algorithms, quickly responds when periods of silence occur and inserts artificial noise until voice activity resumes. - Page 61 Allows user to assign specific feature to the designated line Sections Description key. Line Key For line key, the available feature list: DND, Menu, MSG, Status, Book, Fwd, PickUp, Group PickUp, Intercom, Speed Dial, History, Favorites, Redial, Account, ACD,...
-
Page 62: Phone->Ring Tones
BLF, BLFList, Call Return, Hot Desking, Record, XML Browser, DTMF. Allows user to assign specific feature to the designated soft keys. Soft Key For softkey, the available features list: DND, Menu, MSG, Status, Book, Fwd, PickUp, Group, Pickup, Intercom, Speed Dial, History, Favorites, Redial, Call Return, Hot Desking, XML Browser. -
Page 63: Phone->Tones
Allow user to upload and view ringtone files or delete Sections Description uploaded ringtone files. All Ringtones Note: Ringtone files must be .wav format and has some specific requirement, please contact to Akuvox technical support team for instructions how to make ringtone files. system ringtones files cannot be deleted thus user can only delete uploaded ringtones. -
Page 64: Phone->Dial Plan->Replace Rule
Tone Allows user to select a specialized tone sets (classified by Sections Description countries) or to customize own tones. Note: Available country tones sets are: China,Spain,Luxembourg,Sweden,Taiwan,Belgium,Denmark,Fi nland,Germany,Netherlands,Norway,Portugal. 5.13.Phone->Dial Plan->Replace Rule Path:Web UI->Phone->Dial Plan->Replace Rule... -
Page 65: Phone ->Dial Plan->Dial Now
Allow user to select Replace rule or Dial-now to display or edit. Sections Description Allow user to modify selected rules information, for replace Rules rule, you can modify related accounts, prefix and replace. Rules Modify Area codes are also known as NPAs (Numbering Plan Areas). They usually indicate different geographical areas within one Area Code country. - Page 66 Allow user to select Replace rule or Dial-now to display or edit. Sections Description Allow user configure dial now delay time for dial now. Rules It means user can configure the IP phone to dial out the Dial Now Delay phone number automatically after the designated delay time if it match any dial now rule.
-
Page 67: Phone ->Action Url
5.15.Phone –>Action URL Path: Web UI->Phone->Action URL To display and configure Action URL settings. Sections Description Setup Completed: When the IP phone completes startup. Action URL Registered: When the IP phone successfully registers an ... - Page 68 account. Unregistered: When the IP phone logs off the registered account. Register Failed: When the IP phone fails to register an account. Off Hook: When the IP phone is off hook. On Hook: When the IP phone is on hook. ...
-
Page 69: Phonebook->Local Phone Book
Transfer Failed: When the IP phone fails to transfer a call. Idle To Busy: When the state of the IP phone changes from idle to busy. Busy To Idle: When the state of phone changes from busy to idle. ... -
Page 70: Phone Book->Remote Phone Book
To display and select local contact type. Sections Description All Contacts: To display or edit all local contacts. Contact Favorites: To display or edit favorites contacts. Black List: To display black list contacts. To search designated contacts from local phonebook. ... -
Page 71: Phone Book->Call Log
To display and configure Remote Book settings. Sections Description Index: To select desired Remote Book item to display and Remote Book configure. Local Book URL: To configure remote book server address Local Book Name: To configure display remote book name on Phone UI Note: IP phone support at most 5 remote books. -
Page 72: Phone Book->Ldap
To display call history records. Available call history types are All calls, Dialed calls, Received Call History calls, Missed calls, Forwarded calls. HangUp: To click to hangup ongoing call on the IP phone. Note: For “HangUp” feature, you need to have the remote control privilege to control IP phone via Web UI. -
Page 73: Phone Book->Broadsoft
Server: To configure LDAP server’s address. Port: To configure LDAP server’s port. Base DN: To configure searching base DN on LDAP server. User Name: To configure user name for accessing LDAP server. Password: To configure password for accessing LDAP server. - Page 74 To display and configure Broadsoft PhoneBook settings. Sections Description PhoneBook Item: To select specific item to configure. Broadsoft PhoneBook Display Name: The name displayed at IP phone’s LCD screen when accessed via Phone UI. Server Address: Broadsoft PhoneBook server’s address. Server Port: Broadsoft PhoneBook server’s port.
-
Page 75: Upgrade->Basic
5.21.Upgrade->Basic Path: Web UI->Upgrade->Basic To select upgrading rom file from local or a remote server Sections Description automatically. Upgrade Note: Please make sure it’s right file format for right model. To display firmware version, firmware version starts with MODEL name. Firmware version To display Hardware version. - Page 76 To display and configure PNP setting for Auto Provisioning. Sections Description PNP: Plug and Play, once PNP is enabled, the phone will PNP Option send SIP subscription message to PNP server automatically to get Auto Provisioning server’s address. By default, this SIP message is sent to multicast address 224.0.1.75(PNP server address by standard).
-
Page 77: Security->Basic
URL: Auto provisioning server address. User name: Configure if server needs an username to access, otherwise left blank. Password: Configure if server needs a password to access, otherwise left blank. Common AES Key: Used for IP phone to decipher common Auto Provisioning configuration file. -
Page 78: Security->Advanced
To modify user’s password. Sections Description Current Password: The current password you used. Web Password Modify New Password: Input new password you intend to use. Confirm Password: Repeat the new password. Note: For now, IP phone can only support user admin. ... - Page 79 To display or delete Certificate which is used when IP phone is Sections Description connected from any incoming HTTPs request. Web Server Certificate Note: The default certificate could not be deleted. To upload a certificate file which will be used as server certificate.
-
Page 80: Troubleshooting
6.Troubleshooting Check the AC power adapter. Make sure it is the one provided in your package. Issue 1:The LCD does not light up Check the power outlet. Make sure that the power that outlet you are plugging your device into is working. Try to plug a different device into the socket to make sure it has ... -
Page 81: Appendix : Time Zones
7.Appendix : Time Zones −11:00 Samoa Time Zone Time Zone Name −10:00 United States-Hawaii-Aleutian −10:00 United States-Alaska-Aleutian −09:00 United States-Alaska Time −08:00 Canada(Vancouver, Whitehorse) −08:00 Mexico(Tijuana, Mexicali) −08:00 United States-Pacific Time −07:00 Canada(Edmonton, Calgary) −07:00 Mexico(Mazatlan, Chihuahua) −07:00 United States-Mountain Time −07:00 United States-MST no DST −06:00... - Page 82 −03:00 Denmark-Greenland(Nuuk) Time Zone Time Zone Name −03:00 Argentina(Buenos Aires) −03:00 Brazil(no DST) −03:00 Brazil(DST) −02:00 Brazil(no DST) −01:00 Portugal(Azores) Greenland Denmark-Faroe Islands(Torshavn) Ireland(Dublin) Portugal(Lisboa, Porto, Funchal) Spain-Canary Islands(Las Palmas) United Kingdom(London) Morocco +01:00 Albania(Tirane) +01:00 Austria(Vienna) +01:00 Belgium(Brussels) +01:00 Caicos +01:00 Chatam...
- Page 83 +02:00 Finland(Helsinki) Time Zone Time Zone Name +02:00 Gaza Strip(Gaza) +02:00 Greece(Athens) +02:00 Israel(Tel Aviv) +02:00 Jordan(Amman) +02:00 Latvia(Riga) +02:00 Lebanon(Beirut) +02:00 Moldova(Kishinev) +02:00 Russia(Kaliningrad) +02:00 Romania(Bucharest) +02:00 Syria(Damascus) +02:00 Turkey(Ankara) +02:00 Ukraine(Kyiv, Odessa) +03:00 East Africa Time +03:00 Iraq(Baghdad) +03:00 Russia(Moscow) +03:30...
- Page 84 +08:00 China(Beijing) Time Zone Time Zone Name +08:00 Singapore(Singapore) +08:00 Australia(Perth) +09:00 Korea(Seoul) +09:00 Japan(Tokyo) +09:30 Australia(Adelaide) +09:30 Australia(Darwin) +10:00 Australia(Sydney, Melbourne, Canberra) +10:00 Australia(Brisbane) +10:00 Australia(Hobart) +10:00 Russia(Vladivostok) +10:30 Australia(Lord Howe Islands) +11:00 New Caledonia(Noumea) +12:00 New Zealand(Wellington, Auckland) +12:45 New Zealand(Chatham Islands) +13:00...
Need help?
Do you have a question about the 3240 and is the answer not in the manual?
Questions and answers