
Related Manuals for FrontRow Juno ITR-01


Summary of Contents for FrontRow Juno ITR-01
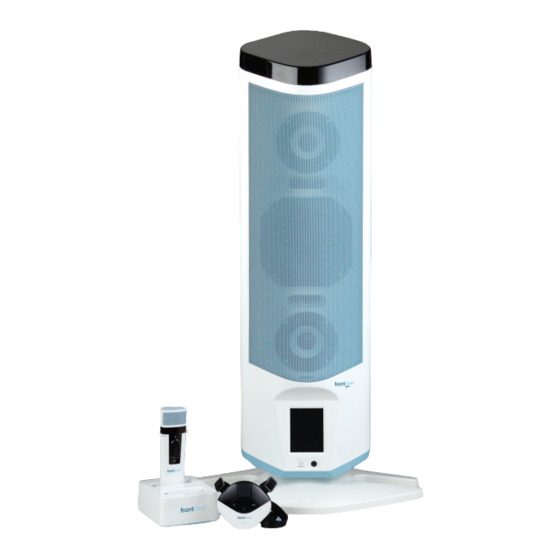
- Page 1 USER GUIDE ITR-01 Tower Receiver ITM-01 Pendant Microphone ISM-01 Pass-Around Microphone IMC-01 Microphone Charger...
-
Page 2: Table Of Contents
ITR-01 Juno Tower Receiver ........ -
Page 3: Important Safety Instructions
Important Safety Instructions 1. Read these instructions. 13. Refer all servicing to qualified service personnel. Servicing is required when 2. Keep these instructions. the apparatus has been damaged in any way, such as power-supply cord or plug 3. Heed all warnings. is damaged, liquid has been spilled or 4. -
Page 4: Electrical Warnings
Electrical Safety Information: DO NOT disassemble the power supply. PRECAUTIONS & SAFETY Return the apparatus to FrontRow for RECOMMENDATIONS qualified service and repair if required. Incorrect reassembly may result in a risk of Follow Manufacturers' Recommendations electric shock or fire. -
Page 5: System Contents, Optional Components & Expansion Modules
System Contents ITM-01 Pendant Lithium Ion Microphone Battery Aux-in cord 1 meter micro USB cable ITR-01 Juno Tower Wall mounting Phillips head Amplifier / Receiver screw set screwdriver Power supply 4 meter USB cable AC cable Optional components Expansion Modules... -
Page 6: Setup And Placement
Setup and Placement Your Juno Tower will perform best when you place it: • Even with either the front or rear edge of the main listening area (i.e. where students sit) • With the speaker facing the center of the listening area. See Image 1 Choose the location that allows connection to the teaching computer (4m USB cable provided) and other audio sources (e.g. -
Page 7: Volume Setting Guidance
3. Use good quality audio cables when connecting the Tower to the classroom PC. 4. The USB cable provided with your Tower System has been qualified by FrontRow. Use this cable whenever possible. If another length of cable is needed, it must be certified for USB 2.0 or better. -
Page 8: Features
Features ITR-01 Juno Tower Receiver Front Back Integrated Sensor Wall Mount Screw Taps Integrated high sensitivity infrared diode array 100mm VESA mount compliant. covers a typical classroom without the need for Transmitter/USB Cable Hook additional sensors. Neatly hang your transmitters while charging 2.1 Speaker Array... - Page 9 Side Custom naming Tower name can be customized using the optional FrontRow Desktop or Teacher Edition software. Name is displayed on the LCD touch screen for easy identification. Feedback suppression ™ The next-generation Adapto digital engine actively scans audio 375 times per second to sup- press feedback squeal before it starts.
-
Page 10: Itm01 Pendant Microphone
FLASHING RED/GREEN..Charge fault Assign custom names to microphones for 7 Lithium Ion Battery easy identification on the Tower LCD or in the optional FrontRow Desktop or Teacher 3-year life expectancy, lightweight, Edition software. rechargeable lithium ion battery. -
Page 11: Ism-01 Pass-Around Microphone
15 Custom naming 9 Charging / Programming Jack Assign custom names to microphones for For charging via USB cable or for easy identification on the Tower LCD or in configuring settings using the FrontRow the optional FrontRow Desktop software. Microsoft Settings application. -
Page 12: Activate Tower And Microphone
Activate Tower and Microphone Image 3 1. Turn Tower on. See Image 3 2. Place microphone around neck and connect clasp. 3. Adjust neck straps to position microphone Power approximately 5in (14cm) from mouth. switch See Image 4 4. Press One-Touch button to wake micro- phone. -
Page 13: Tower Controls
Master Volume Up (press and hold to increase volume quickly) Master Mute Master Volume Down (press and hold to decrease volume quickly) Room 10 Name of Tower (set via FrontRow Desktop or Teacher Edition software) Device Settings Microphone Volume Menu... -
Page 14: Volume
Audio 2 DVD Player NOTE: Using the optional FrontRow Desktop or Teacher Edition software, you can name the devices used with your Juno system for easier identification. For more information visit gofrontrow.com/juno. *For best results, the volume on the device should be at least 75% of its maximum volume. -
Page 15: Volume
See Image 9 3. Adjust the volume of the microphone. See Image 10 NOTE: Using the optional FrontRow Microphone Settings application, you can name the microphones used with your Juno system for easier identification. For more information visit gofrontrow.com/juno. -
Page 16: Settings
See Image 11 1. Select the feature you would like to configure. 2. See details for each feature below. NOTE: Additional settings are available through the optional FrontRow Desktop or Teacher Edition software application. ™ OptiVoice Image 12 A powerful tool for test taking, directions and ESL instruction. -
Page 17: Prioriteach
Microphones when you speak into the Pendant Microphone. See Image 13 NOTE: Advanced settings for PrioriTeach are available through the optional FrontRow Desktop or Teacher Edition software. NOTE: The PrioriTeach feature is only activated by a Pendant Microphone and only when on channel A or B. -
Page 18: Speaker Balancing
Speaker Balancing Image 15 With the optional Speaker Expansion Module, your Juno tower can be connected to external speakers mounted in the ceiling or on the wall. Use the Speaker Balancing option to adjust the balance between the Tower’s internal speakers and the external speakers. -
Page 19: About
Image 18 To prevent tampering with settings, the LCD on your Juno Tower can be locked using a voice command or the optional FrontRow Desktop or Teacher Edition software. To lock or unlock your Tower LCD using Voice Command, say “LCD”. For details on using the voice command feature of your Juno System, see page 19. -
Page 20: Lcd Calibration
NOTE: Use a stylus intended for touch screens or similar soft-tipped object for best accuracy. Firmware Update From time to time, FrontRow may make improvements or enhancements to your Tower's firmware. Use the FrontRow Desktop or Teacher Edition software application to update the Tower firmware (download from gofrontrow.com/juno). -
Page 21: Voice Command
Voice Command Your Juno System lets you remotely control parameters of your Juno Tower using a few simple voice commands. To issue a voice command: 1. Press and hold the One-Touch button on the Pendant Microphone. 2. Wait for Voice Command tone and Tower LCD background to turn green. 3. -
Page 22: Lesson Capture Through Juno
3. Using the supplied USB cable, connect the Juno Tower to your computer. 4. Set the auxiliary output volume dial between 4 and 6. 5. Install the FrontRow Desktop or Teacher Edition software which includes the Juno lecture capture system. Download from gofrontrow.com/juno. -
Page 23: Collaborative Learning Using Class2Class
Pass-Around Microphones. For example, FrontRow classrooms have used this technique to simultaneously connect 14 different classrooms to a live talk with an Olympic ath- lete, and let students communicate with a NASA Command Center during an emergency simulation. -
Page 24: Connecting To Other Classroom Media
Connecting to other Classroom Media Your FrontRow Juno System can connect to other media to enhance the overall audio experience in your classroom. Ideally, these connections were made during installation; however, they can easily be made after the unit is installed using standard audio cords from your local electronics store. - Page 25 Example 2 If your classroom does not have an EZRoom AV Control System, you can connect your computer directly to your Juno Tower. This can be done by connecting your computer’s headphone jack to one of the three stereo RCA inputs. NOTE: The use of high quality audio cables is recommended to avoid the introduction of interference to the system.
- Page 26 Example 3 Some classrooms use the TV/DVD/VCR as stand-alone media. For these classrooms, you may need to use two auxiliary audio input connections to the Juno Tower. NOTE: The use of high quality audio cables is recommended to avoid the introduction of interference to the system.
- Page 27 Example 4 To amplify audio from portable electronics, it may be most convenient to connect these as needed through the quick connect jack on the front of the Juno Tower. Turn the volume on the MP3 player at least 75% of the way up for best sound quality. NOTE: The use of high quality audio cables is recommended to avoid the introduction of interference to the system.
- Page 28 Example 5 Connect either the ITM-01 Pendant or ISM-01 Pass-Around Microphone to any audio source that's too far from the Juno Tower to conveniently connect directly. ISM-01 Wireless Transmission Aux In Audio Out MP3 Player Computer The ITM-01 Pendant or the ISM-01 Pass-Around Microphones can be used to transmit audio from a secondary audio source (MP3 player, computer, portable radio/CD/tape player) to the receiver.
-
Page 29: Rebroadcasting To Personal Fm Receivers
• Mute the transmitter • Mute the transmitter Suggested Classroom Audio Output Settings (adjust as needed for student preference) FrontRow Juno 1 / 2.5* 7 / 8* *A higher output setting may be needed if using a splitter cable for recording. -
Page 30: Itm-01 Pendant Microphone
ITM-01 Pendant Microphone Using Image 23 1. Place microphone around neck and connect clasp. 2. Adjust neck straps to position microphone approximately 5in (14cm) from mouth. See Image 23 3. Press One-Touch button to wake microphone. 5in/14cm Power indicator should be green. See Image 24 NOTE: Your microphone will go into standby mode (off) automatically after 10 minutes in... -
Page 31: Battery
NOTE: When the battery is removed, it will indicator contacts take 2-3 charge/discharge cycles for the bat- tery to report accurate status to the FrontRow Desktop or Teacher Edition application. Battery Safety Warning: To reduce risk of fire or burns: •... -
Page 32: Charging
USB port on your computer. The ITM-01 microphone will not charge unless you have first installed the software drivers as part of the FrontRow Desktop, Teacher Edition Image 30 or Microphone Settings software application. To download the application, visit gofrontrow. -
Page 33: Ism-01 Pass-Around Microphone
ISM-01 Pass-Around Microphone Using Image 32 1. Turn microphone on by sliding the Power Switch up. See Image 32 2. Note Power Indicator (chair icon). See Image 32 Emitter diodes Power Green = On and transmitting indicator Off = Power is off NOTE: In order to conserve battery life, if Power/ Battery... -
Page 34: Labeling
Labeling Image 35 Your Pass-Around Microphone includes a location for adding a name or room number clear window for easy identification. 1. Place the microphone on a stable surface with the battery door facing up. 2. Remove the battery door using the supplied Phillips screwdriver. -
Page 35: Battery
NOTE: When the battery is removed, it will Indicator contacts take 2-3 charge/discharge cycles for the bat- tery to report accurate status to the FrontRow Desktop or Teacher Edition application. Battery Safety WARNING: To reduce risk of fire or burns: •... -
Page 36: Charging
USB port on your computer. The ISM-01 microphone will not charge unless you have first installed the software drivers as part of the FrontRow Desktop, Teacher Edition Image 41 or Microphone Settings software application. To download the application, visit gofrontrow. -
Page 37: Microphone Configuration
Restore defaults – Restore the microphone settings to factory defaults. Firmware updates – From time to time, FrontRow may make improvements or enhancements to your microphone's firmware. Use this function to periodically check for updates. -
Page 38: Using Multiple Microphones
Programming and switching the microphone channels 1. Use a USB cable to connect the Image 43 microphone to a computer with the FrontRow Microphone Settings software application** installed. 2. Open the Microphone Settings software application. 3. Click the Microphone Settings button. - Page 39 6. Unscrew battery door using the supplied Image 44 Phillips screwdriver. See Image 44 7. Using the channel indicator labels included with your microphones, label the switch Pendant Microphone positions you've just reprogrammed. See Image 45 8. Move the selection switch (see Image 46) to the channel you want to use –...
-
Page 40: Imc-01 Microphone Charger
IMC-01 Microphone Charger Image 47 Charger setup 1. Insert microphones in either of the two charge pockets. See Image 47 2. Find the power plug that is appropriate for the power outlet style in your country. See Image 48 3. Slide power plug onto the power supply. See Image 49 4. -
Page 41: Troubleshooting
USB cable to the computer and micro- drivers installed. To install the drivers, you phone. The following message should now will need to install the FrontRow Microphone be displayed: Click Start Update to pro- Settings application, the FrontRow Desktop ceed. - Page 42 Volume control(s) on the Tower installed. To install the drivers, you will need (see pages 12, 13). to install the FrontRow Desktop or the • Position the microphone closer to mouth. Teacher Edition application*. You may need to reconnect your Tower after installation.
-
Page 43: Regulatory
Regulatory without the express approval of FrontRow receiver: part 15, subpart A Calypso LLC in writing, could void the user's FrontRow Juno Receiver ITR-01 authority to operate those elements of the system. FrontRow Juno Transmitter ITM-01 This product conforms with the... - Page 44 Batteries Batteries contain substances that can be harmful to human health and the environ- ment if not handled correctly. Batteries are marked with the WEEE sym- bol. This symbolises that exhausted batter- ies must not be disposed of together with unsorted rubbish, but are to be collected separately.
- Page 45 © 2014 FrontRow Calypso LLC Phonic Ear, FrontRow, Calypso and the names of Phonic Ear, Calypso, and FrontRow products are trademarks or registered trademarks of FrontRow Calypso LLC in the U.S. and other countries. 821-5082-112/Rev G 0914...
Need help?
Do you have a question about the Juno ITR-01 and is the answer not in the manual?
Questions and answers