Table of Contents
Advertisement
Advertisement
Table of Contents
Troubleshooting

Subscribe to Our Youtube Channel
Related Manuals for Craftex CT015N


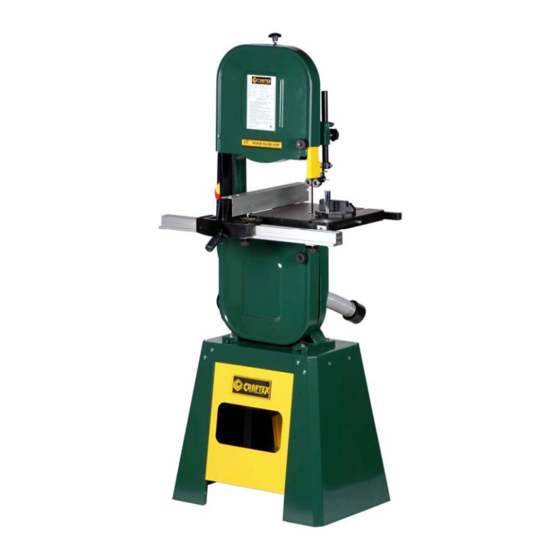
Summary of Contents for Craftex CT015N
- Page 1 15” WOOD BAND SAW – CT015N...
-
Page 2: Table Of Contents
3-speed 15” Wood Band Saw - Model CT015N General Safety Instructions Page 3 Specific Safety Instructions Page 4 Features Page 5 Features Illustration Page 6 Unpacking Page 7 Tools Necessary for Assembly and Optional Page 8 Accessories for the CT015N... -
Page 3: General Safety Instructions
GENERAL SAFETY INSTRUCTIONS Extreme caution should be used when operating all power tools. Know your power tool, be familiar with its operation, read through the owner’s manual and practice safe usage procedures at all times. • CONNECT your machine ONLY to the matched and specific power source. •... - Page 4 BAND SAW -CT015N- SAFETY INSTRUCTIONS A band saw may not appear to be a dangerous tool but it is always important to use consideration and caution during its operation: remember, a band saw can sever a finger just as easily and quickly as a table saw.
-
Page 5: Features
The CT015N 3-speed 15” Band Saw is a professional woodworking tool, and like all power tools, proper care and safety precautions should be exercised at all times. - Page 6 3-SPEED 15” WOOD BAND SAW MODEL CT015N FEATURES...
-
Page 7: Unpacking
Once it is out of the shipping carton, lower the guard to cover the saw blade. Your CT015N Band Saw is shipped with a protective coating on the top surface of the cast-iron saw table to prevent rust and corrosion. This coating should be removed prior to assembly. - Page 8 14mm wrench Allen keys: supplied 14mm wrench socket Optional Accessories for your CT015N Band Saw: CT001 Circle Cutting Attachment: This attachment guides in cutting accurate circles from 4 inches to 24 inches in diameter. The bracket remains on the machine.
-
Page 9: Motor Mount Assembly
STEP ONE: MOTOR MOUNT ASSEMBLY Parts required (with part#): Qty: Tools required: 201: stand top 14mm wrench 209: motor 212: motor plate 210: motor knob 213: eye screw 205: nuts, 5/16” 214: self-locking nuts, 3/8” 215: hex bolt, 3/8” x 1 1/4” 216: flat washers, 5/16”-20 217:... - Page 10 STEP ONE (continued) 2. Turn the stand top upside down. Insert the eye screw (#213) in the slot on the underside of the stand top using 1 1/4” bolt (#215) and nut (#214). Tighten but ensure that it can still move freely (it should be able to hold its position but still pivot).
-
Page 11: Assembling The Stand
STEP TWO: ASSEMBLING THE STAND (three sides only) Parts required (with part#): Qty: Tools required: 202: stand front (with logo) 12mm wrench 206: stand sides 12mm wrench socket 203: carriage bolts, 5/16” x 5/8” 16 204: flat washers, 5/16”-16 205: nuts, 5/16”... - Page 12 STEP TWO (continued) 2. Repeat #1 above for the left side panel (#206). 3. Turn the unit around so that the motor fan is facing you and assemble the front panel (#202) to the sides with two bolts on each side. Tighten fingertip tight. 4.
-
Page 13: Mounting The Saw To The Base
STEP THREE: MOUNTING THE SAW TO THE BASE Parts required (with part#): Qty: Tools required: band saw body 14mm wrench 14mm wrench socket hex screws, 3/8” x 2” flashlight flat washers, 3/8” Phillips screwdriver flat washers, 1 1/4” 117: hex nuts, 3/8” 222: hex bolts, 3/16”... - Page 14 STEP THREE (continued) 4. Measure the distance from each corner on the base of the saw body to the edge of saw stand table to square up. Once this is done, securely tighten all four bolts (you will need to get on the floor and underneath the table to do this).
-
Page 15: Pulleys And Belts
STEP FOUR: PULLEYS AND BELTS Parts required (with part#): Qty: Tools required: 160: motor pulley Rubber mallet 164: pulley shaft bracket knob- 3 14mm wrench screws 14mm wrench socket 157: pulley shaft bracket 158: main pulley drive 162: lower pulley drive 159A: small drive belt 161A: large drive belt 1. - Page 16 STEP FOUR (continued) 4. Mount the main pulley drive (the wheel drive pulley) (#158), the smaller of the two pulley drives, face in to the drive shaft. Insert the key and tap in it with a rubber mallet. 5. Mount the lower pulley drive (the idler pulley) (#162) face out and push it in as far along the shaft as it will go.
-
Page 17: Pulleys And Belts
NOTES ON SPEED SELECTION: • Your Craftex CT015N Band Saw enables three speed selections: 750FPM (the belt is positioned on the inner rim of the speed selector pulley); 1230FPM (the belt is positioned on the middle rim of the speed selector pulley); or 2800FPM (the belt is positioned on the outer rim of the speed selector pulley). - Page 18 STEP FIVE: ADJUSTING BLADE AND BOTTOM BEARINGS Adjusting Blade Tension and Tracking 1. The blade adjustment screw (part #33A) is used to control the tension of the band saw blade. Turning the screw clockwise increases the tension. The blade tension should be released when the saw is out of use for any length of time. 2.
-
Page 19: Assembling The Saw Table
STEP SIX: ASSEMBLING THE SAW TABLE Parts required (with part#): Qty: Tools required: table bracket 12mm wrench 79A: working table rubber mallet table centre insert machinist’s square table pin lock knobs hex screws, 5/16” x 1 1/4” 2 flat washers, 5/16” 116: hex bolt, 3/8”... -
Page 20: Assembling The Fence
STEP SEVEN: ASSEMBLING THE FENCE Parts required (with part#): Qty: Tools required: fence body Allen key F11: scale (tape measure) F12: large fence rail F15: L-type plates (brackets) F16: knobs , 5/16” x 5/8” F18: small fence rail separate hardware pack 1. -
Page 21: Adjusting The Top Bearings
STEP EIGHT: ADJUSTING THE TOP BEARINGS Tools required: 10mm wrench 10mm wrench socket 1. Remove (raise) the saw blade guard by loosening the screws. 2. Adjust the top bearings using the same principles as the adjustments to the bottom bearings (see STEP FIVE, page 17). 3. -
Page 22: Attaching The Dust Collection Hose, Pulley
STEP NINE: ATTACHING THE DUST COLLECTION HOSE, PULLEY COVER AND BACK PANEL Parts required (with part#): Qty: Tools required: dust collection hose Phillips screwdriver 154: pulley cover 12mm wrench 202: stand brace 12mm wrench socket 153: pan screws, 3/16” x 1/2” 203: carriage bolts, 5/16”... -
Page 23: Troubleshooting
TROUBLESHOOTING General Problem Solution The band saw won’t start when The machine is not plugged in; plug switched on. in the machine to the power outlet. Check your fuses and circuit breaker. Check the power cord for any damage. The band saw and stand are If the floor is uneven, move the vibrating too much. -
Page 24: Troubleshooting
TROUBLESHOOTING: Saw Blade Problem Solution The blade is caught in the stock or is Make sure your kerf is open; do not turning too tightly or too loosely on a squeeze it closed when cutting. curve. Tailor the quality and size of your blade to the type and thickness of the stock you are cutting;... - Page 25 CT015N 3-SPEED 15” BAND SAW SCHEMATIC DIAGRAM - FRAME...
- Page 26 CT015N 3-SPEED 15” BAND SAW SCHEMATIC DIAGRAM - CASE...
- Page 27 CT015N 3-SPEED 15” BAND SAW SCHEMATIC DIAGRAM – BASE AND MOTOR...
- Page 28 CT015N 3-SPEED 15” BAND SAW SCHEMATIC DIAGRAM – TABLE...
- Page 29 CT015N 3-SPEED 15” BAND SAW SCHEMATIC DIAGRAM – FENCE...
-
Page 30: Parts List
PARTS LIST PART# DESCRIPTION PART# DESCRIPTION Body Knob Blade Guard Hex Screw Spring Washer Square Nut Hex Nut Shaft Hinge Assembly Pan Screw 3/16*1/2 Cord Holder Steel Pin Motor Cord ***** Power Cord Inner Wheel Cover Bearing Base ***** Bearing 6203 Screw ***** Bearing 6202... - Page 31 PART# DESCRIPTION PART# DESCRIPTION Upper Spacing Sleeve Pointer Bearing 6200 Pan Screw C-Ring S10 ***** ***** 105A Gauge ***** 106A Lock Bolt ***** ***** Upper Blade Guide ***** Flat Washer 1/4 ***** ***** ***** Hex Bolt 1/4*3/8 ***** Table Insert ***** Pin 3*10 *****...
- Page 32 PART# DESCRIPTION PART# DESCRIPTION Fence Body Saw Blade Cover Shaft Socket Head Screw Hex Bolt 1/4*3/8 10*25 Upper Hinge Socket Head Screw Phlp Screw M4*6 5*10 Lower Hinge Fence Base Stud Latch Set Screw 1/4*1/4 Lower Locating Shaft C-Ring S10 Upper Locating Shaft Bearing 6200 Catch...
-
Page 33: Optional Blades
OPTIONAL BLADES Blades(97 ¼”) Width Pitch Gauge CT015018 1/8” 14 RAKER .025” CT015316 3/16” 6 HOOK .025” CT015316LT** 3/16” 10 RAKER .025” CT015014 ¼” 6 HOOK .025” CT015014LT** ¼” 6 HOOK .025” CT015038 3/8” 6 HOOK .025” CT015038LT ** 3/8” 4 HOOK .025”... -
Page 34: A Helping Hand
(Never use a wider blade than specified for your machine) Especially when re-sawing, it is beneficial to use a wider blade and properly apply tension. CT015N has many blades available for use. From 1/8” – 1”, the CT015N has the ability to tackle many jobs.
Need help?
Do you have a question about the CT015N and is the answer not in the manual?
Questions and answers