Table of Contents
Advertisement
Advertisement
Table of Contents

Related Manuals for Craftex CX205


Summary of Contents for Craftex CX205
- Page 1 CX205-10” & CX206-12” LEFT TILT TABLE SAWS User Manual...
-
Page 2: Table Of Contents
Table of Contents General Safety Instructions..................3 Specific Safety Instructions..................4 CX205 Features...................... 5 CX206 Features...................... 6 Physical Features ....................7 Set Up........................8 Un-Packing & Inventory ..................8 Proper Grounding ....................9 Assembly Motor Cabinet ......................10 Hand Wheels ......................10 Extension Wings .....................10... -
Page 3: Generalsafety Instructions
GENERALSAFETY INSTRUCTIONS Extreme caution should be used when operating all power tools. Know your power tool, be familiar with its operation, read through the owner’s manual and practice safe usage procedures at all times. ALWAYS read and understand the NEVER leave a tool unattended while it user manual before operating the is in operation. -
Page 4: Specific Safety Instructions
CX205/CX206 SPECIFIC SAFETY INSTRUCTIONS NEVER use a saw blade that has DO NOT attempt to remove jammed missing carbide teeth, loose teeth, or pieces unless the table saw has come chipped or broken teeth. to a complete stop and the power... -
Page 5: Cx205 Features
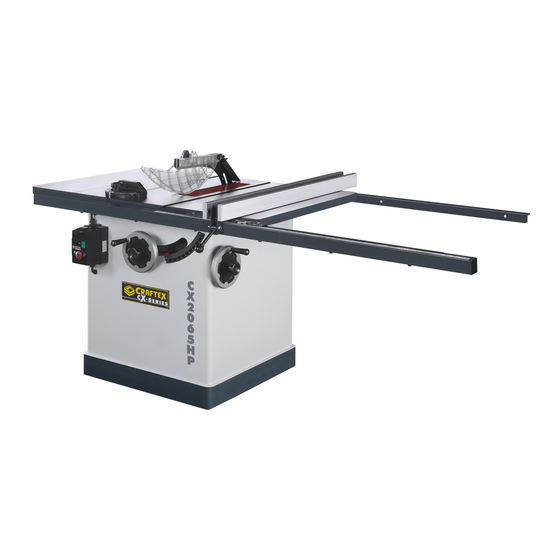
FEATURES MODEL CX205 – 10” LIFT TILT TABLE SAW As part of the growing line of Craftex woodworking equipment, we are proud to offer CX205 - 10” Left Tilt Table Saw. The Craftex name guarantees Craft Excellence. By following the instructions and procedures laid out in this owner’s manual, you will receive years of excellent... -
Page 6: Cx206 Features
FEATURES MODEL CX206 – 12” LEFT TILT TABLE SAW As part of the growing line of Craftex woodworking equipment, we are proud to offer CX206 - 12” Left Tilt Table Saw. The Craftex name guarantees Craft Excellence. By following the instructions and procedures laid out in this owner’s manual, you will receive years of excellent... -
Page 7: Physical Features
CX205/CX206 – Left Tilt Table Saw Physical Features Blade Guard Fence Rear Miter Fence Rail Gauge Magnetic Switch Front Fence Rail Blade Tilt Fence Lock Lock Knob Blade Height Blade Height Blade Tilt Lock Hand Wheel Hand Wheel... -
Page 8: Setup
Use a solvent cleaner that will not damage painted surfaces. WARNING CX205/CX206 is a very heavy machine, do not over-exert yourself. For safe moving method use fork truck or get the help of an assistant or friend. -
Page 9: Proper Grounding
WARNING CX205 is equipped with a 220-V single Improper connection of the equipment- phase motor and provided with a power grounding conductor can result in a risk supply cord that is to be connected directly of electric shock. -
Page 10: Assembly
ASSEMBLY shaft secure it with a set screw provided. See figure-5 CX205/CX206 features 4 mounting holes on its base. To mount and level the table saw on your shop floor, shimming may be required. Mounting the saw to the floor reduces vibration and increases stability. -
Page 11: Fence Rails
table and the extension wing which can cause misalignment and the wings can not be properly attached to the table. Attach the extension wings to the table using the screws removed from the main table. Place a straightedge across the extension wings and the main table to make sure that the extension wings surface is flat with the main table. -
Page 12: Magnetic Switch
Installing the Blade hands. Both the CX205 & CX206 are equipped with a 10” & 12” blade respectively. install the blades, turn the power off and remove the plug from the power supply (if... -
Page 13: Fence Tape Scale
Fence Tape Scale riving knife. Ensure the blade guard is in the Slide the fence against the blade and lock it correct position and tighten the wing nut. in position. Place the adhesive backed tape scale on the fence tube so that the “0” on Place the set of Anti-Kickback pawls onto the tape scale is aligned with the red the riving knife at the notch. -
Page 14: Arbor Extension
COLLECTOR If you need to make adjustments to the insert, remove the insert and turn it upside CX205/CX206 features a 4” diameter dust down and lay it on a flat surface (not your ports to connect to a dust collector. -
Page 15: Basic Controls
BASIC CONTROLS TEST RUN The basic controls of this machine are Once you have assembled your machine shown in the figure below. Use the figure completely, then it is time for a test run to and read the text to understand what the make sure that the machine works properly basic controls of this table saw are. -
Page 16: Adjustments
ADJUSTMENTS Blade Alignment Blade Tilt Adjustment Your CX205/CX206 table saw is shipped The blade can be tilted at any angle from the factory fully aligned so that the between 90-degree and 45-degree and the mitre slots are parallel to the saw blade. -
Page 17: Adjusting The Riving Knife
Adjusting the Riving Knife Miter Gauge Adjustment The riving knife comes, pre installed on The gauge supplied with the CX205/CX206 your saw. First, using the hand wheel, raise table saw is equipped with individually the installed blade completely to access the adjustable stops at 90 and 45 degrees both riving knife. -
Page 18: Operations
OPERATIONS Crosscutting Before operating the table saw make sure Cutting solid wood across the grain and in have performed important plywood or metal cutting across the width of adjustments and all the guards are in place. the work-piece is called crosscutting. Mark the work-piece where you want to start the cut from and make sure the mitre Rip Cutting... -
Page 19: Maintenance
MAINTENANCE Position the miter gauge back into the slot 1. Clean off any preservative on the saw and hold the work piece against the mitre components with mineral spirits and gauge. Slide the mitre gauge and feed the wipe dry. work piece into the blade so that the blade cuts the waste side of the work piece. -
Page 20: Optional Accessories
Add a Solid & Functional Extension Table to Your Saw 30”x18” cast iron table with 12” extension Swing arm support Will fit CX205 & CX206 Model CX205EXT (for CX205) Model CX206EXT (for CX206) Model CX205ST Carbide Dado Sets... -
Page 21: Wiring Diagram
CX205/CX206 – LEFT TILT TABLE SAW WIRING DIAGRAM... -
Page 22: Parts Breakdown & List
CX205/CX206 – LEFT TILT TABLE SAW BLADE GUARD PARTS BREAKDOWN... - Page 23 CX205/CX206 – LEFT TILT TABLE SAW BLADE GUARD PARTS LIST...
- Page 24 CX205/CX206 – Extension Table (optional) Model # CX205EXT & CX206EXT...
- Page 25 CX205/CX206 – LEFT TILT TABLE SAW FENCE PARTS BREAKDOWN...
- Page 26 CX205/CX206 – LEFT TILT TABLE SAW OPTIONAL EXTENSION TABLE & FENCE PARTS LIST...
- Page 27 CX205/CX206 – LEFT TILT TABLE SAW TILT AND HEIGHT MECHANISM PARTS BREAKDOWN...
- Page 28 CX205/CX206 – LEFT TILT TABLE SAW TILT AND HEIGHT MECHANISM PARTS LIST...
- Page 29 CX205/CX206 – LEFT TILT TABLE SAW TABLE & BASE PARTS BREAKDOWN...
- Page 30 CX205/CX206 – LEFT TILT TABLE SAW TABLE & BASE PARTS LIST...
- Page 31 CX205/CX206 – LEFT TILT TABLE SAW MOTOR PARTS BREAKDOWN...
- Page 32 CX205/CX206 – LEFT TILT TABLE SAW MOTOR PARTS LIST...
- Page 33 CX205/CX206 – LEFT TILT TABLE SAW ARBOR & RIVING KNIFE PARTS BREAKDOWN...
- Page 34 CX205/CX206 – LEFT TILT TABLE SAW ARBOR & RIVING KNIFE PARTS LIST...
-
Page 35: Warranty
This warranty shall not apply to consumable products such as blades, bits, belts, cutters, chisels, punches etceteras. Craftex shall in no event be liable for injuries, accidental or otherwise, death to persons or damage to property or for incidental contingent, special or consequential damages arising from the use of our products.
Need help?
Do you have a question about the CX205 and is the answer not in the manual?
Questions and answers