Table of Contents

Related Manuals for Belling Built In Pyrolytic


Summary of Contents for Belling Built In Pyrolytic
- Page 1 Users Guide Handbook Built In Pyrolytic Caution: Read the instructions before using the appliance CUSTOMER CARE HELPLINE - AUSTRALIA: 1-300-556-816 NEW ZEALAND: 09-274-8265 WEBSITE: WWW.BELLING.COM.AU PART NO: 082761500 DATE: 17/01/2014...
-
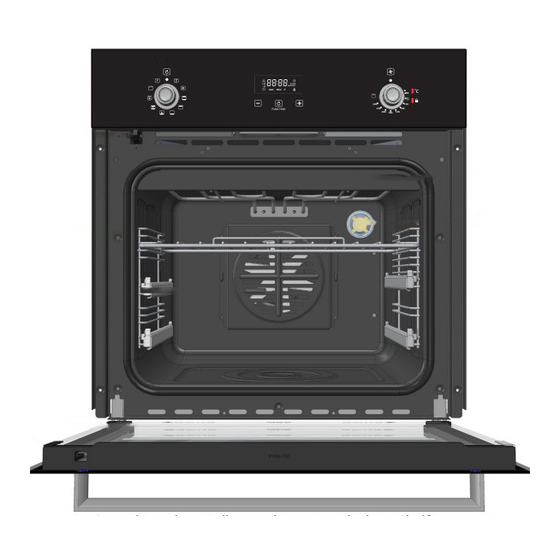
Page 2: Getting To Know Your Product
SAFETY GETTING TO KNOW YOUR PRODUCT USING YOUR PRODUCT USING YOUR PROGRAMMER CLEANING INSTALLATION TECHNICAL CUSTOMER CARE Introduction Should you need it ..Inside the paperwork which has come with this appliance, there is a leaflet and card explaining the terms of our warranty and guarantee. -
Page 3: Before Using The Product
BEFORE USING THE PRODUCT • The manufacturer is not responsible if an incorrect installation and use, causes injuries and damage. • Make sure that you have removed all packaging and wrap- ping. Some of the items inside this appliance may have addi- tional wrapping. - Page 4 • Cleaning and user maintenance shall not be made by children without supervision. • NEVER try to extinguish a fire with water, but switch off the appliance and then cover the flame with a lid or damp cloth. • Danger of fire: Do not store items on the cooking surfaces.
- Page 5 CAUTION! • Do not spray aerosols in the vicinity of this appliance while it is in operation. • Do not store or use flammable liquids or items in the vicinity of this appliance. • Do not modify this appliance. • This appliance is for cooking purposes only.
- Page 6 • Before carrying out a Pyrolytic self-cleaning function or the First Use function, please remove from the oven cavity: - Any excess food residues, oil or grease spills / deposits. - Any removable objects (including shelves, side rails and grill pans provided with the product) •...
- Page 7 h:min min:sec Auto FUNCTION 1. Control panel 2. Grill 3. Light 4. Door lock 5. Shelf runners 6. Oven fan 7. Inner door glass Oven Temperature Indicator h:min min:sec Auto FUNCTION Oven Timer & Oven Tempera- functions Programmer ture Control Door Lock Indicator 9.900...
- Page 8 (Function buttons dependant on model) FUNCTION (Function buttons dependant on model) Minute minder Pyrolytic cleaning mode Cooking time Volume level End of cooking time 7-segment display Time of day Max. adjustable minute minder Child lock Max. adjustable cooking time Cooking pot Display hours:minutes Automatic mode Display minutes:seconds...
-
Page 9: Recommended Uses
Symbol Function / Feature Recommended Uses Grill Ideal for anything from toast to steaks. Fanned Grill The fan allows heat to circulate around the food. Ideal for thinner foods such as bacon, fish and gammon steaks. Foods do not require turning. Use with the oven door closed Conventional Oven This function is ideal for traditional roasting. - Page 10 CAUTION! As part of the cooking process, hot air is expelled through a vent in the oven. When opening the oven door, care should be taken to avoid any possible contact with potentially hot air, since this may cause discomfort to people with sensitive skin.
-
Page 11: Oven Furniture
Slow cooking • Make sure that frozen foods are thoroughly thawed before cooking. • Do not slow cook joints of meat or poultry weighing more than 2¼kg/4½lb. • Preheat the oven to 170°C and cook for 30 minutes, then adjust the oven control to for the remainder of the cooking time. - Page 12 Position baking trays and roasting tins on the middle of the shelves. The cooling fan The cooling fan may operate when the main oven is on and may continue to operate for a period after the oven has been switched off, to help cool the cav- ity down.
-
Page 13: Using The Touch Controls
Symbols & functions: (Function buttons dependant on model) FUNCTION (Function buttons dependant on model) Minute minder Pyrolytic cleaning mode Cooking time Volume level End of cooking time 7-segment display Time of day Max. adjustable minute minder Child lock Max. adjustable cooking time Cooking pot Display hours:minutes Automatic mode... -
Page 14: Select Function
SELECT FUNCTION FUNCTION 1st TOUCH MINUTE MINDER 2nd TOUCH COOK TIME 3rd TOUCH END OF COOK 4th TOUCH TIME ADJUST 5th TOUCH VOLUME ADJUST MINUTE MINDER The minute minder can be set using the symbols up to a maximum of 99 minutes. -
Page 15: Delayed Cooking
END OF COOKING TIME (The time of day the oven will turn off) The end of cooking time can be set using the symbols. The latest end of cooking time is limited to the time of day plus Once set, the display changes to &... - Page 16 functions are selectable again. Activating the child lock in manual mode completely locks the appliance & the symbol is switched off. After de-activation, as described above, the symbol is displayed again. child lock remains activated after a power failure. Before renewing the set- tings, the child lock has to be deactivated, as described above.
-
Page 17: Pyrolytic Oven Cleaning
• The glass in the door should always be kept clean. To remove stubborn dirt and stains, use absorbent kitchen roll or a damp sponge and an ordi- nary detergent. • If the oven is installed underneath a hob, make sure that the burners or electric plates/zones remain turned off during the automatic cleaning cycle. - Page 18 START PYROLYTIC CLEANING Select Pyrolytic function on your oven function control. The display should show the default cleaning time of 2:00 hours. To start the cleaning process, and the P symbol will flash for 5 seconds. touch the FUNCTION The door will lock within the pyrolytic cycle and the door lock indicator will come on.
- Page 19 General • It is important to clean the product regularly as a build up of fat can affect performance or damage it and may invalidate your guarantee. • Always switch off your appliance and allow it to cool down before you clean any part of it.
-
Page 20: Telescopic Shelving System
• For your safety, glass door panels are made of toughened glass. This ensures that, in the unlikely event that a panel breaks, it does so into small fragments to minimise the risk of injury. Please take care when handling, using or cleaning all glass panels, as any damage to the surfaces or edges may result in the glass breaking without warning or apparent cause at a later date. -
Page 21: Step 1 : Prepare Installation
STEP 1 : PREPARE INSTALLATION Do not lift the appliance by the door handle. Whilst every care is taken to eliminate burrs and raw edges from this product, please take care when handling - we recommend the use of protective gloves during installation. - Page 22 the unit, we recommend that a gap of at least 80mm is made by shortening AIRFLOW WORK TOP the shelf. When installing the appliance below a work top, there must be a minimum ventilation area of 60cm below the FRONT OF COOKER appliance, either through the plinth or through the kick board, as indicated...
-
Page 23: Step 4: Secure Appliance Into Housing Unit
with a contact opening width of at least 3mm must be provided. Use a 13 amp fuse. A type HO5 V V-F cable must be used as the mains lead. The cross section must be a minimum of 1.5mm². The mains terminal block is sited on the right of the angled part of the service panel. - Page 24 ELECTRIC PRODUCTS Electrical supply/load 240V ~ 50Hz 60cm: load = 2680W Countries of destination AU. Australia - NZ. New Zealand. WARNING! This appliance must be earthed. The Data badge is located at the bottom of the front frame, behind the door and rear of the product.
- Page 25 14.702...
- Page 26 FAQ’S What parts of the appliance can be washed in a dishwasher? • Any enamelled parts such as the grillpan can be cleaned in a dishwasher, as can oven shelves and shelf guides. There’s been a power failure and the product won’t work. •...
-
Page 27: Changing Light Bulbs
Optional Extras A grill pan handle can be purchased as an optional extra from our Customer Care department quoting the part numbers below: HANDLE - 082283705 HANDLE GRIP - 082469100 COMPLETE GRILLPAN PACK - 012635666 CHANGING LIGHT BULBS Warning!: There is a risk of electric shock, so always make sure you have turned off and un- plugged your appliance before starting. -
Page 28: Important Note
CONTACT US Calling for a service If you should experience any problems with your cooker please contact your retailer or place of purchase. Important note: Service work is to be conducted by authorised persons only. It is advisable to have your cooker checked regularly and maintained in good condition.
Need help?
Do you have a question about the Built In Pyrolytic and is the answer not in the manual?
Questions and answers
The time has not returned on the display after pyrolytic cleaning has finished