Table of Contents
Advertisement
Quick Links
Advertisement
Table of Contents

Related Manuals for Wintec WPL-2000


Summary of Contents for Wintec WPL-2000
-
Page 2: Safety Notes
Return to original dealer immediately if it emits strange smell or fume. ƒ Set the WPL-2000 on the place where can receive GPS signal easily for 10 to 15 minutes if it is the first time to be used. This procedure enables the device to gather some Almanac Data and ensures the quicker position fixed and better GPS performance. -
Page 3: Table Of Contents
WPL-2000 Auto-show Track Logger CONTENTS FeATures ProducT overview conTenTs inserTing BATTeries Power on & Power oFF oPerATion FuncTion descriPTion • MAin Mode • Setting Mode showing TrAck googLe MAPs overview using win_TooL uTiLiTy TrAck ediTing viA TiMeMAchineX TrouBLe shooTing... -
Page 4: Features
Ð Start to record GPS log Turn on WPL-2000 before you start your trip, make sure it gets acquisition, and take pictures with your digital camera. The device records the GPS log after the power is turned on until turned off. - Page 5 Useful & user-friendly inbuilt software No need to install any extra software, the inbuilt one will pop up after connect WPL-2000 to Ð computer. No matter GPS parameter setting, format converting Geo-tagging…etc. can be done via Ð the inbuilt software.
-
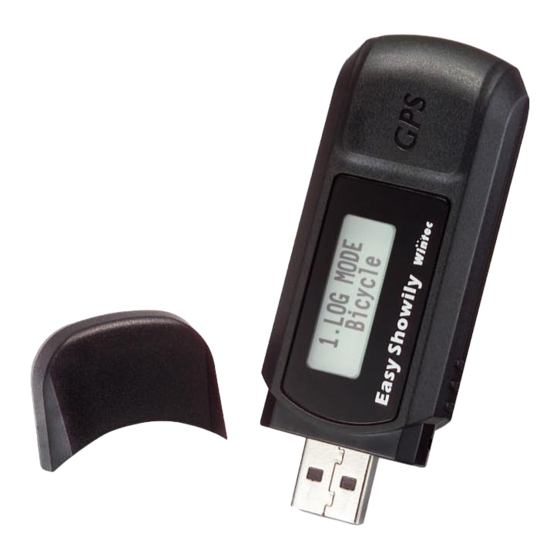
Page 6: Product Overview
PrOdUcT OvErviEW Function button Power button Track button 1.LOG MODE Bicycle Easy Showily GPS Antenna Location ° 100 km/h Easy Showily USB cover USB connector... -
Page 7: Contents
1 x WPL-2000 / Auto-show Track Logger Ð 1 x USB extended cable (15cm) Ð 2 x AAA alkaline battery Ð 1 x Lanyard Ð 1 x Leather case Ð 1 x Quick installation Guide Ð Before using the device, please make sure that all the accessories are included in the package. -
Page 8: Inserting Batteries
iNSErTiNG BATTEriES Take off the USB cover. Slide the battery cover. insert batteries into the unit with correct direction. (AAA 1.5v battery *2; Alkaline batteries are recommended.) close the battery cover. Put on the USB cover. - Page 9 To remove batteries Be sure WPL-2000 has been turned the power off before removing batteries. The abnormal process may cause damage of log data. Replace new batteries immediately when the NOTE low battery icon pop up. Doing so can avoid worse GPS performance and incomplete log °...
-
Page 10: Power On & Power Off Operation
GPS satellites can not be reached. Change the location and try again. Power Off Press and hold the power button for 3 seconds under any screen to turn the WPL-2000 Ð off after using. -
Page 11: Function Description
FUNcTiON dEScriPTiON Function button Power button Track button 1.LOG MODE Bicycle Easy Showily The WPL-2000 includes two modes, the Main Mode and Setting Mode. Main Mode Heading & speed Ð ° ° 1500 m 1500 ft Go to distance accumulated page. -
Page 12: Average Speed
counter accumulated Ð TOTAL T. Total Time accumulated. 14h51m10s MOVE T. Move Time accumulated. 10h30m35s STOP T. Stop Time accumulated. 4h20m35s Go to Average speed page. Switch around information of Total Time, Move Time and Stop Time. Average speed Ð AVG. - Page 13 current time Ð CLOCK 8 : 35 : 25 Back to Heading & speed page. The clock depends on the time zone set by user NOTE Below screen will show up under following situations. • The first time to use this device. CLOCK •...
-
Page 14: Setting Mode
Confirm the option and Go to Usage capacity of log data page. Enable(On) or disable (Off) the Shake Mode. As Shake Mode On, the WPL-2000 will auto-shut off (sleep) if the device is NOTE motionless over 5 minutes (default, the duration can be set via Win_Tool), and... -
Page 15: Time Zone Setting
Usage capacity of log data. Ð 3.REC MEMORY 48.6% Back to Main Mode. Go to Time Zone Setting Time Zone Setting Ð 4.ZONE + 8 : 00 Confirm the option and back to Main Mode. Confirm the option and back to Log Mode Setting. Adjust the time zone. -
Page 16: Showing Track
SHOWiNG TrAck Remove the USB cover and connect the WPL-2000 with a USB port on a computer. The inbuilt access tool (WIN_TOOL) will be executed automatically and pop up following dialogue, please press “OK”. You probably can not see the above dialogue if the antivirus program in your computer does not accept the “Auto Run”... - Page 17 Now, the recorded track will be shown on Google Maps automatically. At this moment, the inbuilt Win_Tool will be minimized and hidden in the system tray. Click its icon as below anytime when you want to use the Win_Tool. Allow this page to access my computer...
-
Page 18: Google Maps Overview
GOOGLE MAPS OvErviEW Track Information: Basic information of the device and selected track. Selected Track: Select which track inside WPL-2000 you want to show. The default is the last track. Track Point Tour: Key in the digit which exact point you want to see and press “Go to”... -
Page 19: Using Win_Tool Utility
USiNG WiN_TOOL UTiLiTY version & Language Ð Win_Tool Version. Language Page: Select a language here. Please be aware the language setting only for Win_Tool but device. - Page 20 Ð Tab: LOG Data Tab. LOG Data Source: Select a LOG Data Source from Easy Showily (WPL-2000) or other. Transfer: Select a format, and press the “Transfer” button to convert to. China Map: When the track is logged in Mainland China, please tick “China Map” and transfer to Google Maps again.
- Page 21 Download latest Win_Tool: • Press the Download latest Win_Tool button. • Open the “EasyShowily_Win_Tool.rar fi le. • Un-compress the rar fi le to any space you assigned and you will see the following pictures.
- Page 22 Release Note (English): Elaborate the difference between this version and last version in English. Update file: The main file for update process. Release Note (Chinese): Elaborate the difference between this version and last version in Chinese.
- Page 23 How to update WPL-2000 Warning: After the update process, all LOG data inside the WPL-2000 will be deleted. Besides, the password mechanism will be disabled, and back to factory setting. After un-compress the rar fi le, use the right key function to copy the update fi le i.e. the WPL2000.img.
- Page 24 Paste the WPL2000.img fi le here instead of the existing one. right click Plug out the WPL-2000 and turn it on again. The “CLEAR LOG DATA NOW..” message will show on the LCD. It will take around 30 sec. and back to Main screen. Please be...
-
Page 25: Device Setting
When shake mode on, please set the duration time. If there is no movement for 5 minutes (default), WPL-2000 will turn off automatically, and turn on again when it feels vibration. • If WPL-2000 is turned off manually under shake mode on, it will not auto-turn on even with any movement. - Page 26 LOG Mode Ð Tab: LOG Mode Tab. LOG Mode: Select a Log mode and press “Set Log Mode” button to confirm the setting. • Walk: Log a track point per 10 sec. or 20 m (The velocity should be 1 km/h at least.). •...
-
Page 27: Gps Setting
• Cold Start is suggested if one of below mentioned is confirmed. a) The WPL-2000 didn’t be operated more than 3 months. b) The distance between your current location and the last time device turn off location is more than 800 km. - Page 28 Photo Tool Ð Press the “Geotagging / Report” button for further application. Geotagging Ð Before Geotagging process, please make sure that the time zone of device and digital camera should be the same as each other, otherwise photos won’t be correctly Geotagged.
- Page 29 combine photos with track Page: Photo Page. Selected LOG Section: Choose a track that you want to combine photos or create a report. Record points: Indicate how many way points included in the selected track. Load JPEG Photos: Press this button to select photos for Geotagging. •...
- Page 30 When the auto-Geotagging is not working or you want to modify the geographic coordinates, please use the function of manual Geotagging. • By Map: Drag the “red sign” on the map to the correct position, and press the “Manual Geotagging” button (right key function) to complete Geotagging process. •...
- Page 31 combine UrL (web picture or video link) with track Page: URL page. Add URL: Press this button to add URL item to the [URL Link] area for Geotagging. • URL Type: Select a URL type for photo or video. • URL Link: Key in a link of web photo or video.
- Page 32 The Geotagging for URL link can be done by Map or Coordinates. • By Map: Drag the “red sign” on the map to the correct position, and press the “Manual Geotagging” button (right key function) to complete Geotagging process. • By Coordinates: Key in the exact Latitude (format: dd.ddddddd degree), Longitude (format: ddd.
- Page 33 Create a track file including photos and URL link Max. Photo Show Size: Select a size of photo shown on your track. Map Type: Google Earth or Google Maps. When you choose Google Maps, the extra function of Google Maps API Key as NOTE below will show up.
- Page 34 Photo Map: Create a file only showing Geotagged photos on map (The initial file’s name will be “PGM”). Photo-Track Map: Create a file showing Geotagged photos and track on map (The initial file’s name will be “PTGM”). File Area: All files from point 4 & 5 will be shown here. Right key function is available for copying and deleting those files.
- Page 35 A complete report File...
- Page 36 Track Map: A Map with track. If you have created a Photo-Track Map (PTGM) fi le during previous process, NOTE the track presented on report will include photos. Instantaneous Basic Information: The basic information will be changed along with the dynamic track.
- Page 37 Save a report Save report Button Press the “Save Report” button to save it in the specific area you assigned. The complete report can be demonstrated anytime by double clicking the report file.
- Page 38 Please be aware that all files including jpeg, html and xml files should exist in NOTE the same folder; otherwise the report file can not be shown normally.
- Page 39 Help Ð Page: Help Page. WPL-2000 User Manual: Link to a WPL-2000 user manual. Download TimeMachineX: Link to Wintec’s website to download TimeMachineX software. MSCHART Register: Execute the MSCHART Register when the report function is not working. The computer which is login should be Administrator or the one has the same NOTE authorities.
-
Page 40: Track Editing Via Timemachinex
After downloading, double click the program and follow the InstallShield Wizard to complete the installation process. Convert the track file to TimeMachineX’s format Ð Plug in the WPL-2000 to PC, and execute Win_Tool.. Use Win_Tool to convert the log data of WPL-2000 to TK1 format i.e. the format for TimeMachineX. - Page 41 Execute TimeMachineX and stay in “Track Covert” page, the TK1 file transferred via WPL-2000 in last step should be show up in TK1 list as below. The step2 should be done before executing TimeMachineX; otherwise, the NOTE TK1 file won’t auto-show up in the TK1 list.
- Page 42 A TK1 file includes a lot of tracks. That means all tracks inside the WPL-2000 would combine to only one TK1 file. Please use the right key function to convert TK1 format to TK2. A TK2 file stands for one track, so you can choose a TK2 file for track editing.
- Page 43 Track Editing Ð Enter "Track Editor" page, “Edit Track” tab, and select a TK2 file for editing. double click Start the track editing process.
- Page 44 Save the TK2 file. Save as a new TK2 file. The changed TK2 file can not be saved back to WPL-2000, so if you prefer to NOTE make a report or complete Geotagging with changed TK2 file, please do it via...
-
Page 45: Trouble Shooting
TrOUBLE SHOOTiNG If you run into any problem using WPL-2000, use the following table to troubleshoot the problem. If the problem persists, contact your dealer for further service. The WPL-2000 can not get acquisition. Ð Ð You may be in a location where the radio signals from GPS satellites can not be reached.
Need help?
Do you have a question about the WPL-2000 and is the answer not in the manual?
Questions and answers