Table of Contents
Advertisement
Quick Links
Advertisement
Chapters
Table of Contents

Related Manuals for Toto Link wireless N router


Summary of Contents for Toto Link wireless N router
- Page 1 User Manual Wireless-N ADSL2+ Modem Router...
-
Page 2: Table Of Contents
Table of Contents 1. ABOUT THIS GUIDE ........................3 1.1 Navigation of the User’s Guide......................3 2. PRODUCT OVERVIEW ......................3 2.1 Introduction............................3 2.2 Features ..............................3 2.3 Panel Layout ............................4 2.3.1 Front Panel ................................ 4 2.3.2 Rear Panel ................................. 4 3. - Page 3 4.8.2 Port Filtering ..............................29 4.8.3 MAC Filtering ..............................29 4.8.4 URL Filtering ..............................30 4.8.5 Port Forwarding............................... 31 4.8.6 DMZ ................................31 4.9 Management............................32 4.9.1 DDNS ................................32 4.9.2 Time Zone Setting ............................32 4.9.3 Denial-of-Service ............................33 4.9.4 Upgrade Firmware............................
-
Page 4: About This Guide
1. ABOUT THIS GUIDE Thank you very much for purchasing the wireless N router. This guide will introduce the features of this router and tell you how to connect, use and configure the router to access Internet. Please follow the instructions in this guide to avoid affecting the router’s performance by improper operation. -
Page 5: Panel Layout
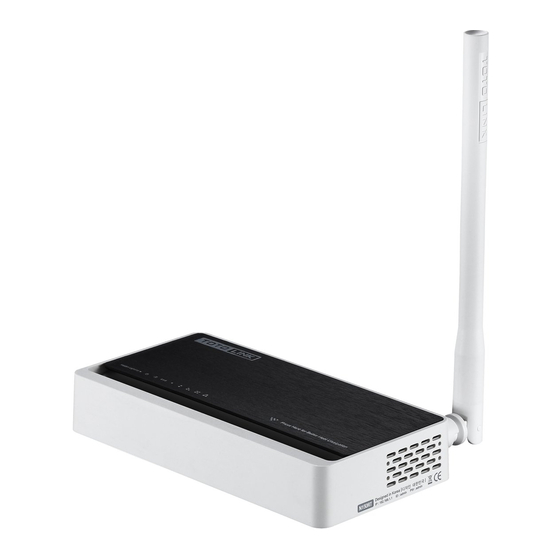
2.3 Panel Layout 2.3.1 Front Panel The front panel of this router consists of 8 LEDs, which is designed to indicate connection status. POWER This indicator lights blue when the router powered on, otherwise it is off. This indicator blinks blue when router powered on. This indicator blinks blue when there are wireless devices connected and WLAN transmitting data to the router. -
Page 6: Hardware Installation
The Power socket is where you will connect the power adapter. DC IN This port is where you will connect with the cable to access Internet. This port connects the router to local PC. 1/2/3/4 LAN Press for about 2~3 seconds, the system LED indicator keep solid light, it RST-WPS means WPS working, while press for about 10 seconds, all LEDs blinks Button... -
Page 7: Set Up The Computer
Power, WPS, LAN, WLAN and WAN port LEDs of the WLAN Router will light up indicating a normal status. 2. When the WAN Port is connected to Internet successfully, the WAN LED will light up. 3. When the LAN Port is connected to the computer system, the LAN LED will light up. 3.3 Set up the Computer The default IP address of the router is 192.168.1.1, the default Subnet Mask is 255.255.255.0. -
Page 8: Connecting To Internet
Figure 3-2 Failure Ping command If the result displayed is similar to the figure 3-2, it means that your PC has not connected to the router successfully. Please check it following below steps: 1. Is the connection between your PC and the router correct? If correct, the LAN port on the router and LED on your PC’s adapter should be lit. - Page 9 Enter admin for User Name and Password, both in lower case letters. Then click OK button or press Enter key. Now you will get into the web interface of the device. The Main screen will appear. Note: If the above screen does not prompt, it means that your web-browser has been set to using a proxy.
-
Page 10: Changing Password
4.2 Changing Password Now, we recommend that you change the password to protect the security of your router. Please go to Management—Password to change the password required to log in your router. User Name: type in the name that you use to login the web interface of the router. New Password: new password is used for administrator authentication. -
Page 11: Operation Mode
4.4 Operation Mode This parameter specifies the operating network modes for the Router. This router provides three modes: Gateway, Repeater Bridge and Repeater WISP. You could refer to the following description to choose the right one. -
Page 12: Network
1. Gateway In this mode, the device connects to the internet via an ADSL/Cable Modem. NAT is enabled and PCs on LAN ports share the same IP Address to the ISP via the WAN port. The connection type can be setup on the WAN page using PPPOE, DHCP client or static 2. -
Page 13: Wan Interface
4.5.1 WAN Interface This part allows you to configure the WAN port parameters so that your computer can access Internet. Enable UPnP: the UPnP (Universal Plug and play) protocol is supported to bring to network connected devices the ease of installation and configuration which is already available for directly connected PC peripherals with the existing Windows “Plug and Play”... -
Page 14: Static Ip
IPv6 packets to pass through a NAT router. Clone MAC Address: MAC address is the physical address of your computer’s network card. Generally, every network card has one unique Mac address. Since many ISPs only allow one computer in LAN to access Internet, users can enable this function to make more computers surf Internet. -
Page 15: Pppoe
choose this mode, you will get a dynamic IP address from your ISP automatically. Host Name: the name of your computer, online neighbors will identify the computer according to the name. MTU: it means Max Transmit Unit for packet. When using slow links, large packets can cause some delays thereby increasing lag and latency. -
Page 16: Lan Interface
User Name/Password: enter the User Name and Password provided by your ISP. Service Name (AC): this is optional. It describes the service name your ISP provided to you. Generally, leaving these fields blank will work. DNS: Domain Name System. If you select Set DNS Manually, you will have to type in the DNS address by yourself. - Page 17 IP Address: This is the IP addresses to be represented by the LAN (including WLAN) interface that is connected to the internal network. This IP will be used for the routing of the internal network (it will be the Gateway IP for all the devices connected on the internal network).
-
Page 18: Static Dhcp Settings
4.5.3 Static DHCP Settings It allows you to reserve IP addresses and assign the same IP address to the network device with the specified MAC address any time it requests an IP address. 4.5.4 VLAN Settings VLAN (Virtual Local Area Network) provides you a very convenient way to manage hosts by grouping them based on the physical port. -
Page 19: Wireless Setting
Ethernet/Wireless: specifies the WAN port and wireless AP. WAN/LAN: defines the WAN port or LAN port. Forwarding Rule: VLAN feature also support forwarding rule as bridge and NAT between LAN port and WAN port. Tag: The router will add specific VLAN number to all packets on the LAN while sending them out. - Page 20 unauthorized access. Encryption: This router supports WEP, WPA, WPA2, WPA-Mixed security options. Please select one according to the Access Point security policy. 1) WEP WEP (Wired Equivalent Privacy) is based on the IEEE 802.11 standard and uses the RC4 encryption algorithm. Enabling WEP allows you to increase security by encryption data being transferred over your wireless network.
-
Page 21: Multiple Ssid
Encryption Key: Please refer to Key Length to set this parameter. 2) WPA/WPA2 Wi-Fi Protected Access (WPA) is the most dominating security mechanism in industry. It is separated into two categories: WPA-personal and WPA-Enterprise, it is the current most secure method of wireless security and required for 802.11n performance. TKIP--Temporal Key Integrity Protocol is one cipher for data encryption supported by WPA. -
Page 22: Wireless Repeater
By default, it is disabled. You should select Enable and the configuration parameters will appear. The encryption please refer to 4.6.2 Wireless AP 4.6.4 Wireless Repeater You can setup wireless security in this page. It is very practical for protecting your private information. -
Page 23: Advanced Settings
Please click Site Survey button to search for any Access Point. Then they will be showed in the form. Utility will search for wireless networks in range on all the supported channels while device is operating in Access Point mode. If any Access Point is found, you could choose to connect it manually when client mode is enabled. - Page 24 Band: This option allows you to choose the radio standard for operation of your Router. 802.11b and 802.11g are old 2.4GHz mode, while 802.11n is the latest standard based on faster Orthogonal Frequency Division Multiplexing (OFDM) modulation. Channel Width: This is the spectral width of the radio channel. Supported wireless channel spectrum widths: 20MHz is the standard channel spectrum width.
-
Page 25: Wireless Wds Settings
device’s wireless performance and is also power-saving for client side. If this value set lower than 100ms, it will speed up the wireless client connection. Preamble Type: this option is to define the length of the sync field in an 802.11 packet. Most modern wireless network uses shot preamble with 56 bit sync filed instead of long preamble with 128 bit sync filed. -
Page 26: Wireless Wps Settings
Enable WDS: by default, you can’t select the checkbox to enable WDS. MAC Address: the other AP’s MAC Address that you want to communicate with. Comment: describes the reason why you want to communicate with others. The WDS Security Setup allows you to set encryption for your WDS connection. You can refer to the Wireless Security Setup. -
Page 27: Access Control
Client PIN Number: please input the PIN code specified in wireless client you wish to connect, and click Start PIN button. The WPS LED on the router will blink fast when WPS is in progress. It will return to normal condition after two minutes. (You need to setup WPS within two minutes) 4.6.8 Access Control By default, Wireless Access Control Mode is disabled. -
Page 28: Firewall
4.7 QoS QoS means Quality of Service. Deploying QoS management to guarantee that all applications receive the service levels required and sufficient bandwidth to meet performance expectations is indeed one important aspect of modern enterprise network. 4.8 Firewall The firewall of this router helps to protect you local network against attack from unauthorized outsiders. -
Page 29: Ip Filtering
Internet. Furthermore, it can filter out specific packets that trigger the router to build an unwanted outgoing connection. 4.8.1 IP Filtering Enable IP filtering: you can select this checkbox to enable IP Filtering function. Local IP Address: the IP address that you want to filter. Comment: describe the reason why you want to filter the IP address. -
Page 30: Port Filtering
4.8.2 Port Filtering Enable Port Filtering: you can select this checkbox to enable Port Filtering function. Port Range: the port range that you want to filter. Protocol: choose which particular protocol type should be filtered. Here you can choose UDP/TCP/Both. Comment: describe the reason why you want to filter these ports. -
Page 31: Url Filtering
Comment: describe the reason why you want to filter the MAC address. Just few words are saved there usually. Current MAC Filter List: this table will list the detailed information about the MAC address that will be filtered. 4.8.4 URL Filtering Enable URL Filtering: you can select this checkbox to enable URL filtering function. -
Page 32: Port Forwarding
4.8.5 Port Forwarding Enable Port Forwarding: you can select this checkbox to enable Port Forwarding function. IP Address: enter the Port’s IP address. Protocol: choose which particular protocol type should be forwarding. Here you can choose Both/UDP/TCP. Port Range: set the range that the port forward to. Comment: describe the reason why you want to use port forward function. -
Page 33: Management
4.9 Management 4.9.1 DDNS DDNS means Dynamic Domain Name System. The ISP often provides you with a dynamic IP address when you connect to the Internet via your ISP. It means that the public IP address assigned to your router changes each time you access the Internet. Before you use the Dynamic DNS feature, you have to apply for free DDNS service to the DDNS service providers. -
Page 34: Denial-Of-Service
You can specify the device’s time zone according to GMT (Greenwich Mean Time) or copy computer time as the current time only by clicking the Copy Computer Time button. Time Zone Select: Select the Time Zone where the router is located. Enable NTP client update: NTP means Network Time Protocol which is used to make the computer’s time synchronized with its server or clock source, such as Quartz and GPS. -
Page 35: Upgrade Firmware
4.9.4 Upgrade Firmware This page allows you to upgrade the Access Point firmware to new version. Please note: DO NOT power off the device during the upload because it may crash the system. 4.9.5 Reload Factory Settings This page allows you to save current settings to a file or reload the settings from the file which was saved previously. -
Page 36: Password
4.9.6 Password User Name: type in the name that you use to login the web interface of the router. New Password: new password is used for administrator authentication. Confirm Password: new password should be re-entered to verify its accuracy. Note: password length is 8 characters maximum, characters after the 8 position will be truncated. - Page 37 User Manual Wireless-N ADSL2+ Modem Router...
- Page 38 Table of Contents 1. ABOUT THIS GUIDE ........................3 1.1 Navigation of the User’s Guide......................3 2. PRODUCT OVERVIEW ......................3 2.1 Introduction............................3 2.2 Features ..............................3 2.3 Panel Layout ............................4 2.3.1 Front Panel ................................ 4 2.3.2 Rear Panel ................................. 4 3.
- Page 39 4.8.2 Port Filtering ..............................29 4.8.3 MAC Filtering ..............................29 4.8.4 URL Filtering ..............................30 4.8.5 Port Forwarding............................... 31 4.8.6 DMZ ................................31 4.9 Management............................32 4.9.1 DDNS ................................32 4.9.2 Time Zone Setting ............................32 4.9.3 Denial-of-Service ............................33 4.9.4 Upgrade Firmware............................
-
Page 40: About This Guide
1. ABOUT THIS GUIDE Thank you very much for purchasing the wireless N router. This guide will introduce the features of this router and tell you how to connect, use and configure the router to access Internet. Please follow the instructions in this guide to avoid affecting the router’s performance by improper operation. -
Page 41: Panel Layout
2.3 Panel Layout 2.3.1 Front Panel The front panel of this router consists of 8 LEDs, which is designed to indicate connection status. POWER This indicator lights blue when the router powered on, otherwise it is off. This indicator blinks blue when router powered on. This indicator blinks blue when there are wireless devices connected and WLAN transmitting data to the router. -
Page 42: Hardware Installation
The Power socket is where you will connect the power adapter. DC IN This port is where you will connect with the cable to access Internet. This port connects the router to local PC. 1/2/3/4 LAN Press for about 2~3 seconds, the system LED indicator keep solid light, it RST-WPS means WPS working, while press for about 10 seconds, all LEDs blinks Button... -
Page 43: Set Up The Computer
Power, WPS, LAN, WLAN and WAN port LEDs of the WLAN Router will light up indicating a normal status. 2. When the WAN Port is connected to Internet successfully, the WAN LED will light up. 3. When the LAN Port is connected to the computer system, the LAN LED will light up. 3.3 Set up the Computer The default IP address of the router is 192.168.1.1, the default Subnet Mask is 255.255.255.0. -
Page 44: Connecting To Internet
Figure 3-2 Failure Ping command If the result displayed is similar to the figure 3-2, it means that your PC has not connected to the router successfully. Please check it following below steps: 1. Is the connection between your PC and the router correct? If correct, the LAN port on the router and LED on your PC’s adapter should be lit. - Page 45 Enter admin for User Name and Password, both in lower case letters. Then click OK button or press Enter key. Now you will get into the web interface of the device. The Main screen will appear. Note: If the above screen does not prompt, it means that your web-browser has been set to using a proxy.
-
Page 46: Changing Password
4.2 Changing Password Now, we recommend that you change the password to protect the security of your router. Please go to Management—Password to change the password required to log in your router. User Name: type in the name that you use to login the web interface of the router. New Password: new password is used for administrator authentication. -
Page 47: Operation Mode
4.4 Operation Mode This parameter specifies the operating network modes for the Router. This router provides three modes: Gateway, Repeater Bridge and Repeater WISP. You could refer to the following description to choose the right one. -
Page 48: Network
1. Gateway In this mode, the device connects to the internet via an ADSL/Cable Modem. NAT is enabled and PCs on LAN ports share the same IP Address to the ISP via the WAN port. The connection type can be setup on the WAN page using PPPOE, DHCP client or static 2. -
Page 49: Wan Interface
4.5.1 WAN Interface This part allows you to configure the WAN port parameters so that your computer can access Internet. Enable UPnP: the UPnP (Universal Plug and play) protocol is supported to bring to network connected devices the ease of installation and configuration which is already available for directly connected PC peripherals with the existing Windows “Plug and Play”... -
Page 50: Static Ip
IPv6 packets to pass through a NAT router. Clone MAC Address: MAC address is the physical address of your computer’s network card. Generally, every network card has one unique Mac address. Since many ISPs only allow one computer in LAN to access Internet, users can enable this function to make more computers surf Internet. -
Page 51: Pppoe
choose this mode, you will get a dynamic IP address from your ISP automatically. Host Name: the name of your computer, online neighbors will identify the computer according to the name. MTU: it means Max Transmit Unit for packet. When using slow links, large packets can cause some delays thereby increasing lag and latency. -
Page 52: Lan Interface
User Name/Password: enter the User Name and Password provided by your ISP. Service Name (AC): this is optional. It describes the service name your ISP provided to you. Generally, leaving these fields blank will work. DNS: Domain Name System. If you select Set DNS Manually, you will have to type in the DNS address by yourself. - Page 53 IP Address: This is the IP addresses to be represented by the LAN (including WLAN) interface that is connected to the internal network. This IP will be used for the routing of the internal network (it will be the Gateway IP for all the devices connected on the internal network).
-
Page 54: Static Dhcp Settings
4.5.3 Static DHCP Settings It allows you to reserve IP addresses and assign the same IP address to the network device with the specified MAC address any time it requests an IP address. 4.5.4 VLAN Settings VLAN (Virtual Local Area Network) provides you a very convenient way to manage hosts by grouping them based on the physical port. -
Page 55: Wireless Setting
Ethernet/Wireless: specifies the WAN port and wireless AP. WAN/LAN: defines the WAN port or LAN port. Forwarding Rule: VLAN feature also support forwarding rule as bridge and NAT between LAN port and WAN port. Tag: The router will add specific VLAN number to all packets on the LAN while sending them out. - Page 56 unauthorized access. Encryption: This router supports WEP, WPA, WPA2, WPA-Mixed security options. Please select one according to the Access Point security policy. 1) WEP WEP (Wired Equivalent Privacy) is based on the IEEE 802.11 standard and uses the RC4 encryption algorithm. Enabling WEP allows you to increase security by encryption data being transferred over your wireless network.
-
Page 57: Multiple Ssid
Encryption Key: Please refer to Key Length to set this parameter. 2) WPA/WPA2 Wi-Fi Protected Access (WPA) is the most dominating security mechanism in industry. It is separated into two categories: WPA-personal and WPA-Enterprise, it is the current most secure method of wireless security and required for 802.11n performance. TKIP--Temporal Key Integrity Protocol is one cipher for data encryption supported by WPA. -
Page 58: Wireless Repeater
By default, it is disabled. You should select Enable and the configuration parameters will appear. The encryption please refer to 4.6.2 Wireless AP 4.6.4 Wireless Repeater You can setup wireless security in this page. It is very practical for protecting your private information. -
Page 59: Advanced Settings
Please click Site Survey button to search for any Access Point. Then they will be showed in the form. Utility will search for wireless networks in range on all the supported channels while device is operating in Access Point mode. If any Access Point is found, you could choose to connect it manually when client mode is enabled. - Page 60 Band: This option allows you to choose the radio standard for operation of your Router. 802.11b and 802.11g are old 2.4GHz mode, while 802.11n is the latest standard based on faster Orthogonal Frequency Division Multiplexing (OFDM) modulation. Channel Width: This is the spectral width of the radio channel. Supported wireless channel spectrum widths: 20MHz is the standard channel spectrum width.
-
Page 61: Wireless Wds Settings
device’s wireless performance and is also power-saving for client side. If this value set lower than 100ms, it will speed up the wireless client connection. Preamble Type: this option is to define the length of the sync field in an 802.11 packet. Most modern wireless network uses shot preamble with 56 bit sync filed instead of long preamble with 128 bit sync filed. -
Page 62: Wireless Wps Settings
Enable WDS: by default, you can’t select the checkbox to enable WDS. MAC Address: the other AP’s MAC Address that you want to communicate with. Comment: describes the reason why you want to communicate with others. The WDS Security Setup allows you to set encryption for your WDS connection. You can refer to the Wireless Security Setup. -
Page 63: Access Control
Client PIN Number: please input the PIN code specified in wireless client you wish to connect, and click Start PIN button. The WPS LED on the router will blink fast when WPS is in progress. It will return to normal condition after two minutes. (You need to setup WPS within two minutes) 4.6.8 Access Control By default, Wireless Access Control Mode is disabled. -
Page 64: Firewall
4.7 QoS QoS means Quality of Service. Deploying QoS management to guarantee that all applications receive the service levels required and sufficient bandwidth to meet performance expectations is indeed one important aspect of modern enterprise network. 4.8 Firewall The firewall of this router helps to protect you local network against attack from unauthorized outsiders. -
Page 65: Ip Filtering
Internet. Furthermore, it can filter out specific packets that trigger the router to build an unwanted outgoing connection. 4.8.1 IP Filtering Enable IP filtering: you can select this checkbox to enable IP Filtering function. Local IP Address: the IP address that you want to filter. Comment: describe the reason why you want to filter the IP address. -
Page 66: Port Filtering
4.8.2 Port Filtering Enable Port Filtering: you can select this checkbox to enable Port Filtering function. Port Range: the port range that you want to filter. Protocol: choose which particular protocol type should be filtered. Here you can choose UDP/TCP/Both. Comment: describe the reason why you want to filter these ports. -
Page 67: Url Filtering
Comment: describe the reason why you want to filter the MAC address. Just few words are saved there usually. Current MAC Filter List: this table will list the detailed information about the MAC address that will be filtered. 4.8.4 URL Filtering Enable URL Filtering: you can select this checkbox to enable URL filtering function. -
Page 68: Port Forwarding
4.8.5 Port Forwarding Enable Port Forwarding: you can select this checkbox to enable Port Forwarding function. IP Address: enter the Port’s IP address. Protocol: choose which particular protocol type should be forwarding. Here you can choose Both/UDP/TCP. Port Range: set the range that the port forward to. Comment: describe the reason why you want to use port forward function. -
Page 69: Management
4.9 Management 4.9.1 DDNS DDNS means Dynamic Domain Name System. The ISP often provides you with a dynamic IP address when you connect to the Internet via your ISP. It means that the public IP address assigned to your router changes each time you access the Internet. Before you use the Dynamic DNS feature, you have to apply for free DDNS service to the DDNS service providers. -
Page 70: Denial-Of-Service
You can specify the device’s time zone according to GMT (Greenwich Mean Time) or copy computer time as the current time only by clicking the Copy Computer Time button. Time Zone Select: Select the Time Zone where the router is located. Enable NTP client update: NTP means Network Time Protocol which is used to make the computer’s time synchronized with its server or clock source, such as Quartz and GPS. -
Page 71: Upgrade Firmware
4.9.4 Upgrade Firmware This page allows you to upgrade the Access Point firmware to new version. Please note: DO NOT power off the device during the upload because it may crash the system. 4.9.5 Reload Factory Settings This page allows you to save current settings to a file or reload the settings from the file which was saved previously. -
Page 72: Password
4.9.6 Password User Name: type in the name that you use to login the web interface of the router. New Password: new password is used for administrator authentication. Confirm Password: new password should be re-entered to verify its accuracy. Note: password length is 8 characters maximum, characters after the 8 position will be truncated. - Page 73 User Manual Wireless-N ADSL2+ Modem Router...
- Page 74 Table of Contents 1. ABOUT THIS GUIDE ........................3 1.1 Navigation of the User’s Guide......................3 2. PRODUCT OVERVIEW ......................3 2.1 Introduction............................3 2.2 Features ..............................3 2.3 Panel Layout ............................4 2.3.1 Front Panel ................................ 4 2.3.2 Rear Panel ................................. 4 3.
- Page 75 4.8.2 Port Filtering ..............................29 4.8.3 MAC Filtering ..............................29 4.8.4 URL Filtering ..............................30 4.8.5 Port Forwarding............................... 31 4.8.6 DMZ ................................31 4.9 Management............................32 4.9.1 DDNS ................................32 4.9.2 Time Zone Setting ............................32 4.9.3 Denial-of-Service ............................33 4.9.4 Upgrade Firmware............................
-
Page 76: About This Guide
1. ABOUT THIS GUIDE Thank you very much for purchasing the wireless N router. This guide will introduce the features of this router and tell you how to connect, use and configure the router to access Internet. Please follow the instructions in this guide to avoid affecting the router’s performance by improper operation. -
Page 77: Panel Layout
2.3 Panel Layout 2.3.1 Front Panel The front panel of this router consists of 8 LEDs, which is designed to indicate connection status. POWER This indicator lights blue when the router powered on, otherwise it is off. This indicator blinks blue when router powered on. This indicator blinks blue when there are wireless devices connected and WLAN transmitting data to the router. -
Page 78: Hardware Installation
The Power socket is where you will connect the power adapter. DC IN This port is where you will connect with the cable to access Internet. This port connects the router to local PC. 1/2/3/4 LAN Press for about 2~3 seconds, the system LED indicator keep solid light, it RST-WPS means WPS working, while press for about 10 seconds, all LEDs blinks Button... -
Page 79: Set Up The Computer
Power, WPS, LAN, WLAN and WAN port LEDs of the WLAN Router will light up indicating a normal status. 2. When the WAN Port is connected to Internet successfully, the WAN LED will light up. 3. When the LAN Port is connected to the computer system, the LAN LED will light up. 3.3 Set up the Computer The default IP address of the router is 192.168.1.1, the default Subnet Mask is 255.255.255.0. -
Page 80: Connecting To Internet
Figure 3-2 Failure Ping command If the result displayed is similar to the figure 3-2, it means that your PC has not connected to the router successfully. Please check it following below steps: 1. Is the connection between your PC and the router correct? If correct, the LAN port on the router and LED on your PC’s adapter should be lit. - Page 81 Enter admin for User Name and Password, both in lower case letters. Then click OK button or press Enter key. Now you will get into the web interface of the device. The Main screen will appear. Note: If the above screen does not prompt, it means that your web-browser has been set to using a proxy.
-
Page 82: Changing Password
4.2 Changing Password Now, we recommend that you change the password to protect the security of your router. Please go to Management—Password to change the password required to log in your router. User Name: type in the name that you use to login the web interface of the router. New Password: new password is used for administrator authentication. -
Page 83: Operation Mode
4.4 Operation Mode This parameter specifies the operating network modes for the Router. This router provides three modes: Gateway, Repeater Bridge and Repeater WISP. You could refer to the following description to choose the right one. -
Page 84: Network
1. Gateway In this mode, the device connects to the internet via an ADSL/Cable Modem. NAT is enabled and PCs on LAN ports share the same IP Address to the ISP via the WAN port. The connection type can be setup on the WAN page using PPPOE, DHCP client or static 2. -
Page 85: Wan Interface
4.5.1 WAN Interface This part allows you to configure the WAN port parameters so that your computer can access Internet. Enable UPnP: the UPnP (Universal Plug and play) protocol is supported to bring to network connected devices the ease of installation and configuration which is already available for directly connected PC peripherals with the existing Windows “Plug and Play”... -
Page 86: Static Ip
IPv6 packets to pass through a NAT router. Clone MAC Address: MAC address is the physical address of your computer’s network card. Generally, every network card has one unique Mac address. Since many ISPs only allow one computer in LAN to access Internet, users can enable this function to make more computers surf Internet. -
Page 87: Pppoe
choose this mode, you will get a dynamic IP address from your ISP automatically. Host Name: the name of your computer, online neighbors will identify the computer according to the name. MTU: it means Max Transmit Unit for packet. When using slow links, large packets can cause some delays thereby increasing lag and latency. -
Page 88: Lan Interface
User Name/Password: enter the User Name and Password provided by your ISP. Service Name (AC): this is optional. It describes the service name your ISP provided to you. Generally, leaving these fields blank will work. DNS: Domain Name System. If you select Set DNS Manually, you will have to type in the DNS address by yourself. - Page 89 IP Address: This is the IP addresses to be represented by the LAN (including WLAN) interface that is connected to the internal network. This IP will be used for the routing of the internal network (it will be the Gateway IP for all the devices connected on the internal network).
-
Page 90: Static Dhcp Settings
4.5.3 Static DHCP Settings It allows you to reserve IP addresses and assign the same IP address to the network device with the specified MAC address any time it requests an IP address. 4.5.4 VLAN Settings VLAN (Virtual Local Area Network) provides you a very convenient way to manage hosts by grouping them based on the physical port. -
Page 91: Wireless Setting
Ethernet/Wireless: specifies the WAN port and wireless AP. WAN/LAN: defines the WAN port or LAN port. Forwarding Rule: VLAN feature also support forwarding rule as bridge and NAT between LAN port and WAN port. Tag: The router will add specific VLAN number to all packets on the LAN while sending them out. - Page 92 unauthorized access. Encryption: This router supports WEP, WPA, WPA2, WPA-Mixed security options. Please select one according to the Access Point security policy. 1) WEP WEP (Wired Equivalent Privacy) is based on the IEEE 802.11 standard and uses the RC4 encryption algorithm. Enabling WEP allows you to increase security by encryption data being transferred over your wireless network.
-
Page 93: Multiple Ssid
Encryption Key: Please refer to Key Length to set this parameter. 2) WPA/WPA2 Wi-Fi Protected Access (WPA) is the most dominating security mechanism in industry. It is separated into two categories: WPA-personal and WPA-Enterprise, it is the current most secure method of wireless security and required for 802.11n performance. TKIP--Temporal Key Integrity Protocol is one cipher for data encryption supported by WPA. -
Page 94: Wireless Repeater
By default, it is disabled. You should select Enable and the configuration parameters will appear. The encryption please refer to 4.6.2 Wireless AP 4.6.4 Wireless Repeater You can setup wireless security in this page. It is very practical for protecting your private information. -
Page 95: Advanced Settings
Please click Site Survey button to search for any Access Point. Then they will be showed in the form. Utility will search for wireless networks in range on all the supported channels while device is operating in Access Point mode. If any Access Point is found, you could choose to connect it manually when client mode is enabled. - Page 96 Band: This option allows you to choose the radio standard for operation of your Router. 802.11b and 802.11g are old 2.4GHz mode, while 802.11n is the latest standard based on faster Orthogonal Frequency Division Multiplexing (OFDM) modulation. Channel Width: This is the spectral width of the radio channel. Supported wireless channel spectrum widths: 20MHz is the standard channel spectrum width.
-
Page 97: Wireless Wds Settings
device’s wireless performance and is also power-saving for client side. If this value set lower than 100ms, it will speed up the wireless client connection. Preamble Type: this option is to define the length of the sync field in an 802.11 packet. Most modern wireless network uses shot preamble with 56 bit sync filed instead of long preamble with 128 bit sync filed. -
Page 98: Wireless Wps Settings
Enable WDS: by default, you can’t select the checkbox to enable WDS. MAC Address: the other AP’s MAC Address that you want to communicate with. Comment: describes the reason why you want to communicate with others. The WDS Security Setup allows you to set encryption for your WDS connection. You can refer to the Wireless Security Setup. -
Page 99: Access Control
Client PIN Number: please input the PIN code specified in wireless client you wish to connect, and click Start PIN button. The WPS LED on the router will blink fast when WPS is in progress. It will return to normal condition after two minutes. (You need to setup WPS within two minutes) 4.6.8 Access Control By default, Wireless Access Control Mode is disabled. -
Page 100: Firewall
4.7 QoS QoS means Quality of Service. Deploying QoS management to guarantee that all applications receive the service levels required and sufficient bandwidth to meet performance expectations is indeed one important aspect of modern enterprise network. 4.8 Firewall The firewall of this router helps to protect you local network against attack from unauthorized outsiders. -
Page 101: Ip Filtering
Internet. Furthermore, it can filter out specific packets that trigger the router to build an unwanted outgoing connection. 4.8.1 IP Filtering Enable IP filtering: you can select this checkbox to enable IP Filtering function. Local IP Address: the IP address that you want to filter. Comment: describe the reason why you want to filter the IP address. -
Page 102: Port Filtering
4.8.2 Port Filtering Enable Port Filtering: you can select this checkbox to enable Port Filtering function. Port Range: the port range that you want to filter. Protocol: choose which particular protocol type should be filtered. Here you can choose UDP/TCP/Both. Comment: describe the reason why you want to filter these ports. -
Page 103: Url Filtering
Comment: describe the reason why you want to filter the MAC address. Just few words are saved there usually. Current MAC Filter List: this table will list the detailed information about the MAC address that will be filtered. 4.8.4 URL Filtering Enable URL Filtering: you can select this checkbox to enable URL filtering function. -
Page 104: Port Forwarding
4.8.5 Port Forwarding Enable Port Forwarding: you can select this checkbox to enable Port Forwarding function. IP Address: enter the Port’s IP address. Protocol: choose which particular protocol type should be forwarding. Here you can choose Both/UDP/TCP. Port Range: set the range that the port forward to. Comment: describe the reason why you want to use port forward function. -
Page 105: Management
4.9 Management 4.9.1 DDNS DDNS means Dynamic Domain Name System. The ISP often provides you with a dynamic IP address when you connect to the Internet via your ISP. It means that the public IP address assigned to your router changes each time you access the Internet. Before you use the Dynamic DNS feature, you have to apply for free DDNS service to the DDNS service providers. -
Page 106: Denial-Of-Service
You can specify the device’s time zone according to GMT (Greenwich Mean Time) or copy computer time as the current time only by clicking the Copy Computer Time button. Time Zone Select: Select the Time Zone where the router is located. Enable NTP client update: NTP means Network Time Protocol which is used to make the computer’s time synchronized with its server or clock source, such as Quartz and GPS. -
Page 107: Upgrade Firmware
4.9.4 Upgrade Firmware This page allows you to upgrade the Access Point firmware to new version. Please note: DO NOT power off the device during the upload because it may crash the system. 4.9.5 Reload Factory Settings This page allows you to save current settings to a file or reload the settings from the file which was saved previously. -
Page 108: Password
4.9.6 Password User Name: type in the name that you use to login the web interface of the router. New Password: new password is used for administrator authentication. Confirm Password: new password should be re-entered to verify its accuracy. Note: password length is 8 characters maximum, characters after the 8 position will be truncated. - Page 109 Table of Contents 1. ABOUT THIS GUIDE ........................3 1.1 Navigation of the User’s Guide ......................3 2. PRODUCT OVERVIEW ......................3 2.1 Introduction ............................3 2.2 Features ..............................3 2.3 Panel Layout ............................4 2.3.1 Front Panel ................................ 4 2.3.2 Rear Panel .................................
- Page 110 4.8.2 Port Filtering..............................29 4.8.3 MAC Filtering ..............................29 4.8.4 URL Filtering ..............................30 4.8.5 Port Forwarding ............................... 31 4.8.6 DMZ ................................31 4.9 Management ............................32 4.9.1 DDNS ................................32 4.9.2 Time Zone Setting ............................32 4.9.3 Denial-of-Service ............................33 4.9.4 Upgrade Firmware ............................
-
Page 111: About This Guide
1. ABOUT THIS GUIDE Thank you very much for purchasing the wireless N router. This guide will introduce the features of this router and tell you how to connect, use and configure the router to access Internet. Please follow the instructions in this guide to avoid affecting the router’s performance by improper operation. -
Page 112: Panel Layout
2.3 Panel Layout 2.3.1 Front Panel The front panel of this router consists of 8 LEDs, which is designed to indicate connection status. POWER This indicator lights blue when the router powered on, otherwise it is off. This indicator blinks blue when router powered on. This indicator blinks blue when there are wireless devices connected and WLAN transmitting data to the router. -
Page 113: Hardware Installation
The Power socket is where you will connect the power adapter. DC IN This port is where you will connect with the cable to access Internet. This port connects the router to local PC. 1/2/3/4 LAN Press for about 2~3 seconds, the system LED indicator keep solid light, it RST-WPS means WPS working, while press for about 10 seconds, all LEDs blinks Button... -
Page 114: Set Up The Computer
Power, WPS, LAN, WLAN and WAN port LEDs of the WLAN Router will light up indicating a normal status. 2. When the WAN Port is connected to Internet successfully, the WAN LED will light up. 3. When the LAN Port is connected to the computer system, the LAN LED will light up. 3.3 Set up the Computer The default IP address of the router is 192.168.1.1, the default Subnet Mask is 255.255.255.0. -
Page 115: Connecting To Internet
Figure 3-2 Failure Ping command If the result displayed is similar to the figure 3-2, it means that your PC has not connected to the router successfully. Please check it following below steps: 1. Is the connection between your PC and the router correct? If correct, the LAN port on the router and LED on your PC’s adapter should be lit. - Page 116 Enter admin for User Name and Password, both in lower case letters. Then click OK button or press Enter key. Now you will get into the web interface of the device. The Main screen will appear. Note: If the above screen does not prompt, it means that your web-browser has been set to using a proxy.
-
Page 117: Changing Password
4.2 Changing Password Now, we recommend that you change the password to protect the security of your router. Please go to Management—Password to change the password required to log in your router. User Name: type in the name that you use to login the web interface of the router. New Password: new password is used for administrator authentication. -
Page 118: Operation Mode
4.4 Operation Mode This parameter specifies the operating network modes for the Router. This router provides three modes: Gateway, Repeater Bridge and Repeater WISP. You could refer to the following description to choose the right one. -
Page 119: Network
1. Gateway In this mode, the device connects to the internet via an ADSL/Cable Modem. NAT is enabled and PCs on LAN ports share the same IP Address to the ISP via the WAN port. The connection type can be setup on the WAN page using PPPOE, DHCP client or static 2. -
Page 120: Wan Interface
4.5.1 WAN Interface This part allows you to configure the WAN port parameters so that your computer can access Internet. Enable UPnP: the UPnP (Universal Plug and play) protocol is supported to bring to network connected devices the ease of installation and configuration which is already available for directly connected PC peripherals with the existing Windows “Plug and Play”... -
Page 121: Static Ip
IPv6 packets to pass through a NAT router. Clone MAC Address: MAC address is the physical address of your computer’s network card. Generally, every network card has one unique Mac address. Since many ISPs only allow one computer in LAN to access Internet, users can enable this function to make more computers surf Internet. -
Page 122: Pppoe
choose this mode, you will get a dynamic IP address from your ISP automatically. Host Name: the name of your computer, online neighbors will identify the computer according to the name. MTU: it means Max Transmit Unit for packet. When using slow links, large packets can cause some delays thereby increasing lag and latency. -
Page 123: Lan Interface
User Name/Password: enter the User Name and Password provided by your ISP. Service Name (AC): this is optional. It describes the service name your ISP provided to you. Generally, leaving these fields blank will work. DNS: Domain Name System. If you select Set DNS Manually, you will have to type in the DNS address by yourself. - Page 124 IP Address: This is the IP addresses to be represented by the LAN (including WLAN) interface that is connected to the internal network. This IP will be used for the routing of the internal network (it will be the Gateway IP for all the devices connected on the internal network).
-
Page 125: Static Dhcp Settings
4.5.3 Static DHCP Settings It allows you to reserve IP addresses and assign the same IP address to the network device with the specified MAC address any time it requests an IP address. 4.5.4 VLAN Settings VLAN (Virtual Local Area Network) provides you a very convenient way to manage hosts by grouping them based on the physical port. -
Page 126: Wireless Setting
Ethernet/Wireless: specifies the WAN port and wireless AP. WAN/LAN: defines the WAN port or LAN port. Forwarding Rule: VLAN feature also support forwarding rule as bridge and NAT between LAN port and WAN port. Tag: The router will add specific VLAN number to all packets on the LAN while sending them out. - Page 127 unauthorized access. Encryption: This router supports WEP, WPA, WPA2, WPA-Mixed security options. Please select one according to the Access Point security policy. 1) WEP WEP (Wired Equivalent Privacy) is based on the IEEE 802.11 standard and uses the RC4 encryption algorithm. Enabling WEP allows you to increase security by encryption data being transferred over your wireless network.
-
Page 128: Multiple Ssid
Encryption Key: Please refer to Key Length to set this parameter. 2) WPA/WPA2 Wi-Fi Protected Access (WPA) is the most dominating security mechanism in industry. It is separated into two categories: WPA-personal and WPA-Enterprise, it is the current most secure method of wireless security and required for 802.11n performance. TKIP--Temporal Key Integrity Protocol is one cipher for data encryption supported by WPA. -
Page 129: Wireless Repeater
By default, it is disabled. You should select Enable and the configuration parameters will appear. The encryption please refer to 4.6.2 Wireless AP 4.6.4 Wireless Repeater You can setup wireless security in this page. It is very practical for protecting your private information. -
Page 130: Advanced Settings
Please click Site Survey button to search for any Access Point. Then they will be showed in the form. Utility will search for wireless networks in range on all the supported channels while device is operating in Access Point mode. If any Access Point is found, you could choose to connect it manually when client mode is enabled. - Page 131 Band: This option allows you to choose the radio standard for operation of your Router. 802.11b and 802.11g are old 2.4GHz mode, while 802.11n is the latest standard based on faster Orthogonal Frequency Division Multiplexing (OFDM) modulation. Channel Width: This is the spectral width of the radio channel. Supported wireless channel spectrum widths: 20MHz is the standard channel spectrum width.
-
Page 132: Wireless Wds Settings
device’s wireless performance and is also power-saving for client side. If this value set lower than 100ms, it will speed up the wireless client connection. Preamble Type: this option is to define the length of the sync field in an 802.11 packet. Most modern wireless network uses shot preamble with 56 bit sync filed instead of long preamble with 128 bit sync filed. -
Page 133: Wireless Wps Settings
Enable WDS: by default, you can’t select the checkbox to enable WDS. MAC Address: the other AP’s MAC Address that you want to communicate with. Comment: describes the reason why you want to communicate with others. The WDS Security Setup allows you to set encryption for your WDS connection. You can refer to the Wireless Security Setup. -
Page 134: Access Control
Client PIN Number: please input the PIN code specified in wireless client you wish to connect, and click Start PIN button. The WPS LED on the router will blink fast when WPS is in progress. It will return to normal condition after two minutes. (You need to setup WPS within two minutes) 4.6.8 Access Control By default, Wireless Access Control Mode is disabled. -
Page 135: Firewall
4.7 QoS QoS means Quality of Service. Deploying QoS management to guarantee that all applications receive the service levels required and sufficient bandwidth to meet performance expectations is indeed one important aspect of modern enterprise network. 4.8 Firewall The firewall of this router helps to protect you local network against attack from unauthorized outsiders. -
Page 136: Ip Filtering
Internet. Furthermore, it can filter out specific packets that trigger the router to build an unwanted outgoing connection. 4.8.1 IP Filtering Enable IP filtering: you can select this checkbox to enable IP Filtering function. Local IP Address: the IP address that you want to filter. Comment: describe the reason why you want to filter the IP address. -
Page 137: Port Filtering
4.8.2 Port Filtering Enable Port Filtering: you can select this checkbox to enable Port Filtering function. Port Range: the port range that you want to filter. Protocol: choose which particular protocol type should be filtered. Here you can choose UDP/TCP/Both. Comment: describe the reason why you want to filter these ports. -
Page 138: Url Filtering
Comment: describe the reason why you want to filter the MAC address. Just few words are saved there usually. Current MAC Filter List: this table will list the detailed information about the MAC address that will be filtered. 4.8.4 URL Filtering Enable URL Filtering: you can select this checkbox to enable URL filtering function. -
Page 139: Port Forwarding
4.8.5 Port Forwarding Enable Port Forwarding: you can select this checkbox to enable Port Forwarding function. IP Address: enter the Port’s IP address. Protocol: choose which particular protocol type should be forwarding. Here you can choose Both/UDP/TCP. Port Range: set the range that the port forward to. Comment: describe the reason why you want to use port forward function. -
Page 140: Management
4.9 Management 4.9.1 DDNS DDNS means Dynamic Domain Name System. The ISP often provides you with a dynamic IP address when you connect to the Internet via your ISP. It means that the public IP address assigned to your router changes each time you access the Internet. Before you use the Dynamic DNS feature, you have to apply for free DDNS service to the DDNS service providers. -
Page 141: Denial-Of-Service
You can specify the device’s time zone according to GMT (Greenwich Mean Time) or copy computer time as the current time only by clicking the Copy Computer Time button. Time Zone Select: Select the Time Zone where the router is located. Enable NTP client update: NTP means Network Time Protocol which is used to make the computer’s time synchronized with its server or clock source, such as Quartz and GPS. -
Page 142: Upgrade Firmware
4.9.4 Upgrade Firmware This page allows you to upgrade the Access Point firmware to new version. Please note: DO NOT power off the device during the upload because it may crash the system. 4.9.5 Reload Factory Settings This page allows you to save current settings to a file or reload the settings from the file which was saved previously. -
Page 143: Password
4.9.6 Password User Name: type in the name that you use to login the web interface of the router. New Password: new password is used for administrator authentication. Confirm Password: new password should be re-entered to verify its accuracy. Note: password length is 8 characters maximum, characters after the 8 position will be truncated.
Need help?
Do you have a question about the wireless N router and is the answer not in the manual?
Questions and answers