
Related Manuals for WMF 1300 Series


Summary of Contents for WMF 1300 Series
-
Page 1: User Manual
coffee wakes up the world User Manual Coffee machine North America English 01.01.001 Model Series 1300 Order number 33 2495 3000 Edition 09.2009... -
Page 2: Safety Warnings
Introduction and General information Safety Warnings The lightning flash with arrowhead symbol, within an equilateral triangle, is intended to alert the user to the presence of uninsulated “dangerous voltage” within the product’s enclosure that may be of sufficient magnitude to constitute a risk of fire or electric shock to persons. -
Page 3: Safety Warning Signs
Introduction and General information Safety Warning Signs For a detailed description of the warnings, see the “Safety” chapter 9.1. NotiCe CaUtioN Hazard to the machine. Hazard to the user. Read and understand user manual before using this See chapter 9.1: Safety. machine. - Page 4 Introduction and General information Congratulations on the purchase of your WMF coffee machine You will be impressed by the machine's technical design, long service life, economy, and especially by the quality of the coffee it produces. CaUtioN The WMF 1300 coffee machine is a fully automatic single read and cup machine for espresso, café...
-
Page 5: Table Of Contents
Table of Contents Safety Warnings . . . . . . . . . . . . . . . . . . . . . . . . . . . . . . . . . . . . . . . . . . . . . . . . . . . . . . . . . . . . Safety Warning Signs . - Page 6 Table of Contents 3 .3 .3 Care . . . . . . . . . . . . . . . . . . . . . . . . . . . . . . . . . . . . . . . . . . . . . . . . . . . . . . . . . . . . . . . . . . . . . . . Cleaning program .
- Page 7 Table of Contents 5 .1 .3 Mixer rinsing . . . . . . . . . . . . . . . . . . . . . . . . . . . . . . . . . . . . . . . . . . . . . . . . . . . . . . . . . . . . . . . . 5 .1 .4 Combi spout cleaning .
-
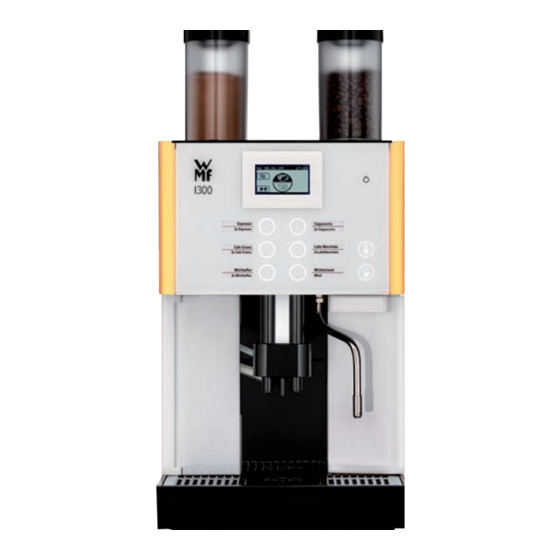
Page 8: Chapter 1 Introduction
Introduction and General information Chapter 1 introduction Parts of the coffee machine 0 8 . 0 4 . 2 0 0 9 0 8 : 1 6 0 8 . 0 4 . 2 0 0 9 0 8 : 1 6 Display with one button level User Manual WMF 1300... -
Page 9: User Manual Wmf
Introduction and General information Bean hopper (optional 1 or 2) Manual insert / Tablet insert Choc hopper / Topping hopper (optional) Touch-screen display Beverage buttons Height-adjustable combi spout with integrated milk foamer Cover Grounds container Removable drip tray with drip grid ON / OFF button Steam button (optional) or Decaf button (optional) Hot water button... -
Page 10: User Manual Signs And Symbols
Introduction and General information User Manual Signs and Symbols Cross reference instruction 0 8 . 0 4 . 2 0 0 9 0 8 : 1 6 Start position Main menu Ready to operate display If the menu symbol is shown in this user manual, the description starts at the start position. -
Page 11: Glossary
Introduction and General information glossary Term Explanation • • Listings, selection options Individual steps ™ ™ Description of coffee machine state and / or explanations of Text in italics automatic steps. Seconds Minutes Barista Professional coffee server Beverage dispensing Dispensing coffee, hot water or Choc beverages For example performance of the water filter in litres of water Capacity it can filter... -
Page 12: Chapter 2 Operation
Operation Chapter 2 operation A display-guided installation program takes care of initial start-up after delivery from the factory. Initial start-up w Installation instruction Switch on coffee machine PIN protection w Software ™ Press ON / OFF button and hold for 2 seconds w Settings Coffee machine switches on and heats up. -
Page 13: Milk Or Milk Foam (Optional)
Operation Milk or milk foam (optional) 2.4.1 Dispense milk or milk foam Press the beverage button assigned to milk or milk foam ™ Dispensing occurs. Dispensing continues for as long as the button is held. 2.4.2 Connect up the milk Use a suitable milk nozzle. -
Page 14: Dispensing Hot Water
Operation Dispensing hot water ™ Press the hot water button Dispensing occurs. If less water is required than the pre-set dispense amount, dispensing can be stopped by pressing the button again. Dispensing steam (optional) Press the steam button ™ Steam is dispensed for as long as the button is held CaUtioN pressed. -
Page 15: Height Adjustment Of The Combi Spout
Operation Height adjustment of the combi spout The combi spout height is adjustable. Take hold of the combi spout from the front and push ™ to the desired height Adjustment height: 1.97 - 7.48 inch (50 - 180 mm) Bean hopper / product hopper If possible, replenish product hopper in advance. -
Page 16: Grounds Container
Operation Preparation of coffee grounds using the manual insert Open manual insert lid ™ Insert coffee grounds (max. 0.035 lbs / 16 g) ™ Close manual insert lid ™ Press desired beverage button ™ For beverages on level two, touch the toggle button before opening the manual insert lid. -
Page 17: Drip Tray
Operation 2.12 Drip tray For coffee machines without a drain connection, the drip tray must be emptied regularly. Pull out the drip tray carefully and empty it, then ™ replace the drip tray On coffee machines with a drain connection the drip tray CaUtioN may also be removed (e.g. -
Page 18: Chapter 3 Software
Software Chapter 3 Software an overview ready to operate Touch clear area on the ready to operate display. Additional pads 0 8 . 0 4 . 2 0 0 9 0 8 : 1 6 are activated. There are various options for the ready to operate display. 0 8 . - Page 19 Software Main menu functions (pads) Chapter 3.3 Milk and foam Chapter 3.3.1 Timer program Chapter 3.3.2 Care Chapter 3.3.3 Settings Chapter 3.3.4 PIN entry Chapter 3.3.5 PIN access control Chapter 3.3.6 Accounting Chapter 3.3.7 Menu control pads Save settings start Start or confirm a step continue Back to the higher menu level...
-
Page 20: Ready To Operate
Software ready to operate 3.2.1 Warm rinsing Recommended after a longer brewing pause, especially before dispensing a cup of espresso. ™ Touch the warm rinse pad Warm rinse pad (active / inactive) The pipes are rinsed with hot water begins. The water w Settings w Operating options warms the brewing system and guarantees an optimum page 34... -
Page 21: Information
Software 3.2.5 information Touch pad on the ready to operate display ™ The Information menu appears. The main “Information" menu contains the following selection options: Service i n f o r m a t i o n s e r v i c e • Contact (address of WMF service location) c u s t o m e r c a r e •... -
Page 22: Main Menu
Software Main menu m a i n m e n u Other illustrations of the main menu for protected levels w PIN access control page 36. 3.3.1 Milk and foam Milk foam quality The milk foam quality is set here. This setting will apply to all beverages with milk foam. -
Page 23: Timer State
Software timer state ™ Touch the timer status Activate / deactivate timer = On / Off. timer status When the timer is activated, the timer symbol, a little clock, appears on the display. Set timer ™ Touch the timeradjustment Program the switch on and switch off times. timeradjustment operating time Touch the... -
Page 24: Copy Day
Software Copy day In day 1-5 or day 1-7, the switching times are copied to the indicated days. Any day may be copied to other days, complete with its switch times / events. The individual days 1,2,3 ... 7 are displayed. -
Page 25: Delete Timer
Software Delete timer ™ Touch on page 2 of the timer main program menu delete timer delete timer Scroll to desired day and touch to select ™ Besides individual days, “all workdays” or the entire week can also be deleted. A security dialogue now appears querying whether This action cannot be undone. -
Page 26: Cleaning Program
Software Cleaning program ™ Touch the cleaning prog. The daily cleaning program starts. cleaning prog. The program automatically executes foamer cleaning if milk beverages have been dispensed. Mixer rinsing follows for the WMF 1300 with mixer system. The cleaning program sequence is described in cleaning instruction. -
Page 27: Descaling
Software Descaling The water hardness, the water flow, and whether a tank filter is used determine the schedule for descaling. This descaling point in time is calculated by the WMF 1300 and displayed. Descaling is in three stages. • Preparation •... -
Page 28: Descaling Machine With Constant Water Supply
Software Descaling Descaling begins. This part of the routine takes about 13 min. On completion of descaling, carefully empty the ™ Order numbers of the article collection container w Appendix C Replace the water tank ™ Accessories and spare parts page 67 Empty remaining descaling solution from water tank ™... -
Page 29: Filter Change
Software Descaling Insert the water tank filled with descaling solution, and ™ confirm on the display Descaling begins. This part of the routine takes about 13 min. Remove water tank and empty out remaining descaling ™ solution ™ Rinse water tank and fill to maximum with cold water Replace the water tank ™... -
Page 30: Rinse Filter
Software rinse filter The Filter rinse option enables water system and filter rinsing and bleeding following long intervals in operation. filter rinsing Touch the filter rinsing ™ Hot water runs out of the hot water spout during this CaUtioN process. Scald hazard. -
Page 31: Selecting The Beverage Button When Setting
Software Selecting the beverage button when setting = more ™ Press the desired beverage button = less = exit without change Selecting the beverage button on the 2nd Level = save the values Touch the toggle pad ™ = start test Press the desired beverage button ™... -
Page 32: Button Allocation
Software Coffee beverages c h o c i a t t o q u a l i t y l e v e l Quality The five available quality levels affect the coffee brew. Q u a l i t y 4 The higher the quality level, the more intensive the release Quality of the flavor and aromatic substances in the coffee. -
Page 33: Weigh Grounds
Software Weigh grounds Empty and replace coffee grounds container ™ Touch the weigh grounds ™ The process dispenses ground coffee directly into the grounds container and the grounds may then be weighed. The grind quantity is dispensed three times. Boiler temperatur ™... -
Page 34: Water Hardness / Capacity
Software Water hardness / capacity On plumbed coffee machines with a constant water supply (without anti-scale filter, optional), and coffee machines Water hardness: with a water tank, the water hardness (carbonate hardness) is set here. With fitted filter and constant water supply. Filter capacity is set here. -
Page 35: Illumination
Software oN / oFF button w PIN rights access control Recommendation for self-service: via PIN. Page 36 If “via PIN“ is set, then the PIN for the cleaning level will be queried before switching on or off. Menu pad w Access main menu Recommendation for self-service: delayed. -
Page 36: Pin Rights Access Control
Software 3.3.6 PiN rights access control If a PIN has been assigned for a particular access level, no access will be granted without a PIN. Cleaning level m a i n m e n u On entering the valid PIN, access to: = Setting the milk foam quality = Timer program (read only) Cleaning level access... -
Page 37: Delete Pin
Software A PIN may be assigned to any level. Example: a c c e s s - c o n t r o l The levels are hierarchical. a c c o u n t i n g Example: The PIN for the level is valid for setting s e t t i n g... -
Page 38: Chapter 4 Other Settings
Other settings Chapter 4 other settings Mechanical settings 4.1.1 Set grinding degree ™ Remove bean hopper Preset grinding degree is now visible. Release coffee dispenser and wait until grinder starts up ™ With grinder running, alter grind fineness as desired on ™... -
Page 39: Chapter 5 Care
Care Chapter 5 Care Regular cleaning is essential in order to ensure problem-free operation of the coffee machine and to ensure optimum coffee quality. If the machine has been or will be shut off for several CaUtioN days, perform all cleanings. Health hazard. -
Page 40: Cleaning Intervals Overview
Care Cleaning intervals overview Care O Foamer rinsing w Cleaning instruction Cleaning program O Foamer cleaning O Mixer rinsing Combi spout cleaning, standard O Combi spout cleaning, Plug&Clean w General cleaning Coffee grounds container cleaning Drip tray cleaning Housing cleaning w Weekly cleaning Brewing unit cleaning (x) x... -
Page 41: Daily Cleaning
Care Daily cleaning For all cleaning procedures CaUtioN See the step for step instructions in the Cleaning irritation and scald hazard. instructions. Hot steam. Follow the Manual. Observe the Safety instructions. Hot liquids. Do not reach under 5.1.1 Cleaning program the spouts during cleaning. -
Page 42: Plug&Clean
Care Plug&Clean Cleaning of the Plug&Clean is in three parts. • Automatic foamer rinsing for a maximum of 3 minutes after each beverage with milk or milk foam • Display-guided milk system rinsing once per week • , lay combi spout, milk hose and milk Plug&Clean cleaning program nozzles in a cleaning solution w Cleaning instruction... -
Page 43: Weekly Cleaning
Care Weekly cleaning 5.2.1 Cleaning the brewing unit CaUtioN ™ Switch off coffee machine using the ON / OFF button Bruising or crushing hazard. Disconnect mains plug ™ Work carefully. Push combi spout fully upwards ™ Follow the Remove grounds container towards the front of the ™... -
Page 44: Choc / Topping Mixer Cleaning (Optional)
Care ™ Dry the brewing unit with a cloth Allow to dry completely before reinstalling in the coffee machine. Remove coffee ground residues in the chute. Wipe out the coffee grounds towards the front or suck ™ out using a vacuum cleaner Refit the brewing unit after it has been dried. -
Page 45: Water Tank Cleaning
Care The propeller for the mixer is now visible and can be ™ cleaned with a cloth Dismantle two-piece mixer bowl ™ Clean both parts of mixer bowl and mixer hose under ™ warm running water Allow all parts to dry completely ™... -
Page 46: Regular Cleaning
Care regular cleaning 5.3.1 Bean hopper cleaning The bean hoppers should be cleaned as required and at regular intervals (at least monthly). Switch off coffee machine using the ON / OFF button ™ Disconnect mains plug ™ Release bean hopper lock using multitool by turning in ™... -
Page 47: Steam Outlet Cleaning
Care ™ Thoroughly wipe out hopper with a damp cloth Thoroughly clean individual dosing auger components ™ Allow product hopper and individual components to dry ™ completely Re-assemble and insert the dosing auger and screw on ™ union screws Portion controller with individual parts, dosing auger Ensure correct orientation of discharge. -
Page 48: Chapter 6 Haccp Schedule
HACCP schedule Chapter 6 HaCCP schedule You are required by law to ensure that your customers are not subject to any health risks as a consequence of “Food Hygiene Ordinance from 05.08.1997“ consumption of food items you serve. A HACCP schedule (Hazard Analysis Critical Control Points) for risk identification and assessment is required. -
Page 49: Recommendation For Choc And Topping (Optional)
HACCP schedule Keep milk cool At commencement of operation milk should be • Always have a new pre-refrigerated milk pack handy. at approx. 35-41 °F (2-5 °C). • If a pre-refrigerated freshly opened pack is used within WMF AG offers a range a period not exceeding 3 hours, refrigeration during use of refrigeration options is not necessary. -
Page 50: Chapter 7 Maintenance
Maintenance Chapter 7 Maintenance Please observe that this is a professional industrial coffee machine which needs regular maintenance and descaling. Timing of descaling is calculated by the machine and depends on the degree of hardness of the local mains water and whether or not a filter is fitted. Descaling The maintenance schedule is based on the degree of use w Software chapter w Care... -
Page 51: Mixer Maintenance (Choc)
Maintenance Mixer maintenance (Choc) Maintenance every 6,000 Choc servings or every 2 years, whichever is sooner, may only be undertaken by trained personnel or by WMF Service. Mixer maintenance (topping) Maintenance every 18,000 Topping servings or every 2 years, whichever is sooner, may only be undertaken by trained personnel or by WMF Service. -
Page 52: Chapter 8 Messages And Instructions
Messages and instructions Chapter 8 Messages and instructions Messages for operation refill beans R e f i l l b e a n s Top up bean hopper (refer to display) ™ Check: ™ • Is the product hopper lock open? w Care •... -
Page 53: Error Messages And Malfunctions
Messages and instructions Coffee machines with water tank: C h a n g e f i l t e r Change filter Change filter within one week and confirm in the Care menu ™ Follow anti-scale filter instructions. Coffee machines with a constant water supply: C h a n g e f i l t e r Change filter Change filter within one week and confirm in the Care menu... - Page 54 Messages and instructions In many cases, this eliminates the malfunction and you can continue working. If this is not successful: Find the error message or error code in the following list and follow the sequence of actions indicated. If this does not rectify the fault or if the error indicated is not listed please call WMF Service.
- Page 55 Messages and instructions Error Error Action instruction display description Boiler Beverage dispensing temporarily blocked. overtemperature Check that mains tap is on or that the water tank is ™ filled and inserted correctly If still not OK: Switch off the coffee machine ™...
-
Page 56: Error Without Error Display
Messages and instructions error without error display Error pattern Action instruction No hot water output but water Clean hot water spout ™ in coffee grounds container Call WMF Service ™ (coffee dispensing possible) No Choc dispensing but water Do not use Choc ™... -
Page 57: Chapter 9 Safety
Safety Chapter 9 Safety Hazards to the operator At WMF, safety is one of the most essential product features. The effectiveness of safety devices can only be ensured if the following points are observed: WarNiNg • Read the User manuals carefully prior to use. Failure to follow •... -
Page 58: Hazards To The Coffee Machine
Safety Bruising or crushing hazard. CaUtioN There is a hazard of bruising or crushing when handling Bruising or all moving parts. Do not reach into the bean hopper or crushing hazard. the brewing unit opening when the coffee machine is Hazard of being injured. -
Page 59: Duties Of The Owner / Operator
Safety • We recommend damage prevention measures such as: - installation of a suitable water monitor in the mains water supply - installation of smoke alarms • After a company holiday we recommend running the cleaning mode at least twice before reusing the w Cleaning instruction machine. -
Page 60: Warranty Claims
Warranty The operator shall ensure that electrical equipment and operating facilities are in a fit state (in USA in accordance with NEC). In order to ensure the operating safety of your coffee machine, it is essential to perform regular checks of the safety valves and the pressure containerss, among other checks. -
Page 61: No Warranty Is Provided
Warranty No warranty is provided: • On any parts subject to natural wear and tear. This includes seals, mixers, and brewing unit, among other items. • For malfunctions due to the effect of the weather, scale build-up, chemical, electrochemical or electrical effects, unless attributable to a fault on the part of WMF. -
Page 62: Appendix A: Overview Of Additional Instructions
Appendix: Additional instructions appendix a: overview of additional instructions User Manual WMF 1300... - Page 63 Appendix: Additional instructions User Manual WMF 1300...
-
Page 64: Appendix B: Technical Data
Appendix: Technical data appendix B: technical data technical data for coffee machine Nominal power rating * 1,9 kW Recommended daily capacity 60-80 cups Espresso, Café Crème Overall hot water output 2 US gal. (10 l) per day Coffee bean hopper 1.1 lbs (500 g) per load (2.2 lbs (1000 g) optional) Choc hopper / Topping hopper approx. - Page 65 Appendix: Technical data Mains voltage 120 V + 6 % - 10 %, tolerance range Mains voltage interruption < 50 ms: no interruption of function Conector NEMA 5-20 Water supply 3 / 8 inch MIP hose connector with main valve, and filter with (Constant water 0.2 to 0.25 mm mesh size, on site.
- Page 66 User Manual WMF 1300...
-
Page 67: Appendix C: Accessories And Spare Parts
Appendix: Accessories and spare parts appendix C: accessories and spare parts User Manual WMF 1300... - Page 68 Appendix: Accessories and spare parts User Manual WMF 1300...
-
Page 69: Index
Index index Cooler adapter 13 Copy day 24 Countertop cooler 49 Cover 9 2. Level 34 Cup&Cool 13 Cup volumes 31 Customer care 21, 25, 39 Customer Check-up 30, 50 Access control 36 Customer check-up message 53 Access Main Menu 20 Accessories and spare parts 67 Accounting level 36 Accounting numbers of beverages 37... - Page 70 Index Mixer Maintenance 51 Mixer rinsing 26, 42 HACCP schedule 48 Mixer system 11 Hazard to the coffee machine 58 Hazard to the operator 57 Height adjustment of the combi spout 15 Hose connector 65 Nominal power rating 64 Hot water button 9, 14 No warranty will be offered 61 Hot water dispensing 9, 14 Numbers of items 37...
- Page 71 Index Self-service 11 Timer program 22 Service 21 Timer state 23 Service center 51 Tips 52 Service maintenance message 53 Toggle switch 9, 20, 34 Set grinding degree 38 Topping 11 Set timer 23 Topping hopper 9 Setting 30 Touch-screen display 9 Setting level 36 Signs and Symbols 10 Software 18...
- Page 72 Your nearest WMF Service: © 2009 WMF AG All rights reserved, in particular duplication, distribution and translation rights. No part of this manual may be reproduced in any form or processed, duplicated or distributed using electronic systems without written consent. Design and production / typesetting and print presentation: TecDoc GmbH;...
Need help?
Do you have a question about the 1300 Series and is the answer not in the manual?
Questions and answers