Table of Contents
Advertisement
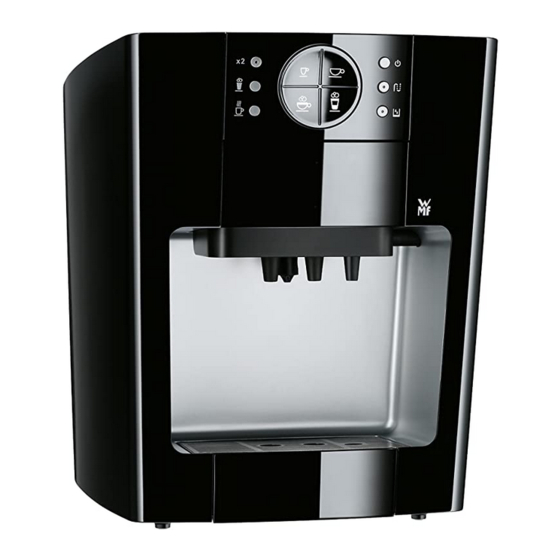
Legend for overview pictorial on the fl ip-open side
1 Locking button
2 Door
3 Water tank
4 Mains cable
5 WMF milk connector
5a Milk hose
5b Handle
5c Milk hose adapter
1
6 Drip tray with drip tray grid
7 Beverage dispenser with 4 spouts:
7a Hot water spout
7b Milk foaming steam nozzle
7c 2 coffee spouts
8 Pad cassette
Beverage buttons with
9
illuminated cross
10 Function keys
Operator control panel
The descriptions in this user manual are
always based on the assumption that
coffee pad machine is ready to operate.
Advertisement
Table of Contents

Related Manuals for WMF 10


Summary of Contents for WMF 10
- Page 1 8 Pad cassette Beverage buttons with 5b Handle illuminated cross 5c Milk hose adapter 10 Function keys Operator control panel The descriptions in this user manual are always based on the assumption that coffee pad machine is ready to operate.
- Page 2 An overview of the functions and indications The following functions are what makes The following signals are displayed: your WMF 10 coffee pad machine unique: fl ashes red Tank must be fi lled Illuminated cross Beverage buttons with illuminated cross (in the beverage fl...
-
Page 3: Before Starting
Coffee, latte macchiato or cappuccino - with the WMF 10, you can get your favourite hot drink by just pressing a button. Before starting Read this user manual before you start preparing the coffee. Only then you can use all the functions, operate your WMF 10 safely and treat yourself to a wonderful cup of coffee . -
Page 4: Table Of Contents
5.5.2 Setting the water hardness ....... . . 34 Preparing the WMF milk connector ......12 5.5.3 Descaling agent . -
Page 5: For Your Safety
The WMF 10 is designed for preparing quantities normal in private use and is unsuitable for commercial purposes. The WMF 10 is not intended for use in areas such as kitchens for employees, in shops, offi ces and other commercial areas, in agriculture, or for use by customers in hotels, motels, bed-and-breakfast hotels and other residential facilities. -
Page 6: Hazard Instructions
Switch off the electric supply and pull out the mains cable. > Do not connect a damaged mains cable and do not repair it yourself. > Entrust only qualifi ed technical personnel such as WMF After-sales Service with repairing the appliance or replacing the mains cable. - Page 7 For your safety Probable risk of burns or scalding due to hot components or steam and hot liquids! The spouts in the coffee dispenser become very hot during operation. You can get burnt if you touch the spouts. You can get scalded by hot beverages and steam that is discharged. >...
- Page 8 For your safety Possible material damage due to overfl owing drip tray! If you only infrequently drain the drip tray, it can overfl ow. It can possibly damage the delicate items in the surrounding area. > Drain the drip tray regularly and rinse after each use. >...
-
Page 9: Initial Setup
Supplied kit and optional accessories > Check the scope of supply for completeness. For effective cleaning of your WMF 10, you can additionally purchase the WMF 1 descaler and the WMF milk system cleaner from the specialist dealer or from the WMF store. Legend... -
Page 10: Installation And Connection
Initial setup Installation and connection > Unpack the coffee pad machine. Hazard! Risk of accidents for children at low installation height! If the height of installation is too low, children can reach into the device and may be injured by hot steam or water. -
Page 11: Fill The Water Tank And Insert The Water Fi Lter
Initial setup Fill the water tank and insert the water fi lter > To switch on the coffee pad machine, press the On-/Off-/C button. As long as the water tank is empty, the illuminated cross fl ashes red. Caution! Possible damage to your coffee pad machine with unsuitable liquids! Liquids other than drinking water can damage your coffee pad machine or result in clogging. - Page 12 Initial setup Depending on the quality of your tap water, you should insert the water fi lter from the scope of supply Inserting the water fi lter here (see “2.1 Supplied kit and optional accessories” on page 5). The water fi lter ensures a genuine coffee taste. It fi lters out chlorine and other impurities from the water. >...
-
Page 13: Rinsing For Fi Rst Time Of Use
Initial setup > Place the tank lid on the water tank. Filling the water tank > Pour cold tap water through the fi lling opening up to the maximum marking (5). When using the water tank, the tilting device (6) must be tilted forward. Inserting the water >... - Page 14 Initial setup > Press the cleaning button. In the beginning, the pump is somewhat louder than usual. During rinsing, the number of rinsing procedures required is determined electronically. If several rinsing procedures are necessary, they are interrupted every 45 seconds. The cleaning button fl ashes blue again. >...
-
Page 15: Operation
Operation Operation In this chapter, you can learn everything about the easy method of coffee preparation with the WMF 10 and how you can individually customise your WMF 10 - entirely according to your preference! Before the fi rst operation, you should have carried out the initial setup (see Chapter „2 Initial setup“... -
Page 16: Preparing The Wmf Milk Connector
To make milk foam for cappucino, latte macchiato or milk beverages, you have to insert the milk hose of the WMF milk connector in a vessel with milk. Milk is a very sensitive foodstuff. Always ensure cleanliness when using milk. Always keep the milk in a... -
Page 17: Coffee Preparation
Place the milk container on the right next to the appliance. > Insert the WMF milk connector until it comes to rest in the opening on the right-hand side. > Submerge the end of the milk hose in the milk. -
Page 18: Inserting The Coffee Pads
Operation 3.3.1 Inserting the coffee pads Use only commercial coffee pads with 7 cm outer diameter (coffee quantity approx. 7 g). Coffee pads with a smaller diameter do not make good coffee. Hard pads that are offered for the espresso machines and pads with additives for cappuccino or the like cannot be used. - Page 19 Operation The more carefully you insert the coffee pads, the better your coffee will be. Therefore, follow the instructions below: > Distribute the powder uniformly in the coffee pad up to the edge so that water cannot get past the 1 Inserting the coffee coffee pad.
-
Page 20: Inserting The Ground Coffee Cassette
Operation > When pushing in the pad cassette, ensure that the pad does not get displaced. Otherwise the seal Pad cassette sliding in does not close reliably. > Turn the locking knob in position as much as possible to the right, to fi rmly clamp the pads in the brewing system. -
Page 21: Preparing A Small And A Large Coffee
Operation However, you can also work without fi lter paper. If you need spare fi lter paper, you can get it from a specialist dealer or directly from WMF after-sales service. > Fill the coffee or espresso powder. The ground coffee cassette can contain 6 to 7.5 g of coffee, depending on the quality of the coffee, suffi... - Page 22 Operation > One cup Place a cup centrally below the two coffee spouts. > Wait until the illuminated cross glows white. > Press the button for large coffee or small coffee. The corresponding quantity is fi lled into the cup. Place the two cups close to one another below the two coffee spouts.
-
Page 23: Preparing Cappuccino And Latte Macchiato
Operation If you wish to set the cup volume to the maximum value, do not press the button again. The coffee dispensing stops automatically at the maximum quantity. The illuminated cross then fl ashes white 3 times to confi rm successful programming. The program is now fi... - Page 24 Operation With the Teach-In function, you can change the cup volumes according to your personal wishes. The Teach-In- milk foam and coffee proportions can be selected up to approx. 250 ml. independently of one another. programming For latte macchiato, you can use a glass 14 cm in height when you remove the drip tray with the tray grid.
-
Page 25: Milk Foam
Clean the ground coffee cassette under running water after use. > If you do not wish to use the milk foamer again immediately, carry out an express cleaning, as described in the Chapter “5.2.1 Express cleaning of the WMF easy clean” on page 25. Milk foam >... -
Page 26: Hot Water
If you do not wish to use the milk foamer again immediately, carry out an express cleaning, as described in the Chapter “5.2.1 Express cleaning of the WMF easy clean” on page 25. Stir the instant cocoa powder in fresh milk directly in the milk container so that it is smooth and free of lumps. -
Page 27: Energy Saving Functions
Energy saving functions Energy saving functions Your coffee pad machine is equipped with several functions that reduce energy consumption. Sleep mode If you have not used the appliance for about 5 minutes, sleep mode is activated automatically. The illuminated cross then fl ashes red slowly. >... -
Page 28: Caring For The Coffee Pad Machine
- immediately after preparing beverages with milk, if Cleaning the milk foamer the milk foamer is not used immediately once again (Express cleaning WMF easy clean) - at the latest, while switching off. Manual basic cleaning of - daily after the last milk foaming 5.4.1... -
Page 29: Clean The Milk Foamer
Briefl y press the cleaning button to start the express cleaning. Water is sucked in through the milk foamer and rinses it. > To support the cleaning operation, you can repeatedly rotate and push the WMF milk connector back and forth at the handle. 5.2.2... -
Page 30: Rinsing
Caring for the coffee pad machine. You can then carry out an express cleaning. However, if the milk residues are already dry, then the only possibility is manual cleaning, as described in Chapter “5.4.1 Milk foamer” on page 29 ff. Rinsing Rinse the appliance if it has not been used for several days. -
Page 31: Manual Cleaning
Caring for the coffee pad machine. > Switch on the appliance with the On/Off/C-button. > Immediately after switching on, keep the cleaning button pressed down (3 to 4 seconds) until the pump starts. The entire heating system is rinsed. Water is then sucked out of the collecting vessel through the milk foamer. - Page 32 Caring for the coffee pad machine. > Only wipe the housing from the outside with a moist cloth. Do not use any sharp or scouring cleaners; Cleaning machine they would damage the surface. housing > Empty the drip tray regularly to avoid overfl owing. Drip tray emptying >...
-
Page 33: Milk Foamer
To sustain the functioning of the milk foamer, the parts carrying milk should be put at least once a week in the WMF milk system cleaner. Pour one dosing cap (20 ml) in 1/4 litres of water. Soak the milk-carrying... - Page 34 Caring for the coffee pad machine. > Additionally, clean the steam nozzle once a month (see Chapter “5.4.4 Steam nozzle” on page 32 ff.), before you reassemble the parts of the milk foamer. Installing parts after > Insert the mixer (4) with the milk foaming nozzle (3) from below until it comes to a stop at the steam cleaning outlet (7).
-
Page 35: Coffee Spout Cassette With Sieve Insert
Caring for the coffee pad machine. 5.4.2 Coffee spout cassette with sieve insert Even with small deposits in the sieve insert (2), the quality of the cream is signifi cantly degraded. In the case of limescale residues due to very hard tap water, this could arise even after only 100 cups. >... -
Page 36: Pad Cassette And Ground Coffee Cassette
Caring for the coffee pad machine. 5.4.3 Pad cassette and ground coffee cassette > Remove the coffee pads and the ground coffee cassette after use from the pad cassette. > Remove the ground coffee from the ground coffee cassette. > Clean the ground coffee cassette under running water. -
Page 37: Descaling
fl ashes. Depending on the coffee consumption and water hardness, you will be prompted to descale even after 4 to 10 weeks. After the descaling button has fl ashed once, the appliance will be blocked after 50 more beverage preparations. -
Page 38: Setting The Water Hardness
The illuminated cross briefl y fl ashes white 3 times to confi rm the successful programming. > Do not stop for more than 10 seconds when setting the water hardness. Otherwise, the appliance automatically switches into the Off state and retains the originally set value. -
Page 39: Descaling Agent
You can check the setting at any time by repeating the fi rst step of the setting. 5.5.3 Descaling agent The automatic descaling program of your coffee pad machine is optimised for using the 125 ml WMF 1 descaling agent. >... -
Page 40: Applying The Descaling Program
Caring for the coffee pad machine. Caution! Damage to the appliance from unsuitable descaling agents! If you use acetic acid or acetic acid essence, materials in the appliance can be damaged by it. Citric acid does not enable complete descaling. Warranty claims will be voided in case of damage that results from using an unsuitable descaling agent or not following the descaling specifi... - Page 41 Caring for the coffee pad machine. > Take out the water fi lter from the water tank and place the steam nozzle in place of the water fi lter. > Put on the suction cap fi rmly back on again. >...
- Page 42 Caring for the coffee pad machine. After the second rinsing, the appliance automatically goes into the Off state. > Turn the locking knob back to the home position , as soon as the discharge is over. > Remove the steam nozzle from the water tank. >...
-
Page 43: Measures For Problem Rectifi Cation
Measures for problem rectifi cation Measures for problem rectifi cation Problem Rectifi cation measure Water tank cannot Water tank rocker not in removal position? be put in place > Tilt the water tank rocker outwards until it snaps into place in the draining position. After rinsing, when >... - Page 44 Measures for problem rectifi cation Problem Rectifi cation measure Pumps are very noisy Suction cap not mounted correctly? > Check that the suction cap at the bottom of the water tank is fi rmly seated. Even if you do not use a water fi lter, the suction cap must be installed fi rmly in place. Pad cassette cannot Coffee pad not correctly inserted? be locked...
- Page 45 Measures for problem rectifi cation Problem Rectifi cation measure No water fl ows Water tank empty? > Fill the water tank with cold water. Suction cap not mounted correctly? > Check that the suction cap is fi rmly seated at the bottom of the water tank. Even if you do not use a water fi...
- Page 46 Measures for problem rectifi cation Problem Rectifi cation measure Coffee has no cream The optimum quality of the cream is not achieved until you have used your coffee pad machine a few times. Sieve insert calcifi ed? > In this context, see Chapter “5.4.2 Coffee spout cassette with sieve insert” on page 31 . >...
- Page 47 Milk foam has large bubbles > Check whether the steam nozzle is fi rmly screwed into the steam outlet. > Clean the milk foamer. The WMF milk system cleaner supports the cleaning. > Remove the impurities in the air channel of the milk hose adapter.
- Page 48 Measures for problem rectifi cation Problem Rectifi cation measure The locking knob is blocked The opening in the middle of the pad cassette is blocked. and no coffee comes out > Pull the mains plug and let the appliance cool for an hour. If the blockage has still not dissolved there is an option of an emergency opening: You need an offi...
-
Page 49: Transportation And Disposal
The appliance is subject to the Directive on Waste Electrical and Electronic Equipment (WEEE / EU-Directive) and may not be disposed off with domestic garbage. You can get further information from the nearest recycling depot or our WMF Service-Centre. -
Page 50: Technical Data
Technical data Technical data Rated voltage 220-240 V 50 Hz Power rating 1600 W Power draw in the Off state < 0.5 W Power draw in sleep mode: < 0.5 W Protection class: Free length of the connecting cable: Dimensions 261 x 331 x 326 mm Empty weight approx. -
Page 51: Warranty And Service, Index
Warranty and Service, Index Warranty and Service Do you have any queries about the use or operation of your WMF 10? Please contact your specialist dealer. Of course, in case of defects, your legal warranty entitlements are available to you in their entirety.
Need help?
Do you have a question about the 10 and is the answer not in the manual?
Questions and answers