WMF 1200 S User Manual
1200 series
Hide thumbs
Also See for 1200 S :
- User manual (100 pages) ,
- Service manual (17 pages) ,
- Operating & cleaning instructions (10 pages)

Related Manuals for WMF 1200 S


Summary of Contents for WMF 1200 S
-
Page 1: User Manual
coffee wakes up the world User Manual Coffee machine English 01.01.01 Model Series 1200 Order number 33 2603 0010 Edition 04.2012... - Page 2 Congratulations on the purchase of your WMF coffee machine The WMF 1200 S coffee machine is a fully automatic single Please read the User Manual prior to using the coffee machine. cup machine for espresso, café crème, cappuccino, milk Ensure that the staff has access to coffee, latte macchiato, milk foam and hot water.
-
Page 3: Table Of Contents
Table of Contents Chapter 1 Introduction Parts of the coffee machine User Manual Signs and Symbols Ready to operate Glossary Chapter 2 Start-up Unpacking Water tank 2.2.1 Insert WMF water filter (optional) ........11 2.2.2 Determine the water hardness . - Page 4 4.2.3 Ground coffee ............28 4.2.4 Milk foam volume .
- Page 5 Weekly cleaning 6.4.1 Choc / Topping mixer cleaning (optional) ....... . 46 6.4.2 Water tank cleaning (optional) .
-
Page 6: Chapter 1 Introduction
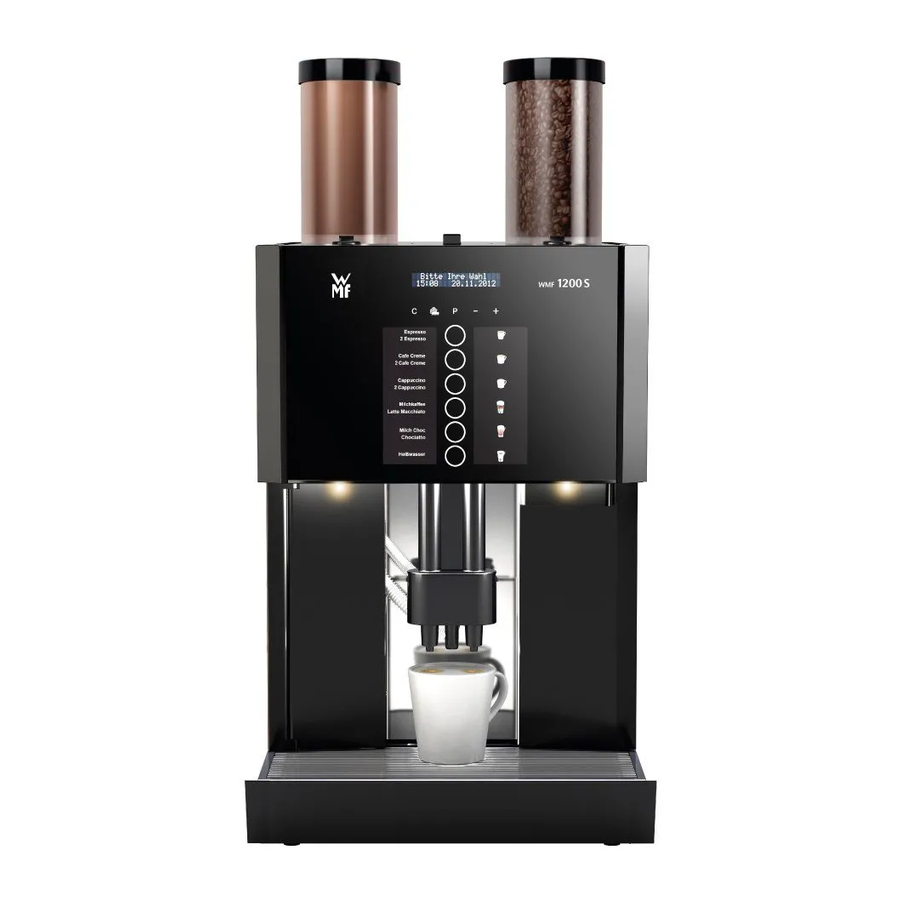
Introduction Chapter 1 Introduction Parts of the coffee machine your selection pls 08:15 02.05.2012 User Manual WMF 1200 S ... - Page 7 Introduction Bean hopper (optional 1 or 2) Manual insert / tablet insert Choc hopper / Topping hopper (optional) Display Beverage buttons Height-adjustable combi spout to dispense beverages Cover Grounds container Removable drip tray with drip grid Hot water button ON/OFF switch (on the bottom of the front panel) Water tank (coffee machines without a constant water supply) Brewing unit Display and functional pads...
-
Page 8: User Manual Signs And Symbols
Introduction User Manual Signs and Symbols Caution. Caution. Risk to the machine. Risk to the user. Follow the manual. Observe the Safety chapter. Caution. Caution. Hot liquid. Hot surface. Observe the Safety chapter. Observe the Safety chapter. Caution. Caution. Bruising or crushing Hot steam. -
Page 9: Glossary
Introduction Glossary Term Explanation • • Listings, selection options ™ Individual steps ™ Description of coffee machine state and/or Text in italics explanations of automatic steps. Quoted in °dH. The water hardness is a measure of Carbonate hardness the calcium dissolved in the water. For example the capacity of the water filter in litres Capacity of water it can filter... -
Page 10: Chapter 2 Start-Up
Start-up Chapter 2 Start-up (For initial start-up after delivery from the factory) Please refer to WMF 1200 S User Manual, pay special Caution. attention to the hazard notices and Safety chapter. Follow the manual. Observe the Safety chapter. Do not loosen any screws and do not remove any housing Warning. -
Page 11: Insert Wmf Water Filter (Optional)
Start-up 2.2.1 Insert WMF water filter (optional) ™ Remove the in-built water sieve from the water outlet in the water tank ™ Place the cartridge adapter onto the water outlet from above (with lock open) and lock into place ™ Unpack the water filter cartridge and place it on the cartridge adapter 2.2.2 Determine the water hardness... -
Page 12: Constant Water Supply (Optional)
Start-up Constant water supply (optional) ™ Carefully insert the seals attached to connecting tube ™ Connect the rear connection of coffee machine and the on-site water tap or water filter with the connecting tube Follow water filter instructions. ™ Check connections for leaks and tighten if necessary ™... -
Page 13: Connect Up The Milk
Start-up Connect up the milk Use a suitable milk nozzle on the combi spout. • orange milk nozzle = with a refrigerator, * light blue milk nozzle milk temperature 4 - 8 °C • green milk nozzle = milk temperature 8 - 16 °C * white milk nozzle * Alternative milk nozzles, depending on the milk types Standard version used. -
Page 14: Fill Coffee Bean Hopper
Start-up Fill coffee bean hopper ™ Remove the lid ™ Fill with coffee beans ™ Lock the lid Ensure that no foreign objects land in the coffee bean Follow the manual. hopper. Such foreign objects can damage the grinders. This damage is not covered under the warranty. Observe the Safety chapter. -
Page 15: Switch On Coffee Machine / Start-Up Program
Start-up Switch on coffee machine / start-up program ™ Press the ON/OFF switch your selection pls 08:15 02.05.2012 Coffee machine switches on. The start-up program starts. language: english OK: P change: -/+ The language used in the display is set here. The start-up program provides a step-by-step guide through the remaining start-up steps on the display. -
Page 16: Water Filter
Start-up Water filter If water filter is set to “yes”, the filter should be rinsed water filter: after the “SB mode” display. OK: P change: -/+ Insert the water filter w p age 11 Water hardness ... with water tank filter, or with no filter water hardn.: The hardness of the water being used. -
Page 17: Start-Up Complete
Start-up ... all coffee machines Machine heats up. A warm-up rinse follows the heating up ... heating-up process. This warms up all the pipes. After each brewing cycle, in the heating up phase and during the care programs, release water runs into the drip tray. -
Page 18: Chapter 3 Operation
Operation Chapter 3 Operation A display-guided start-up program helps perform initial start-up after delivery from the factory. Initial start-up w S tart-up page 10 Switch on coffee machine Change PIN ™ Switch on coffee machine using the ON/OFF switch w S ettings Coffee machine switches on and heats up. -
Page 19: Warm Rinsing
Operation Warm rinsing ™ Touch and hold for longer than 2 seconds Recommended after a longer warm rinse brewing pause, especially before in progress dispensing a cup of espresso. A warm rinsing of the pipes with hot water starts. The water warms the brewing system and guarantees an optimum coffee temperature. -
Page 20: Height Adjustment Of The Combi Spout
Operation Height adjustment of the combi spout The combi spout height is adjustable. ™ Take the combi spout from the front and push to the desired height Clearance height: 59 - 169 mm Bean hopper / product hopper • If possible, refill product hopper in advance. • Fill the hoppers no more than the amount needed for one day, in order to maintain the freshness of the products. -
Page 21: Manual Insert
Operation Manual insert The manual insert is located in the centre of the coffee machine cover. Manual insert is used: • For inserting cleaning tablets • When using an additional ground coffee variety, such as decaffeinated coffee Add ground coffee or cleaning tablet only when display Follow the manual. -
Page 22: Grounds Container
Operation Grounds container The grounds container receives the used coffee grounds The display shows a message as soon as the grounds container needs to be emptied. Beverage dispensing is blocked for as long as the grounds container is removed. ™ Push combi spout all the way up ™... -
Page 23: Drip Tray
Operation 3.11 Drip tray For coffee machines without a drain connection, the drip tray must be emptied regularly. ™ Pull out the drip tray carefully and empty it, then replace the drip tray On coffee machines with a drain connection the drip tray Caution. -
Page 24: Chapter 4 Settings
Settings Chapter 4 Settings Introduction to settings: ™ Briefly touch select program browse: -/+ Chapter 4.1 Chapter 4.2 Chapter 4.3 cup volumes change recipes set grinding degree OK: P browse: -/+ OK: P change: -/+ OK: P browse: -/+ cup volumes water volume: 37 ml brewing test select beverage... - Page 25 Settings Chapter 4.4 Chapter 4.5 Chapter 4.6 basic settings counters information OK: P browse: -/+ OK: P browse: -/+ OK: P browse: -/+ language: english espresso V0.0x dd.mm.yyyy OK: P change: -/+ browse: -/+ browse: -/+ etc. all beverages sw. off time: 0min WMF 1200S Basic OK: P change: -/+...
-
Page 26: Cup Volumes (Cup Size)
Settings, Cup volumes (cup size) Cup volumes (cup size) The coffee machine adjusts the recipe quantities to the new cup volume. ™ Briefly touch select program browse: -/+ ™ Browse with cup volumes select beverage ™ Select the program with Cup volumes ™... -
Page 27: Change Recipes
Settings, Change recipes Change recipes Here you can adjust the recipes of your coffee specialties according to your personal tastes. The following settings are available: • Water volume • Ground coffee • Milk foam volume * • Latte macchiato pause interval Adjustments can be made only to • Milk volume * the additions that are available for... -
Page 28: Water Volume
Settings, Change recipes 4.2.2 Water volume water volume: 35 ml OK: P change: -/+ ™ Example: touch until the water volume is increased to 37 ml water volume: 37 ml OK: P test: beverage Each beverage setting can be tested during setup. ™... -
Page 29: Latte Macchiato Pause Interval
Settings, Change recipes 4.2.5 Latte macchiato pause interval Pause interval between dispensing milk and coffee. macch. pause: 20sec OK: P change: -/+ ™ As soon as the beverage is set as desired, confirm with Possible only for latte macchiato. 4.2.6 Milk volume Setting in seconds. -
Page 30: Set Grinding Degree
Settings, Set grinding degree Set grinding degree 4.3.1 WMF Perfect Extraction System The Perfect Extraction System is ™ Briefly touch for the preparation of beverage select program specialties containing espresso. browse: + ™ Place a collection container under the spout for the warm rinse ™... - Page 31 Settings, Set grinding degree Grinding degree too coarse grinding too coarse test: P end: C Set grinding degree ™ Turn the multitool clockwise to set the grinding degree w p age 41 finer Test the new grinding degree setting ™ Place a suitably sized cup under the combi spout ™...
-
Page 32: Basic Settings
Settings, Basic settings Basic settings • Language • Date • Switch off time • Date / time (display) • Switch on time • Water filter • Milk foam quality (optional) • Water hardness • Topping quality (optional) • Audio signal • ECO-mode • SB mode (self-service mode) • Boiler temperature • Display contrast... -
Page 33: Switch On Time
Settings, Basic settings 4.4.4 Switch on time switch on time: off OK: P change: -/+ Automatic switch on time for the coffee machine. If set to “off”, the machine will not be switched on automatically. If set to “on”, the clock time can be set using ™... -
Page 34: Eco-Mode
Settings, Basic settings 4.4.7 ECO-mode ECO-mode: 0 OK: P change: -/+ The energy consumed by the coffee machine at its lowest load can be reduced here. ™ Confirm the desired setting with ECO- Hot water boiler Steam boiler mode For coffee beverages and hot water For milk beverages Ready to operate: always, immediately. -
Page 35: Boiler Temperature
Settings, Basic settings 4.4.8 Boiler temperature boiler temp.: 96°C OK: P change: -/+ Boiler temperature in °C (brewing water temperature). (Standard setting 96 °C) ™ Confirm the desired setting with 4.4.9 Office functions office functions OK: P change: -/+ ™ Touch 4.4.9.1 Second beverage level 2nd level: yes OK: P change: -/+... -
Page 36: 4.4.11 Date
Settings, Basic settings 4.4.11 Date date dd.mm.yyyy OK: P change: -/+ The current date. = day (two places) mm = month (two places) yyyy = year (four places) ™ Confirm the desired setting with 4.4.12 Date / time (display) date / time: off OK: P change: -/+ The display of time and date on the “Ready to operate”... -
Page 37: Audio Signal
Settings, Basic settings 4.4.15 Audio signal audio signal: OK: P change: -/+ ™ Confirm the desired setting with 4.4.16 SB mode (self-service mode) SB mode: no OK: P change: -/+ When set to “yes”, the functional pads are not displayed. Recommended for self-service. -
Page 38: 4.4.19 Pin Entry And Pin Protection
Settings, Basic settings 4.4.19 PIN entry and PIN protection change PIN OK: P change: -/+ ™ Touch to open the “Change PIN” menu Enter the PIN using the beverage buttons. The uppermost button is 0, the second is 1, the third is 2, etc. Initial PIN entry (activate PIN) When shipped from the factory, the PIN is “00000”. -
Page 39: Counters
Settings, Counters Counters ™ Briefly touch select program browse: -/+ ™ Browse with counters OK: P browse: -/+ You can display the number of beverages prepared here. ™ Confirm the counter display with ™ Use to browse through the individual beverages Example espresso: espresso browse: -/+... -
Page 40: Information
Settings, Information Information ™ Briefly touch select program browse: -/+ ™ Browse with information OK: P browse: -/+ 4.6.1 Software version V0.0x dd.mm.yyyy browse: -/+ The software version and date are shown. 4.6.2 Machine name WMF 1200S Basic browse: -/+ The name and type of the machine are displayed. -
Page 41: Chapter 5 Other Settings
Other settings Chapter 5 Other settings Mechanical settings 5.1.1 Set grinding degree ™ Remove bean hoppers Preset grinding degree is now visible. ™ Release coffee dispensing and wait until grinder starts ™ With grinder running, alter grinding degree as desired on the side of the machine using the multitool Left grinder Right grinder... -
Page 42: Chapter 6 Care
Care Chapter 6 Care Regular cleaning is essential in order to ensure problem-free operation of the coffee machine and to ensure optimum coffee quality. Prior to and after every instance that the machine is shut Caution. off for several days, perform all cleanings. Health hazard. -
Page 43: Care Programs Overview
Care Care programs overview About the cleaning programs ™ Briefly touch select clean.program browse: -/+ w C leaning instructions cleaning OK: P browse: -/+ switching off OK: P browse: -/+ cleaning OK: P browse: -/+ no switching off OK: P browse: -/+ for machines without Plug&Clean milk system rinsing... -
Page 44: Daily Cleaning
Care Daily cleaning For all cleaning programs, the combi spout, the milk Caution. Hot liquids in the nozzle, and the milk hose must be installed. dispensing area. Observe the Safety chapter. 6.3.1 Cleaning program The cleaning program leads step by step through milk system rinsing, the optional mixer rinsing and the machine Cleaning program cleaning via software. -
Page 45: Milk System Cleaning Plug&Clean
Care Milk system cleaning Plug&Clean Plug&Clean cleaning consists of three parts. • Automatic foamer rinsing after each beverage with milk or milk foam (optional) Milk system cleaning Plug&Clean • Display-guided Plug&Clean cleaning w C leaning instructions • Once per week, place combi spout, milk hose and milk nozzles in a cleaning solution 6.3.3 Mixer rinsing... -
Page 46: Weekly Cleaning
Care Weekly cleaning 6.4.1 Choc / Topping mixer cleaning (optional) Cleaning will be more frequent depending on powder consumption. ™ Press the ON/OFF switch for longer than 2 seconds until coffee machine switches off ™ Disconnect mains plug ™ Pull off mixer hose from mixer to combi spout ™... -
Page 47: Regular Cleaning
Care Regular cleaning 6.5.1 Brewing unit cleaning The brewing unit should be cleaned as required and at regular intervals. Recommendation: weekly. ™ Press the ON/OFF switch for longer than 2 seconds until Caution. Bruising or crushing coffee machine switches off hazard. ™... -
Page 48: Bean Hopper Cleaning
Care Never clean the brewing unit in a dishwasher and never Risk to the machine. use any cleaner additives. ™ Clean the brewing sieve under running water or with Follow the manual. a cloth ™ Remove residual coffee grounds using a paint-brush or scrubber ™... -
Page 49: Product Hopper Cleaning (Optional)
Care ™ Lift bean hoppers out ™ Completely empty bean hoppers and wipe out thoroughly with a damp cloth ™ Allow bean hoppers to dry completely ™ Refill and replace bean hoppers ™ Lock with the multitool by turning counter-clockwise Never reach into the coffee grinders. Caution. -
Page 50: Descaling
Care ™ Re-assemble and insert the dosing auger and screw on union nuts Ensure correct orientation of discharge. ™ Refill and replace product hopper ™ Lock with the multitool by turning counter-clockwise Filter change Follow the water filter User Manual for a filter change. After a filter change, perform a rinse as guided by the display. -
Page 51: Descaling Machine With Constant Water Supply
Care 6.7.1 Descaling machine with constant water supply Preparation ™ Touch ™ Touch until the desired program is displayed ™ Select the desired program with ™ Remove the milk hose ™ Turn off mains tap ™ Remove and empty drip tray ™... -
Page 52: Descaling Machine With Water Tank
Care Rinsing Rinsing starts. Duration approx. 11 minutes. After the initial rinsing from the water tank, the display requests that the water supply be turned on again. ™ Turn on mains water tap Leave the water tank in place. The water tank coupling is rinsed for approx. - Page 53 Care ™ Remove the water filter, if used ™ Mix the two bottles of liquid descaling agent in the Crystals may form in the liquid descaling agent when stored. water tank with 1 bottle of warm water The crystals must not enter the ™...
-
Page 54: Chapter 7 Haccp Schedule
HACCP schedule Chapter 7 HACCP schedule You are required by law to ensure that your customers are not subject to any health hazards as a consequence of consumption of food items you serve. A HACCP “Food Hygiene Ordinance from 05.08.1997” schedule (Hazard Analysis Critical Control Points) for risk identification and assessment is required. -
Page 55: Haccp Schedule
HACCP schedule Keep milk cool. At commencement of operation milk should be at approx. 6 - 8 °C. • Always have a new cooled milk pack handy. WMF AG offers a range • If cooling is not used during operation, then the milk of refrigeration options must be used up very quickly. -
Page 56: Chapter 8 Maintenance
Maintenance Chapter 8 Maintenance Please observe that this is a professional industrial coffee machine which needs regular maintenance and descaling. Timing of descaling is calculated by the machine and depends on the degree of hardness of the local mains water and whether or not a water filter is fitted. Descaling The maintenance schedule is based on the degree of use w ... -
Page 57: Wmf Service
Maintenance WMF Service You can reach the WMF Service Centre if the local service point is not known. WMF AG Eberhardstrasse D-73309 Geislingen (Steige) User Manual WMF 1200 S ... -
Page 58: Chapter 9 Messages And Instructions
Messages and instructions Chapter 9 Messages and instructions Operating messages 9.1.1 Empty grounds container Grounds container is full empty grounds cont. ™ Remove grounds container empty and rinse under running water ™ Wipe dry the grounds container ™ Replace grounds container ™... -
Page 59: Insert Ground Coffee
Messages and instructions 9.1.6 Insert ground coffee The manual insert lid is open insert ground coffee ™ Insert ground coffee select beverage ™ Close the manual insert ™ Select the desired beverage with the beverage button Touch to cancel the process. Ground coffee that has already been inserted is removed via the grounds container. -
Page 60: Error Messages On The Display
Messages and instructions Some messages lead to blocking of individual functions. You will notice this by the fact that the beverage button illumination goes out. The beverage buttons that are still illuminated can continue to be used. Your WMF 1200 S is provided with a diagnostics program. Any errors that occur are shown on the display. -
Page 61: Errors Without Error Message
Messages and instructions Error Error Action instructions number description Water error: Between each of the following steps switch the machine off and on again. If error not remedied carry out the next step. during the brewing cycle ™ Check that mains tap is on or that the water tank is filled and inserted correctly ™... - Page 62 Messages and instructions Error pattern Action instructions Choc portion controller ™ Clean portion controller w C are w P roduct hopper cleaning, page 49 blocked, Choc dispensed only with water ™ Empty powder ™ Turn dosing auger manually until all powder is removed ™...
-
Page 63: Chapter 10 Safety
Safety Chapter 10 Safety 10.1 Hazards to the operator At WMF, safety is one of the most essential product features. The effectiveness of safety devices can only be Caution. Failure to follow safety ensured if the following points are observed: instructions can result • Read the User Manual carefully prior to use. - Page 64 Safety Bruising or crushing hazard. Caution. Bruising or crushing There is a bruising or crushing hazard when handling hazard. all moving parts. Do not reach into the bean hopper or Risk of injury. the brewing unit opening when the coffee machine is switched on.
-
Page 65: Hazards To The Coffee Machine
Safety 10.2 Hazards to the coffee machine Please observe the following points so as to • We recommend damage prevention prevent problems with and damage to the measures such as: coffee machine: - installation of a suitable water • For water with carbonate hardness in monitor in the mains water supply excess of 5 °dH, a WMF water filter must - installation of smoke alarms... -
Page 66: Directives
Safety 10.4 Directives The machine fulfils the requirements of the Any modifications that are not approved by German Food and Feed Code (LFGB), the WMF will cause this declaration to become Regulation on Commodities (BedGgstV), invalid. the EC regulation No. 10/2011 as well as Currently valid national rules apply in the EC regulation No. -
Page 67: Duties Of The Owner / Operator
Safety 10.5 Duties of the owner / operator The operator of such equipment These measures are conducted by must ensure regular maintenance by WMF Service or by WMF authorised service WMF Service technicians, their agents or personnel as part of the maintenance work. other authorised persons, and checking of Machine cleaning must be done only using safety devices. -
Page 68: Warranty Claims
Safety, Warranty claims 10.6 Warranty claims During the warranty period of 12 months from transfer of risk, the purchaser has statutory warranty entitlements. The vendor should always be afforded the opportunity to rectify errors within an appropriate period. Claims above and beyond the above, in particular damage claims as a result of consequential damage, are excluded, Warranty period 12 months to the extent that this is legally permissible. -
Page 69: Appendix: Overview Of Additional Instructions
Appendix: Overview of additional instructions Appendix: Overview of additional instructions User Manual WMF 1200 S ... -
Page 70: Appendix: Technical Data
Appendix: Technical data Appendix: Technical data Technical data for coffee machine Nominal power rating * 2.0 - 2.4 kW Recommended daily capacity 60 - 80 cups espresso, café crème Overall hot water output 16 l/h Coffee bean hopper approx. 500 g per load Choc hopper / Topping hopper approx. - Page 71 Appendix: Technical data Mains voltage tolerance range 230 V +6 % and -10 %, Mains voltage interruption < 50 ms: no interruption of function Water supply 3/8 inch hose connector with mains tap, and filter with 0.2 to (Constant water supply 0.25 mm mesh size, on site. optional) Min.
-
Page 72: Appendix: Accessories And Spare Parts
Appendix: Accessories and spare parts Appendix: Accessories and spare parts User Manual WMF 1200 S ... - Page 73 Appendix: Accessories and spare parts User Manual WMF 1200 S ...
-
Page 74: Index
Index Index Dispensing hot water 7, 19 Dispensing test 26, 27 Dosing auger 50 Drip grid 7 Drip tray 7, 23 Drip tray, housing and front panel 45 Additional instructions 2, 70 Duties of the owner / operator 67 Automatic switch on time 33 Error 58 Basic settings 32 Error list 59... - Page 75 Index Mains power connection 71 Safety 63 Mains tap 9 Safety devices 63 Maintenance 56 Sanitize milk system 54 Malfunctions 59, 61 Self-service 9 Manual insert 7, 21 Sequence of milk and coffee dispensing 29 Mechanical settings 41 Set grinding degree 30, 41 Menu pad 7 Settings (basic settings) 15 Messages 58...
- Page 76 Your nearest WMF Service: © 2012 WMF AG All rights reserved, in particular duplication, distribution and translation rights. No part of this manual may be reproduced in any form or processed, duplicated or distributed using electronic systems without written consent. Design and production / typesetting and print presentation: TecDoc GmbH;...
Need help?
Do you have a question about the 1200 S and is the answer not in the manual?
Questions and answers
WHAT DOES THE ERROR F26 MEANS