Table of Contents
Advertisement
Quick Links
Advertisement
Table of Contents

Related Manuals for Bosch BRS Tower


Summary of Contents for Bosch BRS Tower
- Page 1 Bosch Recording Station Appliance Hardware Installation Manual...
-
Page 3: Table Of Contents
Bosch Recording Station Appliance Table of Contents | en Table of Contents Safety Precautions General Safety Precautions Electrical Safety Precautions Important Notices FCC & ICES compliance EMC Compliance ESD Precautions Operating Precautions System Overview Introduction BRS Tower 2.2.1 Control Panel Buttons/LEDs BRS 19-inch 1U 2.3.1... - Page 4 | Table of Contents Bosch Recording Station Appliance 4.3.3 Outer Rails 4.3.4 Installing the Chassis into a Rack 4.3.5 Installing the Chassis into a Telco rack BRS 19-inch 2U - Rack Mounting Instructions 4.4.1 Separating the Sections of the Rack Rails 4.4.2...
-
Page 5: Safety Precautions
Bosch Recording Station Appliance Safety Precautions | en Safety Precautions General Safety Precautions The following safety precautions must be observed: Read, follow and retain instructions All safety and operating instructions must be read and followed before installing the device. Retain instructions for future reference. - Page 6 | Safety Precautions Bosch Recording Station Appliance Damage requiring service. Unplug the device from the mains power supply and arrange for the device to be serviced by qualified personnel if: – The mains cable or mains plug is damaged.
- Page 7 Bosch Recording Station Appliance Safety Precautions | en Lightning For added protection of the device during a storm, or when it is not used for a lengthy period of time, unplug the device from the mains and disconnect the cable system. This prevents the device being damaged by lightning or a power surge.
-
Page 8: Electrical Safety Precautions
Installation should only be carried out by qualified customer service personnel in accordance with the applicable electrical regulations. Disposal Your Bosch product has been developed and manufactured using high-quality materials and components that can be reused. This symbol means that electronic and electrical devices that have reached the end of their working life must be disposed of separately from household waste. -
Page 9: Important Notices
Bosch Recording Station Appliance Safety Precautions | en CAUTION! Mainboard Battery: There is a danger of explosion if the onboard battery is installed upside down, which will reverse its polarities. This battery must be replaced only with the same or an equivalent type recommended by the manufacturer (CR2032). -
Page 10: Emc Compliance
| Safety Precautions Bosch Recording Station Appliance Informations FCC et ICES (modèles utilisés aux États-Unis et au Canada uniquement) Ce produit est conforme aux normes FCC partie 15. la mise en service est soumises aux deux conditions suivantes : –... -
Page 11: Operating Precautions
Bosch Recording Station Appliance Safety Precautions | en Operating Precautions The chassis cover must be in place when the system is operating to assure proper cooling. Out of warranty damage to the system can occur if this practice is not strictly followed. -
Page 12: System Overview
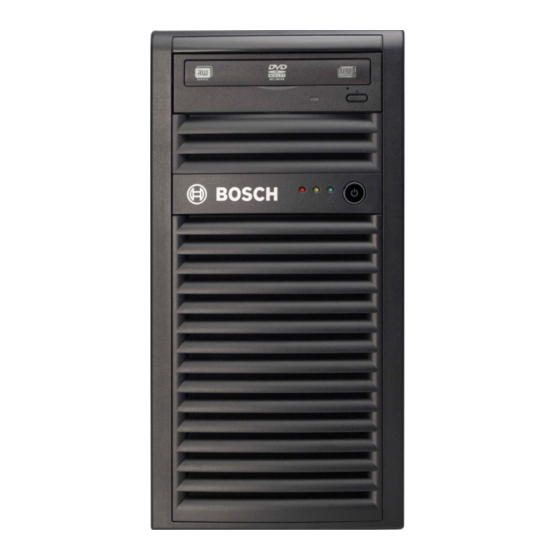
Introduction This manual applies to the following models: – Bosch Recording Station Tower (BRS Tower) – Bosch Recording Station 19-inch 1U (BRS 19-inch 1U) – Bosch Recording Station 19-inch 2U (BRS 19-inch 2U) BRS Tower Front view: There are several LEDs on the control panel and on the drive carriers. The LEDs display the system and component status. -
Page 13: Control Panel Buttons/Leds
Bosch Recording Station Appliance System Overview | en Rear view: Mains connection 100 - 240 VAC, 50 - 60 Hz Keyboard - Mouse Note: We recommend using PS2 mouse and keyboard. 2x USB Serial interface COM1 Do not use ! - Page 14 | System Overview Bosch Recording Station Appliance Overheat/Fan Fail This LED indicates a fan failure when flashing. When Continuously On (not flashing): This LED indicates an overheat condition caused by cables obstructing the airflow in the system or the ambient room temperature being too warm.
-
Page 15: Brs 19-Inch 1U
Bosch Recording Station Appliance System Overview | en BRS 19-inch 1U Front view: There are several LEDs on the control panel and on the drive carriers. The LEDs display the system and component status. This chapter explains the meanings of all LED indicators and the appropriate responses that need to be taken. -
Page 16: Control Panel Leds
| System Overview Bosch Recording Station Appliance 2.3.2 Control Panel LEDs The control panel located on the front of the chassis has LEDs to provide you with critical information related to different parts of the system. This section explains what each LED indicates when illuminated and any action that may be required. -
Page 17: Overheating
Bosch Recording Station Appliance System Overview | en 2.3.5 Overheating The section lists actions that should be taken in the unlikely event the system overheats. If the system overheats, do the following: Use the LEDs to determine the nature of the overheating condition. -
Page 18: Brs 19-Inch 2U
| System Overview Bosch Recording Station Appliance BRS 19-inch 2U Front view: There are several LEDs on the control panel and on the drive carriers. The LEDs display the system and component status. This chapter explains the meanings of all LED indicators and the appropriate responses that need to be taken. -
Page 19: Control Panel Buttons
Bosch Recording Station Appliance System Overview | en 2.4.1 Control Panel Buttons There are two push-buttons located on the front of the chassis. These are a reset button and a power on/off button. Reset The reset button is used to restart the system. -
Page 20: Drive Carrier Leds
| System Overview Bosch Recording Station Appliance Power Indicates power is being supplied to the system's power supply units. This LED should normally be illuminated when the system is operating. 2.4.3 Drive Carrier LEDs Your chassis uses SAS/SATA. Each SAS/SATA drive carrier has two LEDs. -
Page 21: Maintenance
Bosch Recording Station Appliance Maintenance | en Maintenance This chapter covers the steps required to install components. The only tool you will need to install components and perform maintenance is a Phillips screwdriver. BRS 19-inch 1U CAUTION! Review the warnings and precautions listed in the manual before setting up or servicing this chassis. -
Page 22: Removing/Replacing Hard Drives
| Maintenance Bosch Recording Station Appliance 3.1.2 Removing/Replacing Hard Drives Removing Hard Drive Carriers from the Chassis 1. Press the release button on the drive carrier. This extends the drive carrier handle. 2. Use the handle to pull the drive carrier out of the chassis. - Page 23 Bosch Recording Station Appliance Maintenance | en Installing a Hard Drive to the Hard Drive Carrier Remove the screws (2) securing the dummy drive to the carrier. Remove the dummy drive from the carrier. Install a new drive into the carrier with the printed circuit board side facing down so that the mounting holes align with those in the carrier.
-
Page 24: System Fans
| Maintenance Bosch Recording Station Appliance 3.1.3 System Fans System fans provide cooling for the chassis. The system fans are powered from the system board. Adding a System Fan Turn off the power to the system and unplug the system from the outlet. -
Page 25: Power Supply
If one power supply unit fails, the system will not shut down but you should replace the unit. Replacing the unit can be done without powering down the system. Replacement units can be ordered directly from Bosch RMA desk. Release Tab Replacing the Power Supply Power down the system and unplug the power cord. -
Page 26: Brs 19-Inch 2U
| Maintenance Bosch Recording Station Appliance BRS 19-inch 2U CAUTION! Review the warnings and precautions listed in the manual before setting up or servicing this chassis. 3.2.1 Removing the Chassis Cover Removing the Chassis Cover Remove the two screws on each side of the cover, which secure the cover to the chassis. -
Page 27: Removing/Replacing Hard Drives
Bosch Recording Station Appliance Maintenance | en 3.2.2 Removing/Replacing Hard Drives Removing Hard Drive Trays from the Chassis Press the release button on the drive carrier. This extends the drive carrier handle. Use the handle to pull the drive out of the chassis. - Page 28 | Maintenance Bosch Recording Station Appliance Remove the dummy drive from the carrier. Install a new drive into the carrier with the printed circuit board side facing down so that the mounting holes align with those in the carrier.
-
Page 29: System Fans
Bosch Recording Station Appliance Maintenance | en CAUTION! Only the respective hard disk drives are recommended for use. 3.2.3 System Fans System fans provide cooling for the chassis. The system fans are powered from the system board. Replacing a System Fan If necessary, open the chassis while the power is running to determine which fan has failed. -
Page 30: Power Supply
If one power supply unit fails, the system will not shut down but you should replace the unit. Replacing the unit can be done without powering down the system. Replacement units can be ordered directly from Bosch RMA desk. Replacing the Power Supply If your chassis includes a redundant power supply (at least two power modules), you can leave the system running and remove only one power supply. - Page 31 Bosch Recording Station Appliance Maintenance | en Push the new power supply module into the power bay until you hear a click. Plug the AC power cord back into the module and power up the system. Replacing the Power Distributor Redundant chassis that are 2U or greater require a power distributor.
-
Page 32: Rack Installation
| Rack Installation Bosch Recording Station Appliance Rack Installation This chapter provides a quick setup checklist to get your chassis up and running. Following these steps in the order given should enable you to have the system operational within a minimum amount of time. -
Page 33: Rack Mounting Considerations
Bosch Recording Station Appliance Rack Installation | en 4.2.4 Rack Mounting Considerations Ambient Operating Temperature If installed in a closed or multi-unit rack assembly, the ambient operating temperature of the rack environment may be greater than the ambient temperature of the room. Therefore, consideration should be given to installing the equipment in an environment compatible with the manufacturer’s maximum rated ambient temperature (Tmra). -
Page 34: Brs 19-Inch 1U - Rack Mounting Instructions
| Rack Installation Bosch Recording Station Appliance BRS 19-inch 1U - Rack Mounting Instructions This section provides information on installing the chassis into a rack unit. There are a variety of rack units on the market, which may mean the assembly procedure will differ slightly. You should also refer to the installation instructions that came with the rack unit you are using. -
Page 35: Inner Rails/Inner Rail Extensions
Bosch Recording Station Appliance Rack Installation | en 4.3.2 Inner Rails/Inner Rail Extensions The chassis includes a set of inner rails which are in two sections: – inner rails – inner rail extensions. The inner rails are pre-attached and do not interfere with normal use of the chassis if you decide not to use a 19-inch rack. -
Page 36: Installing The Chassis Into A Rack
| Rack Installation Bosch Recording Station Appliance Installing the Outer Rails to the Rack Attach the longer section of the outer rail to the outside of the shorter section of the outer rail. You must align the pins with the slides. Both ends of the outer rail must face the same direction in order to be secured to the rack (see also Section Assembling the Outer Rails). -
Page 37: Installing The Chassis Into A Telco Rack
Bosch Recording Station Appliance Rack Installation | en Confirm that chassis includes the inner rails (A) and rail extensions (B). Also, confirm that the outer rails (C) are installed on the rack. Line chassis rails (A and B) with the front of the rack rails (C). -
Page 38: Brs 19-Inch 2U - Rack Mounting Instructions
| Rack Installation Bosch Recording Station Appliance BRS 19-inch 2U - Rack Mounting Instructions This section provides information on installing the chassis into a rack unit with the quick- release rails provided. There are a variety of rack units on the market, which may mean the assembly procedure will differ slightly. -
Page 39: Inner Rails/Inner Rail Extensions
Bosch Recording Station Appliance Rack Installation | en 4.4.2 Inner Rails/Inner Rail Extensions The chassis includes a set of inner rails in two sections: – inner rails – inner rail extensions. The inner rails are pre-attached to the chassis, and do not interfere with normal use of the chassis if you decide not to use a 19-inch rack. -
Page 40: Installing The Chassis Into A Rack
| Rack Installation Bosch Recording Station Appliance 4.4.4 Installing the Chassis into a Rack Extend the outer rails as illustrated above. Align the inner rails of the chassis with the outer rails on the rack. Slide the inner rails into the outer rails, keeping the pressure even on both sides. When the chassis has been pushed completely into the rack, it should click into the locked position. -
Page 41: Additional Documentation
Additional documentation Use the Quick Installation Guide and the Software Installation Manual to configure the system. Information regarding the operation of the Bosch Recording Station can be found in the Operating Manual. Documentation for Bosch Security System products can be found as follows: www.boschsecurity.com >... - Page 42 | Additional documentation Bosch Recording Station Appliance - | V1 | 2011.10 Hardware Installation Manual Bosch Security Systems...
- Page 44 Bosch Security Systems Werner-von-Siemens-Ring 10 85630 Grasbrunn Germany www.boschsecurity.com © Bosch Security Systems, 2011...
Need help?
Do you have a question about the BRS Tower and is the answer not in the manual?
Questions and answers