Table of Contents
Advertisement
Quick Links
SIDE-
POWER
Thruster systems
Installation and user's manual
GB
Installations- und Bedienungsanleitung
D
Mechanical thruster installation only
S L E I P N E R M O T O R A S
S L E I P N E R M O T O R A S
S L E I P N E R M O T O R A S
S L E I P N E R M O T O R A S
S L E I P N E R M O T O R A S
P.O. Box 519
N-1612 Fredrikstad
Norway
Tel: +47 69 30 00 60
Fax:+47 69 30 00 70
SH 100/185 T
SP 220 HYD/SP 300 HYD
SP 550 HYD
www.side-power.com
sidepower@sleipner.no
© Sleipner Motor AS 2006
Advertisement
Table of Contents

Related Manuals for Side-Power SH 100/185 T


Summary of Contents for Side-Power SH 100/185 T
- Page 1 SH 100/185 T SIDE- SP 220 HYD/SP 300 HYD POWER SP 550 HYD Thruster systems Installation and user's manual Installations- und Bedienungsanleitung Mechanical thruster installation only S L E I P N E R M O T O R A S...
-
Page 2: Table Of Contents
Contents Installation instructions User's manual Technical specifications ............3/4 Important user precautions ............ 23 Planning & important precautions .......... 5 How to use Sidepower thrusters .......... 23 Tunnel installation Warranty statement ............. 24 Positioning of the tunnel / thruster .......... 6 Spareparts list &... -
Page 3: Technical Specifications
Waterline Port side Starboard side Waterline M E T R I C M E T R I C M E T R I C I M P E R I A L I M P E R I A L I M P E R I A L M E T R I C M E T R I C... - Page 4 Requirements / Hydraulic hose connections to motor Port A Drain port Port B (Must be installed) Motor type Port A Drain port Port B 1/2" BSP 1/4'' BSP 1/2" BSP 1/2" BSP 1/4'' BSP 1/2" BSP U-10 3/4" BSP 1/4'' BSP 3/4"...
-
Page 5: Planning & Important Precautions
Planning and important precautions Prior to installation, it is important that the installer reads this guide to ensure necessary acquaintance with this product. This manual is intended to support educated / experienced staff and is therefore not sufficient in all details for the correct installation. If the height in the room you are installing the Sidepower is limited, the Sidepower can be installed horizontally or at any angle in between. -
Page 6: Positioning Of The Tunnel / Thruster
Fig. 1 Pivot Fig. 3 point B = 10,0m A = 11,0m Fig. 2 Fig. 4 Ø Positioning of the tunnel / thruster Positionierung von Tunnel / Thruster The Thruster should be as far forward as possible (Fig. 1) Tunnelplazierung soweit vorne wie möglich (Fig. 1) Because of the leverage effect around the boats pivot point, it is very Um einen möglichst großen Abstand vom Drehpunkt des Schiffes zu important for the thrusters actual effect in the boat to get it as far for-... -
Page 7: How To Shape The Tunnel Ends
Fig. 1 Fig. 2 R = 0,1 x D (10%) R = 0,1 x D (10%) ☺ ☺ ☺ ☺ ☺ Fig. 3 Fig. 4 Tunnel ends Formgebung der Tunnelenden Rounded tunnel ends will maximize thrust and minimize Abgerundete Tunnelenden erhöhen die Schubkraft und noise. -
Page 8: How To Prevent Drag From Tunnel Installation
☺ ☺ ☺ ☺ ☺ ☺ ☺ ☺ ☺ ☺ Fig. 1 Fig. 2 Fig. 3 Prevent drag from tunnel Optimaler Strömungsverlauf am Rumpf A possible problem in sailboats or fast powerboats, is that they get Segelboote und sehr schnelle Booten können gelegentlich durch a drag from the back face of the tunnel, as this becomes a “flat”... -
Page 9: Possible Tunnel Installation In Sailboats
Fig. 1 ☺ ☺ ☺ ☺ ☺ Pos. A Pos. B ☺ ☺ ☺ ☺ ☺ Tunnel installation in sailboats Installation in Segelbooten Many sailboats have a racing type hull which means that it is very Segelboote weisen häufig einen Rumpf in Rennform auf, was flat bottomed and has a very shallow draft in the bow section. -
Page 10: Series Production Installation
Fig. 1 Fig. 2 Radius = D x 0,1 a1 a2 Fig. 3 Fig. 4 Series production installation Installation bei Serienproduktion Boat builders having thrusters as standard, or delivering a large Hersteller die Thruster als Standard oder Modelle mit Bug- bzw. portion of one or more models with thrusters, have the opportunity Heckschrauben anbieten, haben die Möglichkeit einer kosten- und to make a perfect tunnel installation, while saving both time and... -
Page 11: Tunnel Installation In A Grp Boat
Fig. 1 Fig. 2 Fig. 3 Fig. 4 Tunnel installation Tunnelinstallation We recomend that a professional does the fibreglass fitting of Wir empfehlen, die Glasfiberarbeiten von einem Fachmann aus- the tunnel. These instructions are only general, and do not führen zu lassen. Dieses Handbuch beinhaltet nicht alle explain in any way the details of fibreglass work. - Page 12 Fig. 1a Fig. 1c Fig. 1 Fig. 1b Fig. 1d Fig. 3 Fig. 2 R = D x 0,1 R = D x 0,1 Tunnel installation Tunnelinstallation Soften the edges with a radius of 10% of the tunnel diameter (Fig. Runden Sie die Kanten mit einem Radius (10% des Tunneldurch- 1a) or make a slope with a length of 10 - 15% of the tunnel diam- messers) ab (Fig.
-
Page 13: Getriebe Und Motorhalterung
PORT STARBOARD Fitting gearhouse and motor bracket Getriebe und Motorhalterung SH 100/185 T SH 100/185 T 1. Mark the centreline of the tunnel and the boats centreline. 1. Die Mittellinie von Tunnel und Boot markieren. Damit Schub- The gearhouse must be fitted with the gearhouse lid (the screwed richtung und Kontrollpanel übereinstimmen, das Getriebege-... - Page 14 SP 220 HYD / SP 300 HYD Fig. 2 Fig. 1 SP 220 HYD BOATS CENTRELINE TUNNELS CENTRELINE Ø 11,00mm 7/16" Ø 46,00mm 1,81" 40,0mm Fig. 3 1,57" Fig. 2 BOATS CENTRELINE SP 300 HYD Fig. 4 TUNNELS CENTRELINE Bolt tightening forces: Ø...
- Page 15 SP 550 HYD BOATS CENTRELINE Fig. 1 Fig. 3 TUNNELS CENTRELINE Ø 17mm 2/3" Ø 83mm 70,0mm 3 1/4" 2 3/4" Fig. 2 Fig. 4 Bolt tightening forces: Bolts (2x) holding gearhouse to bracket: 150 Nm (109 lb/ft) Fitting gearhouse and motor bracket Getriebe und Motorhalterung SP 550 HYD SP 550 HYD...
-
Page 16: Oil Tank & Propeller
SH 100/185T Locktite Fitting oil tank & propellers Ölvorratsbehälter & Propeller SH 100/185 T SH 100/185 T 1. Turn the propeller shaft so that the drivepin (5) is in a horizontal 1. Die Propellerachse so drehen, daß der Mitnahmestift (5) in position and ensure that it is centred in the propellershaft. - Page 17 SP 220 HYD / SP 300 HYD / SP 550 HYD Fitting oil tank & propellers Ölvorratsbehälter & Propeller SP 220 HYD / SP 300 HYD / SP 550 HYD SP 220 HYD / SP 300 HYD / SP 550 HYD 1.
- Page 18 SH 100/185 T Fig. 1 Bolt tightening force (4x): 33 Nm (24 lb/ft) Fitting the hydraulic motor Einbau des Hydraulikmotors 1. Remove the 4 bolts in the motorbracket. 1. Die 4 Bolzen in der Motorhalterung enfernen. 2. Die Antriebsachse im Getriebegehäuse und die Motorachse 2.
- Page 19 SP 220 HYD / SP 300 HYD Fig. 1 Bolt tightening forces: Bolts (4x) holding motor to bracket: 33 Nm (24 lb/ft) Fitting the hydraulic motor Einbau des Hydraulikmotors 1. Remove the 4 bolts in the motorbracket. 1. Die 4 Bolzen in der Motorhalterung enfernen. 2.
- Page 20 SP 550 HYD Fig. 1 Bolt tightening forces: 2x bolts (M 12) holding motor to adaptor plate: 57 Nm (42 lb/ft) 4x bolts (M 12) holding adaptor plate to bracket: 57 Nm (42 lb/ft) Fitting the hydraulic motor Einbau des Hydraulikmotors 1.
-
Page 21: Maintenance & Service
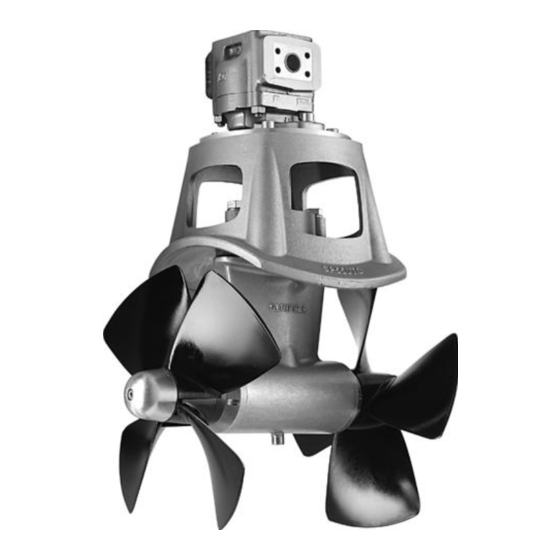
SH100/185 T - SP 220 HYD - SP 300 HYD SP 550 HYD Hydraulic motor Mounting plate Motorbracket for holding motor and gearhouse together on the tunnel. Flexible coupling secures the electromotor if propeller is jammed. Changeable from inside the boat. Glassfibre reinforced lexan propeller for ultimate performance. -
Page 22: Checklist For Control Of The Installation
Checklist (only for thruster) Checkliste (nur für Thruster) Propeller is fastened correctly to the shaft. Der Propeller ist korrekt auf der Achse befestigt. Propeller turns freely in tunnel. Der Propeller läßt sich frei im Tunnel drehen. Lower-unit is filled with gearoil. Das Getriebegehäuse ist mit Getriebeöl gefüllt. -
Page 23: Important User Precautions
Important user precautions Wichtige Benutzerhinweise Always turn the main power switch off before touching any part Vor Arbeiten am Thruster oder in dessen Umgebung immer of the thruster, as an incidental start while touching moving den Hauptschalter ausschalten, da ein unbeabsichtigter Start parts can cause serious injuries. -
Page 24: Warranty Statement
Warranty statement 1. The equipment manufactured by Sleipner Motor AS (The “Warrantor”) is warranted to be free from defects in workmanship and materials under normal use and service. 2. This Warranty is in effect for of two years from the date of purchase by the user. Proof of purchase must be included, to establish that it is inside the warranty period. 3. -
Page 25: Spareparts List & Drawing
Spareparts SH100/185T SH100/185T - SP 220 HYD - SP 300 HYD - SP 550 HYD 2.4 - 2007... - Page 26 Spareparts SP 220 HYD SH100/185T - SP 220 HYD - SP 300 HYD - SP 550 HYD 2.4 - 2007...
- Page 27 Spareparts SP 300 HYD SH100/185T - SP 220 HYD - SP 300 HYD - SP 550 HYD 2.4 - 2007...
- Page 28 Spareparts SP 550 HYD SH100/185T - SP 220 HYD - SP 300 HYD - SP 550 HYD 2.4 - 2007...
- Page 29 SERVICE SIDE- POWER Thruster systems SH100/185T - SP 220 HYD - SP 300 HYD - SP 550 HYD 2.4 - 2007...
- Page 30 SERVICE SIDE- POWER Thruster systems SH100/185T - SP 220 HYD - SP 300 HYD - SP 550 HYD 2.4 - 2007...
- Page 31 SERVICE SIDE- POWER Thruster systems SH100/185T - SP 220 HYD - SP 300 HYD - SP 550 HYD 2.4 - 2007...
-
Page 32: Service Centres
Tel: +65 6749 9359 Tel: +47 69 30 00 60 Tel: +43 5574 899000 amalmar@otenet.gr Fax: +65 6749 9360 Fax: +47 69 30 00 70 Fax: +43 5574 89900-10 www.alquest.com.sg www.side-power.com www.ascherl.at Iceland alquest@singnet.com.sg sidepower@sleipner.no MARAS EHF office@ascherl.at Reykjavik Poland...
Need help?
Do you have a question about the SH 100/185 T and is the answer not in the manual?
Questions and answers