
Related Manuals for Side-Power SE120


Summarization of Contents
Bow Installation Considerations and Precautions
Installation Environment and Safety
Covers compartment requirements, ventilation, clearances, and avoiding hazards.
Tunnel and Component Finishing
Guidelines for tunnel interior, antifouling, and component mounting.
Thruster Installation Considerations and Precautions
Core Thruster Handling and Operation
Proper handling, power circuit, and operational guidelines for the thruster.
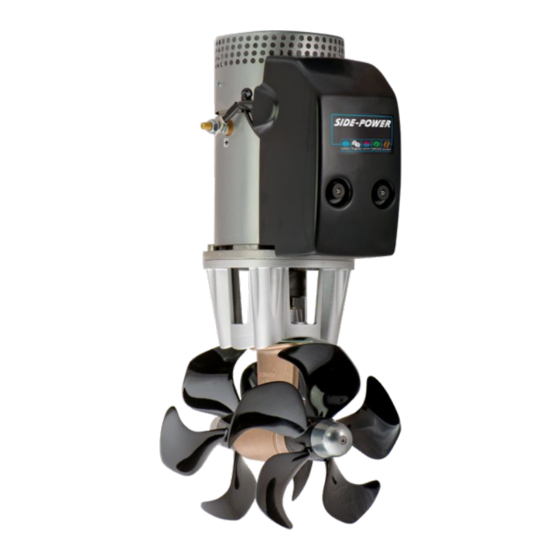
Technical Specifications
Component Descriptions
Details on motor, gearhouse, tunnel, propeller, and batteries.
Operational Limits and Safety Features
Information on maximum usage and built-in safety mechanisms.
Positioning of the Tunnel / Thruster
Forward Positioning Strategy
Install thruster as far forward as possible for leverage effect on rotation power.
Depth and Waterline Placement
Install thruster deep underwater to prevent air suction and improve efficiency.
Tunnel Length Optimization
Optimal Tunnel Length Guidelines
Factors affecting tunnel length, avoiding excessive length to maintain performance.
Thruster Placement Within Tunnel
Ensure thruster and gear leg are fully contained within the tunnel for proper function.
Tunnel Length Variations by Hull Type
Adjust tunnel length for standard, flat bottom hulls, and high-speed operations.
Tunnel Installation in Sailboats
Sailboat Tunnel Installation Method
Adapt tunnel installation for sailboats with flat bottoms and shallow drafts using deflectors.
Water Deflection and Drag Reduction
Managing Tunnel Drag
Address drag caused by the tunnel's back face in water flow.
Deflector and Recess Solutions
Implement hull recesses or deflectors to improve water flow and reduce drag.
Preventing Water-Induced Damage
Avoid damage from water forces by managing flow through the tunnel.
Tunnel End Design
Optimizing Tunnel End Shape
Use rounded tunnel ends for better thrust, reduced noise, and cavitation.
Hull-Specific End Treatments
Consider angled tunnel ends for steel/aluminium hulls.
Tunnel Installation Procedure
Tunnel Positioning and Cutting
Mark, drill, and cut the hull opening for the tunnel installation.
Securing the Tunnel to the Hull
Grind, insert, mark, and cast the tunnel to the hull using fiberglass.
Tunnel Installation Finishing
Finishing Tunnel Edges and Slopes
Round tunnel edges and create slopes for specific hull types.
Applying Additional Reinforcement
Add layers for strength and waterproof the areas where the tunnel meets the hull.
Gear Leg & Motor Bracket Installation
Centering and Marking
Mark tunnel and boat centerlines and use gasket for accurate hole placement.
Gear Leg and Motor Bracket Assembly
Fit gear leg, check clearance, and assemble motor bracket with proper torque.
Propeller Installation
Propeller Mounting and Securing
Install propeller, washer, lock-nut, and anode securely using correct procedures.
Applying Antifouling
Apply antifouling to gear leg and propeller, avoiding rubber elements and anodes.
Motor Installation
Mounting Motor to Bracket
Mount the motor onto the bracket, ensuring couplings are engaged and terminals accessible.
Support for Angled Installations
Provide additional support if the motor is installed more than 30 degrees off vertical.
Thruster Electrical Installation
Cable and Battery Sizing
Select appropriate cables and batteries with sufficient cranking capacity for the thruster.
Main Switch and Fuse Installation
Install main switch and fuse correctly for safe operation and protection.
Cable Connections and Lugs
Ensure proper electrical and mechanical isolation for cable lugs and connections.
Control Panel Cable Installation
Control Panel Compatibility and Wiring
Control panels are compatible and can be installed using Y or T connectors.
Multi-Panel Operation Rules
Understand operational rules for multiple control panels to prevent thruster stoppage.
Control Panel Installation
Panel Mounting Location and Cutting
Select a suitable location and use a template to cut the panel opening.
Connecting and Securing the Panel
Connect cables, place gasket, insert, and fasten the control panel.
Pre-delivery Checklist
Mechanical and Electrical Checks
Verify tightening of bolts, electrical connections, and component security.
Operational and Installation Verification
Confirm propeller function, antifouling, water leakage, and correct drive direction.
Need help?
Do you have a question about the SE120 and is the answer not in the manual?
Questions and answers