
Subscribe to Our Youtube Channel
Related Manuals for Intelix DIGI-P52


Summary of Contents for Intelix DIGI-P52
-
Page 1: Operation Guide
DIGI-P52 Installation and Operation Guide Rev 140814 8001 Terrace Ave Phone: 608-831-0880 Suite 201 Toll-Free: 866-462-8649 Middleton, WI 53562 Fax: 608-831-1833... - Page 2 DIGI-P52 Installation Guide...
-
Page 3: Important Safety Instructions
Do not block the air ventilation openings. Only mount the equipment per Intelix’s instructions. » Use only with the cart, stand, table, or rack specified by Intelix or sold with the equipment. When/if a cart is used, use caution when moving the cart/equipment combination to avoid injury from tip-over. -
Page 4: Table Of Contents
DIGI-P52 Installation Guide Table of Contents Product Overview ��������������������������������������������������������������������������������������������������������������������������������������� Package Contents ��������������������������������������������������������������������������������������������������������������������������������������� Front and Rear Panels ��������������������������������������������������������������������������������������������������������������������������������� Front Panel ���������������������������������������������������������������������������������������������������������������������������������������������������� Rear Panel ����������������������������������������������������������������������������������������������������������������������������������������������������� IR Remote ������������������������������������������������������������������������������������������������������������������������������������������������� Installation Instructions ���������������������������������������������������������������������������������������������������������������������������� Quick Start �������������������������������������������������������������������������������������������������������������������������������������������������� Mount the Matrix ��������������������������������������������������������������������������������������������������������������������������������������� Shelf Mounting Instructions ......................... -
Page 5: Picture Mode
DIGI-P52 Installation Guide Picture Menu ����������������������������������������������������������������������������������������������������������������������������������������������� Picture Mode ............................Color Temperature ..........................Aspect Ratio (Zoom) ..........................Noise Reduction (HDMI Only) ......................Screen (VGA Only) ..........................Color Range (HDMI Only) ........................Sound Menu ������������������������������������������������������������������������������������������������������������������������������������������������ Sound Mode ............................Surround Sound ............................ EQ (Equalizer) ............................ -
Page 6: Product Overview
The DIGI-P52 can be controlled in many different ways. When the VGA inputs are defined as PC signal inputs, the DIGI-P52 can be configured to automaticcaly switch to a device once connected to the switcher. The front panel offers source selection, output resolution, and volume control. -
Page 7: Package Contents
DIGI-P52 Installation Guide Package Contents Please verify the following items are in the shipping box prior to installation of the DIGI-P52. DIGI-P52 Switching Scaler Rubber Shelf Feet 1 ea 4 ea 12V DC 2A Power Mounting Rails with Screws Supply... -
Page 8: Front And Rear Panels
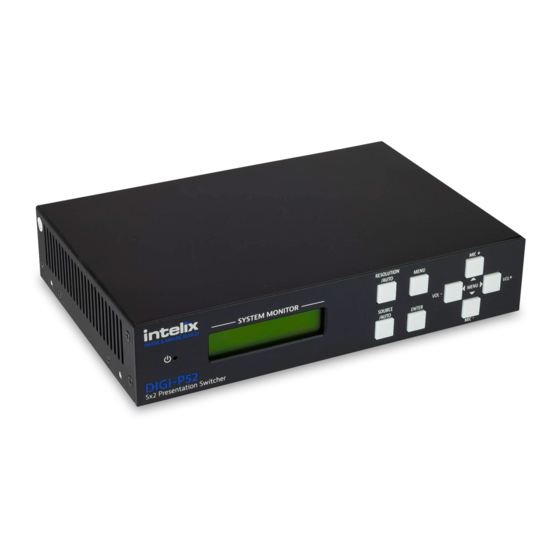
DIGI-P52 Installation Guide Front and Rear Panels Front Panel Power indicator LED LCD screen Resolution selection button Menu button Source volume down button (Menu Left) Microphone volume up button (Menu Up) Source volume up button (Menu Right) Source select button Menu “Enter”... -
Page 9: Rear Panel
DIGI-P52 Installation Guide Rear Panel Unbalanced analog audio inputs Unbalanced analog audio output IR outputs IR input Firmware update port RS232 input 12V DC input Microphone input Microphone input selector HDMI inputs VGA/analog video inputs HDMI output HDBaseT with PoE output... -
Page 10: Ir Remote
DIGI-P52 Installation Guide IR Remote The included IR remote performs all of the functions available on the front panel of the DIGI-P52 plus CEC control for compatible sources. Please see page 18 for information on controlling the matrix from the front panel and the IR remote. -
Page 11: Installation Instructions
Apply power Mount the Matrix At least 2 inches of free air space is required on both sides of the DIGI-P52 for proper side ventilation. Avoid mounting the DIGI-P52 near a power amplifier or any other source of significant heat. -
Page 12: Connect Sources
DIGI-P52 Installation Guide Connect Sources HDMI Inputs Connect the source devices to HDMI inputs using HDMI cables that are less than or equal to 5 meters in length. For source devices that are further away, an HDMI extension device will be required to complete the connection. -
Page 13: Connect Displays
The HDBaseT output provides 15 watts of Power over Ethernet, which eliminates the need for a power supply with a compatible HDBaseT receiver. Intelix recommends using the DIGI-HD60C-R or DIGI-HD60-R for installations which require remote power. Connect the HDBaseT receiver to the display per the manufacturer’s instructions. -
Page 14: Connect Microphone Input (Optional)
DIGI-P52 Installation Guide Connect Microphone Input (Optional) Insert the removable 3-pole terminal block to the MIC input terminal. Set the MIC switch to the proper setting for the microphone input source. 48V phantom power No phantom power LINE No gain needed... -
Page 15: Connect Ir Control (Optional)
An IR signal may be passed to a remote display location through the HDBaseT connection. In order to control the DIGI-P52 via IR or extend an IR signal to a remote display, the included DIGIB-EYE must be connected to the IR input port (IR IN) of the scaler. -
Page 16: Connect Rs232 Control (Optional)
RS232 port on the DIGI-P52 and the controller. To use the RS232 extension capabilities of the DIGI-P52, simply send the RS232 command of the remote display to the DIGI-P52. Consult the manual of the control device(s) to determine which pins the TX/RX signals are carried on. -
Page 17: Apply Power
DIGI-P52 Installation Guide Apply Power Plug the power supply into the power input port on the rear of the matrix. Twist the locking ring clockwise to prevent accidental disconnection of power. -
Page 18: Front Panel And Ir Remote Operation
Auto Selection: Press and hold the Source/Auto button for 15 seconds to enable the Auto Switching mode of the DIGI-P52. This function will not be available if either of the VGA ports are set to an alternate analog video format. -
Page 19: Volume Control
DIGI-P52 Installation Guide Volume Control Press VOL- and VOL+ to adjust the audio level of the source volume control. Press MIC- and MIC+ to adjust the audio level of the microphone volume control. INPUT SOURCE INPUT 1 INPUT 2 INPUT 3... -
Page 20: Additional Ir Remote Functions
MIC MUTE INPUT 4 INPUT 5 AUTO LINE DIGI-P52 Installation Guide LINE MUTE MIC MUTE Additional IR Remote Functions LINE LINE MUTE Picture, Zoom, and Sound Modes P.M. Cycles through all Picture Modes (see page 22). ZOOM Cycles through all Aspect Ratios (see page 22). -
Page 21: Menu Navigation
DIGI-P52 Installation Guide Menu Navigation The menu system of the DIGI-P52 provides a wide array of options to customize the installation of the product regardless of customer needs. Upon entering the menu, navigating left or right will provide four different submenus: Options, Picture, Sound, and Setup. -
Page 22: Picture Menu
DIGI-P52 Installation Guide Picture Menu The Picture menu features per input image adjustments: picture mode, color temperature, aspect ratio, noise reduction (HDMI only), screen settings (VGA only), and color range (HDMI only). Picture Mode Selecting Picture Mode will open another menu which will change the contrast, brightness, color, and sharpness of the input image. -
Page 23: Screen (Vga Only)
DIGI-P52 Installation Guide Screen (VGA Only) Selecting Screen will open another menu which will adjust the input signal processing to clear up various analog distortion issues. Auto Adjust will automatically correct for any input signal issues. Manual adjustments include Horizotal Position, Vertical Position, Size, and Phase where values range from 0 to 100. Pressing MENU will exit the submenu. -
Page 24: Setup Menu
OSD duration. OSD Language Selecting OSD Language will open another menu which will change the menu language of the DIGI-P52. The available languages are: English, German, Russian, Chinese, French, Spanish, and Swedish. The default language is English. Pressing MENU will exit the submenu. -
Page 25: Rs232 Commands
DIGI-P52 Installation Guide RS232 Commands RS232 Settings: 9600 baud, 8 Data bits, 1 Stop bit, Parity = None There are no spaces between any of the characters in the command string. <CR> = Carriage return (Hex 0D) <LF> = Line Feed (Hex 0A) -
Page 26: Video Input Customization
DIGI-P52 Installation Guide Video Input Customization Description Command Response Aspect Ratio : 16:9<CR><LF> Aspect Ratio : 4:3<CR><LF> Aspect Ratio : auto<CR><LF> Cycle aspect ratio 50608% Aspect Ratio : panorama<CR><LF> Aspect Ratio : justscan<CR><LF> Aspect Ratio : zoom2<CR><LF> Aspect Ratio : zoom1<CR><LF>... -
Page 27: Video Output Configuration
DIGI-P52 Installation Guide Video Output Configuration Description Command Response 1360x768 output 50619% Resolution: 1360x768<CR><LF> 1920x1200 output 50620% Resolution: 1920x1200<CR><LF> 1600x1200 output 50621% Resolution: 1600x1200<CR><LF> 1024x768 output 50626% Resolution: 1024x768<CR><LF> 1280x720 output 50627% Resolution: 1280x720<CR><LF> 1280x800 output 50628% Resolution:1280x800<CR><LF> 1920x1080 output 50629% Resolution: 1920x1080<CR><LF>... -
Page 28: Audio Input Configuration And Adjustment
DIGI-P52 Installation Guide Audio Input Configuration and Adjustment Description Command Response Use embedded audio for HDMI 1 50706% HDMI 1 Audio from Embedded<CR><LF> Use external audio for HDMI 1 50707% HDMI 1 Audio from LINE<CR><LF> Use embedded audio for HDMI 2 50708% HDMI 2 Audio from Embedded<CR><LF>... -
Page 29: Cec Setup And Control
DIGI-P52 Installation Guide CEC Setup and Control Description Command Response Enable CEC 50686% HDMI CEC ON<CR><LF> Disable CEC 50687% HDMI CEC OFF<CR><LF> CEC Play/pause 50901% CEC cmd: play&pause<CR><LF> CEC Stop 50902% CEC cmd: stop<CR><LF> CEC Menu 50903% CEC cmd: menu<CR><LF>... -
Page 30: System Query
DIGI-P52 Installation Guide System Query Description Command Response LINE Volume: XX<CR><LF> Check volume level 50630% MIC Volume: XX<CR><LF> Input: HDMI 1<CR><LF> Input: HDMI 2<CR><LF> Check input source 50631% Input: HDMI 3<CR><LF> Input: VGA 1<CR><LF> Input: VGA 2<CR><LF> Resolution: 1360x768<CR><LF> Resolution: 1920x1200<CR><LF>... -
Page 31: System Query (Continued)
DIGI-P52 Installation Guide System Query (continued) Freeze: enable<CR><LF> Check Freeze output image status 50753% Freeze: disable<CR><LF> Front Panel Lock<CR><LF> Check front panel lock status 50754% Front Panel Unlock<CR><LF> Volume Icon: enable<CR><LF> Check volume bar display status 50651% Volume Icon: disable<CR><LF>... -
Page 32: Cec Setup And Control
DIGI-P52 Installation Guide CEC Setup and Control Description Command Response Enable CEC 50686% HDMI CEC ON<CR><LF> Disable CEC 50687% HDMI CEC OFF<CR><LF> CEC Play/pause 50901% CEC cmd: play&pause<CR><LF> CEC Stop 50902% CEC cmd: stop<CR><LF> CEC Menu 50903% CEC cmd: menu<CR><LF>... -
Page 33: Troubleshooting
DIGI-P52 Installation Guide Troubleshooting Presentation Switcher does not power on » Verify power outlet is active. » Verify the power supply connector is secured to the rear of the switcher. No video from HDBaseT output » Verify the green link LED on the HDBaseT output is lit solid. -
Page 34: Technical Specifications
DIGI-P52 Installation Guide Technical Specifications Input Connections HDMI Inputs Three (3) HDMI type A VGA Inputs Two (2) HD15-F Analog Audio Inputs Five (5) 3-Pole/3.5mm Euroblock Microphone Input One (1) 3-Pole/3.5mm Euroblock Control (Front Panel) Push Button Control (Rear Panel) RS232 via 3-Pole/3.5mm Euroblock, RS232 via HDBaseT Output (8P8C-F), IR via 3.5... - Page 35 DIGI-P52 Installation Guide Control Parameters RS232 Baud 9600 baud HDBaseT Signal Characteristics Maximum Distance 60 m Cable Requirements Solid core shielded Category 5e, Category 6 or greater with TIA/EIA-568B crimp pattern Bandwidth 10.2 Gbps Gain 0 dB – 10 dB at 100 MHz Signal to Noise Ratio (SNR) >...
- Page 36 Please contact us with your questions and comments. Intelix 8001 Terrace Ave, Ste 201 Middleton, WI 53562 Phone: 608-831-0880 Toll Free: 866-462-8649 Fax: 608-831-1833 www.intelix.com intelix@intelix.com Intelix is a brand of: 11675 Ridgeline Drive Colorado Springs, Colorado 80921 USA Phone: 719-260-0061 Fax: 719-260-0075 Toll-Free: 800-530-8998...
Need help?
Do you have a question about the DIGI-P52 and is the answer not in the manual?
Questions and answers