
Related Manuals for Syscom Video NCT-2211


Summary of Contents for Syscom Video NCT-2211
- Page 1 Quick Installation Guide Mini Cube Network Camera Please read this manual thoroughly before use, and keep it handy for future reference.
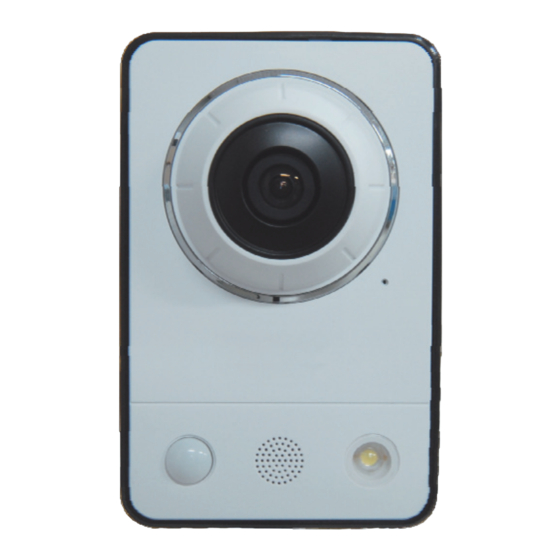
- Page 2 DSP compression chip, and makes it available on the network as real-time, full frame rate Motion JPEG and H.264 (or MPEG-4) video streams. Network Camera Features H.264, MPEG4 and MJPEG Wired and Wireless interface Micro-SD NCT-2211 Illumination LED PIR Sensor Audio H.264, MPEG4 and MJPEG Wired interface Micro-SD...
-
Page 3: Installation Steps
3. The Syscom Virtual Management System User’s Manual 4. The SmartManager Installation software 5. The Syscom Virtual Management System Installation software Note: Check your package to make sure that you received the complete system, including all components shown above. • Front View [NCT-2211/NCT-2221]... - Page 4 Quick Installation Guide Camera Dimension See the diagrams below for the exact dimension of the NUT-4201D, IR Bullet network cameras. Dimensions Unit: mm Base Installation(Cable through the wall with the mount base) There are two ways of installing the camera.
- Page 5 Quick Installation Guide 1) Installation1 (Cable through the wall with the mount base) A. Drill the mounting location, using the template sheet (or the bottom of the mount base) as a template. B. Insert the plastic anchors into the hole which has just drilled. C.
-
Page 6: Installation
Quick Installation Guide C. Connect connection cable and network lines. D. Fit the screw holes of the mount base into the plastic anchors. E. Remove the conduit knockout punched for the cable entry. Screw up the mount screws (M5x20). Adjust the camera suitably using the pan & tilt function, and fasten and fasten the mount screws (M6x16) to fix the camera. - Page 7 Quick Installation Guide Note: You can get the Optional ODS Controller from your installer. ▶ ID & IP assignment To make changes in the OSD menu, please the OSD controller provided optionally with your camera purchase. You can set Camera Title and IP Address. 1.
-
Page 8: Network Connection And Ip Assignment
Quick Installation Guide 2.2 Network Connection and IP assignment The Network Camera supports the operation through the network. When a camera is first connected to the network it has no IP address. So, it is necessary to allocate an IP address to the device with the “Smart Manager”... -
Page 9: Operation
Quick Installation Guide 3. Operation The Network Camera can be used with Windows operating system and browsers. The recommended browsers are Internet Explorer, Safari, Firefox, Opera and Google Chrome with Windows. 3.1 Access from a browser Start a browser (Internet Explorer). Enter the IP address or host name of the Network Camera in the Location/Address field of your browser. -
Page 10: Setting The Admin Password Over A Secure Connection
Quick Installation Guide 3.3 Setting the admin password over a secure connection To gain access to the product, the password for the default administrator user must be set. This is done in the “Admin Password” dialog, which is displayed when the network is accessed camera for the setup at the first time. -
Page 11: Control Toolbar
Quick Installation Guide 2) Control toolbar The live viewer toolbar is available in the web browser page only. It displays the following buttons: The Stop button stops the video stream being played. Pressing the key again toggles the start and stop. The Start button connects to the network camera or start playing a video stream. -
Page 12: Resetting To The Factory Default Settings
Quick Installation Guide 4) Focus and Zoom Control You can control Zoom and Focus in the live screen. Press the button on the left top in the live screen to activate the Zoom & Focus control panel. • Adjusting Zoom: Click “–“... - Page 13 Quick Installation Guide Switch off the Network Camera by disconnecting the power adapter. Remove the rear cap of the camera. Press and hold the Reset button with a straightened paperclip while reconnecting the power. Keep the Reset button pressed during about 2 seconds. Release the Reset button.
Need help?
Do you have a question about the NCT-2211 and is the answer not in the manual?
Questions and answers