
Related Manuals for Healthstream HC10TVUB


Summary of Contents for Healthstream HC10TVUB
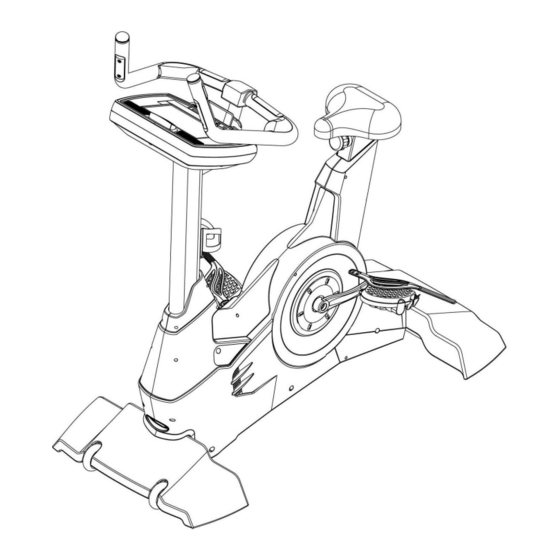
- Page 1 HC10TVUB OWNER’S MANUAL _____________________________________________________________________________________________________...
-
Page 2: Table Of Contents
Index Pre Installation Tips………………... ……………………………………………………………02 Selecting Where Your Bike Goes………………………………………………………………. .02 Specifications ……..……………………………………………………………………………..03 Assembly Parts …………………………………………………………………………………..04 Parts Details ………………………………………………………………………..…………...05 Assembly Procedures ……………………………………………………………………………06 Operation Instructions …………………………………………………………………………...12 2010/2/26 Ver1.0+V1.0... -
Page 3: Pre Installation Tips
Pre Installation Tips The following are tips to aid you in the installation of the 850B Fitness Bike: 1. Prepare all relevant parts before starting, this will save you time! 2. All screws are tightened by turning to the right and loosened to the left. 3. -
Page 4: Specifications
Specifications Max. User Weight 400Ibs/180kg Size of Machine 64cm x 131.7cm x 146.1cm Packing Weight of 62.2kg Machine Net Weight of 52.2kg Machine Power Supply 15V/2A DC (Charger) 2010/2/26 Ver1.0+V1.0... -
Page 5: Assembly Parts
Assembly Parts 2010/2/26 Ver1.0+V1.0... -
Page 6: Parts Details
Parts Details ITEM Description Steel hexagon socket head screw M8xP1.25x25 Blue Nylok Spring Washer M8 Flat Washer Ø8xØ16x2.0t Inner steel hexagon socket head screw M8XP1.25X20 Blue Nylok Spring Washer M8 Umbrella-head cross screw Blue Nylok M4xP0.7x10 Spring Washer M4 Round-head cross screw M5x15 Allen Wrench 6mmx40x120 <120 crossing for longer part>... -
Page 7: Assembly Procedures
Assembly Procedures STEP 1. Attaching the Seat to the Main Frame of the bike After must first loads POPIN(H), then seat cushion (D) depends on the arrow direction insertion frame group (C) localization then. 2010/2/26 Ver1.0+V1.0... - Page 8 STEP 2. Attaching the Upper Control Frame to the Main Frame 1. The first pilot wire and the cable line passes through the frame on the control tube, then on the control pedestal (B) assembly in frame group (C), bears again afterward the blue color falls receives in the steamed bread hexagonal screw (a) and spring washer (b) puts down China to take charge of (c), like chart insertion locking localization then.
- Page 9 STEP 3. Attaching the Handlebars Thread the 3 wires in the Handles (E) through the exit of the bend pipe on the Control Frame. Then fix the handlebars by tightening with the CKS Hex Screws (d) and Spring Washers (e) according to the drawing below.
- Page 10 STEP 4. Wire connection of control pipe system Pull out the wires in the tube of the Upper Control Frame (B) according to the drawing below. 2010/2/26 Ver1.0+V1.0...
- Page 11 STEP 5. Attaching the Computer 1. Connect the Computer (A) with the wires from the Upper Control Frame (B). Fix using Blue Nylok Screws (f) and M4 Spring Washers (g). Make sure the screws have been tightened well to avoid any loosening or possible damage to the computer. Caution: When assembling the Computer, kneeling down may be needed.
- Page 12 STEP 6. Attaching the Decoration Covers to the Bike Frame Finally, fasten the left and right decoration covers (G and F) with Round Head Philips Screws (h) according to the drawing below. 2010/2/26 Ver1.0+V1.0...
-
Page 13: Operation Instructions
Computer Operation Instructions I. Subject Instruction This computer has touch control 10.1”TFT-LCD window. It can display SPEED, LEVEL, DISTANCE, CAL, TIME, WATTS, BPM, RPM, CHANNEL, VOLUME and PROGRAM figures. II. Display and booting of the starting-up window goals mode:Target TIME, DISTANCE and CALORIE exercise mode. Race mode: User can compete with computer according to the distance and time he wants. - Page 14 HRC mode: Heartbeat exercise mode which has levels of 65%, 75%, 85% and THR. Set the exercise levels in accordance with the coach or requirements of self-direction. programs mode:There are exercise program, stable exercise program and six different kind of program to choose. User mode: User can set up strength of excise in each level.
- Page 15 11. ON:Touch this key to start the video function(TV, DTV, AV, MP3 mode) and press again to turn off. 12. TV:Touch this key to switch among TV, DTV, AV, MP3 mode (circle). 13. Touch the center of the image area under TV, DTV or AV mode to zoom in or zoom out the screen.
- Page 16 IV. Mode Instructions 1. For the treadmill is dynamo type, it need 25PRM above or 15VDC/2000ma transformer to start the computer continuously. 2. When the treadmill not plug to the transformer, the computer will be totally powered by dynamo. While the rotate speed is lower than 40RPM, the computer will be powered by batteries.
- Page 17 13. After the program is over or under pause mode for 1 minutes, the buzzer will beep for seconds and then the accumulate sport values will display in the center window and after 20 seconds or press key, it will back to standby mode. V.
- Page 18 User enter target value:Press to adjust WEIGHT(default:70kgs; range:23-180kgs), TIME(default:20minutes;range:0, 10-99minutes) or DISTANCE(default:5kilometers;range:0-99kilometer)or CALORIES(default:500Kcal;range:0-999 Kcal)。 After setting parameter, press or press during setting to start program (It will be start by default if there is no parameter need to be adjust).The target value will be carried out by count down.
- Page 19 MALE HEART RATE <35 >=186 >=170 >=139 >=129 <129 <45 >=183 >=165 >=124 >=112 <112 <55 >=186 >=167 >=127 >=100 <100 >=55 >=188 >=165 >=129 >=107 <107 RESULT FEMALE HEART RATE <35 >=197 >=181 >=150 >=140 <140 <45 >=212 >=197 >=161 >=150 <150...
- Page 20 standby directly to choose. 4. After setting parameter, press or press during setting to start program (It will be start by default if there is no parameter need to be adjust).The target value will be carried out by count down. (Parameter will make measure according value you enter) 5.
- Page 21 preset preset preset preset User Mode This mode will record the last state user entered. After enter this mode user can press MODE to adjust the resistance from 1 to 32 level,then press to adjust L1-l2 of each level. The relative light will shine during setting this level, then press to adjust the next level.
- Page 22 challenge time of target distance. Press to adjust. At the time, program will compute race speed of monitor according the value user entered. 2. Press to start race. After showing3,2,1 on screen, user start race with monitor. 3. If the value which user entered is invalid, user should adjust, otherwise, this mode can’t be started.
- Page 23 return to standby directly to choose. 5. Press during setting to start program (It will be start by default if there is no parameter need to be adjust). 6. During carrying out program, user can press to adjust workout level. There are total 8 levels to be chosen.
- Page 24 Program Control Project Figure level review 2010/2/26 Ver1.0+V1.0...
- Page 25 2010/2/26 Ver1.0+V1.0...
- Page 26 2010/2/26 Ver1.0+V1.0...
- Page 27 2010/2/26 Ver1.0+V1.0...
- Page 28 2010/2/26 Ver1.0+V1.0...
- Page 29 2010/2/26 Ver1.0+V1.0...
- Page 30 2010/2/26 Ver1.0+V1.0...
- Page 31 2010/2/26 Ver1.0+V1.0...
- Page 32 2010/2/26 Ver1.0+V1.0...
- Page 33 2010/2/26 Ver1.0+V1.0...
- Page 34 2010/2/26 Ver1.0+V1.0...
- Page 35 2010/2/26 Ver1.0+V1.0...
- Page 36 Program Mode (When the TV image appears blank or no signal, you can adjust TV system setup in this mode, and non-engineer is not allowed to change the parameters of this mode to avoid error): Under start/ready mode, press and then press Simulation Signal Setup Steps:...
- Page 37 7. Choose Factory Default and press ENTER key. 8. ”Enter password” will display,then press FAN key 4 times. 9. Then ”Do you want to perform factory default?” will display,choose Yes. 10. Repeat step 3. P.S. You can just change Factory Default of Main Menu and the rest can’t be changed. 2010/2/26 Ver1.0+V1.0...
Need help?
Do you have a question about the HC10TVUB and is the answer not in the manual?
Questions and answers