
Related Manuals for Healthstream HS6.0B


Summary of Contents for Healthstream HS6.0B
- Page 1 If you have any questions , please contact The Fitness Generation, +61 (03) 9765 9999. Free call number 1300 796 636 www. healthstreamfitness.com.au...
-
Page 2: Safety Hints
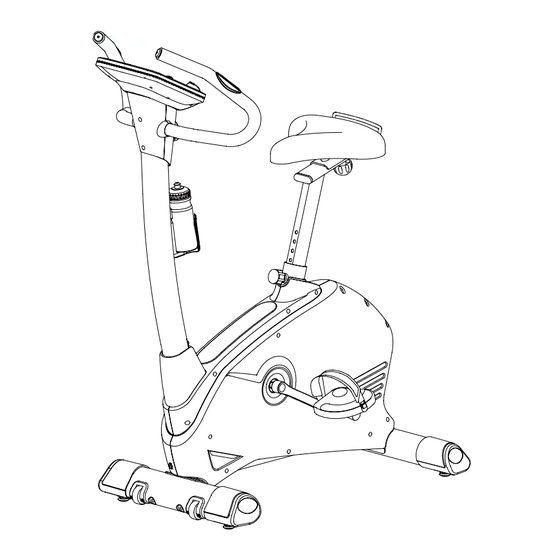
Instructions for the correct adjustment of the seat. SAVE THESE INSTRUCTIONS - THINK SAFETY! CAUTION!! Please be careful when opening this unit. HS6.0B If you have any questions , please contact The Fitness Generation, +61 (03) 9765 9999. Free call number 1300 796 636... - Page 3 HANDLE BAR COMPUTER CENTRAL TUBE SADDLE TOWEL HOUSING KNOB REAR STABILIZER FRONT STABILIZER PEDAL If you have any questions , please contact The Fitness Generation, +61 (03) 9765 9999. Free call number 1300 796 636 www. healthstreamfitness.com.au...
-
Page 4: Assembly Pack Check List
ASSEMBLY PACK CHECK LIST FIGURE 1 J2 SCREW M8X105L J4 SPRING M8 J5 WASHER M8X16X1.2T FIGURE 2 J2 SCREW M8X105L J4 SPRING M8 J5 WASHER M8X16X1.2T FIGURE 5-2 J1 SCREW M4X20L FIGURE 5-3 J1 SCREW M4X20L FIGURE 6 J3 KNOB If you have any questions , please contact The Fitness Generation, +61 (03) 9765 9999. - Page 5 FIGURE_1 ASSEMBLY FOR FRONT STABILIZER Attach the front stabilizer(C) to the bracket at the front of the mainframe(A). Insert 2pcs bolts(J2),2pcs spring(J4) and 2pcs washer(J5) through the front stabilizer(C) to attach with the mainframe(A). Then, fix the bolts tightly. FIGURE_2 ASSEMBLY FOR REAR STABILIZER Attach the rear stabilizer(B) to the bracket at the front of the...
- Page 6 FIGURE_3 ASSEMBLY FOR CENTRAL SUPPORT TUBE STEP 1.TAKE OFF THE BOLT(A5), STEP 2.PUT THE UPPER CENTRAL TUBE WASHER(L4), (L) THROUGH DECORATION FORM THE MAIN FRAME(A) COVER(M) FIRST AND AFTER BEFORE ASSEMBLY. THE CABLE CONNECTED WELL POSITION THE COVER(M) UNTILL THE BUTTON. STEP 3.CONNECT THE SENSOR STEP 4.ASSEMBLE SUPPORT TUBE(L) WITH WIRE(A7) AND THE...
- Page 7 FIGURE_4 ASSEMBLY FOR HANDLE BAR First,remove the washer (L4) and nut(L5) from the handle bar(E). Put the handle bar(E) into the handle bar housing and secure it by washer(L4) and nut(L5). FIGURE_5-1 ASSEMBLY FOR COMPUTER HOUSING STEP 1:Take screw(L7) out from central tube(L) first.
- Page 8 FIGURE_5-2 ASSEMBLY FOR COMPUTER HOUSING STEP 2: Slide the sensor wires(L3 & E3 ) through the monitor front housing(H1) as shown on (view A). Then, connect the monitor rear housing with monitor front housing by screws(J1). FIGURE_5-3 FINISH THE ASSEMBLY FOR COMPUTER HOUSING Attention: Please position all sensors wire outside of the computer housing.
- Page 9 FIGURE_6 ADJUSTING THE HANDLE Loose the knob(J3) to the left direction and you can adjust different position what you need. FIGURE_7 ASSEMBLY THE COMPUTER Connect the sensor wires(E3 & L3) with computer wires and put the computer on the computer housing(H). If you have any questions , please contact The Fitness Generation, +61 (03) 9765 9999.
-
Page 10: Adjust The Saddle
FIGURE_8 ASSEMBLY SADDLE SUPPORT TUBE & SADDLE WITH MAIN FRAME & WATER BOTTLE & TOWEL HOUSING STEP 1:Loosen the knob(A22) and keep on pulling it. Then, insert the saddle support tube(D) into the main frame(A). Release the knob(A22) after the saddle support tube is equipped appropriately. STEP 2. - Page 11 FIGURE 9 ASSEMBLY PEDAL WITH MAIN FRAME Install the right strap on right pedal and the left starp on left pedal. Step 1.Equip the left pedal(H1) with the crank by anti-clockwise direction. Step 2.Equip the right pedal(H2) with the crank by clockwise direction. If you have any questions , please contact The Fitness Generation, +61 (03) 9765 9999.
- Page 12 If you have any questions , please contact The Fitness Generation, +61 (03) 9765 9999. Free call number 1300 796 636 www. healthstreamfitness.com.au...
- Page 13 If you have any questions , please contact The Fitness Generation, +61 (03) 9765 9999. Free call number 1300 796 636 www. healthstreamfitness.com.au...
- Page 14 Part DESCRIPTION Q’TY Part DESCRIPTION Q’TY c i t A8-1 A9-1 A9-2 Screw 4*20 c i t A11-1 * ” A11-2 A11-3 c i t A11-4 A11-5 z i l A11-6 ” 8 A11-7 A11-8 z i l A11-9 A11-10 A11-11 Axle 10*120L ”...
- Page 15 F1-2 Strap(L) Strap(R) Washer8*16*1.2T Spring M8 Washer M8*16*1.2T Towel housing Washer If you have any questions , please contact The Fitness Generation, +61 (03) 9765 9999. Free call number 1300 796 636 www. healthstreamfitness.com.au...
-
Page 16: How To Move The Machine
FIGURE 10 HOW TO MOVE THE MACHINE Step1. Hold the handle bar and push down the handle bar. Step2. You can move the machine easily by the transportation wheel on the front stabilizer. If you have any questions , please contact The Fitness Generation, +61 (03) 9765 9999. Free call number 1300 796 636 www. - Page 17 1. FUNCTION IDENTIFICATION BAR GRAPH DISPLAY MODE CONTROL LIST Profiles Programs as listed here MANUAL-PROGRAM - WATT 16 x Rows = 16 Load resistance -PERSONAL-H.R.C. Levels USER DATA Display 16x Column = time intervals There are total 5 user Data (.U0-U4) including Gender, Age, 12 Program Profiles Graph Key Quick key of press 12 Program...
- Page 18 3. POWER ON 1. Plug in 6V 1A power Adaptor to right country socket and connect the I / L PIN to Fitness equipment. 2. When stay in U0~U4, only there is pulse input, then PULSE symbol on the right in window will operate to display automatically as per H.R.C.: If pulse maximum value is set, then the function cancel automatically.
- Page 19 F. RECOVERY When you have finished your workout, press RECOVERY. For RECOVERY to function correctly, it needs your Heart Rate input. TIME will count down from 1 minute and then your fitness level from F1 to F6 will be displayed. NOTE: during RECOVERY, no other displays will operate. F 1 ~ F6 = RECOVERY HEART RATE LEVEL Operating ENTERS: 1.
-
Page 20: Weight Training
AEROBIC EXERCISE Aerobic exercise is any sustained activity that sends oxygen to your muscles via your heart and lungs. Aerobic exercise improves the fitness of your lungs and heart - your body’s most important muscle. Aerobic exercise fitness is promoted by any activity that uses your large muscle -arms, legs, or buttock, for example. - Page 21 Quadriceps Stretch WARM UP With one hand against a wall for balance, reach behind you and pull your right foot up. Bring your heel as close to your buttocks as possible. Hold for 15 counts and repeat with left foot up. Inner Thigh Stretch Sit with the soles of your feet together with your knees pointing outward.
Need help?
Do you have a question about the HS6.0B and is the answer not in the manual?
Questions and answers