Table of Contents
Advertisement
Quick Links
Advertisement
Chapters
Table of Contents

Related Manuals for Docomo Prime CA-01C


Summary of Contents for Docomo Prime CA-01C
- Page 1 CA-01C ’11.6 INSTRUCTION MANUAL...
- Page 2 Thank you for choosing "docomo PRIME series CA-01C". Before use, be sure to thoroughly read this manual to ensure that you use CA-01C correctly. About manual of CA-01C The operations of CA-01C are also described in " " (Guide) (available in this FOMA terminal) and "Instruction Manual (Detailed version)"...
-
Page 3: Table Of Contents
Contents FOMA Terminal ......2 Style ..........7 Introduction What You Can Do with CA-01C ...3 Precautions (Always follow these directions) ...8 Part Names and Functions ..5 Waterproof/Dustproof Function ...19 Before Using ......23 Sound/Screen Setting ....36 Basic Operation Screen Explanation ....27 Lock/Security ......41 p.23... -
Page 4: Foma Terminal
SSL/TLS. In the event that the user shall sustain damage or loss due to the use of SSL/TLS, neither DOCOMO nor the certifier shall be responsible for any damage or loss. Certifier: VeriSign Japan K.K., Cybertrust Japan Co., Ltd., GlobalSign K.K., RSA Security Japan Ltd., SECOM Trust Systems Co., Ltd., Comodo CA Ltd., Entrust, Inc. -
Page 5: What You Can Do With Ca-01C
Waterproof/Dustproof function CA-01C is waterproof to IPX5 and IPX8 standards, and dustproof to IP5X standard if all caps are closed as well as the EXILIM Phone panel is securely attached. You can make/receive calls or send/receive mail messages in the rain, in a bathroom and at a poolside, etc. -
Page 6: Main Functions
Main Functions You can shoot 3D images and display them straightaway on the CA-01C display. In addition, pressing the 3D key lets you display 2D images and 1Seg in 3D. Still In Movie While shooting a movie, you can capture still images by pressing the shutter key. -
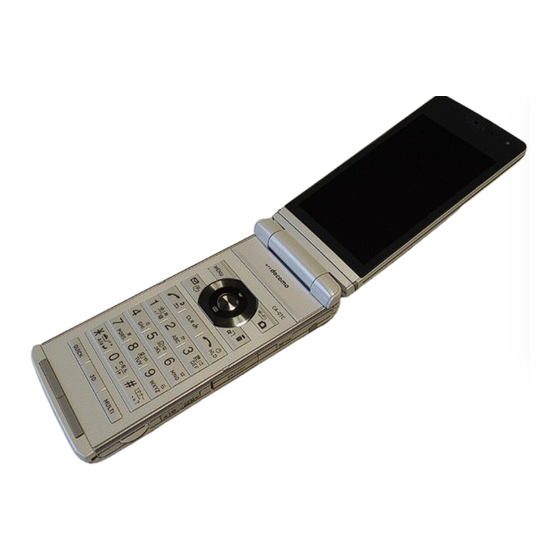
Page 7: Part Names And Functions
Part Names and Functions Charge lamp Multi-function keys : Up/Down key Illuminance sensor Detect brightness. Do not cover Move the cursor or contents etc. with hand or put sticker on it. upward or downward. Display the i-Widget/Search Earpiece phonebook menu screen. Hear other party's voice from here. - Page 8 Illumination/Charge lamp GPS antenna The antenna is built-in. Covering mark the antenna part with your Read the IC card and make iC hand may affect the quality. transmissions. FOMA antenna The antenna is built-in. Covering Sub-display the antenna part with your Display the clock or FOMA terminal hand may affect the quality.
-
Page 9: Style
Style This FOMA terminal has three styles; folded, opened (Communication style), or folded with the display rotated outward (Touch style). Folded Communication style Touch style In this manual, operations by keys with the FOMA terminal opened (Communication style) are mainly described. Even if touch operation is available, key operations description takes priority. -
Page 10: Precautions (Always Follow These Directions)
Precautions (Always follow these directions) To ensure that you use your FOMA terminal Indicates that it is an instruction- correctly, read "Precautions" carefully before use. based compulsory conduct (must Keep this manual after reading for future reference. be acted). The precautions must be observed at all times since they contain information intended to Indicates that you must unplug prevent the bodily injury or damage to property. - Page 11 Use the battery pack and adapter specified Do not leave the devices in humid, dusty by NTT DOCOMO for the FOMA terminal. or hot places. Failure to observe this precaution may cause Doing so may cause fire, burns or electric shock.
- Page 12 Do not turn on the light against the car drivers, etc. If the display or camera lens is broken, be careful with the broken glass and any exposed FOMA terminal parts. Doing so may interfere with driving and cause a traffic accident. A protective film is used for the display, and a plastic panel is used Don't for the surface of the camera lens to prevent glass from shattering.
- Page 13 Put insulation tape on the terminals of used Don't contact with the charging terminals. Also, battery pack and return it to a docomo Shop or do not carry or store the battery pack Service Counter, or dispose of the battery pack in Don't with metal items such as necklaces.
- Page 14 If the fuse in the DC adapter blows, always 4. Precautions for the Adapter and Desktop Holder replace it with the specified type of fuse. Failure to observe this precaution may cause fire, WARNING burns or electric shock. Refer to the respective manuals for the information on the specified fuse.
- Page 15 6. Precautions for Use Near 7. Precautions for Viewing 3D Images Electronic Medical Devices CAUTION According to the Guidelines on the Use of Radio communication Equipment such as Cellular If you have a history of photosensitive Telephones - Safeguards for Electronic Medical epilepsy or heart disease or you are Equipment established by the Electromagnetic unwell...
-
Page 16: Material List
Material list Parts Material Coating Display and key Nylon resin UV coating Acrylic resin UV coating External chassis Sub-display Nylon resin Tin deposition, UV coating Battery pack storage Polycarbonate resin UV coating Display panel Hardened glass Shatter-proof film, Hard coating Display hinge Nylon resin UV coating... -
Page 17: Handling Precautions
FOMA terminal. benzene or detergents as these agents may Please be aware that DOCOMO bears no obligation or erase the printing on the FOMA terminal or responsibility in the event that data is altered or lost. - Page 18 UIM. recharged. In this case, please purchase a new battery pack. Please be aware that DOCOMO bears no obligation or The ambient temperature of the room should be 5 to 35 . ...
- Page 19 Bluetooth function. Users are advised to assess their responsibilities and Please be aware that DOCOMO is not accordingly configure security settings. responsible for data leak when making data Wireless LAN ...
- Page 20 Cautions 2.4GHz device cautions The operating frequency band of the WLAN is used Do not use the altered FOMA terminal. Using an by industrial, scientific, consumer and medical altered device is a violation of the Radio Law. equipment including microwave ovens, premises A "Technical Conformity Mark "...
-
Page 21: Waterproof/Dustproof Function
EXILIM Phone panel is securely attached. *1 : IPX5 means that the CA-01C continues to function as a phone after being sprayed from all directions with 12.5 liters of water per minute from a 6.3 mm diameter nozzle for at least 3 minutes, from a distance of approx. 3 meters. - Page 22 Opening/closing the external connector terminal cap, microSD card slot cap or HDMI micro plug (Type D) cap <Example: External connector terminal cap> Opening Closing Hook your finger on the slot and open the cap in the direction of arrow. Close the cap by pressing securely in the direction of arrow. Slot Attaching/removing the EXILIM Phone panel Removing...
-
Page 23: Important Notices
FOMA terminal causing electric shock or malfunction. Stop using the FOMA terminal, turn off the power, remove the battery pack and contact a repair counter specified by DOCOMO. All caps and the rubber packing of the EXILIM Phone panel play an important role in maintaining waterproof/dustproof function. - Page 24 Draining water when the FOMA terminal gets wet When the FOMA terminal gets wet, drain the water following the steps below. If water adheres to the mouthpiece/microphone, earpiece or speaker, the volume of the other party's voice or melody may be decreased or sound quality may deteriorate. In such a case, drain the water following the steps below and dry the FOMA terminal in open air to recover the function.
-
Page 25: Before Using
The UIM is an IC card that contains private information such as your phone number. This FOMA terminal does not operate with a UIM (Blue) in it. If your UIM is blue, check with a docomo Shop Service Counter for replacement. Remove the EXILIM Phone panel ( p.20) - Page 26 Charging For the charging time and continuous talk time, refer to "Main specifications" ( p.95). The battery pack, AC adapter and provided desktop holder are not waterproof/ dustproof. Never charge the battery with the FOMA terminal left wet. It is recommended that the desktop holder be used for charging to prevent water from seeping inside and dust from getting in through the external connector terminal.
-
Page 27: Turning Power On
Turning power ON (1 second or longer) Standby screen If Initial setting screen appears When you turn the power on for the first time after purchase, Initial setting screen appears. To turn the power off Press for 2 seconds or longer. Configuring default setting After turning the power on for the first time after purchase, screens for initial settings such as "Auto time", "Change... -
Page 28: Checking Your Own Phone Number
Notifying your caller ID on the other party's phone Set whether to show your phone number (caller ID) on the other party's phone (display) when making a call. "TEL function" "Dial/Receive setting" "Caller ID notification" "Activate/Deactivate" "ON" or "OFF" If you hear a message requesting your caller ID, make a call again with Caller ID notification enabled or with 186 prefix. - Page 29 Screen Explanation Viewing display/icon Symbols ( , , , etc.) displayed on the screen and sub-display are referred to as icons. Icons indicate the status of such as the FOMA terminal and signal reception. Icons indicating the status of the FOMA terminal At the top of the screen, icons indicate the status of the FOMA terminal.
- Page 30 Reminders and Desktop icons In the middle of the screen, icons indicate the status of new arrivals. You can paste desktop icons, with which you can launch functions. Reminders (examples) Missed call Record message Record VP message Voice Mail New mail Desktop icons (examples) Schedule Voice recorder...
- Page 31 Checking missed calls/new mail Checking missed calls Press to view "received date/time/caller's name (phone number)", etc. Checking new mail Press to view "sender/received date and time/subject", etc. You need to set "Mail" under "Sub-display setting" to "ON". "Setting" "Screen/Display" "Sub-display setting" "ON"...
-
Page 32: Key Operation
Changing the design of the main menu You can change the design of the main menu (background, icon, etc.). Choose from "Basic" - "Standard", "Simple", "Original theme" and "Kisekae Tool". (Kisekae) Select a design Key operation The soft keys (Function display) corresponding to and the direction icons corresponding to are displayed on the screen. -
Page 33: Menu Operation
Menu operation You can select various functions of the FOMA terminal from the main menu, which appears when you press on the standby screen. to move the highlight, then (Select) Select the displayed menu sequentially If no key is pressed for 15 seconds or longer while the main menu is displayed, the main menu ends and the previous screen reappears. -
Page 34: Using Touchscreen
Using Touchscreen The FOMA terminal display is a touchscreen display. Touch the screen directly with your finger to operate. Notes on use The touchscreen is designed to be touched lightly with a finger. Do not press the screen firmly with a finger or pointed objects such as fingernails, ballpoint pens, and pins. In the following cases, the touchscreen may not respond even if touched. - Page 35 Using Start by voice From the standby screen, you can activate and execute a function by voice. This function is convenient when you do not know under which menu the required function belongs to, or when you want to activate a function quickly. * Start by voice is not available when "English"...
-
Page 36: Screen Explanation
Character Entry Entering characters When entering information to save to the phonebook, or creating mails or schedules, enter text. Switching entry modes Entering characters Converting entered text Press (Chrct) on Press a dial key several times Convert entered text to the text entry screen to enter your desired text. - Page 37 Let's enter text. <Example : entering " (Autumn camp)"> Enter Hiragana once twice to move the cursor to the target conversion candidate 5 times twice and then to select the candidate (Set) once once to lower case 3 times 3 times twice (Han-dakuten) Entering Deco-mail pictogram/Deco-mail picture...
-
Page 38: Sound/Screen Setting
Sound/Screen Setting Changing ring tone Changing the ring tone for FOMA calls "Setting" "Sound/Vib./Manner" "Select ring tone" "FOMAphone" "Select ring tone" "Melody" Select ring tone Other options such as a melody, i-motion, Chaku-Uta®, or Chaku-Uta-Full® can be set ring tones. When i-motion is set, a video also plays. - Page 39 Using manner mode Set the FOMA terminal not to play ring tones or keypad sound through the speaker with a single key operation. Even in manner mode, the camera shutter sound, the auto focus lock sound or the start/end/pause sound of a moving picture recording or a voice recorder plays.
- Page 40 Making display hard to see from people around Screen Filter makes it difficult for others to see the display. When Screen Filter is set, is displayed on the standby screen. (1 second or longer) To release the setting (1 second or longer) You may not be able to set/release the Screen Filter while editing a text, etc.
- Page 41 Setting Kisekae Tool Set various FOMA terminal designs such as screens and ring tones at once. "Setting" "Screen/Display" "Kisekae Tool setting" Select a folder Highlight an item (Set all) "YES" When you use Kisekae Tool to change the menu display design, the structures of some menus may change in accordance with the frequency of use.
- Page 42 Checking missed calls or new mail with illumination and camera ring illum. Set whether to keep the illumination and camera ring illum. flashing or to stop flashing. Setting illumination "Setting" "Backlight/Illum." "Illumination setting" "Illumination in call" "Missed info" "ON" or "OFF" Checking with illumination and camera ring illum.
-
Page 43: Lock/Security
Any code is set at time of subscription A 4-digit number is required to verify your identity when you subscribe to some services at a docomo Shop, docomo Information Center and " (User support)" (in Japanese only), or when you use network services. - Page 44 Your PIN unblocking key (PUK) is written on application form (copy for customer), which a docomo Shop gives you at time of subscription. If you have subscribed at a retailer other than the docomo Shop, please bring your UIM and official documents that verify your identity, such as a driver's license, to a docomo Shop Service Counter, or contact "General Inquiries"...
-
Page 45: Various Lock Functions
IC * Unavailable from part of IP phones. Lock * My docomo is also available to set/release Omakase Lock via PC, etc. (in Japanese only) card function of Osaifu- Keitai only by contacting For details on Omakase Lock, refer to "Mobile DOCOMO. - Page 46 Type of Lock Function Setting procedure Lock the touchscreen to To activate: "Setting" "Lock/Security" prevent misoperations Lock bar "Lock bar setting" "ON" while the FOMA terminal setting is in Touch style and after To deactivate temporarily: In Touch style and when the touchscreen the touchscreen goes off.
- Page 47 Resetting to default Resetting the function settings to default Reset the function settings to default. For the function that can be reset, see "Menu list" ( p.91). "Initialize" and "Reset settings" are different. Do not mix them up. If you perform "Initialize", you will lose all data you have stored. "Setting"...
-
Page 48: Call Telephone
Call Telephone Making a call/videophone call As CA-01C is not equipped with the front camera, during a videophone call, you can send only the substitute image (Chara-den) or image from the rear camera to the other party. Making a call by entering the phone number... -
Page 49: Adjusting Earpiece Volume
Making an international call Use WORLD CALL to make international calls from Japan. For WORLD CALL, please contact "General Inquiries" on the last page of this manual. Country code Area code (City code) The other party's phone number (voice call) / (V.phone) After the call ends, Dial the other party's phone number excluding "0"... - Page 50 When you can not answer a call Setting record message When you cannot answer a voice or videophone call, the FOMA terminal can record a voice or videophone message. "TEL function" "Rec. msg./Voice memo" "Record message setting" "ON" "Phone" or "Videophone" Select an item Set ring time (3-digit number between 000 and 120 seconds) If you receive a call with Record message setting ON...
-
Page 51: Select An Item
Charged Melody call Required Charged Koe-no-Takuhaibin Not required Free For details on "OFFICEED", refer to the NTT DOCOMO corporate website (http://www.docomo. biz/html/service/officeed/) (in Japanese only). Setting voice mail service "TEL function" "Voice mail service" Select an item Setting call waiting "TEL function"... -
Page 52: Emergency Call
For a country code, international call access code, universal number international prefix, available countries and overseas operators, refer to "Mobile Phone User's Guide [International Services]" or DOCOMO "International Services website". Overseas usage fees (call charge, packet communications charge) differ from those in Japan. - Page 53 Available services overseas Main communication services GSM/GPRS Voice call Videophone call i-mode i-mode mail i-Channel *3 *4 i-concier i-Widget Packet communications via a PC Obtaining location information using GPS *1 : When 2in1 is active, dialing using Number B is not available. Dialing using the additional number of Multi number is not available.
- Page 54 Making a call to outside the country you stay in On the standby screen, (1 second or longer) to enter + s s s C ountry code A rea code (City code) The other party's s phone number (voice call) / (V.phone)
-
Page 55: Mail
Mail Only by subscribing to i-mode, Mail can be exchanged between i-mode users or anyone who has an Internet e-mail address. You can send up to 10 attachments (images, moving picture files, etc.) of up to 2 MB in addition to the message (The maximum number of the files varies depending on the file size). - Page 56 Sending Deco-mail/Decome-Anime Deco-mail Decome-Anime Deco-mail is a service that Decome-Anime is a service a l l ows yo u to d e co rate that allows you to compose i-mode mail by changing d e c o r a t i v e m a i l u s i n g the character color/size and animation templates with background color, waving...
- Page 57 "Inbox" Select a folder Select an i-mode mail Received mail detail screen Received mail list screen Replying to i-mode mail On Received mail list screen/Received mail detail screen Compose message (Send) To quote the received message to reply, press ) for 1 second or longer. Checking new i-mode mail You can receive the i-mode mails and messages stored at the i-mode center by checking with the center.
-
Page 58: Using Sms
"Area Mail setting" Select an item Using SMS This service allows you to exchange SMS between DOCOMO terminals, or with subscribers to overseas operators other than DOCOMO. For countries and overseas operators, refer to "Mobile Phone User's Guide [International Services]" or the DOCOMO "International Services website". -
Page 59: Phonebook
Phonebook Adding phonebook entries FOMA terminal has two types of phonebooks: FOMA terminal phonebook that various functions can be set to and UIM phonebook whose entries are available even in another terminal. Adding phone numbers, mail addresses, etc. An entry cannot be stored unless you fill in the "Name" field. On the standby screen, (1 second or longer) "Phone"... -
Page 60: I-Mode/Full Browser
i-mode/Full Browser i-mode You can use online services such as i-mode site connection, accessing to Internet, i-mode mail, with i-mode by using display of i-mode compatible terminal. i-mode requires a subscription and is a fee based service. For details on i-mode, refer to "Mobile Phone User's Guide [i-mode] FOMA version". Information on i-mode menu sites and Internet websites is generally protected by copyright law. -
Page 61: Displaying Web Pages Designed For Pc
Browsing i-mode site " " flashes while communicating, and " " flashes while receiving i-mode services (during i-mode). Scroll down to the bottom of the Communicating screen Connected screen iMenu screen to select "English" Displaying web pages designed for PC "i-mode/web"... -
Page 62: Saving Site Contents
Scroll in the direction that the key is pressed. Scroll up or down by screen. Jump to the previous page. * Press then (Page (Page ) to scroll up or Jump to the next page. down by screen. Storing frequently accessed sites Website displayed using i-mode or Full Browser (Submenu) "Bookmark"... -
Page 63: I-Channel
The ticker on the standby screen shows latest information that is automatically delivered to your terminal. "Basic Channel": This channel is distributed by DOCOMO. Packet communications charges do not apply to automatically update basic channels. "Okonomi (Optional) Channel": This channel is distributed by information service providers (IP). -
Page 64: Map/Gps
Map/GPS Under no circumstances shall DOCOMO be held liable for any loss or damage, due to loss of opportunity such as positioning (communicating) result check, resulting from external causes such as failure, malfunction or battery death of the FOMA terminal or blackout. - Page 65 Set whether to regularly send automatically collected location information by AUTO-GPS function to DOCOMO. Automatically sending location information to DOCOMO enables you to use i-concier or other services that are linked to services provided by DOCOMO. To use services, you need to apply for them or set them.
-
Page 66: Camera
Camera Viewing and operating shooting screen Shooting in Communication style Photo (still image) shooting screen Movie (moving picture) shooting screen Remaining storage count/Memory info Save Shooting mode Focus frame Zoom Submenu setting status Key operation guidance Quality Display orientation Self-timer Shot light Brightness Face selection mode... - Page 67 Shooting in Touch style In Touch style, you can set various shooting options with touch operation. Functions Touch a function icon to change the function settings. Other menu View the setting palette of functions not displayed here. Shooting screen in Touch style Shoot Quit Shooting still images/moving pictures...
- Page 68 Viewing still images/moving pictures after shooting Still images are saved in "My picture", and moving pictures are saved in "i-motion/movie" under Data box. Still images/moving pictures can be set to the standby screen, etc. Viewing still images/moving pictures in Data box "Data box"...
-
Page 69: 1Seg
1Seg Using 1Seg 1Seg service is provided by broadcasting companies (broadcasters). Communications charges do not apply to receive video and voice data. For details on NHK receiving fees, contact NHK. * Packet communications charges apply to view data broadcast site and i-mode site. Information charges may apply for some sites (i-mode pay sites). -
Page 70: Setting Channels
Setting channels When you use 1Seg for the first time or move to another area, set the channels. "CAMERA/TV/MUSIC" "1Seg" "Channel setting" "Select area" Select an area or prefecture "YES" To search for channels automatically and register a channel list "CAMERA/TV/MUSIC"... -
Page 71: Music
Music Music&Video Channel Music&Video Channel is a service that automatically performs overnight downloads of programs of up to approximately two hours in length. Also, up to approximately one hour of high quality video programs can also be delivered. After just configuring it once, Music&Video Channel automatically updates content, so you can always carry the latest videos and audio programs with you. -
Page 72: Playing Programs
Setting programs Choose a program you want to enjoy, and the program data will be automatically downloaded overnight. You can set 2 programs at a time. "CAMERA/TV/MUSIC" "Music&Video Channel" "Program set." Follow the on-screen instructions to set a program You may need to register a site providing Music&Video Channel programs to My Menu before setting a program. - Page 73 Some programs/tracks have playback restrictions. " " or " "appears at the beginning of the title for the program/track with restrictions on the play count, period or time limit. The program/ track whose playback period is restricted cannot be played before or after the period. If the battery pack is removed from the FOMA terminal for more than approx.
-
Page 74: I- Α Ppli/I-Widget
ppli/i-Widget α ppli are software applications that run on i-mode compatible terminals. You can automatically receive α updated stock prices, weather information, etc., and play games without being connected to the network, by downloading i- ppli from i-mode sites. The FOMA terminal also supports i- ppli online which allows α... -
Page 75: I-Motion/Movie
i-motion/Movie i-motion is sounds, moving pictures, etc. Download i-motion from i-motion-downloadable sites to the FOMA terminal. You can download and play various movies provided on websites such as portal sites or moving picture sites. * When downloading/streaming movies, the received file size may become very large. Note that packet communications charges may be high when large files such as streaming type with no file size restriction are received. -
Page 76: Osaifu-Keitai
Please be aware that DOCOMO is not responsible for loss or alteration of the IC card data, any monetary losses incurred while using Osaifu-Keitai services under any circumstance such as malfunction or changing your model. -
Page 77: I-Concier
For details on i-concier, refer to "Mobile Phone User's Guide [i-mode] FOMA version". Receiving information Icon When you receive information, " " appears at the top of the screen. Pop up On the standby screen Select a pop up message message Displaying i-concier " ® (Butler Sheep)" ©NTT DOCOMO "i-concier"... -
Page 78: Convenient Tools
JAN code : When you scan the JAN code shown to the right with the FOMA terminal, "4942857113068" is displayed. QR code : When you scan the QR code shown to the right with the FOMA terminal, " (NTT DOCOMO, INC.)" is displayed. -
Page 79: Using Bluetooth Function
Using Bluetooth function Registering a Bluetooth device to FOMA terminal If the Bluetooth device you want to use has not been registered, register it. Up to 10 Bluetooth devices can be registered. Place the Bluetooth device to be registered on standby beforehand. "Tool"... - Page 80 Using client mode You can make/receive voice calls via Wi-Fi or view/use i-mode or the Internet at a high speed by connecting to a Wi-Fi access point such as Home U, using the CA-01C as a client (slave). "Tool" "Next"...
-
Page 81: Data Management
This FOMA terminal supports commercially available microSD cards of up to 2 GB and microSDHC cards of up to 32 GB (as of May, 2011). Make sure to format microSD card on CA-01C. You may not be able to use microSD card formatted on another terminal or PC. - Page 82 To remove the microSD card, push it in and release. The card pops up slightly. Note that the card may fly out of the slot. Grip the groove of the microSD card and slowly pull the card out. Formatting microSD card Note that all data in the microSD card will be deleted when you format it.
- Page 83 Copying data to FOMA terminal <Example: To copy a phonebook to the FOMA terminal> "Tool" "microSD" "Refer microSD data" "Phonebook" Highlight a file (Submenu) "Add to phone" or "OVR to phone" Select a copying method Enter your security code "YES" Backing up data to microSD card Note that, if backup data exists in the microSD card, the data will be overwritten.
-
Page 84: Connecting To A Pc
To transfer data, you need to install the "FOMA communication setting file" (driver). For details, refer to the "Manual for PC Connection". "FOMA communication setting file" (driver) and "Manual for PC Connection" can be downloaded from NTT DOCOMO website. http://www.nttdocomo.co.jp/english/support/ DOCOMO Connection Manager "DOCOMO Connection Manager"... -
Page 85: Support
If you are still unable to identify the problem after checking the points, please contact "Repairs" on the last page of this manual (in Japanese only) or a repair counter specified by DOCOMO. The power will not turn on Is the battery pack properly attached? p.23... - Page 86 Battery life is very short Is the FOMA terminal left outside the service area for a long time? In a place outside the service area, the terminal searches the radio waves for communication and the battery is consumed more quickly. The available operating time of the battery pack depends on the conditions of usage and degraded degree of battery pack.
- Page 87 Cannot make a call by pressing the dial keys Is Original Lock for "Keypad dial" under "Dial/sending mail" set? p.43 Is Auto-key lock set? p.43 Is Restrict dialing set? Is Dial lock set? p.43 Is Self mode set? Calls cannot be made or received (" "...
- Page 88 If, after contacting DOCOMO, you are informed that your FOMA terminal needs repairs Bring it to a repair counter specified by DOCOMO. The repair counter is only open during business hours. Depending on the malfunction, repairs may take some time.
- Page 89 Do not remove the manufacturer's specification sticker put on the FOMA terminal. If the content of the sticker cannot be confirmed, determination of whether technical standard is satisfied cannot be made. Thus, requests for repair may be rejected. The settings of the functions may be cleared (reset) due to the damage, repair or improper use of the FOMA terminal.
-
Page 90: Updating Software
When software is updated, the unique information (model, serial number, etc.) of your FOMA terminal is automatically transmitted to the server at DOCOMO. We do not use the transmitted information for any purposes other than Software Update. If the update fails, the message "Rewrite failed" will appear and all operations will become unavailable. -
Page 91: Scanning Function
Enter your security code "Update" Your FOMA terminal is checked if it needs an update. Go to step 2 in "Running software update by selecting the icon". Scanning function This function detects data and programs that are imported to the FOMA terminal, and deletes data or stops launching applications that could cause some fault. -
Page 92: Options And Related Devices
Carry Case L 01 FOMA eco Solar Panel 01 *1 To connect to CA-01C, the Earphone Plug Adapter P001 or Earphone Plug Adapter 01 for External connector terminal is required. *2 To connect to CA-01C, the Earphone Plug Adapter 01 for External connector terminal is required. -
Page 93: Appendix
Appendix Menu list settings are reset to default by "Reset settings". Some functions that cannot be reset to default settings (or default states) may be included in settings. Main item Sub item Branch item Main item Sub item Branch item Mail Inbox mode/web... - Page 94 Voice recorder Channel list Channel setting Download dictionary User setting Common phrases Phrases/Store word MUSIC Player Store word Music&Video Channel Contact DOCOMO My picture Phonebook Search phonebook Data box TEL function MUSIC Add to phonebook Music&Video Channel UIM operation motion/Movie Phonebook set./Check...
- Page 95 Main item Sub item Branch item Main item Sub item Branch item Caller ID request Setting Screen/Display Machi-chara setting TEL function Dial/Receive setting Caller ID notification Soft key Arrival call act Original menu Dial call setting Menu display set Receive call setting Viewer settings In-call setting Icons...
- Page 96 Main item Sub item Branch item Main item Sub item Branch item Setting Lock/Security UIM setting GPS set./ Service setting Map/Overseas history Scanning function Serv. host URL set. IC card lock setting Illum./Tone settings Battery eco mode eco mode autostart Overseas NW 3G/GSM setting search...
-
Page 97: Main Specifications
Main specifications Phone Product name CA-01C Size (When folded) Height approx. 114 mm x Width approx. 51 mm x Thickness approx. 16.9 mm (Thickest : Approx. 21.0 mm) Weight Approx. 149 g (Battery pack attached) Continuous Single mode (FOMA) [FOMA/3G] Stationary ("AUTO"... - Page 98 Music Continuous playback i-motion Approx. 540 min. playback time Chaku-Uta-Full® Approx. 1,650 min. *6*7 SD-Audio Approx. 1,650 min. *6*7 Windows Media Audio (WMA) file Approx. 1,800 min. MPEG-1 Audio Layer3 (MP3) file Approx. 1,650 min. Music&Video Channel Approx. 1,930 min. (Audio) Approx.
- Page 99 Therefore in general, the closer you are to a base station, the lower the power output of the device. This mobile phone can be used in positions other than against your ear. This mobile phone satisfies the international guidelines when used with a carrying case or a wearable accessory approved by NTT DOCOMO, INC.
- Page 100 Radio Frequency (RF) Signals THIS MODEL PHONE MEETS THE U.S. GOVERNMENT'S REQUIREMENTS FOR EXPOSURE TO RADIO WAVES. Your wireless phone contains a radio transmitter and receiver. Your phone is designed and manufactured not to exceed the emission limits for exposure to radio frequency (RF) energy set by the Federal Communications Commission of the U.S.
-
Page 101: Export Administration Regulations
Changes or modifications not expressly approved by the party responsible for compliance could void the user's authority to operate the equipment. Declaration of Conformity The product CA-01C is declared to conform with the essential requirements of European Union Directive 1999/5/EC Radio and Telecommunications Terminal Equipment Directive 3.1 (a), 3.1 (b) and 3.2. -
Page 102: Intellectual Property Right
"DCMX", "i-area", "WORLD WING", "OFFICEED", "2in1", Morpho, Inc. in Japan and other countries. "docomo PRIME series" and "iC" logo are trademarks IrSimple™, IrSimpleShot™, IrSS™ and OBEX™ or registered trademarks of NTT DOCOMO. are trademarks of Infrared Data Association. - Page 103 This product contains NetFront Browser, NetFront Others Document Viewer and NetFront Sync Client of ACCESS CO., LTD. ACCESS, the ACCESS logo, and This product is licensed complying with the MPEG-4 NetFront are registered trademarks or trademarks of Visual Patent Portfolio License, and you are permitted ACCESS CO., LTD.
- Page 104 2001-2008 Tok yo I nstitute of Technology, Bluetooth SIG, INC. and any use of such marks by NTT Interdisciplinary Graduate School of Science and DOCOMO, INC. is under license. Other trademarks and Engineering trade names are those of their respective owners.
-
Page 105: Index
Index Connect to PC ............82 AC adapter..............24 Adapter ..............12 Deco-mail ..............54 After-Sales Service ..........86 Deco-mail pictogram/Deco-mail picture .... 35 Alarm ................. 76 Decome-Anime ............54 Area Mail ..............55 Desktop holder ............24 Auto receive mail ............ 54 Desktop icon ............ - Page 106 IC card lock ............... 43 Lock bar setting ............44 iC transmission ............82 Lock function ............43 i-Channel ..............61 Lock/Security Icon description ............27 Auto-key lock ...............43 i-concier ..............75 Dial lock .................43 Illumination .............. 39 IC card lock ..............43 i-mode ...............
- Page 107 Own number display ..........26 Scanning function ........... 89 Scanning results display ...........89 Part names and functions .........5 Update pattern data ..........89 Pattern data update ..........89 Schedule ..............76 Phone Screen Filter ............. 38 Make a call by entering the phone number ..46 Security code ............
- Page 108 Volume ..............47 Warranty ..............85 Waterproof/dustproof function ......19 When you cannot answer a call Public mode (Drive mode)........48 Public mode (Power OFF) ........48 Record message ............48 Wi-Fi................78 Access point mode .............78 Client mode ..............78 Precautions ..............17 WMA ................70 WORLD CALL ............
- Page 109 * Packet communications charges do not apply to use via i-mode. Charges will apply if using the service from overseas. * "docomo ID/password" are required to use this site from a PC. * Please contact "General Inquiries" on the last page of this manual if you forget or do not have "Network security code"...
- Page 110 (Business hours : 9:00 a.m. to 8:00 p.m. (open all year round)) Please confirm the phone number before you dial. For Applications or Repairs and After-Sales Service, please contact the above-mentioned information center or the docomo shop etc. near you on the NTT DOCOMO website or the i-mode site.
- Page 111 AT Command List ................ 38 About Manual for PC Connection This manual describes necessary information for data communication using the CA-01C and how to install "FOMA communication setting file" and "DOCOMO Connection Manager". The procedures or screens may vary depending on your environment.
-
Page 112: Data Communication
It is not compatible with FOMA HIGH-SPEED Area communication. You can also access a corporate LAN connected to the FOMA network. Use an access point that supports FOMA packet communication, such as DOCOMO Internet connection service “mopera U”. For packet communication, connect the FOMA terminal to a PC using FOMA USB Cable with Charge Function 02 (optional), Bluetooth communication* or Wi-Fi connection, or to a PDA using a dedicated cable. - Page 113 64K data communication is charged according to the length of time the line is connected, regardless of the amount of data. Use an access point that supports FOMA 64K data communication, such as DOCOMO Internet connection service “mopera U”, or ISDN synchronized 64K access point.
- Page 114 Internet. These fees must be paid directly to the Internet service provider in addition to service fees of FOMA service. Contact your Internet service provider for details. DOCOMO Internet connection service "mopera U" is available. "mopera U" is a pay service for which you need to apply.
-
Page 115: Before Using
The required memory and necessary hard disk space may differ depending on the PC's system configuration. d For the latest information on the operating environment, visit the DOCOMO website. d For DOCOMO Connection Manager, use Internet Explorer 6.0 or later. As for mail software, use "Windows Mail" or "Outlook Express 6.0". -
Page 116: Checking The Procedure
64K data communication and data transfer (OBEX FOMA communication setting file embeds each driver into Windows. Using DOCOMO Connection Manager, you can easily set up packet communication and 64K data communication and create a dial-up connection. Flow chart for completing the data communication setup... - Page 117 <Not using "DOCOMO Connection "DOCOMO Connection Manager"> Manager"> Download "DOCOMO Connection Manager" from the DOCOMO website, and install it to PC a Enables you to use DOCOMO Connection Manager. "Installing DOCOMO Connection Manager" p.18 Set up Set up a mopera U a Set up communication not using "DOCOMO Connection...
- Page 118 Setting the USB mode to "Communication mode" d Set the mode before connecting to PC. d Setting is not required when using Bluetooth connection or Wi-Fi connection. i "Setting" "External connection" "USB mode " "Communication mode" Connecting the devices The following procedure explains how to connect the FOMA USB Cable with Charge Function 02 (optional).
- Page 119 Disconnecting the devices The following procedure explains how to disconnect the FOMA USB Cable with Charge Function 02 (optional). Remove the FOMA USB Cable with Charge Function 02 from the USB terminal of the PC Pull the FOMA USB Cable with Charge Function 02 out horizontally while pressing the release buttons of the external connector of FOMA USB Cable Close the external connector cap of the FOMA terminal NOTE...
-
Page 120: Installing The Foma Communication Setting File (Drivers)
Access the FOMA communication setting file (drivers) download page on DOCOMO website Access http://www.nttdocomo.co.jp/support/utilization/application/foma/com_set/driver/prime/ca01c/ index.html Upon confirming the user agreement, click " " (Agree) of "CA-01C " (CA-01C communication setting file (drivers) download) to agree it If the (File Download - Security Warning) - Page 121 When this screen appears, click The title bar display differs depending on the in- use OS. Turn on the FOMA terminal, then connect the FOMA USB Cable with Charge Function 02 (optional) to your FOMA terminal Connect the FOMA USB Cable with Charge Function 02 to the USB terminal of the PC A message appears on the task bar indicator, and then installation starts.
- Page 122 Checking the installed driver Check that the FOMA communication setting file (drivers) has been correctly installed. This section describes an example using Windows 7. Select " " " " (Control Panel) For Windows XP Select " " (Start) " " (Control Panel) Open "...
- Page 123 Uninstalling the FOMA communication setting file (drivers) If necessary (when updating the drivers, etc.), uninstall the drivers as follows. The procedure for uninstalling from a Windows 7 or Windows Vista machine is described as an example. d Uninstallation is not available while connecting the FOMA terminal with PC. d When uninstalling FOMA communication setting file, be sure to log on as Administrator.
-
Page 124: Preparing Bluetooth Communication
Preparing Bluetooth Communication Perform data communication by connecting a Bluetooth communication compatible PC to the FOMA terminal wirelessly. Register and connect the PC to the FOMA terminal To connect a PC to the FOMA terminal for the first time, register the PC to the FOMA terminal. i "Tool"... - Page 125 Select " " (Device Manager) When the User Account Control screen appears, click " " (Yes). For Windows Vista Select " " (Device Manager) When the User Account Control screen appears, click " " (Continue). For Windows XP Click the " "...
-
Page 126: Connecting To A Wi-Fi-Compatible Pc
" (Next) "WPA2- " (WPA2-personal) under " " (Security type) has the same meaning of "WPA2-PSK". If encryption function is set to CA-01C Set " " (Encryption type) and " " (Security key) options to the same settings as CA-01C. -
Page 127: Docomo Connection Manager
Use of flat-rate data plan Subscribing the flat-rate data plan requires the customers to sign in to the Internet service provider with subscription of the price plan supporting the flat-rate data communication. For more information, see DOCOMO website. Use of mopera For the connection settings, see mopera website. -
Page 128: Before Installing Docomo Connection Manager
Other connection software than DOCOMO Connection Manager d DOCOMO Connection Manager provides the same functions as the ones included in other connection software listed below, and this is all you need. Disable or uninstall the following software, if necessary. -
Page 129: Installing Docomo Connection Manager
NOTE d If no MSXML6 Wireless LAN APIs are available in your Windows XP environment, install them before DOCOMO Connection Manager. When the confirmation screen appears on MSXML6 Wireless LAN APIs installation, click "Install" to proceed it. Restart Windows after completion of installing MSXML6 Wireless LAN APIs, and DOCOMO Connection Manager is automatically installed. - Page 130 Click " " (Next) Confirm the precautions and click " " (Next) Upon confirming the user agreement, click " " (Agree) to agree to it, and click " " (Next) Select the installation location and click " " (Next) If you want to change the location, click " "...
-
Page 131: Starting Docomo Connection Manager
" (DOCOMO Connection Manager) Specify the settings by following the setting wizard The setting wizard will automatically appear when you start DOCOMO Connection Manager for the first time. Follow the guidance and you can make preparations for Internet connection. For details, refer to "... -
Page 132: Executing Set Data Communication
Executing Set Data Communication Start DOCOMO Connection Manager "Starting DOCOMO Connection Manager" p.20 Click the tab of the desired connection method, and click " " (Connect) For details, refer to " " (DOCOMO Connection Manager operating manual). When connection is not available, check “Setting up Dial-up Network” (p.22) and “Setting up Dial-up”... -
Page 133: Setting Up Dial-Up Network
Setting up Dial-up Network This section describes how to set up a dial-up connection for packet communication / 64K data communication without using DOCOMO Connection Manager. The flow of operation is described below. d It is unnecessary to set up the dial-up network for 64K data communication. Go on to "Setting up Dial- up"... - Page 134 Click the " " (Modem) tab to confirm the COM port of the " " (Access point) column of "FOMA CA01C" and click "OK" When connecting wirelessly using Bluetooth communication, confirm the COM port number of the in-use Bluetooth linked standard modem or Bluetooth modem provided by a Bluetooth device maker in the "...
- Page 135 d To check the COM port on Windows XP Open " " (Start) " " (Control Panel) Open " " (Telephone and modem options) from " " (Printers and other hardware) in Control Panel If the " " (Address information) screen is displayed, enter " "...
- Page 136 Phonebook of mobile phone Data to be registered Phone number Memory number of Phonebook Other party's name How to register Register using PC Available (DOCOMO Connection Available (Dedicated software Manager, etc.) required) Register using Mobile phone Unavailable (Cannot even check) Available...
- Page 137 Click " " (Start) " " (All programs) " " (Accessories) " " (Communication) " " (Hyper terminal) to start Hyper terminal Select the " " (Do not display this message again) checkbox and then click " " (Yes) Enter any name in the " "...
- Page 138 Enter the access point (APN) and press Enter in the format of AT+CGDCONT=<cid>, "PDP_type", "APN" <cid> Enter any number between 5 and 10. Please be cautious because if cid has been already set, the setting will be overwritten. "PDP_type" Enter "PPP" or "IP". "APN"...
- Page 139 " (File) menu NOTE d The Caller ID needs to be set to "Notify" to use DOCOMO's internet connection service mopera U or mopera. About 186 (Notify)/184 (Not notify) in Dial-up Network You can attach 186/184 to the access point number in the Dial-up network settings as well.
-
Page 140: Setting Up Dial-Up
Setting up Dial-up d This section takes accessing mopera U by packet communication for example. d To connect using packet communication, enter " 3#" as the number of access point for mopera U or " 1#" for mopera. To connect using 64K data communication, enter " 8701"... - Page 141 Click (Network and Internet) (Show network status and task) (Connect to network) on Control Panel Right-click the icon created for the dial-up and click " " (Properties) Confirm the settings on the " " (General) tab If two or more modems are connected to the When connecting using the FOMA USB Cable with Charge Function 02, confirm that only "...
- Page 142 Click the " " (Options) tab and click "PPP " (PPP settings) Clear all the boxes and click "OK" Click "OK" Setting up dial-up on Windows Vista Open " " " " (Access point) Click " " (Set up the connection or network) Select "...
- Page 143 Click " " (Set up the connection) and then " (Close) Open " " " " (Access point) Right-click the icon created for the dial-up and click " " (Properties) Confirm the settings on the " " (General) tab If two or more modems are connected to the When connecting using the FOMA USB Cable with Charge Function 02, confirm that only "...
- Page 144 Click the " " (Options) tab and click "PPP " (PPP settings) Clear all the boxes and click "OK" Click "OK" Setting up dial-up on Windows XP Open " " (Start) " " (All programs) " " (Accessories) " " (Communication) "...
-
Page 145: Network Connections
Enter any name you want in the "ISP " (ISP Name) and click " " (Next) Enter the number of the access point in the " " (Telephone Number) column and click " " (Next) This screen is an example of accessing mopera U by packet communication. - Page 146 Select the icon created for the dial- up and open " " (Properties) in the " " (File) menu Confirm the settings on the " " (General) tab If two or more modems are connected to the When connecting using the FOMA USB Cable with Charge Function 02, confirm that only "...
- Page 147 When the Step 14 screen reappears, click "OK" Running dial-up connection This section describes how to make a dial-up connection for packet communication by using the dial- up setting. <Example: Using the FOMA USB Cable with Charge Function 02 on Windows 7> Connect the FOMA terminal to the PC with the FOMA USB Cable with Charge Function 02 (optional) "Connecting the devices"...
- Page 148 Check the followings if you cannot connect to the network or dial-up successfully. Problem Points to check "CA-01C" is not recognized Check if your PC satisfies the required operating environment (p.4). by the PC. Check if the FOMA terminal is connected to the PC and the power is turned on.
-
Page 149: At Command List
AT Command List AT commands available on FOMA terminal d The following abbreviations are used in the AT command list; [&F] : Command of which setting is initialized by AT&F command. [&W] : Command of which setting is saved by AT&W command. The setting can be retrieved by ATZ command. - Page 150 AT command Outline Parameter/description Command execution example AT&W Stores the current settings. Only = 0 can be specified (can be omitted). AT&W0 AT&W AT&W? ERROR AT&W ? ERROR DANTE Displays the FOMA terminal DANTE FOMA terminal signal reception level is displayed as signal reception level.
- Page 151 AT command Outline Parameter/description Command execution example AT+CBC Displays the battery status Result: +CBC:<bcs>,<bcl> AT+CBC of the FOMA terminal. bcs: +CBC:0,70 0 : FOMA terminal is powered by the battery. 1 : FOMA terminal is not powered by the battery. AT+CBC? 2 : FOMA terminal is not connected to the battery.
- Page 152 AT command Outline Parameter/description Command execution example AT+CLIP= Displays the other party's = 0 : Not display the result (initial value) AT+CLIP=0 Caller ID on a PC when a = 1 : Display the result 64K data communication call is received. AT+CLIP? AT+CLIP? +CLIP:0,1...
- Page 153 AT command Outline Parameter/description Command execution example AT+COPS Selects the network Format : AT+COPS=<mode>,2,<oper> AT+COPS=0 operator to connect. mode=0 : automatic (searches the network AT+COPS? and switches the network operator +COPS:0 automatically) mode=1 : manual (connects to the network AT+COPS=? operator specified in <oper>) +COPS:(2,,,"44F001"), mode=2 : Disconnects the connection to the...
- Page 154 AT command Outline Parameter/description Command execution example AT+CPIN Enters the PIN code in the Format: AT+CPIN="<pin>","<newpin>" (The status in which FOMA terminal. +CPIN: READY is This command is to enter the PIN1, answered when PIN2, or PUK code - depending on +CPIN? is entered) the state of the result code returned AT+CPIN="1234"...
- Page 155 AT command Outline Parameter/description Command execution example AT+CREG= Specifies whether the result = 0 : Not informed (initial value). AT+CREG=1 screen is present regarding = 1 : Informed. the inside/outside the (Set to informed) Informed when switching between service area information "Inside the service area"...
- Page 156 = 0 : Disconnect the line (can be omitted). (During packet for the FOMA terminal. communication) NO CARRIER Displays the ID code. = 0 : Displays "NTT DoCoMo". ATI0 NTT DoCoMo = 1 : Displays the product name (same with +GMM). ATI1...
- Page 157 AT command Outline Parameter/description Command execution example ATS0= Specifies how many times = 0 : No automatic answer (initial value). ATS0=0 the FOMA terminal rings = 1- 255: A call is automatically answered before it automatically ATS0? after the specified number of receives a call.
- Page 158 AT command Outline Parameter/description Command execution example ATS104= Sets the calling sub address = 0 : # ATS104=0 character. = 1 : % (initial value) = 2 : & ATS104? ATS104=? [&F] ERROR Specifies whether the result = 0 : Returns the result code in numeral ATV1 code is returned in numerals value.
- Page 159 d Supplementary explanation of AT command Commands which do not function The following commands do not generate errors but will not function as a command: ATT (Tone setting) ATP (Pulse setting) Command name: +CGDCONT=[parameter] Outline Sets the access point name (APN) for packet origination. Though this command is a setting command, it will not be recorded in non-volatile memory written by [&W], nor reset by [&F] or [Z].
- Page 160 Command execution example Only the following 4 patterns can be set. (1) is set as an initial value to each cid. Command for permitting all speeds of both uplink and downlink (when cid is 5) AT+CGEQMIN=5 Command for permitting only the speed of uplink 5,760kbps and downlink 7,232kbps (when cid is 6) AT+CGEQMIN=6,,5760,7232 Command for permitting uplink 5,760kbps and all speeds of downlink (when cid is 7) AT+CGEQMIN=7,,5760...
-
Page 161: Result Codes
Result codes Result codes related with data communication Number Character indication Description indication Successfully executed. CONNECT Connected. RING Incoming call. NO CARRIER Line disconnected. ERROR Command not acceptable. NO DIALTONE Unable to detect dialing tone. BUSY Busy tone detected. NO ANSWER Time out in connection completing. - Page 162 Result code display example When ATX0 is set Regardless of the AT¥V command (p.45) setting, only CONNECT appears when the connection is completed. Character indication example: ATD CONNECT Number indication example: When ATX1 is set ATX1, AT¥V0 are set (default) Displayed in CONNECT <rate between the FOMA terminal and the PC>...
- Page 163 Kuten Code List...
-
Page 164: Kuten Code List
Kuten Code List <Guide to the kuten code table> First enter “digits 1-3 of the kuten code” then “digit 4”. d Some kuten codes in the table here may look different from what actually appear on screens. First to third First to third First to third Fourth digit of Kuten codes... - Page 165 First to third First to third First to third Fourth digit of Kuten codes Fourth digit of Kuten codes Fourth digit of Kuten codes digits of digits of digits of Kuten codes Kuten codes Kuten codes...
- Page 166 First to third First to third First to third Fourth digit of Kuten codes Fourth digit of Kuten codes Fourth digit of Kuten codes digits of digits of digits of Kuten codes Kuten codes Kuten codes...
- Page 167 First to third First to third First to third Fourth digit of Kuten codes Fourth digit of Kuten codes Fourth digit of Kuten codes digits of digits of digits of Kuten codes Kuten codes Kuten codes...
Need help?
Do you have a question about the Prime CA-01C and is the answer not in the manual?
Questions and answers