Electrolux E36IC75FSS Service Manual
Icon designer series 36” induction drop-in cooktop
Hide thumbs
Also See for E36IC75FSS:
- Use and care manual (24 pages) ,
- Factory parts catalog (6 pages) ,
- Installation instructions (5 pages)
Table of Contents
Advertisement
ICON™
Designer Series
36" Induction Drop-In Cooktop
SERVICE MANUAL
MODEL E36IC75FSS
NOTICE
This service manual is intended for use by persons having electrical and mechanical training and a level of knowledge of these subjects
generally considered acceptable in the appliance repair trade. The manufacturer cannot be responsible, nor assume any liability for injury
or damage of any kind arising from the use of this data sheet.
Publication # 5995492062
May 2007
P/N 316439222
Advertisement
Table of Contents

Related Manuals for Electrolux E36IC75FSS


Summary of Contents for Electrolux E36IC75FSS
- Page 1 Designer Series 36” Induction Drop-In Cooktop SERVICE MANUAL MODEL E36IC75FSS NOTICE This service manual is intended for use by persons having electrical and mechanical training and a level of knowledge of these subjects generally considered acceptable in the appliance repair trade. The manufacturer cannot be responsible, nor assume any liability for injury or damage of any kind arising from the use of this data sheet.
-
Page 2: Table Of Contents
DIAGNOSIS ..........28 - 32 DETERMINING PAN SIZE ........14 ERROR CODES ............29 INSPECTING PAN BOTTOM ......... 15 ELECTROLUX ICON 36” INDUCTION COOKTOP ERROR CODES TABLE ........29 - 31 INDUCTION COOKTOP ADDITIONAL FAILURE CONDITIONS ....32 DISPLAY MESSAGES ......16 - 17... -
Page 3: Safe Servicing Practices
SAFE SERVICING PRACTICES - ALL APPLIANCES - To avoid personal injury and/or property damage, it is important that Safe Servicing Practices be observed. The following are some limited examples of safe practices: 1. DO NOT attempt a product repair if you have any doubts as to your ability to complete it in a safe and satisfactory manner. -
Page 4: Service Tips - Develop Good Work Habits
SERVICE TOOLS AND EQUIPMENT In addition to standard hand tools such as wrenches, screwdrivers, pliers, etc; the following instru- ments are considered to be essential equipment for technicians servicing Electrolux cooking products. Proper testing and diagnostic procedures are not possible without these tools. - Page 5 INDUCTION COOKTOP FEATURES A COOLER COOKTOP - A unique feature of the Induction Cooktop is whether turned ON or OFF, the cooktop surface remains cooler than standard ceramic cooktops. MAGNETIC DETECTOR - The coil sensor automatically detects whether the pan is magnetic and eliminates accidental “turn-ONs.”...
-
Page 6: Induction Cooktop Features
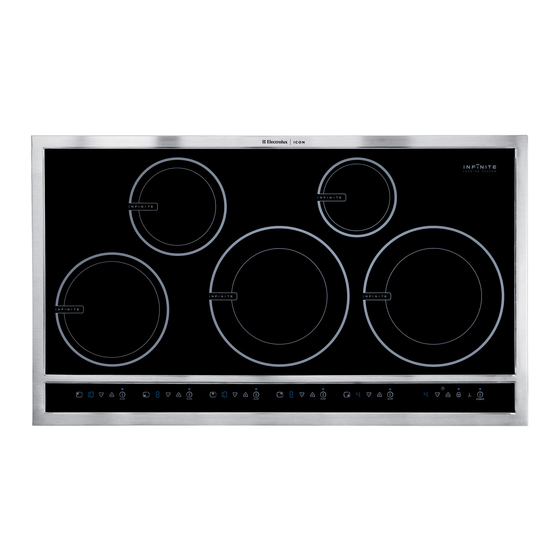
INDUCTION COOKTOP FEATURES Main Cooktop Controls POWER Fig 2. Cooking Zone Controls Graphic will 6 7 8 9 10 vary for each (at 5 locations) cooking zone On/Off Fig 3. 6. Left Front Cooking Zone Control Pads. 7. Left Rear Cooking Zone Control Pads. 8 Central Cooking Zone Control Pads. -
Page 7: Induction Cooktop Wiring Diagram
INDUCTION COOKTOP WIRING DIAGRAM Page 7... -
Page 8: Installation Instructions
INSTALLATION INSTRUCTIONS INSTALLATION AND SERVICE MUST BE PERFORMED BY A QUALIFIED INSTALLER. IMPORTANT: SAVE FOR LOCAL ELECTRICAL INSPECTOR'S USE. READ AND SAVE THESE INSTRUCTIONS FOR FUTURE REFERENCE. FOR YOUR SAFETY: Do not store or use gasoline or other flammable vapors and liquids in WARNING the vicinity of this or any other appliance. - Page 9 INDUCTION COOKTOP INSTALLATION INSTRUCTIONS Overhead Cabinet Should Not Exceed a Maximum Depth of 13" (33 cm) Min. Min. Recommended 30" (76.2 cm) Min. Clearance Distance Between Rear Between the Top of the Edge of Cutout and Cooking Platform and the Nearest Combustible Bottom of an Unprotected 10"...
-
Page 10: Important Safety
INDUCTION COOKTOP INSTALLATION INSTRUCTIONS Important Notes to the Installer NOTE: Wire sizes and connections must conform with the fuse size and rating of the appliance in accordance 1. Read all instructions contained in these installation with the National Electrical Code ANSI/NFPA No. 70– instructions before installing the cooktop. - Page 11 INDUCTION COOKTOP INSTALLATION INSTRUCTIONS If cooktop is used in a new branch circuit installation DO NOT ground to a gas supply pipe. (1996 NEC), mobile home, recreational vehicle, or DO NOT connect to electrical power supply until where local codes DO NOT permit grounding to the appliance is permanently grounded.
-
Page 12: Cooktop Installation
INDUCTION COOKTOP INSTALLATION INSTRUCTIONS Cooktop Installation 3. Set the cooktop into the countertop cutout. NOTE: Do not use caulking compound; cooktop should 1. Visually inspect the cooktop for damage. Also make be removable for service when needed. sure all cooktop screws are tight (see Figure 5). Do not remove the nylon spacers on WARNING the edges of the cooktop. -
Page 13: Introduction To Induction Cooking
INTRODUCTION TO INDUCTION COOKING How Induction Cooking Works Induction cooking uses high frequency magnetic energy to heat the cooking utensil when it is placed over the induction coil. The induction fi elds have no affect on non magnetic surfaces such as paper, plastic, glass, ceramic, or non ferrous metals like aluminum, copper etc. -
Page 14: Selecting Proper Cookware
SELECTING PROPER COOKWARE Determining Pan Size When selecting a pan to use for induction cooking it is important to know the correct size of the pan in order to determine the proper cooking zone to be used. The size of the magnetic portion of the pan bottom has a direct effect on the cooking performance and effi... -
Page 15: Inspecting Pan Bottom
Inspecting Pan Bottom For best results with an induction cooktop the pan bottom should be as fl at as possible with no deep grooves or ridges on the bottom surface. Pans that are not fl at or that have grooves or ridges on the bottom will not be as effi... -
Page 16: Induction Cooktop Display Messages
INDUCTION COOKTOP DISPLAY MESSAGES LED MESSAGES OR LIGHT INDICATORS DISPLAYED BY MAIN CONTROL CONTROLS LOCK - This feature allows the cooktop to be locked only when the cooktop is switched to OFF. Touch and hold the LOCK key pad for 5 seconds. A beep will sound and the Lock indicator light will glow (Fig. - Page 17 INDUCTION COOKTOP DISPLAY MESSAGES LED MESSAGES OR LIGHT INDICATORS DISPLAYED BY COOKING ZONE CONTROLS (CONT’D) POWER LEVEL SETTINGS - The Cooking Zones have fi ve separate Power Level LEDs. Once active, the Cooking Zones will provide 10 Power Levels to choose from.
-
Page 18: Basic Operation
BASIC OPERATION USING THE TOUCH CONTROL Using The Touch Control The recommended way to use the touch pads on the cooktop is shown in Fig. 22. Be sure that your finger is placed in the center of the touch pad Operating The Cooking Zones as shown. - Page 19 BASIC OPERATION OPERATING THE COOKING ZONES (CONT’D) To Turn ON one or more of the Cooking Zones (cont’d) NOTE: Touch once, or repeatedly touch the key pads to adjust or scroll through power levels at any time during the cooking process (To scroll through the power levels quickly touch and hold the key pads until the power level desired is reached).
-
Page 20: Preheat Recommendations
BASIC OPERATION PREHEAT RECOMMENDATIONS Preheat Recommendations Keep Warm Feature When preheating a pan on the cooktop always watch carefully. Whenever using the Minute Timer cooktop the user should always pay attention to any items cooking and remain attentive until the cooking process is complete. Keep in mind that induction may decrease the amount of time required to preheat a cooking utensil. -
Page 21: Component Access And Service Procedures
COMPONENT ACCESS AND SERVICE PROCEDURES WARNING To gain access to the various component parts of the cooktop assembly it must be uninstalled from the cabinet and counter top. Depending on the location of the power supply junction box it may also be necessary to disconnect the cooktop power fl... -
Page 22: Removing Touch Control Boards
COMPONENT ACCESS AND SERVICE PROCEDURES Removing Touch Control Boards The cooking zone touch control boards and main Touch Control Cover Fig. 22 control board are secured to the cooktop glass by Plate a metal cover plate (Fig 22). To access the controls remove the nuts that secure the plate to the cooktop glass. -
Page 23: Removing Induction Coils
COMPONENT ACCESS AND SERVICE PROCEDURES Removing Induction Coils Using a # 25 torx screwdriver loosen the screw terminals on the power board and remove the wires to the induction coil. (Fig. 23) The terminals are forked and can be removed without completely removing the screw. With the induction coil wires removed from the screw terminals the induction coil temperature sensor (RTD) connector can be accessed and unplugged from the induction power board. -
Page 24: Removing The Coil Carrier
COMPONENT ACCESS AND SERVICE PROCEDURES Removing The Coil Carrier The photo in Fig. 24 shows the cooktop coil carrier after the controls, induction coils and insulation pad have been removed. To separate the coil carrier from the induction module housings remove the sixteen screws indicated by the arrows in the photo. -
Page 25: Replacing The Induction Generator Power Board
COMPONENT ACCESS AND SERVICE PROCEDURES Replacing The Induction Generator Power Board To remove and replace the power generator boards begin by removing the heat sink thermal cut out. Next remove the two metal clips that clamp the heat sinks together (if present). Gently pry the clip off with a small screwdriver. -
Page 26: Filter Board Replacement (Two Cook Zone Module)
COMPONENT ACCESS AND SERVICE PROCEDURES Filter Board Replacement (Two Cook Zone Module) To remove and replace the fi lter board in the L1 (Black) L2 (Red) two cook zones module loosen the strain relief Ground (Green) retainer screw and remove the black strain relief. Disconnect the L1, L2 &... -
Page 27: Filter Board Replacement (Three Cook Zone Module)
COMPONENT ACCESS AND SERVICE PROCEDURES Filter Board Replacement (Two Cook Zone Module) Lift the right side of the fi lter board high enough to clear the cooling fan and pull in the direction shown to release the opposite side from the housing (Fig 27). -
Page 28: Troubleshooting And Diagnosis
COMPONENT ACCESS AND SERVICE PROCEDURES Filter Board (Three Cook Zone Module) Disconnect the power supply wires and remove the copper jumpers. Be sure to reinstall the jumpers and wires in the correct terminal locations when Jumper reinstalling the fi lter board. (Fig 28) L1 - Black Jumper L2 - Red... -
Page 29: Error Codes
LEDs (Fig. 8) and the error code number will be displayed in the main touch control timer LED. See the example at right. ELECTROLUX ICON 36” INDUCTION COOKTOP ERROR CODES Error Possible Cause or Condition Suggested Corrective Action... - Page 30 ELECTROLUX ICON 36” Induction Cooktop Error Codes Error Possible Cause or Condition Suggested Corrective Action Low voltage output from 12V supply on -Test all cables & connections on fi lter circuit board in fi lter board in the 3 cook zone induction the 3 zones induction module.
- Page 31 ELECTROLUX ICON 36” Induction Cooktop Error Codes Error Possible Cause or Condition Suggested Corrective Action See error 30 See error 30 Internal generator error, sync - Test cables & connections on center generator circuit board (center cooking zone) (single). - Replace the generator circuit board (single) in the 3 zones induction module .
-
Page 32: Additional Failure Conditions
Additional Failure Conditions Symptom or Failure Control Display Possible Cause or Suggested Corrective Action Condition Pan does not heat up. Normal operation Pan too small for proper pan Use larger pan or this pan on a detection and only works with smaller cooking zone. - Page 33 NOTES Page 33...
-
Page 34: Component Parts Illustration
COMPONENT PARTS ILLUSTRATION E36IC75F CONTROL PANEL Page 34... - Page 35 COMPONENT PARTS ILLUSTRATION E36IC75F DESCRIPTION POS. NO DESCRIPTION POS. NO Interface Cable, side control, to center Housing, plastic carrier, large 21 # Generator, circuit board, (2), 2 zone Interface Cable, side control, to center 21A# Communication Cable, center control, to 2A # Generator, circuit board, 1 zone 22 #...
-
Page 36: Main Top And Surface Units
COMPONENT PARTS ILLUSTRATION E36IC75F MAIN TOP/SURFACE UNITS Page 36... - Page 37 COMPONENT PARTS ILLUSTRATION E36IC75F POS. NO DESCRIPTION POS. NO DESCRIPTION Panel, CARRIER Panel, access Insulation, Elements Insulation, housing, RH Insulation, carrier panel Insulation, housing, rear Screw, 7-19 x 1/2”, (11), housing Insulation, housing, center ring Insualtion, housing, lower 15 # Element, induction coil, 145MM, right rear Defl...
Need help?
Do you have a question about the E36IC75FSS and is the answer not in the manual?
Questions and answers