Table of Contents
Advertisement
Available languages
Available languages
Quick Links
For use with Valor GV60 PLUS or MAX* Remote Control Systems ONLY
INSTALLATION & OPERATION INSTRUCTIONS
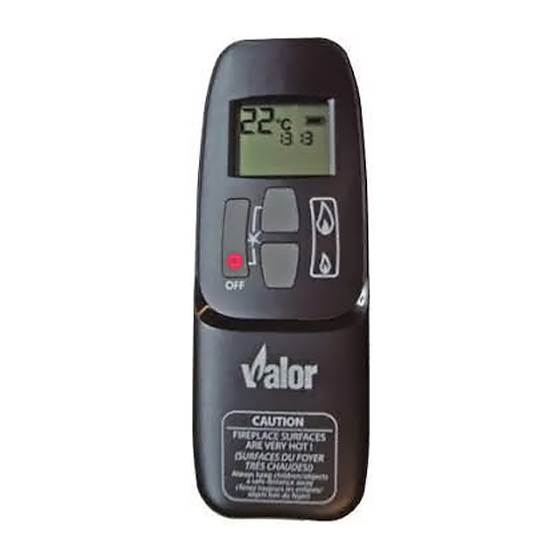
Non-Thermostatic Handset
The handset GV60NTK is used with the Valor GV60
*
PLUS or MAX
receivers to turn the fi re on or off
and the set the fl ame height. It has no thermostat
or programming functions and it does not shutdown
automatically. The handset shows the current time and
the room temperature.
*
NOTE: The handset GV60NTK does not operate
the fan control, the lighting control or the duplex
burner fi replaces with GV60 MAX systems.
Synchronizing the NT handset to the remote
control receiver
The receiver and the handset of the remote control sys-
tem must be initially synchronized before the fi rst use
of a new handset.
1. Insert alkaline batteries in the remote control
receiver and handset. The receiver is located left of
the control valve under the burner module.
2. With a sharp object, press and hold the receiver's
reset button until you hear one short and one long
beeps. Release the reset button after the second
beep.
3. Within the subsequent 20 seconds, press the small
fl ame button (
) on the remote handset until you
hear two short beeps confi rming the sychronization
is set.
This is a one time setting only and is not required when
changing the batteries in the remote receiver. The
remote control system is now ready to use.
4003044-02
© Copyright Miles Industries Ltd., 2011.
GV60NTK
Non-Thermostatic Kit
www.valorfi replaces.com
Current room
temperature
Current time
Valor
logo
only
G6R-H3D6
•
The one-hour feature is maintained when using a
1265WSK wall switch.
•
One handset can be used to synchronize multiple
receivers to activate the one-hour feature.
•
Synchronizing the receiver again with a thermostatic
handset will reactivate the thermostat, programming
and auxiliary functions.
The non-thermostatic
(NT) handset is
identifi ed with a Valor
logo only. It shows
the current time and
room temperature.
The number shown
on its back cover
label is G6R-H3D6
Back cover label
Advertisement
Table of Contents

Related Manuals for Valor GV60NTK


Summary of Contents for Valor GV60NTK
- Page 1 GV60NTK Non-Thermostatic Kit For use with Valor GV60 PLUS or MAX* Remote Control Systems ONLY INSTALLATION & OPERATION INSTRUCTIONS Non-Thermostatic Handset The non-thermostatic Current room temperature (NT) handset is The handset GV60NTK is used with the Valor GV60 identifi ed with a Valor PLUS or MAX receivers to turn the fi...
- Page 2 Remote Control Operation NOTE: Before using the remote control system with the new NT handset, the receiver and the new handset must be synchronized. See previous page of this manual. IMPORTANT: BEFORE YOU BEGIN, please note that on this system, the settings of time and temperature can only be set when the function display is fl...
- Page 3 Because our policy is one of constant development and improvement, details may vary slightly from those given in this publication. Designed and Manufactured by / for Miles Industries Ltd. 190–2255 Dollarton Highway, North Vancouver, BC, CANADA V7H 3B1 Tel. 604-984-3496 Fax 604-984-0246 www.valorfi replaces.com...
- Page 4 GV60NTK Manette sans thermostat Pour usage avec les télécommandes Valor GV60 PLUS ou MAX* SEULEMENT INSTALLATION & OPERATION INSTRUCTIONS Manette sans thermostat La manette sans Température ambiante thermostat n’a que la La manette GV60NTK peut être utilisée avec les marque Valor sur le récepteurs de télécommande Valor GV60 PLUS or...
- Page 5 Fonctionnement de la télécommande NOTE : Avant d’utiliser la télécommande avec la nouvelle manette, le récepteur et la nouvelle manette doivent être synchronisés. Consultez la page précédente de ce guide. IMPORTANT : AVANT DE COMMENCER, prenez note que pour ce système, le réglage de l’heure, de la température et de la fonction automatique ne peut être faite que lorsque l’écran pour la fonction désirée clignote.
- Page 6 Réglage des fl ammes La hauteur des flammes peut être réglée de la façon suivante. Avec la veilleuse allumée, 1. Appuyez sur le bouton (grande flamme) pour allumer le brûleur. 2. Appuyez sur le bouton (grande flamme) pour augmenter la hauteur des flammes. 3.
Need help?
Do you have a question about the GV60NTK and is the answer not in the manual?
Questions and answers