
Related Manuals for Arecont Vision AV2225PMIR


Summary of Contents for Arecont Vision AV2225PMIR
- Page 1 Installation Manual AV2225PMIR AV2225PMIR-A AV2226PMIR AV3225PMIR AV3226PMIR AV3226PMIR-A AV5225PMIR AV5225PMIR-A AV10225PMIR ...
-
Page 2: Table Of Contents
® Arecont Vision MegaView 2 Installation Manual MegaView 2 Installation ® Contents Package Contents .............................. 3 Warranty Information .............................. 4 ® Install MegaView 2 Camera .......................... 5 Replacing the IR LED board: .......................... 10 Camera Software Installation .......................... 11 ... - Page 3 ® Arecont t Vision Me egaView 2 Installati ion Manua a l Pack age Co ontents MegaV View ® Camera P ackage: ® A. A Arecont Visio on MegaView 2 Camera B. Ju unction box adapter C. M Mounting Tem mplate for Ju unction box adapter...
-
Page 4: Warranty Information
3 Year Limited Warranty ARECONT VISION warrants to Purchaser (and only Purchaser) (the “Limited Warranty”), that: (a) each Product shall be free from material defects in material and workmanship for a period of thirty-six (36) months from the date of shipment (the “Warranty Period”);... -
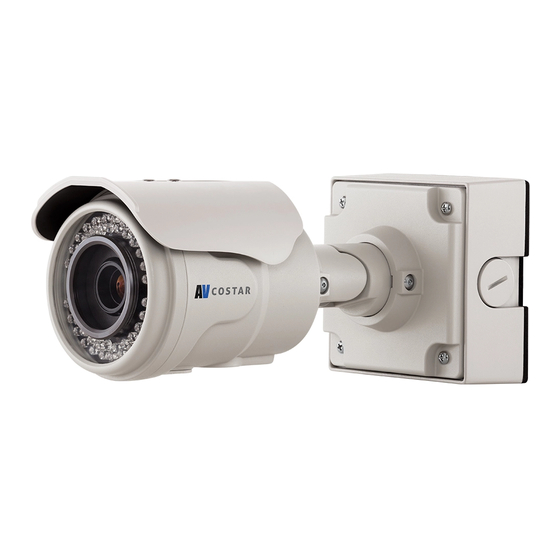
Page 5: Camera
® Arecont t Vision Me egaView 2 Installati ion Manua Insta ll Mega aView ® 2 Came Mount ing the C Camera: NOTE 2: Us se of silicon o on the RJ45 5 connector without junc ction box ada apter does n 1. - Page 6 ® Arecont t Vision Me egaView 2 Installati ion Manua NOTE 1: Bra acket screw ws are all sec curity screws that are tam mper-resistan NOTE 2: Bra acket with 3 axes enable es easy installation in in any locatio on, including g 360°...
- Page 7 ® Arecont Vision MegaView 2 Installation Manual Optional: Connecting Digital I/O: Adjusting the Remote Focus and Remote Zoom: 9. To use digital I/O, connect digital I/O with pigtail cable connector as shown in Image ® NOTE: MegaView 2 camera operating temperature is -40˚C (-40 °F) to +50˚C (122 °F),...
- Page 8 ® Arecont Vision MegaView 2 Installation Manual 16. To manually focus, click the “+20”, “+5”, “+1”, “-20”, “-5”, “-1” buttons to fine tune the focus. Image 9 Adjusting P-Iris: Note: If “Enable P-Iris” is unchecked, the iris will be fully open to the maximum.
- Page 9 ® Arecont Vision MegaView 2 Installation Manual Optional: Enable Audio: 17. Connect a mono analog microphone to MICIN (Microphone In) and connect an active speaker with a built-in amplifier to LOUT (Line Out) via the in-line jack as shown in Image 8, if needed.
- Page 10 ® Arecont t Vision Me e gaView 2 Installati ion Manua al Repla acing th he IR L ED boa ard: 19. Unsc crew glass rin ng (Image 1 20. Use P Phillips screw wdriver to re emove IR LE board d (Image 12) 21.
-
Page 11: Camera Software Installation
Image 13 Image 14 24. Select “Run” next to “Setup Cameras” from the AV100 application manager as shown in Image 15 and wait for “Arecont Vision Image 16 Camera Installer” window to appear as shown in Image 16. 26. For basic mode, select “Install Cameras”... - Page 12 ® Arecont Vision MegaView 2 Installation Manual CAUTION: If the software does not find a camera, the software utility may be blocked by the anti-virus or Windows® firewall. Before turning them off, please consult your IT manager.
- Page 13 Elect trical Bo ox Ada apter (S SV-EBA A) Instal lation I Instruc tions (Sold d Separ rately) Inside th he box: A. E Electrical Box x Adapter B. P Pack of four ( (4) machine screws A ® egaView 2 ...
- Page 14 ® Arecont t Vision Me egaView 2 Installati ion Manua Pole Mount Adapte er (MD- -PMA) I nstalla tion Ins structio (Sold d Separ rately) Inside th he box: Ethernet Ca able and oth er cables (if A. P Pole Mount A Adapter nece essary) throu...
- Page 15 Corn er Mou nt Ada pter (M MD-CRM MA) Inst tallatio n Instru uctions (Sold d Separ rately) Inside th he box: 5. Run Ethe ernet Cable and other c cables (if A. C Corner Moun t Adapter necessa ary) through the Junction...
-
Page 16: Led Indicators (Camera Signal)
® Arecont Vision MegaView 2 Installation Manual LED Indicators (Camera Signal) NOTE: To see the LED indicators, open the plug on the camera body as shown in Image 25. Plug Image 25 Status... -
Page 17: Support
Swap the “troubled” camera with a known good camera to see if the problem follows the camera or stays at the location. 3. Contact Arecont Vision Technical Support one of three ways: 1. Online Portal : Support.ArecontVision.com 2. Phone : 1.818.937.0700 (option #1) 3. -
Page 18: Mounting Template
® Arecont Vision MegaView 2 Installation Manual Mounting Template Junction Box Adapter Mounting Template Page | 18 support@arecontvision.com...
Need help?
Do you have a question about the AV2225PMIR and is the answer not in the manual?
Questions and answers