Advertisement
Quick Links
NORTH AMERICA
3130 East Miraloma Avenue
Anaheim, CA 92806 USA
USA and Canada –
Phone: 800-368-9700
Fax: 800-832-4888
Other Locations – Phone: (001)-714-632-7100; Fax: (001)-714-632-1044
©Premier Mounts 2008
9532-002-001-00
INSTALLATION INSTRUCTIONS
TABLETOP STAND
Shilton, Coventry, England CV79JY
Phone: +44 (0) 2476 614700
EUROPE
Swallow House,
Shilton Industrial Estate,
Fax: +44 (0) 2476 614710
AUSTRALIA,
NEW ZEALAND, OCEANIA
(Distributor)
P.O. Box 295
Mordialloc Victoria 3195
Australia
Phone: 03 9586 6330
www.premiermounts.com.au
Advertisement

Subscribe to Our Youtube Channel
Related Manuals for Premier Mounts PSD-TTS/C


Summary of Contents for Premier Mounts PSD-TTS/C
-
Page 1: Installation Instructions
Mordialloc Victoria 3195 USA and Canada – Shilton, Coventry, England CV79JY Australia Phone: 800-368-9700 Phone: +44 (0) 2476 614700 Phone: 03 9586 6330 Fax: 800-832-4888 Fax: +44 (0) 2476 614710 www.premiermounts.com.au Other Locations – Phone: (001)-714-632-7100; Fax: (001)-714-632-1044 ©Premier Mounts 2008 9532-002-001-00... - Page 2 Keep these installation instructions in an easily accessible location for future reference. Indicates that the power plug is to be disconnected Contact Premier Mounts for any questions from the power outlet. Safety precautions must be taken at all times.
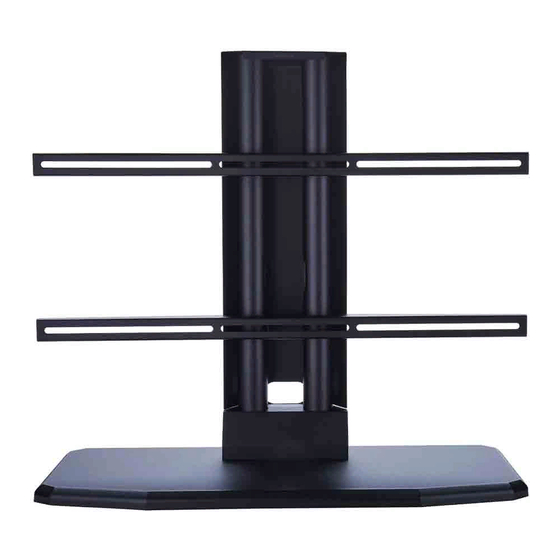
- Page 3 (38.1) (38.1) 1.000 (25.4) 30.00 (762) Base dimensions: PART#: 1.00”(25.4) H x 30.00”(762) W x 13.0”(330) D PSD-TTS/C PSD-TTS COLOR: Silver A. Back cover B. Vertical brackets C. Mounting brackets D. Griplates™ & mounting hardware E. Aluminum block F. Base...
-
Page 4: Table Of Contents
Parts list (1) All of these parts are used to install the mounting bracket. Make sure that none of these parts are missing before beginning installation. If there are parts missing stop the installation and contact Premier Mounts. Aluminum block (1) Griplate™... - Page 5 Flat panel list Acer Eizo Idex PDP7859: M6 x 20 5420T: M8 x 30 PDM4260: M4 x 16 Akai Electrograph Ikegami CTA42AR7A, PDP4247, PDP4290, PDP4294, PDP5090, HPT500AN: M8 x 25 – ½” nylon spacers - DTS42W: M8 x 30 – ¼” nylon spacers (large) PTM4202: M5 x 20 sleeves DTS4230: M8 x 30 –...
- Page 6 Mitsubishi Pioneer SONY PD5010HD, PD5030: M4 x 16 PDPV401, V402, PDP4330HD, PDP433HDE, PFM42B1,PFM42B2: M6 x 20 - 5/16” flat washers PDP433CMX, PDP433PU, PDP4300, PDP4340HD, PFM-42V1,PFM-42V2: M6 x 20– 5/16” flat washers Monivision PRO800HD, PRO800HDI, PRO910HD, PDP4310, PFM50C1: M6 x 20 - 5/16” flat washers PDP501X, V502MX, V502X, PDP503MX, V505, KE-42XBR900: M6 x 20 - 5/16”...
-
Page 7: Parts List
Parts list (2) This wall mount is shipped with all proper installation hardware and components. Make sure that none of these parts are missing before beginning installation. If there are parts missing stop the installation and contact Premier Mounts. Actual screw size... - Page 8 Nylon spacers and flat washers The nylon spacers may be stacked to achieve proper spacing. 9/16" Nylon spacers 1/4" Nylon spacers (large) (Qty 6) (Qty 6) 1/2" Nylon spacers Nylon sleeves (large) (Qty 4) (Qty 12) 5/16" Flat washers (metal) (Qty 6) 1"...
- Page 9 Checking the thread depth on your flat panel 1. Insert thread depth indicator (supplied) through the thread inserts found on Figure 1 the back of the flat panel to make sure inserts measure the same full depth and mark it. (see figure 1) 2.
-
Page 10: Aluminum Block
Secure the aluminum block to the base as shown in (figure 1) to the base by using the five (5) M5 x 30 (mm) Phillip flat head screws (supplied). See figure 1. Do not over tighten the screws. Find a suitable location for the stand. PSD-TTS/C PSD-TTS base... - Page 11 Step 2 Insert the tubes into the secured aluminum block. See diagram to set the cable access openings before tightening the set screws. See figure A. Once the poles are fully inserted into the block and set to their proper positions lock the tubes by tightening the two Plastic caps Tube location for cable...
-
Page 12: Allen Key
Securing the mounting brackets Step 3 Invert the flat panel display and lay it on a soft and flat surface. Apply the vertical brackets and center the mounting brackets from left to right on the display. Secure the mounting brackets with the hardware and griplates™ (supplied). NOTE: The griplates™... - Page 13 Securing the flat panel to the stand Step 4 Raise the display (see warning on this page) and slide the mounting brackets over the tubes, set the height required and using the Allen wrench secure the height by tightening the four (4) M8 socket head screws. Do not over tighten the screws. Make all proper connections at this time.
- Page 14 (Optional) fixed installation Step 5 If securing to a wood table, secure the stand with the two (2) #10 x 1-3/4" wood screws (supplied). Longer or shorter wood screws and or mounting hardware depending on your installation environment are (commercially available). See figure 5. Wood screw access holes Base...
Need help?
Do you have a question about the PSD-TTS/C and is the answer not in the manual?
Questions and answers