
Subscribe to Our Youtube Channel
Related Manuals for Community CLOUD 4


Summary of Contents for Community CLOUD 4
- Page 1 COMMUNITY CLOUD SERIES CLOUD 4 and CLOUD 6 High Output Ceiling Speakers INSTALLATION GUIDE...
-
Page 2: Table Of Contents
TABLE OF CONTENTS Product Features Packing List Product Feature Identification Installation and Wiring Step 1 - Cut the Hole Step 2 - Install Split Ring Step 3 - Expose the Input -Terminal Step 4 - Attach Wiring to Removable Locking Connector Step 5 - Plug Connector into Connector Socket Step 6 - Connect a Secondary Support Line Step 7 - Mount the Speaker into the Ceiling... -
Page 3: Product Features
Thank you for purchasing your new COMMUNITY CLOUD SERIES High Output Ceiling Speakers. The CLOUD 4 and CLOUD 6 ceiling speakers are high output devices, intended to meet the needs of the professional sound contractor. Operational in both 16 ohm and 70V formats, the 6.5”... -
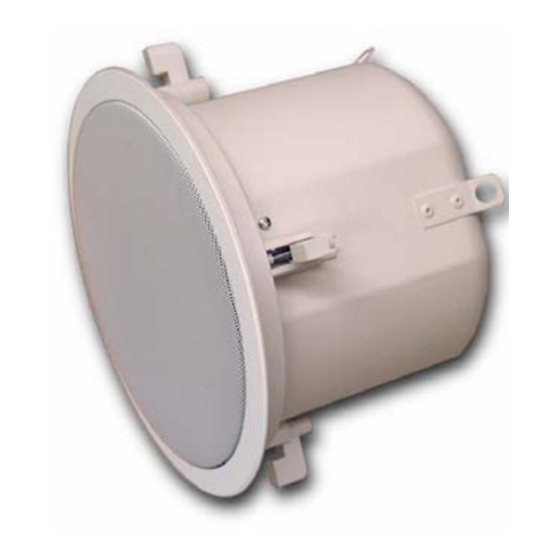
Page 4: Product Feature Identification
Steel Backcan Tap Selector Attachment Screws Strain Relief Fitting Secondary Support Rear Cover Plate Attachment Tab Removable Locking Connector Mounting Tabs Grille Figure 2 – CLOUD 4 and CLOUD 6 feature identification CLOUD 4 and CLOUD 6 – Installation Guide... -
Page 5: Installation And Wiring
INSTALLATION AND WIRING The COMMUNITY speaker installation system for CLOUD 4 and CLOUD 6 has been designed so that the entire installation can be done from beneath the ceiling. In some cases, with a suspended grid ceiling, it may be easier to access from both the top and bottom of the ceiling tile during the installation process. - Page 6 Insert the split ring through the hole cut in the ceiling and place it on the back side of the hole before inserting the speaker. CLOUD 4 and CLOUD 6 – Installation Guide...
-
Page 7: Step 3 - Expose The Input -Terminal
(9.5mm) flexible conduit. Insert the conduit into the strain relief fitting. Using the two horizontal screws that clamp the fitting together, clamp the conduit securely between them. Be sure to leave at least 4 to 6 inches of cable beneath the strain relief fitting. CLOUD 4 and CLOUD 6 – Installation Guide... -
Page 8: Step 4 - Attach Wiring To Removable Locking Connector
5mm (1/5 inch), inserting the bare end of the wire into the connector and screwing down the hold-down screw until tight. Tighten any unused screws to avoid vibration. Figure 7-Attaching wires to connector CLOUD 4 and CLOUD 6 – Installation Guide... - Page 9 To next subsequent speakers or previous speaker will stay connected. It speaker can be useful during troubleshooting to be able to disconnect a single speaker at a time. Figure 9 – Parallel wiring CLOUD 4 and CLOUD 6 – Installation Guide...
-
Page 10: Step 5 Plug Connector Into Connector Socket
Remember to tighten any loose screws to eliminate any vibration. Slip the input terminal cover back onto the rear of the speaker and tighten the two screws that keep it in place. Figure 11 – Plug connector into connector socket CLOUD 4 and CLOUD 6 – Installation Guide... -
Page 11: Step 6 Connect A Secondary Support Line
Then tighten the mounting tabs by turning the screw CLOCKWISE until tight. The first ¼ clockwise turn rotates the attachment tabs outward. The remaining turns tighten the tabs down onto the back of the ceiling surface. DO NOT OVERTIGHTEN. CLOUD 4 and CLOUD 6 – Installation Guide... -
Page 12: Step 8 Adjust Tap Selector
In some installations it is advisable to leave all the grilles OFF until final adjustment of the taps have been made for the entire system. Figure 14 – Adjust tap selector CLOUD 4 and CLOUD 6 – Installation Guide... -
Page 13: Step 9 Insert The Grille
6 mm (1/4 inch). Work your way around the grille, loosening a section at a time until the grille comes out. CLOUD 4 and CLOUD 6 – Installation Guide... -
Page 14: Painting The Speaker
Paint the speaker and then remove the shield once the paint is dry. CLOUD 4 and CLOUD 6 – Installation Guide... -
Page 15: Troubleshooting
“ + ” and “ – “ from the amplifier output are not crossed on one or more of the speakers. If none of the suggestions above solve your problem, please contact Community’s Service Center at (800) 523-4934 or (610) 876-3400. -
Page 16: Warranty
PAINTING THE SPEAKER Community Professional Loudspeakers - Transferable Limited Warranty Community CLOUD 4 and CLOUD 6 loudspeakers are warranted for five (5) years from the date of sale to the original purchaser. Who is protected? Your Community warranty protects the original owner and all subsequent owners. The original bill of sale must be presented whenever warranty service is required. - Page 17 333 East 5 Street, Chester, PA 19013-4511 U.S.A. Phone (610) 876-3400 Fax (610) 874-0190 www.loudspeakers.net © 2004 Community Light & Sound, Inc. 040528JL...
Need help?
Do you have a question about the CLOUD 4 and is the answer not in the manual?
Questions and answers